Preparatory stages before production
Before you start making a table, you need to understand where the table will be located. It can stand both inside the house and outside.
- The table must have a design. You need to understand what paint to paint it with. Or maybe just varnish and that’s it. Original ornaments can be painted on the table.
- Next, drawings are drawn.
- You need to understand what the table will be made of. It can be made of timber, chipboard, plywood and so on.
- Materials and tools are being prepared.
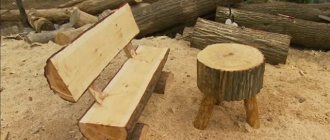
Personal experience. How to make a bench in the forest?
How to make a bench?
In this post we will talk about our personal experience of making two benches in the forest from materials found nearby. For a very long time I wanted to create somewhere in the forest, a cozy place to relax, even if not very secret, so that others could use it, in a quiet, peaceful place, relatively far from the city, clean and beautiful. But for a very long time all this remained just thoughts, dreams.
On the first day we just went on a small hike, without any thoughts of creating anything! And they somehow came to this place on their own without a predetermined goal. It's a 30 minute walk from the city. They came and began to make a fire in a winter forest, although not snow-covered, but rather damp, and in bewilderment they fussed over the fire for what seemed like two hours. It’s been a long time since we went out into the forest, or everything around us is already very wet (we’ll talk about how to properly make a fire in wet forests in the next article ).
In general, we sat, cooked porridge and stew over the fire, and to make it more convenient to eat, we brought a log and put it on two others, so it turned out to be higher. It turned out okay, but not very convenient. I wish there was a bench here, I thought...
When we went home, we discovered that the sand pit not far from the parking lot was full of garbage, including quite suitable materials for construction, thrown out in the middle of nature by some heartless people. There were exactly the kind of lumber that was very well suited for building a bench! Well, why not! Making something useful out of things that no one needs anymore is, in my opinion, very cool! So the idea was born to us, taking our instruments, to come here tomorrow and set up a bench, and in general to make this place “ours”, so that from time to time we could come here, play the guitar, conduct all sorts of survival experiments, practice useful skills and other other...
The next day, we (me and my friend “Shaman”), armed with simple tools (an axe, a hacksaw, a tape measure, a small infantry shovel, gloves, a hammer and some nails) got to work!
First we decided on how everything should stand, then we went to get the material. The most difficult thing was carrying the heavy supports for the benches (but the supports were concrete, and even oiled). It was not very far to carry them, but not very close either, the weight was decent, it was not convenient to hold, and the area was wooded!
We dug holes for supports, it was easy to dig (and this was in January, however, in the photo you can clearly see all the anomalies of the weather in the Bryansk region at the beginning of 2022), sometimes the roots got in the way, but we cut them down with a shovel and an ax!
Some of the supports were coated with ice, but were easily cleaned off. And thanks to the fact that we used a tape measure to select the required length of the parts (supports and boards), we didn’t have to use a saw!
Having previously leveled the height (by eye, since we didn’t take a level), we began to dig in the supports. The sand around the supports, when filling the holes, was compacted with an ordinary stick.
The final touch is nailing the board.
Well, here's what happened in the end:
The second bench was made in the same way, since there was enough material. Please note that we placed the benches between the tree trunks in such a way that, if desired, you could lean your back on them. This is very convenient, especially if your back is tired.
Types of wood
- Beech. The table made from it will be durable. Over time, the material does not crack. This table is easy to handle. Among the disadvantages of a beech table is that it rots over time and its shape changes during drying.
- Alder. The tree is light. It has protection against moisture. This tree will not rot. The table will be strong and reliable.
- Spruce. This tree is flexible. But it is difficult to process. Too many knots on the surface. For this reason, the table will not be level.
- Birch. A table made from it will be reliable. He doesn't care about all the damage. If treated with special disinfectants, it will not rot.
- Oak. Very durable material. Wooden oak tables look very impressive.
- Pine. This material is listening. It can be smeared with special disinfectants. The pine will absorb them.
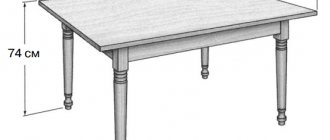
How to determine the optimal sizes
The construction of a garden table with your own hands is carried out in accordance with the drawings, the creation of which requires the dimensions of the future product. One seat requires 60 cm width and 40 cm depth of space. If people sit opposite each other, then the optimal distance between them is 25 cm.
The usual width of the product is 1-1.25 m. The dimensions of the square tables are 90 x 90 cm. Depending on the number of seats, rectangular and round products have different dimensions.
Number of seats (rectangular table)
Number of seats (round table)
The optimal diameter of a round table is 135 cm. Larger models are used for outdoor use. As for the height of the structure, it all depends on the height of the person.
There should be enough space around the table. If this item is placed indoors, then 1 m of free space is left around it.
Features of wood processing
- Thanks to treatment with disinfectant solutions, the life of the wood increases.
- Treat the surface with antiseptics and agents that protect against moisture.
Machine oil is the cheapest and most effective means for treating boards against rotting. Only use it in places where there will be contact with food.
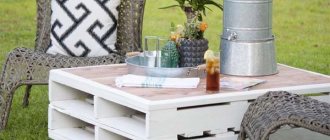
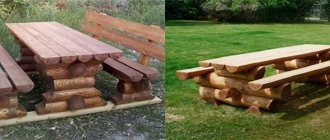
Garden furniture made from stumps
It’s as easy as shelling pears to build soda furniture from ordinary stumps. Moreover, many stumps may remain after uprooting old fruit trees. In this case, the issue of transporting the material disappears by itself. If you show a little imagination and creativity when working, the resulting stumps can turn out to be unique, exclusive furniture that will not go unnoticed. For example, the seats of hemp stools can be decorated with mosaics made from pieces of broken dishes. Small pieces of broken saucers, cups or ceramic tiles are attached to the surface of the stump using liquid nails or epoxy glue.
Unnecessary stumps can become unusual firefly stumps, which during the day will decorate the garden or summer cottage and serve as an ordinary seat, and at night they will turn into lantern stumps. Such stools perform two tasks at once - they illuminate the garden area and expand its boundaries. Making such an element is very simple. It is enough to put a fluorescent or LED strip on a well-cleaned saw cut and cover it with plexiglass and secure it with self-tapping screws.
If you have the skills to work with a chainsaw, you can make an excellent chair from a tree stump. If the cut height allows, the chair will have a back and even armrests. For a chair with armrests you will need a tall and wide stump. It will turn out to be an analogue of the usual soft chair.
Decorating a homemade table
The surface of a homemade table can be sanded. This is done using sandpaper. Next, the wood is treated with disinfectants. And then they prime it.
- You can also varnish the surface. This gives a finished look and elegance to the table. It is better to buy acrylic varnishes, as they have a water-based base.
- The table can be painted in various colors. You can combine colors. You can also draw squares, flowers, and so on. The main thing is to use your imagination and create. Paint using a brush or roller.
- The edges can be trimmed with metal. But not every person can do this. It is better to trust professionals in this regard.
- Decoupage. Various pictures and photos are applied.
Woodpile
How often, when walking through a forest or park, we see thick dry branches broken by the wind, snags or pieces of rhizomes. It's a shame to pass by such material. A person with imagination immediately imagines a beautiful, functional thing. Crafts made from tree branches can decorate the yard of a house or the interior of a room.
Man instinctively associates himself with nature and considers himself a part of it. Therefore, any natural material - stone, wood - brings comfort and tranquility to your home. Wood is a warm material. It absorbs moisture and creates a healthy microclimate. It’s not for nothing that in a log house you can breathe so easily and sleep well. The best bathhouse is also wooden. You can put unusual furniture made of branches in it - a bench, a hanger, stools. It smells of pine resin and birch broom. This adds vigor and strength.
What can be made from driftwood and branches? You can make pieces of furniture and decor from different parts of wood.
You can’t put furniture made from stumps in your house or on your veranda. But such an armchair or stool is well suited for a yard or summer cottage
An original solution for a table and seat made of stumps and thick branches will attract the attention of your neighbors and guests. In order to make such items, you need to have artistic taste, woodworking tools, time and patience.
The main advantage of stump furniture is the lack of materials costs. Everything can be done even without nails using a hacksaw.
Furniture made from stumps and driftwood will harmonize with the rustic style of the site. A real or decorative well made from a log house, a wattle fence made from willow twigs or a fence made from thick branches will look good.
The simplest solution is a bench made of two stumps with a thick board placed on them. You can leave it without a back, or you can equip it with a back made of sanded thick branches. It will be beautiful and unusual. This will be a combination of furniture made from branches and stumps.
Even the marks of time that inevitably appear on the tree do not spoil the appearance of garden items and look natural.
Furniture made from roots and stumps is massive and durable. From a solid tall stump you can use an ax to cut out a chair or a chair with a backrest. The root can be planted on the armrest of such a product.
The most difficult thing is to deliver the forest material to the site and load massive logs or stumps onto the truck.
Stumps are used to make stable stools. They are also sanded and varnished. You can decorate the body of the stump with carvings. The top is colorfully decorated with colored glass or flat stones. They are glued to liquid nails or epoxy resin.
Furniture made from driftwood and thick curved branches are real fairy-tale creations. Product parts are fastened together with self-tapping screws and wood glue, depending on the configuration of the items. Furniture made from branches gives room for imagination. From this material you can build something like a small gazebo. It is good to plant wild grapes near it, which will eventually entwine the tree.
The material for a garden chair, sofa or chair is cleaned of soil and dirt, the bark and top layer of the rhizome are scraped off to light wood, and impregnated with stain and varnish.
Furniture made from branches creates the feeling of openwork weaving.
The garden plot of creative owners is inhabited by fairy-tale characters - goblins or birds - products made from driftwood, gnomes made from tree roots and other forest inhabitants. Logs turn into bears, frogs - princesses and other figures.
To make furniture from branches or furniture from stumps, the wood must be well dried so that it does not rot. To protect against bark beetles, it is treated with antiseptic compounds. DIY crafts made from branches add a romantic style to the interior. You can make an exclusive thing with your own hands.
There are many varieties of such crafts. Handmade crafts from tree branches include wall decoration, various vases, figurines, candlesticks, coasters. If you want the masterpiece you made to decorate your interior for a long time, you need to choose the right material for it.
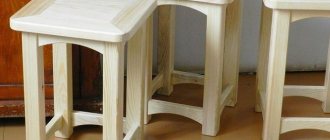
Secrets of making a table
- The table can be made from boards, plywood, chipboard.
- The thickness of the board should not be less than two centimeters.
- The width can be 10-15 cm.
- Before making a table, you need to carefully inspect the boards. There should be no defects.
- The boards must be durable. They must withstand loads.
- It is better to make the legs from timber.
- You can also make legs from boards. Then you need to arrange the boards like the letter “g”.
- The markings are applied with a tape measure and a simple pencil.
- The finished table is processed using brushes and a roller.
Furniture made from stumps and solid wood cuts
Stumps are an excellent material for making stylish, inexpensive and completely unique furniture with your own hands, because in nature there are no two absolutely identical trees. Such stump furniture will fit into almost any interior, be it light classic or country, Scandinavian style or minimalism, loft or industrial. If the stump is painted in glossy or metallic shades, then even high-tech can organically accommodate such an object. A processed cut of a tree trunk or stump can become a comfortable coffee table in the living room, a bedside table in the bedroom, stools in the kitchen or a table in the bathroom. Most often in the interior, a stump is used as a cabinet or table.
How to make a table from a stump with your own hands
First, find a suitable tree stump to create a table or cabinet. This is not so difficult even if you are a purely city dweller without a dacha. Firstly, there are a lot of companies that deal with wood - logging, sawmills, and so on; you can purchase cut wood of the desired size from them. Secondly, we advise you to interview all your acquaintances and friends who have dachas or relatives in villages; they probably have supplies for firewood or uprooted stumps. And thirdly, you can take a saw, go into the nearest forest, find a fallen tree and cut it into pieces.
The stump should be dry, but not rotten. If the bark comes away from the trunk easily enough, then such a stump can be used. If you find fresh wood, you need to let it dry. Leave such a stump for a month or two in a warm and dry room.
The bark must be removed from the trunk. To do this, take a chisel or chisel and carefully, using a hammer, remove the bark.
If you plan to use the stump not just as a decorative decoration, but as a functional piece of furniture, you need to level it. Using a building level, check how level your workpiece is. If the surface of the stump is sloped, level it with a plane.
Sand the cut of the stump and the side with a sander or by hand with sandpaper.
It’s good if the stump has an interesting natural texture with knots, cracks and chips. After you have processed and sanded the entire surface of the stump, clean the cracks of small shavings and dust. To do this, you can use both plumbing tools, a cloth, and a regular vacuum cleaner.
Any stump or cut of a log is beautiful in its natural form. But you can paint the stump in any color (after a coat of primer), apply patterns with a brush or using a stencil, or, at a minimum, open it with varnish or apply a water-repellent impregnation for wood. The latter is especially true if your future table will be actively used outdoors or in a room with high humidity, for example, in a bathroom. Remember that even one coat of varnish will darken the wood a little. It is recommended to apply two or three layers of water-based varnish, and after the last layer has dried, polish with a soft abrasive fiber.
Such a table made from a stump can simply be placed on the floor. You can also use shortened legs from old tables or stools, wheels or special stands
By the way, the use of legs, firstly, will protect your floor from scratches, and secondly, will raise the stump and ensure air circulation, which is important for the long service life of such furniture
Cabinets and tables made of stumps in the interior
Look at different options for tables and bedside tables made from stumps in the interior.
Tables made of stumps in their natural form with minimal processing (click to enlarge):
Painted stump tables:
Stools and chairs and stumps in the interior
There is practically no difference between a table and a stump stool. But it is obvious that sitting on a stump is not very comfortable. In order to make the stump a comfortable stool or footstool, you can simply put a pillow on it. You can also make soft upholstery with filler and attach it to the surface of the log. The presence of a back will make the stump chair even more comfortable. Designers and carpenters cut such a chair from a single piece of wood using a chainsaw, followed by processing. Some examples of using stumps as seats can be seen below.
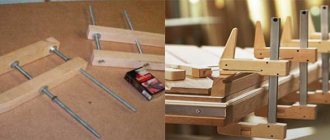
Stages of making a coffee table
You need to understand what the size of the table top will be. Here it will be 115 centimeters in diameter.
- The rope is cut. Its length should be slightly longer than half the tabletop. The length of the rope is 60 centimeters. Then loops are tied at both ends.
- Measure 61 centimeters from the bottom side of the board. Measure the same length on the side. Make a mark and screw in the screw.
- One loop is inserted into the screw. The pencil is attached to the other side of the loop. The circle is measured in this way.
- The circle is cut out with a jigsaw.
- Next, cut out two rectangles. The size of the rectangles is 40 centimeters wide, 100 centimeters long. Make a mark in the middle of the long side of the board. Measure one centimeter on each side and make a mark.
- The parts are cut out with a slice.
Grinding machine to smooth out any uneven surfaces. Only at the beginning it is necessary to delete the pencil entries. You can paint the parts.
The legs are connected using corner brackets. All is ready.
Drawing with dimensions
To make a table with your own hands, you will need to draw up a drawing. This way you will prevent errors during the work process and make furniture much faster. This drawing should contain the following designations :
- length of the product;
- width;
- depth;
- height.
Also in the drawing it should be noted the materials of their manufacture. For furniture designed for 8-10 people, the optimal tabletop size will be 80 by 120 cm .
Important : the dimensions of the table for the dacha are calculated based on the needs of the users and the availability of free space in the dacha area.
If there is a lot of free space, you can assemble a spacious country table with benches . The advantages of this design include:
- capacity;
- sustainability;
- ease of use.
Some people prefer tables with an ice chest . Such designs are convenient. In the summer heat, you can cool drinks in them. This model is practically no different from the product with benches. Only in the middle of the tabletop is an ice box made. Instead of an ice chest, you can build a table with flowers. You will have a beautiful flower bed in the middle of the tabletop.
If there is not much free space on your garden plot, you should opt for a folding furniture model. It is different:
- compact size and ergonomics;
- light weight;
- different transformation options.
Important: to make a tabletop, you should choose a board 3-5 cm thick.
Stages of making a country table
At the first stage, the tabletop is made. To do this, cut the boards into the desired shape and size using a jigsaw.
- Next, we begin making the frame. It is usually the same size as a tabletop. The parts are connected using self-tapping screws.
- At the third stage, the legs are attached. They can be made from timber or boards. When making legs from timber, special holes are made for furniture bolts. And if the legs are made from boards, then the parts are connected using glue. The table legs can be fixed with self-tapping screws. In this case, holes are drilled with a drill. These recesses will not be visible if they are masked with plaster.
- The surface must be carefully sanded with a special machine.
- Next they are treated with stain and painted.
Advantages of wooden tables
- Tables made of wooden boards will suit any interior.
- There is a lot of choice in the stores. There are trees of both hard and soft varieties.
- You can make them different in color and shade.
- It's easy to do.
- Eco-friendly. Such tables do not contain any harmful substances.
- They will last a long time. The main thing is to properly care for them.
- Small scratches on a wooden table can be easily restored on your own.
Cons of wooden tables
- Wooden boards are very expensive.
- Various defects may appear on them.
- Requires special tools.
Features of outdoor wooden tables
The peculiarity of tables for outdoor use is their:
resistance to negative factors;- long service life;
- wide range of models;
- variety of designs and structures.
A table for the dacha can be made from different materials :
- wood;
- vines;
- metal;
- natural or artificial stone.
Each individual option has its own advantages. But it is wooden models that are in greatest demand . Because it is pleasant and convenient to work with wood, and you can make a product of any complexity on your own without much effort.
Photo of a homemade table made of boards
Models and types of tables
There is a great variety of tables in stores, but, conditionally, they can be divided into three main groups: wooden, plastic, metal. They are suitable for the garden plot. For example, plastic. This is an option specifically for a dacha where people do not live permanently, but come, for example, on weekends. Plastic products differ in their shape and size. The main advantage is ease of movement.
If the dining table for the garden is no longer needed outside, you can bring it into the house and then take it out if necessary. Compared to wooden or metal furniture, plastic is cheap. It is easy to buy, transport, and is not afraid of dampness. They are often collapsible. But plastic furniture has disadvantages. Light weight has negative aspects of operation:
- he is unstable;
- The wind easily overturns and drops such furniture.
Fades under the sun, is subject to mechanical damage, cracks, and becomes scratched during use.
Note! Wooden furniture looks great in a country house, surrounded by grass and trees. It is relatively stable and does not fade.
In case of damage it is easy to repair. Disadvantage: high cost, expensive maintenance. Wooden tables do not tolerate temperature changes and high humidity. Therefore, the use of wooden furniture outdoors is several times shorter than the life time inside the house.
Metal products are an option for centuries. Provided the metal itself is of proper quality. Forged furniture is especially presentable:
- Looks great both indoors and outdoors, in the yard or gazebo.
- It is stable, you don’t have to be afraid that gusts of wind can knock it down.
- Durable with proper use, not afraid of moisture or sun.
Carrying it regularly from place to place is not very convenient; the metal is still a bit heavy. There is a drawback: the price. You can partially save money by buying something that is not entirely made of metal, but, for example, with a glass or wooden tabletop. Aluminum ones are cheaper than steel and cast iron products.
The role of the gazebo in the design of the cottage
The gazebo is the most popular garden decoration. It should be combined with the surrounding buildings and the landscape of the site. It will be ideal if the facades of the buildings and the gazebo are finished with the same materials, in the same style.
Outdoor facilities are suitable for summer recreation. You can hide in them from the pouring rain and hide from the hot sun. Take a break to work or just read a book. Have a fun outdoor party with friends. In closed ones they rest until late autumn. You can build a winter garden in them.
The size depends on how you intend to use it. If you are relaxing alone or in a quiet home circle, a small building is suitable. Giving preference to crowded companies, you should build a large, spacious structure. Therefore, furniture is selected according to size.
It is best to choose a place for construction in a quiet corner of the garden. Not very far from home. A variety of living plants are used to decorate. You should take care of comfortable furniture. Tables and benches for the gazebo must be resistant to moisture and withstand temperature fluctuations and sunlight.
The gazebo is often installed in a sunny place - this must be taken into account when selecting materials for the table and benches Source realsroier.ru
Make a table for a gazebo to order
If standard solutions do not suit you, you can always order the production of a table of an original shape or size. It will not cost much more, and the result may even exceed your expectations - the summer furniture will turn out exactly the way you need. The cost of the product in this case will consist of the following work:
- Determining the desired shape and taking measurements (in order to understand at the initial stage what you want, you can look at what options the company offers tables for the gazebo - any reputable organization has a photo catalog).
- Making a drawing.
- Price of necessary materials. If necessary, treat them with protective compounds.
- The actual work of assembling the table.
- Final finishing: painting, decoration with decorative elements.