After the construction of a log house, the remains of logs, logs, and boards are often left behind.
Moreover, there are plenty of substandard building materials after cleaning the site - cut down trees, stumps, snags, etc. All this can be usefully used to make nice and even designer garden furniture - from a simple bench to entire sets of tables, benches and chairs. From this article you will learn how to make from, literally, pasture lumber:
- several options for simple but stylish shops;
- two options for benches;
- stool;
- table.
In addition, you will receive plenty of food for the development of your own design fantasies, the implementation of which depends only on your skills in handling tools and the availability of free time.
All garden furniture products that will be discussed are made in a “wild” or rustic style, or in country style. They are perfect for furnishing a relaxation area outside the home. And if you have a “wild log house”, then even more so, you can’t think of anything better to tastefully “furnish” the area around the house for summer outdoor recreation or gatherings with barbecue.
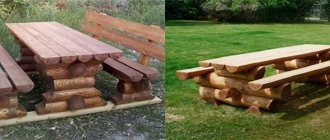
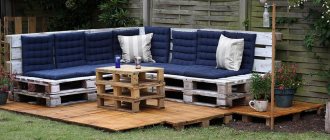
To immediately understand what we are talking about, here it is:
Bench and table without a single nail. With some skill in using a chainsaw, such a kit can be quickly made without a single nail.
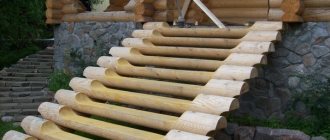
... and about this:
The bench option is more complicated.
Such a product will require more time due to the larger number of parts and the need to fasten them together.
If you don’t mind, you can leave the log bench without protective treatment. But if durability is important to you, then the products should be protected with antiseptic compounds, treated with stain, or varnished.
Tools for making garden furniture
The set is, in general, standard. If you have a workshop, then most likely you have everything you need there. You may need a hammer, mallet, screwdriver (drill), grinder or grinder, axe, plane, stapler, saw...
In order to build a bench or other furniture in a “wild style” quickly and without extra effort, it is advisable to have a chainsaw or electric saw at your disposal. This will make your work a lot easier! Because the main idea in wild furniture projects is the use of half-logs as structural elements.
Of course, it is more convenient to cut whole logs and blocks with a chainsaw. But if you don’t have one, this doesn’t mean that you don’t have the technical ability to build a bench or table yourself. You just have to split the logs with a cleaver and wedges.
In fact, it is possible and not as difficult as it seems. Here is a video on this topic:
In this video they use a cleaver - an ax for chopping wood. Its difference from a carpenter's ax is that the working, piercing part has a noticeable expansion, and the sharpening angle of the blade is wider. You can also use an axe, you just have to drive in the wedges earlier.
On the left is an ax, on the right is a cleaver (the width of its blade may be thicker)
With this method of halving a log, it is important that the log splits along the plane of impact and that the crack does not go sideways. Much depends on the quality of the log. Firstly, it must be dry. In principle, it is advisable to work with dried lumber when building garden furniture, because raw timber can become deformed during the drying process, crack, and your bench, bench or table will become uncomfortable, unstable, or simply lose its aesthetic appearance.
Secondly, if you are splitting a log with a cleaver to obtain smooth materials suitable for building a bench, then it should not be too twisted. That is, the fibers must run more or less evenly, because the crack will go along them. Minor irregularities and deformations along the split surface can be removed with a plane and grinding. In addition, “wild” furniture does not have to be perfectly flat!
Pros and cons of a transforming bench for a summer residence
A folding bench is in demand among summer residents and owners of country houses.
The popularity of the transformer is due to the advantages:
- The main advantage is its compactness. The bench when folded takes up little space. It can be placed against a wall or simply along the sidewalk path.
- They try to make the transformer from light and durable materials. Due to its low weight, the bench can be easily moved to another place.
- The third advantage is the possibility of turning a bench with a back into a table with two benches without backs. The transformer will help out in nature when you need to organize a feast for guests.
The unusual bench also has some disadvantages:
- To assemble a transformable bench table with your own hands, you will need drawings with exact dimensions. If an error is made in the diagram, the structure may not unfold or fold completely.
- The use of thick-walled pipes or an array of hardwood trees increases the weight of the bench. It becomes more difficult to unfold. It will be difficult for only two people to move the transformer to another place.
- Over time, due to frequent use, the moving parts of the bench weaken and play appears. The transformer becomes shaky.
After weighing all of the above factors, it is easier to decide whether such a bench is needed at home.
The nuances of using a chainsaw when building garden furniture with your own hands
Here is a wonderful example of a garden bench that is as designer and unique as it is simple:
Exclusive bench carved from a single curved log
But the simplicity is only apparent. Indeed, its design is elementary - just one log, no other parts or fasteners. The entire structure - seat, back - was cut out with a chainsaw. However, to cut such a shaped product, you need to have excellent command of a chainsaw, a feel for the tool and the material. Therefore, this bench is not so simple.
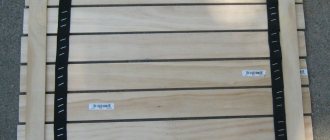
To evenly halve a log, you also need to have some skill. A couple of tips to make your work easier:
- make markings not only at the end, but also along the log;
- if the log is debarked, draw two lines - a strip along which the cut will go, 1 cm thick - this is the approximate thickness that the saw will “eat”;
- if you want to leave the bark and it is inconvenient to draw on a log, then you can stretch a cord from end to end and carefully saw along it;
- secure the log so that it does not “walk” due to the vibration of the saw, support it with wedges, bars, etc.
To decorate a bench or bench, you can lightly run a saw chain along the flat part of the half-logs - the seat and back - and make a few transverse scratches and gouges to age the wood and give the shape a natural look. When sanded, the chipped areas will be smoothed out and will not interfere with use, but the appearance of the bench or bench will become more interesting.
To age wood, firing and brushing are also used - scratching with a hard steel brush.
Choice of modification
Among the variety of models of multifunctional furniture, tables are in particular demand. They are presented in various modifications and forms. According to their purpose they are divided into:
- For magazine work. With the help of a special tabletop and a smooth transformation mechanism, an ordinary table can easily be turned into a work desk, reminiscent of a school desk. The fastening system is designed for several different positions, allowing you to take the desired height. The furniture is equipped with convenient drawers for storing books and stationery.
- Dinner-magazine. This is the most common option, indispensable for small spaces that do not have a separate dining room. It stays folded most of the time and takes up little space. But when guests come, it can be easily expanded to create a full-fledged dining table that can accommodate up to ten people.
- Storage table. Compact design that hides storage space for household items from prying eyes. Consists of a table top and several drawers underneath. Once assembled, access to them is blocked. It opens if you rotate the tabletop around its axis.
- Picnic table. Has many modifications. This is the most common item that is most often made by hand. The tabletop can be rotary, round or rectangular. It is attached to frames that make it easy to move the structure into the desired position.
Making transformable tables with your own hands is not at all difficult. Without any skills, you can start with a picnic product. It has the simplest assembly scheme; any material will do. And after practicing, you can proceed to more complex furnishings. At the same time, choose a design that you really like, and not the one presented in the store.
Examples of DIY table decors, an overview of the best techniques
Journal-worker
Lunch-magazine
Storage table
For a picnic
DIY wild style bench
The simplest piece of garden furniture that you can make with your own hands is a bench. If you have a thick enough log, you can cut it out of a solid mass, and you will get something like this:
Solid log bench
We cut it out with a chainsaw and polish it. We burn it, cover it with varnish, stain – details to taste. This shop looks quite original, despite the simplicity of the design.
If there is no such thick log, then here is the second option:
The ideal combination of ease of manufacture and aesthetic results
It's intuitive how this is done, right? In general, all furniture of this type is folded, just like a log house - the upper elements are placed in cut-out grooves. In this case, the connection goes “into the bowl”, but it is not necessary to cut out an even “moon” groove; it is enough to cut out a triangular segment so that the main half-log sits firmly in the block legs. Such grooves are easy to cut out with an ax - no fine work is required.
The log for the seat does not have to be smooth and without knots; it can also be crooked. The same is true in the case of making a bench. The natural curvature of the material, on the contrary, will add spectacularity to the product - brutality and stylish “wildness”.
Bench made of crooked half-logs
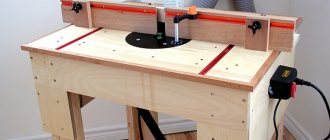
Creative solutions in the design of a hunting lodge and furniture for a fisherman
Making a carpentry workbench with your own hands
For each room, be it a gazebo near the house or a bathhouse, we try to create unique interior accents, and we transfer some solutions to rooms for different purposes if we see that our idea will only benefit from this. For example, wooden arches made of logs painted with picturesque landscapes can complement the hunting design of any room.
Also, small coffee tables are suitable for all rooms in the hunting lodge - we often make their tabletops from cut wood; and the legs are made of suvels and burls. All this creates a colorful and impressive hunting design and makes the house truly memorable and atmospheric.
A simple “wild” bench without a single nail
How to make a bench is already clear. To get a bench, you only need to attach the backrest. It can be attached without a single nail, screw, etc.
To do this, take two bars of triangular or trapezoidal cross-section. We get it from one, sawing it in the middle. A triangular section is needed to make a dovetail connection between the bars and the seat and backrest.
Dovetail connection: trapezoidal tenon into trapezoidal groove.
In the half-logs for the seat and back, triangular (trapezoidal) grooves for supports are cut out so that the wide part is inside the half-logs. Then all the elements are connected in these grooves. In the video you will see that it is easier than it sounds in words:
But this is more difficult than it looks. The main difficulty is to cut grooves of the desired shape at the desired angle in the rounded surface of the half-logs. Without certain dexterity and experience in working with a chainsaw, this is not easy.
There is a simpler option - do without the dovetail, use self-tapping screws or nails to attach the backrest supports to the bench. The supports are attached to chocks, which serve as legs; they can also be attached additionally to the seat mass. The back can be secured in the same way by cutting out moon grooves in the supports themselves, if they are thick enough. We get approximately the following:
Simple and stylish - a bench made of logs.
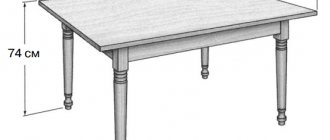
To make the benches and benches described above, you need initial logs from approximately 35 cm in diameter (if we take the same ones). This is dictated by the comfortable parameters of the bench or bench itself. Its height is 40-50 cm. The height of the seat plane is about 1.5 times the diameter of the log. The final calculation depends on the depth of the groove, but it is not necessary to cut it deep.
Another important note:
For two benches, it is advisable to cut the log in half, but for a bench, it is better to move the cutting plane away from the diameter plane, so that the beam for the back is smaller than for the seat. Firstly, your bench will be 5-10 cm higher, which is important if the log is not thick enough. Secondly, do not forget about the center of gravity of the bench.
If the half-log for the back is as massive as the seat, and the back is sloped, then the structure may be unstable. This problem can be solved if you rigidly attach the seat to the lower supports, but you will also be sitting on this bench! And you'll want to sit back!
To prevent the center of gravity from shifting so that the bench will tip over or wobble, the top of the backrest should not extend beyond the vertical axis passing through the extreme points of the lower supports and legs. It is better if the legs protrude further than the back of the bench.
The relative position of the extreme points of the rear legs and the back of the bench
Another significant parameter. There are various original design benches, chairs, etc., but for a standard bench or chair, the backrest slope is within 30° from the vertical axis.
What is needed to assemble a transforming bench
The folding design is considered difficult to manufacture. First of all, you will need a detailed drawing of the transformer bench, where all the components and the dimensions of each part are indicated. As for materials, benches are made of wood and metal. The best option is their combination. To improve strength, the frame of the transformer is made of metal, and the seats and tabletop are made of wood.
It is advisable to purchase pipes with a diameter of 20-25 mm with a galvanized coating. The protective layer will prevent the rapid development of rust.
Advice! The best material for the frame of a folding bench is a profile. Due to the edges, its strength increases, which allows the use of a pipe with thin walls, reducing the overall weight of the finished structure.
From lumber you will need a planed board 20 mm thick. If the frame of the transformer is also made of wood, then use timber from larch, oak, or beech. You can take a pine board. It will last a long time on tabletops and bench seats.
To work, you still need a standard set of tools:
- wood hacksaw;
- plane;
- drill;
- screwdriver;
- roulette;
- hammer;
- pliers;
- screwdriver.
If the frame of the folding bench is metal, a welding machine is needed for assembly. A grinder will help you quickly cut a pipe.
Consumables you will need are bolts, screws, sandpaper, and welding electrodes.
Another bench made of logs that is easy to make with your own hands
This option is suitable if you have logs of small diameters. To make it clear, it’s better to see it once:
Log bench, front view
The same bench, rear view
Everything here is also clear from the picture. The logs are connected - articulated into longitudinal grooves. Half logs - for the back and seat. For the backrest supports, grooves are cut out in the logs of the “legs”, but, in principle, they can be secured with screws or nails. The bottom bar is necessary for the rigidity of the supports.
What's the main thing here? The main thing is to fasten the supporting logs, “legs”. They can be fastened together:
- dowels - metal or wood; as such, reinforcement can be used;
- nails;
- screws, self-tapping screws.
The fastening elements should be staggered between different logs. When attaching the supports for the backrest to the body of the main lower supports, you need to make sure that the fastening elements do not intersect inside the solid wood.
Checkerboard arrangement of dowels in the joints of logs
Important: Do not screw in a screw or drive a nail from scratch! This way you can split the log, especially if it is small in diameter. Pre-drill the holes with a drill equipped with a long drill bit!
Brief description of different types of benches with photos
Classic. An ordinary wooden bench. The design is simple. Its appearance can be changed by making the backrests, for example, cross-shaped, or changing the shape of the handrails.
Metal. She's always beautiful. The metal frame is prepared and then joined together. The product can be decorated with various metal figures. There is a small drawback to this product: sitting on metal is uncomfortable.
Therefore, boards must be secured to the seat. The combination of metal and wood creates a special impression. In addition, it is very comfortable to relax on such a bench.
Stone structures. It is always not only beautiful, but also very original. The view is fabulous. Such a structure is built to last forever. He can't be moved.
Here you need to be very careful in choosing a place so that the bench looks great against the backdrop of the garden, the entire area, and decorates it. There is one drawback of such a bench: the stone is very cold, you need to think about how to insulate the seat.
DIY log table
For example, in this video you will see in two minutes how a master will make a simple set of a bench and a table in a “wild” style without a single nail:
By the way, to strengthen the structure, no one bothers to use glue, nails, etc.
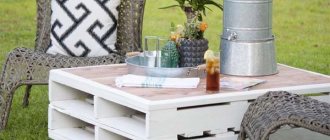
The tabletop can also be installed on a wide stump, which remains from a cut down tree. In general, if there are stumps left on your site, take a closer look at them before uprooting them. Perhaps, if they are positioned well, it will be possible to install a bench on them, but certainly - you can put a table! In this case, it is better to knock down the tabletop from rough boards, or use a homogeneous array.
If you make a table entirely from logs, then the principle is the same as in the construction of benches. The structure is assembled in the same way as a log house - the elements are placed in grooves. If it is necessary to increase rigidity, fasteners and glue are used.
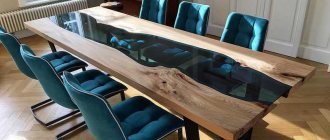
The following image shows a one-piece structure that combines both a table and benches. Doing this is technically no more difficult than a separate bench. The only difference is that you need to tinker with calculations and drawings; you can’t do it by eye.
Single chopped design of a table and two benches made of thick logs and half-logs
Features of surface cleaning from resin
When using softwood, proper surface cleaning of resin is extremely important. This can be done in various ways:
- Solvent. Resin removal can be done using acetone, alcohol or turpentine. The advantage of these substances is the rapid removal of resin and preservation of the wood structure. It must be mixed with water, applied to the wood with a soft brush and dried. All that remains is to rinse with warm water.
- Alkali. These include caustic soda, which is recommended to be mixed with acetone and water. This solution perfectly removes resin and resin. But to prevent alkali residues from destroying the wood, after treatment they should be thoroughly washed off and a paint coating applied.
- Ammonia. Effectively used to remove large resin drips. Ammonia should be mixed with acetone and then applied to the wood. Wash off after 20 minutes.
When processing wood, personal protective equipment must be used to prevent damage to the skin and eyes.
A simple way to make a “wild” stool from thick wood
... which you won’t be ashamed to put in your home. Look how easy it is:
Please note that it is not at all necessary to master a chainsaw, since the scale of the workspace allows you to correct the unevenness of the first cut.
Such a stool will fit into the interior, as well as a table made of logs, especially in a log house in the “wild style”.
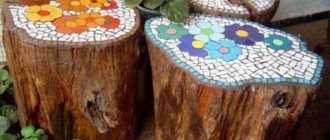
Another method of making a stool, where you don’t even need to cut anything out:
A thick enough piece of wood can make an excellent chair. If you burn it, sand it and varnish it, you get an exclusive product that would be a pity to take outside:
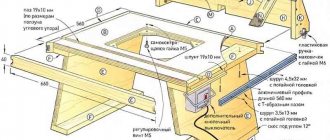
Drawings and diagrams for assembling a transforming bench
Without experience, it is not advisable to draw up a bench diagram yourself. It is optimal to find a ready-made drawing with the indicated dimensions of each part. If your neighbors have such a transformer, the circuit can be copied, but you need to carefully consider the design of the moving units. They create the main complexity of the design of a folding bench.
In general terms, different drawings of a transformer bench with a metal frame are similar. The sizes of a classic bench often differ. As a basis, you can take the drawing provided in the photo of all the wooden elements and the finished assembled structure itself.
For inspiration
Any material can be used to make garden furniture if you get creative. Any snag, branch, or stump. Below are photos that confirm this.
Using curved branches to decorate the back of the bench and armrests
Wild-style bench made of half-logs and crooked branches Designer bench made of logs and branches with an awning from rain and sun
Designer swing bench made from driftwood and naturally shaped branches
Simple and elegant
General information
From this article you can learn how to make beautiful furniture from sawn timber:
- Various options for simple but quite stylish benches.
- Stool.
- A couple of bench options.
- Table.
Moreover, you will be able to get plenty of food in order to develop your own design fantasies, the implementation of which will depend only on your skills with tools, as well as the availability of free time. All garden furniture made of logs, which will be discussed in the article, is made in rustic, “wild”, or country style. They are ideal for furnishing a relaxation area outside the home. And if you have a wild log house, then it would be even better to tastefully furnish the area around the house for summer outdoor recreation or gatherings with barbecue.
Let's talk about a table and a bench without a single nail. With some skill in using a gasoline saw, this kit can be quickly made without using a single nail. Or is there another option for a bench, for which you will need to spend a lot more parts, and it will also be important to fasten everything together. If you don’t mind, then you can leave a bench made of logs even without any protective treatment. But if durability is extremely important to you, then the products should be treated for protection with antiseptic compounds, treated with stain, or covered with paint and varnish.
Location
The first problem that needs to be solved is choosing a location for the bench. It affects the material of the structure. For example, for an old garden with large branchy trees, wood products are suitable; for a small area not heavily planted with trees and shrubs, small openwork structures are recommended.
If you look online for examples of photos of benches in the country, you will see that they are often an integral part of gazebos, verandas and summer areas. If you are planning to do something similar, then make sure that all the details are made in the general style.
Choose a place for the bench so that it offers a pleasant view. It’s unlikely that you’ll want to admire your neighbors’ fence or the walls of your barn.
It is advisable that the bench be located in the shade. It is placed under the crowns of large trees or under canopies. Remember that it acts as a place for rest and relaxation.
You can put benches next to the beds. There are several advantages here. Firstly, the owners of the site will be able to monitor the growth of the crop. Secondly, the bench is suitable for taking a few minutes’ rest from physical labor (digging, watering, harvesting).
Don't forget about decorative decorations. Have you made a simple bench with your own hands? Place flowering shrubs around it. Flower beds are also suitable for decoration. They are placed on a raised platform or a special platform is created from bricks, tiles or logs.
Tips for caring for wood
Since wooden benches will be outdoors all year round, they can be affected by the elements. In order for the tree to last longer, it must be treated with special compounds against pests, which can be found in agricultural stores. You can decorate a bench not only with carvings, but also paint or varnish.
To create unusual benches from logs you will need a little more than 5 hours of work if you do it alone. Here, the seat with a fastened backrest is installed not on dug-in stumps, but on small round processed logs, knocked together. A strong jumper is nailed down between the poles, holding the entire structure.
Where is it most often used?
The use of rounded logs is relevant in many stylistic areas of residential decor, as it can be successfully combined with other materials, with many color shades in the decor of walls, ceilings, and floors. But most often such decorative items can be found in rooms with decor in the following styles.
| Room design direction | Characteristic |
| Country | Country style is distinguished by the naturalness of its materials, so log tables, chairs, beds, and cabinets will fit perfectly into rooms of this style. |
| Provence | Provence requires laconic forms, simplicity of color shades and naturalness of the materials used, which, by the way, corresponds to furniture made of rounded timber. |
| Loft | The loft style is unusual and simple, practical and resists everything overly pompous and expensive. However, it is log furniture that is successfully combined with glass, brick, and plaster, which are so often used in such interiors. |
| Classic | When properly processed, natural wood furniture acquires a strict, conservative look, which is very important for classic living rooms and bedrooms. |
No less relevant is log furniture for a garden house, a gazebo on a summer cottage or a park. But you shouldn’t leave it in the open air for a long time, as precipitation will negatively affect the quality of the surface.
You can complement the beauty of timber furniture with the help of decorative elements made of natural rattan, glass or metal, leather.