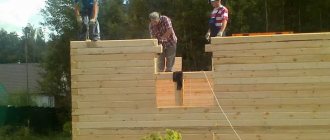
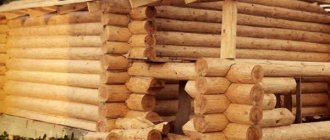
The construction of buildings of any purpose from timber involves fastening the timber to the foundation. This procedure is complex and labor-intensive, and also requires the employee to have certain qualifications and experience. The reliability and durability of the entire structure depends on how well the first crown was secured. That is why installing timber on the foundation is an extremely important stage in the construction of buildings. In this article we will look at options for installing wooden beams on various types of bases.
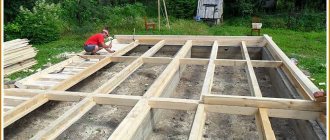
The first stage of this process is the arrangement of a really high-quality foundation for the construction of a building, on which it is necessary to apply two layers of roofing felt sheets, and fill the surface with a cement mixture. Only now should you begin installing wooden elements on the base of the building under construction. The installation of timber should only begin when the foundation is equipped and has stood for more than a week. As already mentioned, installing timber on a foundation is a rather complicated process, and to facilitate it, the first row is used, which is called the bottom frame. To increase the strength of the structure, the harness must be made of wide material.
Before starting all work, you should stock up in advance with all the necessary tools and consumables. Here is their list:
- antiseptic composition;
- building level;
- anchor bolts;
- cement composition;
- sand;
- roofing felt;
- anchor studs.
Return to content
Attaching the timber to the foundation
The foundation is the basis of the entire structure. The choice of its type should be approached especially responsibly, having previously studied the soil on which the construction will take place. So, for example, if the soil moves, a pile type is suitable; for fluffy soils, a shallow foundation can be used. And for the construction of a country house or outbuildings, an excellent option is a foundation built from asbestos pipes or brick pillars.
But no matter what type of foundation is preferred, frame walls are built according to the same principle. For such work, it will be necessary to perform a lower trim, which serves as a kind of layer between the foundation material and the wall material. An excellent option for the bottom harness is a wooden beam. As practice shows, it is most used for these purposes. That is why many people have a question about how to properly lay timber on the foundation. Especially if the owner of the site is building a house for the first time. Timber strapping is the most affordable way to move from the base to creating a frame.
Secrets of processing the bottom frame of the house and the first crown
There are a lot of folk remedies and methods for treating lower crowns, such as linseed oil, copper sulfate, wax, waste oil, etc. All these methods have the right to life, however, the achievements of chemistry in recent years have negated all the positive properties of folk methods. It is worth noting that industrial materials for processing logs often contain some components of folk remedies. The use of creosote for treating lower crowns is not the subject of this article, due to its absolute health hazard.
The durability of the house directly depends on the quality of processing of the lower crown, which means this issue should be approached responsibly. There are a lot of domestic and foreign products on the market today, and foreign ones are significantly superior to domestic ones in price. This feature leads to frequent counterfeiting of these products and the owner of the house will be very upset if he spends extra money but does not get the desired effect. We also note that we will consider antiseptics using the example of the domestic company Senezh, as the most famous at present. It will not be difficult for the reader to find analogues from other well-known and respected manufacturers, such as Rogneda or Neomid.
When considering a range of antiseptics to protect the lower crowns of a garden or country house, owners should pay attention to such a range of antiseptics as preservative antiseptics. They are designed specifically for long-term protection of wood under difficult operating conditions. An example of such products are Senezh Ultra , Senezh Bio and Senezh Impra . All of them provide reliable protection for a period of 30-35 years, but have one drawback - they are not colorless. The tree covered with them has a greenish or yellowish color. Senezh EcoBio has been eliminated from this drawback , while the period of protection for the tree is the same as that of those previously listed.
Rules for performing construction work
Attaching the timber to the foundation must comply with the regulatory requirements for building a house. With proper and strong fixation, it is possible to avoid the formation of cracks on the wall in the future, and even, in some cases, the destruction of the country house. To successfully complete the work and have a long period of use of the material, you should use certain rules and advice from professional builders, who will always tell you how to lay the material:
- Before placing the first crown, it must be treated with a special antiseptic. This substance can be purchased at a hardware store. Processing timber from timber will prevent rotting and extend the service life of the material. It is necessary to fasten the timber to the foundation after preliminary processing - this is one of the main requirements of construction;
- The first crown of the timber should be laid on waterproofing material. A layer of roofing felt will become a reliable barrier to moisture penetration. Attaching a log frame to a “bare” foundation is strictly prohibited. Such a transition from timber will make the house much more resistant to precipitation;
- the timber must be firmly attached to the base, since the foundation is constantly subject to hermetically sealed changes. For example, the adverse effects of groundwater, soil wetting by precipitation, and its drying out lead to changes in the foundation itself. And nothing can be done about it. This is the law of nature. But by securing the timber especially firmly, you can avoid wall deformation and the formation of cracks.
Laying timber is a simple type of work that can be performed by every owner of a summer cottage.
Why does the lower crown rot?
Without understanding the reason, it is impossible to prevent rotting of the lower crown and extend its service life. And replacing this link is a painstaking and costly work that requires special knowledge and skills. By determining the cause of rotting, even at the stage when a house is being built from timber, undesirable consequences can be prevented. The main reasons include:
- Broken or improper waterproofing between the concrete pour and the brickwork of the top of the house foundation. Typically, roofing felt is used for these purposes. This way, moisture does not rise up through the pores of the brick, and a damp base under the first crown of a bathhouse or log house is not the best option.
- Broken or improperly installed second layer of waterproofing between the bottom log and the foundation surface.
- “Bleeding” has not been done, and the foundation and lower sections are not ventilated.
- Precipitation fell and stagnated on the roofing material, since there is no protective ebb. It is performed in different ways, the easiest way is to close the joint around the perimeter with a board or rounding. You can purchase a ready-made drain and install it on the basement of the house foundation by slightly extending it beyond the masonry. Another option is a concrete screed along the top of the foundation with a slope from the log house, covered with any roof on top.
- Insufficiently processed lower crown.
Fixing the first row to the strip foundation
You can firmly fix the wooden beam to the strip base using anchor bolts. The advantage of this fastening method is the possibility of fastening directly at the construction site. This installation of timber is one of the simplest, but at the same time, reliable works. To perform such fixation, it is necessary to lay the timber on a previously prepared foundation covered with waterproofing. At the fastening points, you should make holes in the wood using a drill and a special bit, remove the wood and use a hammer drill to make a hole in the foundation. The last step is to install the anchor bolt into the finished hole and tighten it with a spanner.
Strong fastening of the beam to the foundation using anchor bolts provides not only proven fixation, but also allows, if necessary, to lift the entire structure above the foundation using jacks. The laying of the first crown should be done especially evenly. Therefore, it is recommended to level the foundation before attaching the wooden beam. Also, when laying the material, it is recommended to constantly monitor the evenness of the surface. The use of anchor bolts allows you to quickly, simply and very firmly fix a wooden beam on the base of a country house or outbuilding. You can attach the first row of wooden beams yourself, even without experience or special equipment. Fixing with anchor bolts will not take too much time, and the fixed material will be fixed especially securely.
Fixing wooden beams to screw piles
Attaching the timber to the piles is also not difficult. To attach a wooden beam to a screw foundation with your own hands, you need to:
- connect two wooden beams together. You can simply fasten them together using a special metal plate: one side of the product is attached to one beam, the other side to another beam;
- fix the wooden frame made of timber on the prepared site with your own screw. This can be done using ordinary self-tapping screws;
- check the fixation for strength. The installation of the wooden material is ready, and the construction itself is ready for a new stage of construction. Many people are interested in whether it is necessary to check the strength. The answer is clear - it is absolutely necessary, since in the future this part will be responsible for the strength of the entire structure.
Installation of joists on the floor
When performing work inside a residential building or apartment, the problem of installing joists on a finished concrete floor often arises. This type of work is used if it is necessary to insulate the lower surface of rooms, level it, or lay one or another type of floor covering. In this case, two installation methods can be used.
The first method involves rigidly fixing the bars to the base, which can be done in the same way as fixing the logs to the foundation in the form of a concrete slab. To install the logs in this case, you can use dowel nails or plastic dowels with self-tapping screws of the appropriate length.
Using preliminary markings, or using pre-perforated logs as templates, we drill holes in the floor. Their diameter should allow the fasteners to be tightly installed. Next, we fasten the logs using self-tapping screws or dowel-nails, controlling the horizontalness of the surface of the beams and the overall flatness.
Subsequently, after attaching the logs to the concrete floor with your own hands, you can insulate the base by placing the selected type of insulation in the gap between the bars. Before installation, do not forget to thoroughly treat the wooden parts with antifungal stains and fire retardants, which reduce their flammability.
The second option is more preferable from the point of view of ease of leveling the surface of the joists in one plane. It involves installing floor beams on adjustable screw supports. Raising or lowering certain parts of the base of the future floor is carried out by rotating the supports clockwise or counterclockwise. Thanks to this simple method, floor joists can be given ideal flatness.
Thus, as part of this review, we examined the main methods of installing floor joists in houses on foundations of various types, as well as in rooms on concrete foundations. The technology of many of the methods described is simple and can be done with your own hands.
When making a foundation, is it possible to fix 150x150x100 mortgages in it and then remove them? Then install 100x150 logs into these niches on the upper level with a plinth, so as not to embed the logs into the lower crown. In the future, when laying the floor timber, it will be adjacent to the backing board.
Andrey, Khotkovo.
Hello, Andrey from Khotkovo!
Yes, this is practiced.
The only conditions are that there should be completely reliable waterproofing of the joists from the stone base. This is done by antiseptic treatment of the logs and wrapping them in two layers of waterproofing such as roofing felt on all sides, including the ends.
And so that there is a strong and rigid fixation of the floor timber to the backing board. So that later there is no squeaking when walking on the floors.
Construction in Moscow and Moscow region
Wide range of construction services. Foundation, walls, ceilings, roofing, turnkey!
Other questions on the topic of gender:
Construction in Moscow and Moscow region
Wide range of construction services. Foundation, walls, ceilings, roofing, turnkey!
Construction in Moscow and Moscow region
Wide range of construction services. Foundation, walls, ceilings, roofing, turnkey!
Construction in Moscow and Moscow region
Wide range of construction services. Foundation, walls, ceilings, roofing, turnkey!
Semenych (author of materials)
Our site is regularly updated with interesting and unique materials and articles on the topics of lumber, building materials and works, the author's opinion and knowledge of a real coven with more than 15 years of experience are provided. There is a section - funny stories of shabashniks. If you would like to receive information about this, subscribe to our website's newsletter. We guarantee that your address will not be shared with third parties.
Beam fastening methods
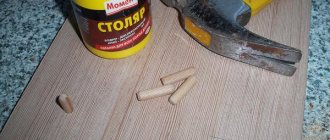
In addition to anchor bolts, wooden beams can be secured with your own hands using dowels. This installation is laid at the moment of pouring the foundation:
- Even when pouring the foundation, it is worth laying a vertical rod in a horizontal position, to which the wooden beam will be attached. The pre-prepared pin is cut to 2/3 of the thickness of the timber. The metal element should not pass through the beam;
- according to the markings and location of the metal pins, it is necessary to drill a hole in the wooden frame;
- put the wooden beam on the metal pins. The installed beam must be fixed very tightly, so it is recommended to first determine the diameter of the hole.
The laid material will not allow the product to move horizontally. With this fixation, you can perform the work firmly and reliably. Strapping material is an integral part of construction. And such work should be performed in the same way as others, observing the requirements of the construction industry.
Things to remember
In order for the grillage to be made with maximum accuracy and good quality, before starting work, you need to check with a level that the top marks of all supports coincide. And also, the accuracy of their location according to the construction plan. That is, all geometric parameters horizontally, diagonally and vertically must correspond to the specified values. Otherwise, it will be impossible to link the individual parts of the harness into a single structure.
The timber for the grillage must meet all quality standards and norms. You cannot build a harness from material that is damaged by pests and has high humidity.
Fastening elements (screws and nails) should be placed along the central axis of the structural elements to prevent cracking. And the connecting points between the wooden parts must be laid with jute or tow.
- Foundation
How to attach timber to the foundation. Connection methods and their features
When building a house from timber, it is necessary to resolve the issue of attaching the first crown to the foundation. The further operation of the building mainly depends on this. For this operation, several technology options have been invented, which we will discuss below.
You will learn how to properly connect timber to a slab, strip, or pile foundation. We will tell you how this is done, and what materials and tools for them should be prepared in advance.
Attaching a beam to a columnar foundation using a reinforcing pin
General installation information
So, if you are interested in the question of how to attach logs to brick posts, then you are seriously thinking about creating a reliable and durable floor. However, with this installation method, you will need to resort to constructing a foundation, and most importantly, it must be done in such a way that it can easily support each installed brick support. You can pour the foundation for installation separately or make it in the form of a narrow strip. The height of the support can be determined using the height at which the timber will be placed.
Columns
To find out the consumption of materials for installing columns under the logs, you need to perform a calculation and then draw up a plan that will indicate the layout of the subfloor, what materials will be required and their quantity. This will need to include the following materials: timber, high-quality cement and bricks.
Laying
To ensure that the lags are laid in a column efficiently, it is recommended to follow the following rule: where the load in the room is insignificant, a larger distance can be maintained between the lags. If thin material is used for flooring, then it is recommended to place the logs close to each other.
This suggests the following conclusion: the smaller the distance between the lags, the higher the strength characteristics of the structure.
However, such a solution leads to high consumption of materials, and therefore an increase in monetary costs. But the end result will be of high quality, and the laid floor will last a long time.
Fixation depending on the type of base
From other publications on our portal, you already know that in construction there are several types of foundations, each of which differs not only in design features, but also in the place where they are best installed.
This depends on various factors, among which the predominant structure of the soil on the site and the price of all work, since it is no secret that the earthen stage of building a house can exceed half the cost of the project.
How to attach a beam to a foundation using a dowel anchor
Slab and strip
Before working on a slab foundation, you need to prepare:
- drill holes in the slab at a distance of 500 mm between their centers;
- insert bolts with locknuts into them;
- make holes of the same diameter and at the same distance in the beam while the foundation hardens.
Advice: it is best to carry out preparatory actions simultaneously with assembling the base or pouring it.
- Check the horizontalness of the top plane of the foundation and make sure that there are no depressions (fill them) or irregularities (scrape them);
- Cover the base with a waterproofing layer, for which ordinary roofing felt is excellent;
- Place a wooden crown on the studs and secure it with locknuts.
How to secure a beam to the foundation using a pin
The timber is attached to the strip base in the same way. The only difference is that there is no need to install bolts in the upper part of the foundation; a dowel is used. In this case, the frame of the house should be prepared and assembled in advance.
Pile
For rigid fixation, the process instructions are as follows:
- insert U-shaped heads into the holes for the studs on the side of the piles;
- cut blanks from timber;
- install a beam into the hole in the head and secure it with a pin;
- mount the heads into the pile, for which you first place a beam on them, placing corner brackets under it, and then weld them to the piles;
- remove the log and weld the remaining heads onto the brackets;
Tip: place roofing felt between the metal and wood to avoid contact between them.
- install the foundation beams into the brackets and secure them with screws.
How to fasten timber to the foundation with anchor bolts
This method makes it possible to assemble the building much faster, since the lower tier of the building is used in the process.
Tip: If fasteners are not used, the timber should be mounted to the T-shaped head.
Upon completion of the work associated with installing and fixing the logs to the foundation, you can begin to build walls. It should be remembered that the crown beam must be completely dried so that there is no deformation of the house frame in the future.
Advice: before installing it on the foundation, the log must be treated with an antiseptic.
Tying the base with timber
This method can be used for foundations of any type, especially for pile foundations. Thanks to this, it is possible to evenly distribute the load from the frame of the house along the perimeter of the latter, thereby increasing its service life.
The tying process should begin after all cavities have been filled with mortar, but the heads have not yet been installed. Thus, it will be possible to avoid changes in the level of installation of piles due to processes occurring inside the soil.
In the photo - foundation piping
How to make a strapping
The process is as follows:
- Prepare a building level and check the accuracy and correct installation of the piles. All detected inaccuracies must be eliminated as quickly as possible;
- Place threaded rods in the corners filled with mortar;
- Also install aluminum corners in the corners;
- Join the logs together by sawing at the top and bottom, and then connect them at right angles. Be sure to wrap the joints with jute.
Once the bottom binding is completed, move on to the top. Usually the last stage goes faster, and doing it yourself is not difficult.
Tools and materials
To install the beam vertically on the foundation, you need to prepare the following tools and materials:
- building level;
- cement M500;
- sand cleared of impurities;
- antiseptic for treating wood against mold and mildew;
- roll of roofing felt for waterproofing;
- anchor studs;
- wooden beam.
Important! The timber is laid on a concrete foundation if it has stood for 7 days or more.
Requirements for wood
When choosing timber for building a wooden house, you should proceed from building codes and regulations, and specifically from GOST 2695-83. The first crown of timber must be laid on a foundation made of larch or oak. These materials have good strength and durability. To extend their service life, they must be treated with an antiseptic.
When choosing wood for building a frame house, the following points are taken into account:
- The cross-section of the timber is 20 × 20 centimeters; the lumber should not have any bending, falling knots or other defects.
- The maximum wood moisture content is 20%. It is best to take logs from winter felling, which took place from December to March. The tree should be aged under a canopy or in another room with natural ventilation. Decks are placed in piles in accordance with the rules of storage.
- Absence of defects allowed by state standards. These include damage to wood from bark beetles, mold or mildew.
- Absence of defects that may remain after processing the material on a sawmill.
What crown treatments are best to use?
There are folk ways to treat the lower crown of a bathhouse, and modern compositions such as: Senezh, Belinka, Tikkurila. For greater savings, it is better to use folk and proven means, but the appearance of the treatment in this case will not be the best. For something more decorative, traditional ones are suitable. The second option is recommended by professionals, as it is safer and more proven. Of course, when purchasing expensive coverage, no one is immune from fakes, the quality of which is not worth talking about. For this reason, most people prefer the old-fashioned methods of processing the first link of a bathhouse and building a house from laminated veneer lumber. Let's talk about both in more detail.
Folk remedies
- Use a solution of copper sulfate. To do this, place a log of natural moisture on its end, and tie a bag with a rag heavily soaked in copper sulfate on top. The rag should be in contact with the end of the beam. Under the influence of natural movements of juices inside the wood, the timber will be saturated with salt solution and protrude from below. The rag must be soaked all the time so that it does not dry out. After this, it is well dried under a canopy. Craftsmen suggest soaking the log in a bath of copper sulfate. Let us immediately make a reservation that this method is not safe for health. When heated, copper sulfate releases toxic fumes to humans.
- Treat the lower crown of a bathhouse or at home with propolis and oil, then rub it with wax. The method looks a little fantastic, but it is used in villages and is time-tested, although labor-intensive.
- A famous processing method in the West and among the Finns. It is prepared from ingredients available to everyone: flour (rye or wheat) - 750-800 g, copper sulfate - 1.5 kg, table salt - 400 g, lime (slaked) - 1.5 kg, diluted in 10 liters of water. Cooking: Add water to the flour, stirring constantly, until it becomes sour cream. Heat 5 liters of water until it boils, add water, stirring. Then everything is mixed and filtered. The finished mixture is heated, stirring constantly, adding vitriol and salt. Slaked lime is added last. You need to cover the crown with a warm composition in 2 layers, after the first one has completely dried. Experts say that such treatment at home is enough for 10-15 years. This composition can be used to treat even the bottom of the floor in a bathhouse and entire lumber when building a house from profiled timber.
- Coniferous timber is the least susceptible to rotting and can be treated with birch tar or spruce resin. Such compositions will protect the wood from bugs, but have a strong unpleasant odor; in addition, spruce resin is sticky. After this treatment, the crowns of the house cannot be painted or sanded. This is also a fire hazard, since these substances are highly flammable. Therefore, it is customary to treat with such compounds the part that comes into contact with the ground.
- In rural areas, the lower link of a log bathhouse can be treated with motor oil treatment. The biggest advantage of this treatment is its low cost. Apply it in a heated or cooled state in several layers, allowing the previous one to be well absorbed. 90% of this composition consists of mineral oils, and they repel water well. The soot contained in the used oil protects the logs from the sun and is an antiseptic. But it has already been proven that impregnation in this way is not of sufficient quality, since it does not penetrate the wood evenly. In addition, this coating has a mourning color.
- The method of treating timber with bitumen or tar has not become a thing of the past. Underground structures are treated with such compounds heated and mixed with diesel fuel. Today, manufacturing companies offer modern bitumen impregnations and mastics.
- Drying oils and oils, they can only conditionally be classified as folk, since these compositions are the basis of varnishes and modern paints. They last a long time, do not peel or crack. For deeper penetration, it is better to apply warm. This way they will be more fluid.
- Moisture penetrates best from the ends of the link; to prevent this, the ends are “riveted.” To do this, tap the ends of the bathhouse logs with a rubber or wooden hammer. This treatment will help the wood stay dry longer and prevent it from cracking.
- Burning the surface of the timber with a blowtorch. This method is not safe, but a thin layer of burnt wood serves as a good antiseptic and destroys the capillaries through which moisture enters the wood.
Traditional processing agents
This type of treatment includes all kinds of drying oils, impregnations, and coatings. Let's talk about some of them in more detail.
"Senezh"
Produced by SENEZH-Preparaty LLC.
Has been tested and certified by Rospotrebnadzor of the Ministry of Health and Social Development of the Russian Federation. Fire-retardant composition produced in polyethylene canisters of 5, 10, 65 and 1000 kg. Acts as a comprehensive protection for wood, including the lower crown. Do not use after varnish, drying oil or any other water-repellent composition. Included in group 2 for the effectiveness of fire protection according to NPB 251-98. The protection period is up to 20 years. Does not change the color of wood, does not interfere with air penetration. Has no smell. It has penetrating properties and accumulates in the inner layers of wood, preventing the penetration of moisture and fungi. Treatment: Apply to cleaned wood with a roller, brush or spray at a temperature not lower than +50C. You need to apply 2-3 layers, allowing the previous one to dry for 20-40 minutes. Do not treat a frozen link or mix it with other impregnations. Must be mixed before application. Consumption: 600 g/m2 (1.6-1.7 m2/kg).
"Belinka"
Issued by the same name.
Has certificates from the Holzforschung Protection Institute. To protect the crown use Belinka Base. Impregnation – Belinka primer is a deeply penetrating composition of alkyd resin and biocides. Protects wood from fungus, pests, blue stains, and moisture. Creates a protective biocidal layer on the surface. Unlike other compositions. has several types of biocides, which increases the level of protection several times. Available in containers of 1, 2.5, 5 and 10 liters.
Treatment: Apply with a roller or brush to a cleaned surface in 2 layers. Drying time for each layer is 6-12 hours. Application temperature from +10C. It can also be used at sub-zero temperatures, but it will take more than 12 hours to dry. Consumption: 1l / 5-10m2.
Schemes and technologies for fastening to the foundation
There are two ways to secure a wooden beam to the foundation. Let's take a closer look at them:
- Hard method - fastening of wooden products occurs using special clamps. The result of the work will be a stationary and reliable supporting structure.
- Overlay - the beams are laid along special cutouts; there are no fastening elements between the lumber and the base. The reliability of the structure is achieved due to the weight of the building, which presses on the lower crown.
Of the two indicated methods, the first is considered more reliable, the second method is easier to implement.
Columnar
Columnar-type structures are used for the construction of residential buildings on unstable soils. The service life of such a foundation is within 30–40 years. Here everything depends on the material used to make the columns (brickwork, concrete, asbestos-cement or metal pipes).
When building a wooden house, a project is drawn up, which determines the number and area of supports, as well as the distance between them. It is necessary to pay attention to the fastening of the timber to the pile foundation. Here you need to take into account the nuances of securing the first row of bars.
Before carrying out the main work, align all the columns in the same horizontal plane. For this, a water building level or level is used. The uniform shrinkage of the house and the durability of the building structure depend on the correctness of such actions.
Important! According to SNiPs, the wooden beam for laying the bottom row should be 5 centimeters larger than other products.
For piping, parts with a cross-section of 20 × 20 centimeters are taken; for the installation of load-bearing walls, square beams with a cross-section of 15 × 15 centimeters are used. The need to select a larger cross-section of wooden products for strapping is due to the fact that they bear the entire weight of the building and short-term loads (snow on the roof, etc.)
You should familiarize yourself with the nuances of attaching the beams to the columnar base. When building a bathhouse or wooden house, the lower crown is fixed through special embedded parts, pins with a diameter of 1.4 centimeters. These bolts are secured into the concrete posts as they are poured. After gaining sufficient strength, the first row of beams is fixed on the supports by clamping the nuts.
A similar situation occurs with brick columns. At the time of installation of the masonry, threaded rods of the same diameter are fixed in its structure. In this case, the upper part of the reinforcement must intercept the thickness of the wooden beam with a margin so that the lower crown can be intercepted. After fixing, the unnecessary part of the pin is cut off with a grinder. In cases where the posts are ready and the studs were not installed during the installation process, they can be replaced with anchor bolts.
Remember! Moisture condenses where metal touches wood, which can lead to corrosion of the steel and the appearance of mold or mildew on wooden structures. Problem areas must be treated with paint or antiseptic.
Tape or slab
When installing timber on a strip or slab base, preliminary preparation of the surface is carried out. Holes are drilled along the perimeter of the foundation at a distance of 50 centimeters from each other and anchor bolts with nuts are installed. The same holes are made in a wooden beam.
Before fixing the beam, it is necessary to check the horizontal plane of the base and lay a layer of roofing material that will be used as waterproofing. We place wooden blanks on the protruding bolts and secure them with nuts.
Let's look at the process of installing the bottom trim in more detail if the work is carried out along with pouring concrete:
- Bolts are installed into the newly poured concrete at a distance of 50 centimeters and left to harden. Fasteners must have curved ends.
- Drill holes in the timber at the required distance for the studs.
- Check the levelness of the base using a building level and level out any unevenness.
- Roofing felt is laid.
- In the corner parts, the beams are additionally fastened using metal squares and self-tapping screws.
- Place the beam on the bolts, install washers and secure its position by clamping the nuts.
Attaching the timber to a strip-type foundation occurs in the same way as a base made of blocks or slabs. In the latter case, it is necessary to assemble the crown frame in advance. Fixation is carried out using dowels.
Pile
Attaching wood material to piles is done as follows:
- U-shaped embedded parts are installed in the holes on the side of the supports;
- blanks are cut from timber;
- wooden products are installed in the head and fixed with fasteners;
- The bars are installed along one line, staples are stuck in and welded to metal piles.
Important! To prevent contact between wood and metal, pieces of roofing material are placed under the piles.
Screw
The construction of a residential wooden structure on a screw foundation occurs quite quickly. The timber is attached to this base quite simply. At the initial stage of work, it is necessary to measure the length and width of the building, after which we check the horizontalness of the surface using a level. We soak the timber with an antiseptic solution and leave it to dry.
Installation work is carried out in the following order:
- drill holes in wooden products for fasteners (their depth should be 2 millimeters greater than the fasteners);
- lay timber around the perimeter of the building;
- secure it to the screw foundation with bolts.
The harness is considered the easiest to install. In addition, it is reliable and durable.
Installation of beams
The traditional way to attach the end of a wooden beam to a wall is to embed it in the brickwork. This design of the junction unit can be used in cases where the thickness of the masonry is 2 bricks (250 mm) or more. The reason is that the end of the beam must enter a specially prepared niche to a depth of at least 12 cm (half a brick). If the thickness of the partition is not enough, then the niche will turn out to be through, which is unreliable and ugly.
The ideal option is to provide niches for the beams in advance when building the wall. If this is not done, then they can be carefully hollowed out. Of course, the second support for the beam in the form of an extension frame must be made before installing the wooden product in the design position.
Installation of the supporting beam is carried out as follows:
- Antiseptic treatment of wood is carried out. The end intended for embedding in the masonry is wrapped with roofing felt.
- The end of the beam is inserted into the niche, and the second rests on the finished structure. The distance from the end of the element to the rear wall of the niche is 40 mm.
- The position of the bar horizontally and vertically is verified, its second end is secured in the chosen way.
- The gaps between the surface of the brick and the wood are sealed with cement-sand mortar grade M50.
The inconvenience of this method is that you need to spend time preparing the niches and waiting for the solution to harden well, otherwise during further assembly of the roof it will fall out in pieces. There is a more practical way: fasten a support beam of the same cross-section as the beams flat to the brickwork. It must be secured in such a way as to ensure the required angle of inclination of the beams when they rest on this base.
The support beam should be secured securely, using anchor bolts that extend into the thickness of the brick by at least 100 mm. The anchor installation step is 30 cm (3 fasteners per 1 linear meter). Afterwards, the beam rests on wooden structures at both ends and is secured with galvanized screws on steel corners.
Double harness
This type of strapping involves the use of two rows of wooden beams of different sections. The structure can be fixed to a screw foundation in two ways:
Threaded connection
They place roofing felt under the supports, place a beam with a cross-section of 20 × 20 centimeters on the screws and tap it with a hammer. In the corner parts, wooden products are fastened using a metal corner and self-tapping screws. The second row of strapping is secured using through metal pins.
Clamps
When fixed to clamps, the first row of timber with a cross-section of 10 × 15 centimeters is laid edge down. The joints of the elements are made in a checkerboard pattern; they should not coincide. The harness is attached to the piles using U-shaped bar clamps. They are mounted on the previous element.
How to fix a joist to a concrete wall
The joists do not always rest on the floor. They can rest on a protrusion in the foundation, or they can rest on special supports for timber, mounted on the walls. For these purposes there are U-shaped metal supports. They are attached to concrete walls or to foundation walls using the same anchors or dowels. First, mark a level on the walls along which the mounting plates are aligned. Next, they are attached to the walls, and then timber is laid in them.
The beam support is open - made of galvanized steel 2 mm thick
The procedure for installing fasteners is the same: marking and drilling holes, and then attach the plates. If the beam support is attached to the foundation walls, then do not forget about waterproofing. Sound insulation is also important. Gaskets are placed between the wall and the plate. In the simplest case, these are pieces of roofing felt folded in half. Next, a beam is inserted into the plates. You don’t have to attach it to the plates, since there is simply nowhere for it to go.
Attaching the frame of a wooden house to the foundation
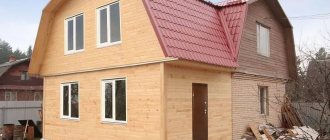
Most owners of country houses or cottages want to build additional outbuildings or a real bathhouse on the site. Most often, such buildings are erected from timber - it is convenient and practical. But the foundations for them can be very different. Therefore, the question of how to lay and strengthen the strapping beam on the foundation is very widely discussed in construction circles. Our article provides detailed recommendations on how to attach timber to the foundation with your own hands.
The frame is a necessary element of a log house; it is the lower crown of the house, which serves to strengthen the foundation and into which it is not recommended to cut floor joists.
Fig 1. Strapping on a columnar foundation
Price for traditional coatings
You can purchase coverings for the crown of a bathhouse or home at any hardware store or market, and even on the Internet. Be sure to ask the seller to show the certificate for the purchased product. Due to the high popularity of these protective products, counterfeits that are unsafe for health began to appear on the markets.
It is easy to distinguish a fake from a quality product:
- Too low price.
- Poor quality packaging.
- Lack of accompanying documentation.
For the convenience of readers, we present the average price for coatings in Russia for 2014 in the form of a table:
| Brand and name of coating | Weight, kg | price, rub. |
| "Senezh Ognebio" | 5 | From 310 |
| 10 | From 510 | |
| 65 | From 3 300 | |
| "Belinka Base" | 1 | From 465 |
| 2,5 | From 1,075 | |
| 10 | From 3 785 | |
| Tikkurila paint Vinha | 0,9 | From 450 |
| 2,7 | From 1 800 | |
| 9 | From 3 670 | |
| Tikkurila Valtti-Pohjuste | 0,9 | From 440 |
| 2,7 | From 1 700 | |
| 9 | From 3 580 |
As you can see from the table, Senezh will be the most profitable option for processing the first crown of your bathhouse or home. Tikkurila is the most expensive. Quality in this case depends little on the brand. Which treatment of the first crown to use will depend on your purchasing capabilities. Professional products are safer and quality tested.
How to tie a wooden house to the foundation before
When building houses in ancient times, when wood was the main building material, our ancestors used wood to construct the foundation. Today this option seems very strange, but many centuries ago this technology was considered correct. How was this accomplished? A clay-sand cushion was laid directly on the ground, and the lower crown of the frame was installed on it. As a rule, the first crown was made of oak. It was well lubricated with tar or resin. We can say that this crown acted as the frame and foundation of the entire structure. The sand provided protection from rain, and the clay protected the crown from the effects of groundwater. Since then, a lot has changed and the technology for laying and fastening timber to the foundation has become different.
When constructing any buildings made of timber, foundations of pile or strip type are very often installed. We will look at attaching the log frame to both of these options.
Floor insulation
Warming is also a very important stage. Below, on one and the other side of the wooden logs, support bars 50 × 50 or 30 × 50 mm are nailed.
Next, a roll is laid on the block, which is an unedged low-grade board; its thickness should be 25 mm. Before laying, such boards are treated with a special antiseptic composition to protect the floor from rodents and insects. Self-tapping screws are used to attach the knurling to the bars.
Insulation
Next, a waterproofing membrane with a throughput capacity of no more than 800 g/m is laid on the created bead. It will protect the heat insulator from exposure to moisture. Afterwards, a heat insulator is mounted on the laid waterproofing layer. Considering that today there is a large assortment of insulating materials on the market, there will be no problems with the choice, but you should understand that not every one of them can be used to insulate a wooden floor.
Here it is recommended to choose mineral wool with a density of 35 to 55 kg/m². When laying, a gap of 2-4 cm is left between the boards and the heat insulator for ventilation.
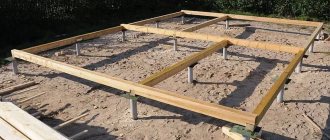
Fastening timber frame to strip foundation
Walls made of wood (be it rounded logs, beams, etc.) are very difficult to attach to the foundation. To accomplish this task, a beam of greater thickness is taken as the first crown that is laid on the foundation.
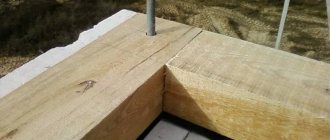
In order to attach the timber to the foundation, anchors are used.
Fig. 2. Attaching the strapping with anchors to a strip foundation with a grillage
Sequence of work
- You will need fasteners, take extra.
- Carefully check that the surface of the foundation is level. To do this, use a building level. If unevenness of more than 10 mm suddenly appears, be sure to eliminate it with a solution. Irregularities of less than 10 mm can be corrected with planks that are placed under the beams.
- Place the crown of timber on roofing felt for waterproofing purposes.
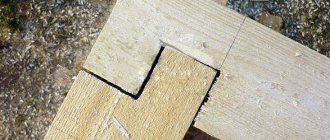
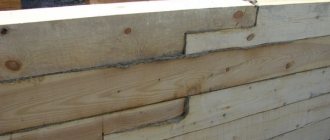
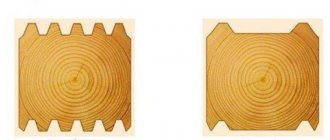
- The lower crown of the harness is bars that interlock with each other in one of two ways - “into the paw” or “into the bowl”.
Fig 3. Connecting corners “into the paw”
Fig. 4. Connecting the corners of a timber house “into a bowl”
- Holes are drilled in the beams that are laid on the lower crown. The diameter of these holes is slightly wider than the diameter of the anchor studs that were previously installed and concreted at the top of the foundation.
- Then the beams with drilled holes are laid on the anchors. Next, install wide washers under them, which are secured with nuts. When the corners of the lower rims are connected to each other with nails or dowels, anchors do not need to be installed in such places.
- Using a building level, determine the exact location of the corners and diagonals of the upper level of the trim. If any unevenness occurs, smooth it out with a plane.
- Once the installation of the bottom trim is completed, you can install the vertical guides for constructing the frame.
By the way, the described method of carrying out the lower trim is relevant both for strip foundations and for any other type of foundation, with minor amendments and technical features.
Rules for choosing beams for interfloor ceilings
The beam must be made of dry wood. It is worth choosing it according to the project. When compiling one, calculations are made for strength and rigidity. The beam must have sufficient mass of its own to at least somehow dampen sounds and vibrations from the upper floor. As a rule, beams with a height of 200-300 mm are used for spans of up to 5 meters. Beams are laid every meter to prevent sagging of the floor joists of the upper floor. Typically, a full beam is a beam of rectangular cross-section, the width of which is 2/3-1/2 of the height. It fits on a narrow edge. The beam is many times more reliable than a carriage board laid on its edge as a beam.
the best choice for large spans is a metal beam. An I-beam will cost less than a powerful laminated timber of the same rigidity and length. And the metal will not have problems with fungus, insects, or fire resistance. When laying, the rolled products must be placed on cushions and good hydro- and thermal insulation against condensation must be ensured. If desired, they can be finished as wood.
Fastening timber frame to a pile-screw foundation
Why is 1-2 rows of strapping needed for a pile foundation? Because piles with caps are point supports. Such supports cannot guarantee that the load will be distributed evenly between all platforms. Surely some piles will have more weight, they may sag, which will adversely affect the entire building.
If you tie the foundation as required by technology, then uniform distribution of loads over the entire area of the foundation will increase the strength, reliability and durability of the foundation and the house itself. We emphasize that the piping should be done literally immediately, as soon as the cavities are filled with mortar and the heads are installed. The soil is different in different places, and internal mechanical processes can disrupt the entire technology. Who then wants to align piles that have moved? In addition, this is a difficult and labor-intensive task. It is better to install the piping correctly right away, meeting all technological requirements, than to repair it later - it’s cheaper and easier.
Fig. 5. According to this scheme, the piles are tied with timber
Strapping process
- Check that the piles are installed correctly and level. If minor deviations are detected after the heads have been installed, it is imperative to eliminate these errors: simply cut out pieces of beams in places where they are superfluous.
- As a rule, holes are made in the pile heads so that the frame can be screwed to them from below.
- The corners of the strapping can be fastened with aluminum corners.
Tying piles for a house made of timber will not be a problem for you if you do not do it alone.
It happens that the customer installed a pile foundation from one company, and another company will build the house for them. Some builders of wooden houses do not consider it necessary to attach the frame to the pile foundation, arguing that the house will not move from the foundation under its own weight. This is true, but the strapping is also attached to the pile foundation in order to eliminate the mobility of the pile foundation and to evenly distribute the weight of the house over the entire foundation. After all, if one pile sags, then the load on the other piles will increase.