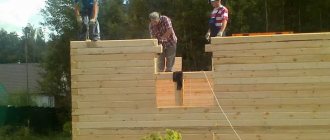
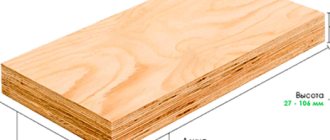
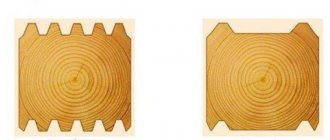
The growing interest in wooden house construction in our country has created a need to inform the population about the methods and techniques used in the construction of wooden structures. Many people are interested in how to fasten timber together, how to mount it to a wall, and also what are the advantages of certain technologies and materials.
We will try to answer these questions.
The reliability of a wooden house or a bathhouse made of timber depends on how the timber is attached to the timber.
T-shaped beam fastenings
Typically, such fastening is used in places where internal walls adjoin external ones.
One of the simple fastenings of timber to each other. Considered the weakest.
T-joint with main tenon
Unlike the previous one, this is a very reliable and durable connection. Thanks to the main tenons, airflow is reduced and at the same time a strong grip is obtained. It is considered quite warm.
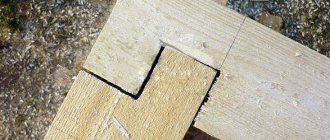
Dovetail or open pan connection
A popular option, popularly known as “dovetail”. One of the strongest, most reliable and warm. There are several options for its implementation. We will show you the simplest one.
Closed semi-frying pan
A rather complex docking option that requires certain skills. The option is a little similar to the previous one, but the adjacent beam does not pass through, but remains inside, resulting in a warm, reliable and windproof connection.
We hope these methods of joining wooden beams will be enough for you. There are many other variations on this theme. At some joints an additional tooth is added or cuts of a rather complex shape are made. All this greatly slows down construction.
Some connections can be strengthened using fasteners; for some, this option is not suitable.
You also need to take into account for which buildings and in which nodes this or that connection will be used. For example, when building a shed, it is not at all necessary to make a complex connection with a main tenon. A half-tree connection is quite suitable for this.
How to fasten timber together
In addition to corners and longitudinal joining, the crowns have to be connected to each other in the vertical direction. After laying two rows of timber, additional fastening in the form of dowels or dowels must be installed.
To tie the crowns, it is best to use square wooden rods with an edge size of 18 mm and a length of 250 mm. For installation, pre-drill 25 mm holes. The drilling depth is equal to one and a half heights of the timber. That is, one dowel completely pierces the upper beam and half of the lower one. The dowels are driven in a checkerboard pattern so that the vertical fastening line does not coincide with the connections on the lower rows. Dowels must be attached to corners, window and door openings.
Corner connections
The long life of a structure or building depends on properly laid and connected boards and logs.
Types of corner conglomeration:
- assembly of components without residue (in the paw);
- assembling the components with the remainder (into the bowl).
Assembly without residue involves laying boards with an even, non-protruding angle. There is a separate modification - a warm corner. Assembly with the remainder involves interlacing boards from protruding ends. The second method is considered financially expensive, since it is necessary to calculate the timber for the projections, but the structure is quite reliable and retains heat much longer.
Miter angular joining
To bevel the ends, the angle is divided in half. In a standard joint, the angle is 90°, as a result of which each end should be cut at 45°. But there are variations of the angle: obtuse or acute. In an uneven corner joint, parts with different widths can be joined.
Miter splicing of components and joining of timber with cutting
Miter splicing of components - the technique is used when the ends of the components are straight and lie on the same straight line. Wooden elements are joined without changing thickness. Joining boards with cutting is used when joining two components at an angle to each other. It is practiced when joining two components with a profile in a corner. If, at the moment of joining, the boards move, the resulting gap will become less noticeable than with miter joints.
Corner lug connection
Docking is practiced when assembling intersecting parts located on an edge, or in a corner version. The most popular types of conglomeration are tee and corner. For the durability of the structure, the connection should be strengthened with a dowel or glued.
Tenon to socket connection
The tenon assembly is performed when joining links that are connected at an angle or at intersection. In all carpentry and carpentry, this joint can be called the most durable. In practice, joining is used in the production of window frames, doors, and cabinet furniture frames.
There are two types of splicing with a tenon into a socket:
- conventional docking with a tenon into a socket;
- connections with a stepped tenon into a socket (semi-darkness). Most of the width of the prepared material is occupied by the spike and socket. An expansion is prepared from the side of the groove, and a tenon step from another link enters it. The semi-darkness prevents the tenon from falling out of the groove.
Other tenon assembly of wood material
- Side tenon – door production;
- secret beveled tenon in semi-darkness - practiced when hiding a tenon;
- tenon in the dark - for wide components, such as the bottom frame of a wooden door.
How to collect crowns correctly?
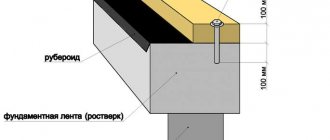
The first and most important operation is laying the first (flashing) crown.
The dimensions of the first row of the frame are determined at the design stage; they are commensurate with the length and width of the foundation. Using a building level, a basic horizontal line is applied to the flashing crown to control the current height of the masonry. The foundation material and wood have different physical properties: the concrete base freezes and forms moisture when it thaws, dew also forms in the summer, concrete has a loose structure and is easily saturated with soil moisture. If waterproofing is insufficient, mold and mildew will appear on the lower beams and under the floor. The trim crown is reliably isolated from the negative effects of moisture.
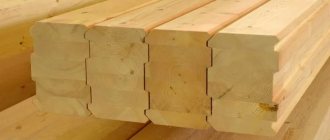
The crown of the house is the main element of the log house; the crown is understood as a closed contour of timber, forming a structure with corners meeting at 90 degrees. The most common standard size for buildings made of solid timber is 250 mm, for buildings made of profiled timber – 150-200 mm. There are the following methods of joining into a crown:
- Cutting into oblo (joining into a bowl);
- Laying in the paw;
- Fastening in a bandage with a main tenon (assembly on a tenon).
Cutting into the claw and laying in the paw are universal joints; this technology can be used in construction from logs and timber. You can do it yourself by attaching it to a headband or a paw. Tenon assembly is used only in timber construction; tenoning is more complex and requires special skills.
Deciding how to lay and fasten the crowns depends on the type of lumber chosen. The profiled timber is reliably connected by its own tongue-and-groove system; for reinforcement, wooden dowels are used; on one side of the building it is enough to install 6-7 such fastenings. When building from solid timber, dowels are installed every 500 mm.
Simultaneously with the laying and fastening, the inter-crown seams are sealed and insulated. For a log house for shrinkage, this operation is performed after completion of shrinkage.
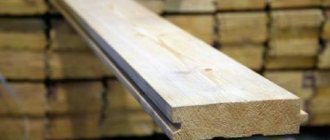
The slot seal performs the functions of heat and sound insulation and is used in the construction of any wooden structures. The type of sealant and laying technology depend on the size of the lumber. When building from solid timber, a layer of sealant is laid when laying each row. When building from timber with natural moisture, this operation is performed after shrinkage by sealing the cracks. The profiled timber has special grooves for the seal.
The seal for solid timber is produced in the form of a strip of tow, flax, natural moss, for profiled timber - in the form of strips of felt, foamed fine-pored rubber and polyethylene foam. The sealing tape is available in sizes from 100 to 250 mm, the sealing strip is selected according to the standard size.
Mold may appear in a seal that is wet or saturated with atmospheric moisture; it is recommended to recess the seal into the gap to a depth of 20-25 mm, and treat the gap with liquid sealant.
Butt joint of timber
Butt fastenings are the simplest type of connection; the workpieces are fastened at right angles using construction staples or standardized fasteners; the building material is not processed. The technology is used in the construction of temporary buildings, field storage facilities and sheds, and arrangement of work sites. The structures are easy to disassemble, and the lumber can be reused many times.
With the advent of new generation woodworking equipment and laminated lumber, the technology has received innovative development. To strengthen the fastening, a hidden tongue-and-groove lock and a trapezoidal key are used. The castle was called the root thorn; the shape and dimensions of the castle were standardized. The groove and tenon are made on modern milling machines, the reliability of fastening is ensured by high precision processing of workpieces. In such a lock, the tenon is securely fixed inside the workpiece.
Special requirements are imposed on the quality of the material; this method of installing timber is used when working with kiln-dried laminated wood. The corners of cottages and luxury housing are fastened to a secret tenon; the technology is used in the design of facades, interiors, furniture manufacturing, the main advantages of fastening:
- The structures are easy to assemble and disassemble; you can purchase an industrial house disassembled and assemble it yourself;
- The corners of buildings are durable and airtight; this method of assembling corners is called a “warm corner”;
- The front side is not processed, the uniformity of the wood texture and the absence of cuts make the façade of the building attractive;
- The fastening can be strengthened with construction adhesive.
For beginners, the easiest option is to connect profiled timber using the butt method. The ends of the beams are cut evenly and fixed at the corners using steel brackets or plates with spikes.
Butt connection of beams
To strengthen corners assembled end-to-end, dowels are often used - vertical rods made of hard wood (oak, birch, hornbeam).
Joining timber on a straight flat key (dowel)
The optimal joining option is the “warm corner” method, also called the “root tenon” connection. At the end of the beam, an internal protrusion-spike is cut out, which protects the seam from blowing and increases the strength of the corner.
A common corner joint method is the dovetail. It differs from the root tenon in its trapezoidal shape, which makes the contact area of the beams denser and more rigid.
Fastening the crowns
For inter-crown connection the following fastenings are used:
- nails, screws and metal pins;
- steel staples;
- dowels, dowels and insert tenons made of wood;
- profiled and laminated timber can have milled locking joints.
Metal fasteners
The photo shows a special self-tapping screw for attaching crowns.
This fastening method is the fastest, simplest, and inexpensive, but it is not reliable enough. When using such fasteners made of ferrous metal, the steel begins to rust in areas where it interacts with wood.
This leads to destruction of the fasteners and frame.
- Typically, steel pins with a cross section of 0.6 cm or special nails without a head are used here. The main volume of loads acts at an angle to the axis of the clamp. Because of this, the nail head is not needed.
- Before installing the fasteners, the crown is drilled to a depth slightly exceeding its level.
Note! As for screws and staples, they are an additional or temporary way to secure parts. When applied to wood, such metal fasteners are not aesthetically pleasing, unreliable and short-lived.
Wood analogues
Pins for inter-crown fastenings.
In this case, the metal fastener is replaced with a wooden rod having a square, round or polygonal cross-section. The instructions warn that this fastener is driven into a hole made in advance in the wall element. An element of the top row of the frame is placed on its protruding section.
This fixation is simple to perform, but strong, durable and reliable. For the production of dowels, durable deciduous wood is used: ash, beech, oak.
Note! Such timber studs must have a moisture content level less than that of the building element. The direction of their fibers should be perpendicular to the elements of the frame.
Varieties of corner fastening without residue
There are two types of corner installation without residue:
- “paw with a cut”;
- "dovetail".
Let's look at them in more detail.
Dovetail connection
"Paw with a cut"
“Paw with a cut” implies the presence of a complex groove system responsible for the unshakable fastening of raw materials to each other. The method is difficult, but highly effective. A protrusion is cut on the surface of the paw. It should show off at the inner corner of the object.
A hole is cut out from the bottom of the crown (of course, the top one) for the previously made tenon. After which the structure is connected. This option is reminiscent of constructor assembly. A structure connected in this way will provide you with safety, solidity and excellent appearance.
"Dovetail"
Fastening the dovetail beam is a rather complicated, but durable and beautiful angular installation method. The option involves interlocking two logs with specially shaped teeth. The beams are directed at right angles to each other: one has tenons, and the other has grooves. This “lock” provides reliable fastening without any gaps and gives the log house stability.
Construction of a log house
Not everyone knows that the construction of wooden houses has its own nuances:
- Correct placement of the first crown. Experts evaluate the quality of construction by the condition of the first 2-3 crowns of the log house. If they are different in color, have cracks or fungus appears on them, this indicates a violation of the construction technology.
- Thorough waterproofing. The higher the quality of the waterproofing layer between the foundation and the first crown, the lower the likelihood of wood being damaged by fungus, the appearance of mold and dark spots.
- No cracks. How to build a house from timber so that it is comfortable and heating costs are minimal? For this purpose, timber should be selected as carefully as possible, avoiding the formation of cracks or bulges on the walls. Inter-crown insulation must be laid between each row. This can be modern roll material. And for connoisseurs of environmentally friendly designs, an alternative solution would be to use moss.
- Nageli. Unlike construction made of brick, foam block or cinder block, when constructing wooden houses, the use of dowels is mandatory. They give the structure additional rigidity.
- Okosyachka. A necessary condition for creating door and window openings. It prevents the door frame from deforming, and also makes the frame more durable and gives the finished structure an aesthetic appeal and a finished look.
You can get advice on how to assemble a house from timber from a company specializing in construction from natural wood. To do this, you can visit the office of a large company and, under the guise of a buyer, ask a specialist all your questions. It will also be useful to inspect the construction site where the timber house is being built.
Methods for fixing materials together
The construction of structures from wood material has been successful for thousands of years. During this time, several optimal and ingenious options for fastening raw materials in the corners and longitudinally (that is, lengthwise) were developed and implemented, which are relevant for both profiled timber and regular timber.
As was said, when constructing an object, the beams can be fixed to each other along the length and at the corners. What's the difference? The fact is that corner fastening is used in the construction of solid walls and attractive internal partitions in the room. A lengthwise fixer is used when the material needs to be built up. Like this? Well, look: there is a log 4 m long, and the size of the wall indicated in the project is 6 m, in this case, you need to lengthen the raw materials.
Types of mates
There are several types of joints that differ in the position of the elements in the frame and among themselves. They are presented in the table below.
| Type of connection | Application |
| Transverse interventional | Serves for fastening beams located in adjacent rows (crowns) of a log house. Prevents elements from moving horizontally. Prevents the upper rows from moving and rotating due to gravity. |
| Longitudinal end | It is used to increase the length of timber for large house sizes within the boundaries of one row. Prevents the displacement of elements along the longitudinal axis and the appearance of cracks between them. |
| End fitting at the corners of the log house | Necessary for fixing beams in the corners of the building. Prevents the displacement of walls and their elements relative to each other. Interferes with changes in the design degree of angles. Prevents the expansion of gaps between the crowns, the creation of “cold bridges” and drafts. |
| T-shaped | Serves to connect partitions to each other or to external (load-bearing) walls. |
Half swallowtail
With this connection, the tenon is sawed down into a cone. The characteristics of the half dovetail connection do not differ from the knot described earlier. But the strength indicator increases. The conical cut securely holds the beams and prevents them from moving apart. This connection is used in the construction of walls with a length greater than the length of the beam.
We suggest you read: What you need to know about a gas sauna stove before buying it
There is no difference in the complexity of manufacturing when joining a half dovetail and a straight tenon. Both methods are performed with or without a template. For an experienced professional, the difference in the labor intensity of making these joints is almost imperceptible.
The half dovetail tenon should not be more than 5cm at its widest point. Otherwise, a crack will appear in the timber with the groove. This happens due to uneven shrinkage. The picture shows this place.
If the half dovetail spike is more than 5 cm
Vertical installation of wooden beams to a concrete surface
Fastening wood to concrete vertically is used for internal work when arranging sheathing for finishing a wall with plasterboard, or externally when arranging a ventilated facade.
Dowels without a plastic sleeve are available for sale and can be screwed into the wall. The cap has an asterisk imprint instead of a cross, so the torque is more powerful. In practice, it has been shown that a dowel with a diameter of 6.5 mm is used for drilling; only an element with such dimensions can be screwed to the end.
Algorithm for performing the work - how to properly attach a wooden block to a concrete wall:
- Place the rail against the wall and check the verticality using a level.
- Drill a hole with a diameter of 6 mm through the timber.
- Insert the plastic sleeve.
- Hammer and tighten the self-tapping screw.
It is necessary to install a level vertically on the gaskets: on the outside - plastic, and on the inside - MDF.
The technology for performing external and internal operations is the same.
Sealing through holes and holes from hardware in a concrete wall
Methods for sanding walls after puttying for finishing
Technology for attaching Mauerlat to aerated concrete
Diamond cutting technology for concrete walls
Types of corners in a log house
Corner joints can be “with remainder” or “without remainder”. The difference is in the ends of the timber, which will either extend beyond the frame or not.
Connecting corner beams with the rest is more expensive (material consumption increases). But the heat capacity and protective functions of such an angle are higher. The most used option for fastening timber with the remainder is “in the fat tail”.
Connection without residue
The splicing of timber without any residue is carried out using several types of knots: “into the bowl”, “into the okhop” or “into the okhryap”. The most common option is in a bowl.
Bowls in timber are made on a special bowl cutter or manually using a saw. The specialists have a mobile cup cutter that they can carry out work right on the construction site. The timber is laid one bowl on top of the other. Felt or jute insulation is laid between them.
The connection of the beam “into the clap” is similar to that “into the bowl”, but differs in the location of the drink. The bowl is cut from the top, not the bottom.
If we compare it with the main types, the connection “in the okhryap” is similar to the “in the paw”. Only in this design the end of the beam is removed, thereby forming an angle without a protrusion. The beam is connected to such a corner using dowels and crosscuts. This type of connection does not have high wind resistance, so often a straight cut is replaced with a trapezoidal one.
Any connection must be discussed with specialists, since the choice must be based on the design features. For profiled timber, connections in length are allowed only according to certain parameters, in accordance with GOST 30974-2002 “Connection of corner wooden and log low-rise structures. Dimensions, design and classification."
Any connection breaks the tightness of the walls, so before installation you need to lay a special insulation and treat the joints with antiseptics, since this will be difficult to do in the future, especially with profiled timber.
There are two main types of log frame corners:
- "without a trace"
- "with the remainder."
When starting construction, you should decide what kind of building it will be, what load the foundation and walls will have to bear, and, accordingly, what kind of timber connection in the corners should be chosen in each specific case.
We invite you to familiarize yourself with: Warm floors in the bathhouse - do-it-yourself options
Considering that correctly set corners are the key to the strength and reliability of the entire structure, corresponding requirements are also imposed on them. This:
- Reliability of fastening. The corner of the house, regardless of how it is constructed, should not be made of lumber with cracks and splits. Wood for construction must be taken with a drying level of up to 20%, which ensures its ability to withstand deformation and environmental changes without damaging the structure.
- Air tightness. The absence of cracks that allow drafts to enter the home is the main requirement for wood corner joints.
Connecting corners to build a house made of timber is divided into:
- Angle with remainder.
- Angle without remainder
The corner connections of the house with the remainder are also called “in oblo”. The design of the unit is key, it can be assembled in several types:
- One-sided.
- Two-way.
- Quadrilateral.
Lap knitting is a universal connection of lumber, used when laying walls made of logs and timber. The workpieces are placed at right angles into cut-out grooves; the size of this groove depends on the size of the material used. Such a lock is used in the construction of log houses and ceilings, the construction of bridges, and the construction of canopies. The main methods of cross fastening:
- Half-tree connection;
- Quarter and third wood joint;
- Notch in one row.
The most widespread cross-shaped connection in half a tree is when cutting corners into a bowl; it is used in the construction of utility structures, residential buildings and baths. The structure is reinforced with building brackets, dowels and dowels.
A variation of the cross-shaped connection is the method of fastening the beams together without any residue; in this case, the two sides of the cross-shaped connection have no continuation. This connection is used when laying corners and is called “no residue in the paw.” Cutting a castle without leaving any residue does not require the use of special tools; the construction of a log house using this method is popular among individual developers.
A more complex method of corner mounting is dovetail installation; a dovetail lock is a reliable but complex fastening. Marking and complex cutting of such a connection requires professional skills; the technology is widely used in the construction of low-rise economy class housing.
Metal fasteners for timber
Fasteners for timber are special elements made of alloy alloys, used to connect wooden structures. They can be either domestic or foreign made. Among the many fasteners, one can distinguish complex parts: supports, angles, couplings and washers, and simple elements: anchors, screws, nails and staples.
Complex fasteners
The support is a perforated fastening part made from a steel profile with a thickness of 2 mm and subjected to the application of an anti-corrosion layer of zinc. It is an angle-shaped structure and is used to fasten floor beams to the wall of the house. Based on the type of structure, the support can be divided into open and closed type fasteners. It is connected to the timber with screws, self-tapping screws or nails. Supports are available for all sizes of timber.
The coupling with washers consists of an M20 nut with a stud welded to a metal plate. The main purpose is to compensate for timber shrinkage.
Connecting angles are made from rolled sheets with a thickness of 2 mm and are galvanized. Corner fasteners are available in a perforated version with a length from 120 to 175 mm. The choice of products is carried out depending on the weight of the structure.
Simple fastening
Pins can be metal or wood. Reinforcement is used as a material for production. They are used to fasten crowns of timber to each other. Metal dowels have high strength and are able to prevent any deformation of the timber. However, due to the corrugated surface, which can disrupt the structure of solid wood, and the incompatibility of metal and wood, it is more advisable to use wooden dowels.
They are usually made from birch or other hardwoods. The strength of wooden elements is almost as good as that of metal products, but they are ideal for a house made of timber, preventing its deformation. Dowels are made from round and square wood.
Spring unit “Strength”
The product is a bolt with a spring and wood carving, made of high-strength anti-corrosion alloy. Fastening the beam with such an element as the “Force” Knot ensures the strength and stability of the connection, and the absence of deformation and torsion. In addition, the product additionally loads the rims themselves, which prevents the formation of cracks and gaps during the shrinkage process. The recommended installation of fastening units per beam is at least 4 pieces.
Nails, metal staples
Nails, as well as metal staples, are good fasteners, but not for timber. Using them to connect timber is a mistake. Nails corrode and become unusable, thereby damaging the wood. Based on these disadvantages, the use of nails and metal staples should be abandoned.
Since any structure is firmly held together with nails, it is better to use them to connect parts rather than knock together walls.
Wooden type - has properties such as absorbing and releasing moisture, so the connection of the timber must be movable.
Longitudinal material connection
Figure 4. Butt and overlay joint.
One of the main disadvantages of timber is its length limitation. The standard dimensions of manufactured products range from 4 to 6 m. For long walls or when using scraps, it is necessary to make a longitudinal connection. Such connections are undesirable in the construction of capital walls due to possible deformation. If it is necessary to install longitudinal joints in several rims, they cannot be placed in adjacent rims along the same vertical line. For internal walls, there are no restrictions on splicing timber due to a more stable temperature regime.
When splicing timber along the length, use a central tenon or various joints with a lock. The straight lock is most often used due to the simple manufacturing process. Samplings are made in the timber to the extent of half the thickness of the timber. The resulting surfaces are available for processing and can be carefully adjusted.
A beam connection that is reliable against displacement can be obtained by using a central tenon. The nest must be made slightly longer than the length of the spike. The length of the tenon should be twice the width of the beam. To connect more firmly, you can install two spikes.
Extension of the beam can also be done with an overlay. The overlay connection can be oblique or straight. Types of connections can be seen in Fig. 4. The ends of the products must be given the selected shape and placed in place. Subsequent crowns will compress and secure the connection with their weight. When extending beams in main walls, it is advisable to use a combination of various fasteners. Products fitted to the overlay connection must be additionally secured with one or two wedges. A view of a wall with spliced timber can be seen in Fig. 1d. All connections must be sealed with sealing material.
Assembly Recommendations
Treating logs with antiseptic impregnations
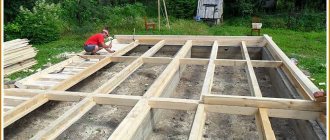
When installing a subfloor in a house, it is very important to choose only high-quality strapping timber. During the operation of the coating, it will be the one that will experience the heaviest load.
And if the quality of the wood or fastening is mediocre, the base can easily become deformed
In the process of assembling timber strapping, experts pay attention to the following points:
- The timber must be precisely calibrated and sized;
- To eliminate the possibility of wood rotting, the timber must be treated with an antiseptic;
- When assembling the frame in a frame house, it is advisable to give preference to logs made of coniferous wood (they are less hygroscopic);
- The timber frame must be laid clearly horizontally, otherwise some of the parts of the structure will experience a large load during operation;
- You can fasten the strapping logs to the support posts using clamps, metal brackets, anchors and U-shaped galvanized profiles.
Altitude bonding
When constructing wooden walls and partitions, masonry made from solid timber of natural moisture is reinforced with dowels, staples or “coupling” fastening. The corrugated timber has increased adhesion; reliable adhesion of the crowns is ensured by the tongue-and-groove connection.
The most common construction operation for height bonding is the construction of walls. Dowels with a diameter of 25-30 mm are used as connecting elements; one dowel holds together several crowns. To fix masonry made of corrugated timber, dowels are required 2-3 times less. The dowel connection is reliable and retains its properties throughout the entire period of operation of the structure.
With the help of fastening “on the coupling” they prevent deformation and the formation of cracks when the lumber dries, the screw tie creates an adjustable vertical tension.
The nuances of selecting and connecting crowns of the first and second rows
First of all, the selected timber must be absolutely flat. After the material is on the foundation strip, covered with two layers of roofing material, you need to arm yourself with a good building level, preferably with a hydraulic circuit, and check the position of the first crown. You cannot make a connection without making sure that the first crown is perfectly horizontal.
Almost always, masters will be disappointed. The supporting surface of the foundation strip is far from plane and has a slope towards one of the corners. Therefore, if you simply make a connection using anchors embedded in concrete, the first crown will turn out to be crooked.
Even if you try to compensate for the deformation by adjusting the joints in the locks at the corners, this will only worsen the situation; due to shrinkage, huge gaps will appear between the timber crowns. Therefore, before fixing the first crown, the beams are leveled horizontally using wooden pads.
For your information! To ensure the tightness of the connection between the timber and the foundation, the space between them is filled with foam, and after 10-15 minutes the nuts on the anchors can be tightened.
Particular attention should be paid to laying the timber and assembling the corners. The first row must be not only strong, but also flexible, therefore, in the starting crown, an end connection on a key is used in the corners, and metal corners are installed on the inside.
Methods for fixing materials together
The construction of structures from wood material has been successful for thousands of years. During this time, several optimal and ingenious options for fastening raw materials in the corners and longitudinally (that is, lengthwise) were developed and implemented, which are relevant for both profiled timber and regular timber.
As was said, when constructing an object, the beams can be fixed to each other along the length and at the corners. What's the difference? The fact is that corner fastening is used in the construction of solid walls and attractive internal partitions in the room. A lengthwise fixer is used when the material needs to be built up. Like this? Well, look: there is a log 4 m long, and the size of the wall indicated in the project is 6 m, in this case, you need to lengthen the raw materials.
disassemble and assemble structures, make temporary flooring.
Reinforced floors are used in warehouses, sports and entertainment complexes. To hold lumber together indoors, synthetic glue is used; when finishing the interior, the timber is fastened with a longitudinal dovetail key.
Conclusion
When constructing cobblestone buildings for various purposes, quite a few types of interfaces are used. They have different levels of strength and reliability, as well as manufacturing complexity. This must be taken into account when choosing one or another type of timber fastening.
It should be taken into account that the fasteners can be either metal or wood. The last option is more preferable. The video in this article develops and complements the topic with more visual points.
Do-it-yourself half-tree corner joints
Half-timber corner notch (overlapping) is the most common type of frame connection. Its logic is extremely simple: at the ends of both parts, recesses (folds) are cut out along the width of the counter part. The fold forms an edge and a shoulder - they must be perfectly smooth and strictly perpendicular to each other. In a high-quality connection, the surfaces of both parts fit tightly and form a joint without the slightest gap.
You can read about methods for precise fitting of carpentry joints in an article devoted to this topic.
Connection marking
Create markings for the fold selection. To do this, use a carpenter's square, a surface planer and a marking knife.
Measure the length of the edge along the width of the mating part. Draw marking lines on the edges. Set the thicknesser to half the thickness of the part and make side markings.
Advice! When creating carpentry joints yourself, use a sharp marking knife instead of a pencil. It will ensure high marking accuracy and the absence of marks on the finished part. In this case, the deepened line will become a convenient starting position for a chisel or auger saw.
Rebate cutting
Using a back saw, saw off the waste part on each part, carefully following the markings without strong pressure or jerking.
Using dowels
This method is an excellent solution for firmly connecting timber. In this case, wedges, also called dowels or dowels, are used. They are made from hard wood, such as aspen.
Wedges guarantee tight connections and allow you to build a warm house that can cope with any frost. The shape of the keys can be different: in the form of a prism, rectangle, dovetail, etc.
The grooves corresponding to the shape into which the dowels will be inserted are pre-made. This method of joining timber can only be done by professionals with extensive experience. Doing this work yourself is highly not recommended.
Joining the timber with the remainder
The easiest way to join timber in the corners of a log house is “into the floor of the tree”. A rectangular groove is cut, the dimensions of which depend on the thickness of the timber and are: The depth of the notch is half the thickness of the timber. That’s why it’s called “half a tree”.
The “tail tail” method is distinguished by the presence of an additional tenon, which provides a stronger and more reliable connection, but requires more carpentry skill. More difficult is connecting the timber into an okhryap. Here you cannot make a mistake when calculating the width of the jumper, but it is much easier to implement than on a log: the geometry here is standard and you can use a template, which significantly speeds up the work, and then an error can only occur when cutting.
We invite you to familiarize yourself with: Sauna and steam bath for and during colds 2019
Length splicing
Such options are typical for lumber if the wall of the house has a non-standard length. For example, the width of the house is 3 m and the length is 10 m. The standard length of the beam is 6 m, so it needs to be increased by 4 m.
For such splicing, knots are used: in the “floor of the tree”, an oblique lock, a longitudinal tenon with dowels, a root tenon. To strengthen and increase rigidity, the structure is stitched with dowels or other types of fasteners. You can read about fasteners for timber HERE.
Firmware is installed at the installation stage. A groove or tenon is made at the end of each link; in the case of a key, two grooves. You need to connect tightly, having previously insulated each joint.
It is not recommended to attach load-bearing walls to a “wood floor”. For such walls, a “root spike”, “swallow’s nest”, or an oblique castle is suitable. We have already spoken in more detail about these longitudinal beam connections HERE.
Features of connecting beams “in a dovetail”
Before sending the finished log house for assembly, it is treated with antiseptics and allowed to dry thoroughly. This measure will reduce the risk of unpleasant consequences if the wood gets wet.
The laying itself does not require any special measures: the logs are assembled according to a number-by-number scheme. The advantage of a log house with such a connection is the tight fit of the constituent elements. Logs need to be stacked on top of each other, additionally using waterproofing gaskets, for example, roofing felt or its modern polymer analogues. The seams are sealed with flax-jute only after construction is completed.
After some time, the logs dry out, including the castle, which is a bridge of cold
To prevent heat from escaping from the premises, it is important to promptly caulk the resulting gaps and insulate the corners with any modern insulation materials. For interior decoration, professionals recommend using mineral wool slabs
It is advisable to carefully waterproof external corners with sheathing, such as siding. It protects the timber from any negative environmental influences.
Loghouse installation technology
Lower junction to the foundation
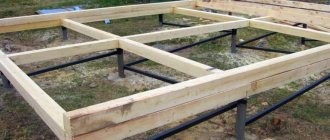
After the material has been selected, purchased and delivered to the site, you can figure out how to build a log frame. And we will start work from the foundation - installation of the casing crown.
What do the instructions from experts in working with wood advise us to do?
Before laying the first crown of timber, it is necessary to perform high-quality waterproofing of the base. Whatever our foundation, we lay either two layers of roofing felt or a special waterproofing membrane on its upper surface.
- We lay a lining beam on top of the waterproofing layer around the perimeter of the entire base. To make this, this tree is characterized by maximum resistance to moisture.
- The thickness of the lining beam must be at least 100 mm, and the width must be at least no less than the width of the main wall beam.
- Sometimes a profiled beam is used as a lining, cut in such a way that it rests on the base not with the tenons of the castle, but with a plane. In this case, installation of an additional lining is not required, but the waterproofing properties of the structure will suffer somewhat.
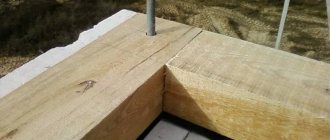
- At the corners of the structure we connect wooden beams “in half a tree”. This allows you to achieve maximum joint strength.
We thoroughly impregnate the backing beam or the first profiled blank with an antiseptic agent (Tikkurila, Senezh, etc.). In principle, if finances allow, it will definitely not be possible before installation begins.
We lay a jute sealing tape on top of the timber. If you are choosing how to lay the timber, you should keep in mind that too thick material is just as ineffective as too thin: in both cases, the risk of blowing increases. For a flat beam, a tape thickness of 10 mm is sufficient, and for glued profiled timber – 5 mm.
To avoid displacement, we fix the jute on the beam using a construction stapler.
We attach brackets to the inside of the lower crown, on which we lay the floor joists. The lower plane of the logs should rest on foundation elements or special cranial bars.
In principle, logs can be embedded into the crown, but if we are talking about how to build a bathhouse from timber or build a house on relatively moist soils, then it is better to act according to the first option. This will make it easier to replace a rotten log with a new one.
Timber fastening technologies
After the first crown has been erected, you can begin laying the beams for the set of walls.
There are several nuances to consider:
In principle, high-quality dried glued laminated profiled timber can be mounted without any connecting elements at all, fastening it into a lock only at the corners (we will talk about corner connection technology a little later). But, nevertheless, to increase strength it is better to connect the workpieces.
- For connections, dowels are used - metal, wooden or plastic pins. It is best to use wooden walls, and even those with the same humidity as the wood itself.
- A hole for the dowel is drilled to connect no more than two beams: the upper beam is “stitched” through, and a nest of half its thickness is formed in the lower one.
- The diameter of the hole should be equal to the diameter of the dowel - so that the fastening element is driven into the wood with slight force by blows of the mallet.
Cutting corners
Corner connections of timber can be made in several ways.
Some of them provide for the protrusion of the workpiece beyond the plane of the wall (connection with the rest), others do not.
- The parts are connected to the rest by cutting out a recess in the workpiece - a bowl. A second beam is placed in this bowl, which can be either solid or with a corresponding cutout. The most popular connection schemes with the remainder are “into the bowl” and “into the bowl”.
- The most common technology for joining without residue is the “half-tree” joining. In this case, protrusions are formed at the ends of the beams, the thickness of which is equal to half the thickness of the parts being connected.
Another method of corner connection is the so-called “warm corner”. This technology involves cutting a vertical groove on the side surface of the beam, into which a corresponding sized tenon is inserted at the end of another element.
Windows and doors
Speaking about the construction of walls, do not forget about window and door openings:
- The openings themselves are either cut out in already laid walls, or are provided for in advance by the design (if we purchase the material as part of the so-called house kit).
- In order to maintain the shape of the openings during shrinkage, we cut special strips into their side surfaces - the so-called ribs.
- Above window and door frames, we must leave a shrinkage gap of at least 50 mm.
Connecting logs in a log house
The construction of log houses using logs is carried out more often than using timber. The connection of logs has technological differences. The requirements for connections are the same - strength and tightness. Let's look at the main ways to make connections along the length and in the corner.
Method of corner connection with the remainder “in the area”
You can connect the remaining logs in the log house using any of the following methods:
- in the region;
- to the clap;
- in a huff.
The first method (“into the cloud”) or “into the bowl” is the simplest. At the same time, a bowl-shaped hole is prepared in the log. Its dimensions must be such that the attached log fits tightly into it. Accordingly, the transverse log must have a bowl or “burl”. Corner connections “in the area” are divided according to the type of execution into options:
- half a tree;
- oval comb;
- in the fat tail.
The most affordable version is a wooden floor bowl. When laying logs, the following must be considered.
- The logs will be stacked more densely if, in addition to cutting out the “obla,” a longitudinal groove is cut along the upper part.
- The groove is filled with flax wool: it will serve as insulation.
- Laying the logs of each subsequent crown is carried out after fixing the transverse logs.
- The strength of the structure is achieved through dowels connecting the upper and lower logs. A dowel is a long wooden dowel with a round or rectangular cross-section.
Connecting logs “in a fat tail”
The fat tail connection is a complex version of the fat tail method. The comb in this case is oval-shaped, and an additional protrusion is placed at the bottom of the bowl, which should be oriented along the log. At the bottom of the recess there is a special recess for the fat tail.
Connecting logs “in a clap”
This connection option is performed similarly to the methods described above. The difference is this. The bowl is cut down at the bottom of the log (with the “in the boulder” method - at the top). To do this, prepare a corner for laying the logs. The end of the previously laid log needs to be slammed down (this is the essence of the method).
Connection "in the okhryap"
With this method, straight recesses are prepared in the upper and lower parts of the log (at the junction), each with a depth of ¼ of the diameter. The method is convenient for use if it is impossible to use other methods of joining logs.
Joining logs in corners without leaving any residue
With this connection method, there is no part of the log protruding beyond the outer perimeter of the wall. For a reliable connection, a “cut” is required: the ends of the logs are fixed with spikes. To prevent the cut from being blown by the wind, the horizontal planes of the cut are made inclined. This connection is called a “dovetail”: the wedge-shaped part of one log is wedged between two inclined planes. If it is necessary to attach a partition to the wall, a T-shaped connection is made. The end of the partition log is given the shape of a truncated cone, at the base of which is a square. The outer part of the cone is expanded. A similar recess is cut out in the corresponding part of the wall. The connection will be reliable due to the jamming of the parts.
Upper frame frame house
This component is installed to reduce the load from accumulated snow transferred to the rafters and walls. Also, the top trim allows you to evenly distribute the weight of the roof. To simplify the work, the upper and lower trims are made from identical materials.
The harness can be secured using metal corners or notches. Having resorted to the second method, it is necessary to calculate in advance the length of the rack, taking into account further cutting.
The strapping beam has special grooves designed for attaching racks. It is worth noting that the grooves must be identical to the grooves located on the lower trim. Nails are used as additional fasteners. The racks can be attached to the beams using angles and self-tapping screws.
Mauerlat takes on the vertical and horizontal load exerted by the rafter system. In this case, the horizontal load is distributed to the walls. In most cases, fastening occurs using a notch. After this, the structure is further strengthened with nails on both sides. You can additionally use corners as fastening elements.
Basic principles and provisions for laying timber
When docking, you must have the following tool:
Corner connection of half-timber timber with insert dowels.
- electric drill;
- Bulgarian;
- plane;
- hacksaw;
- chisel;
- hammer;
- sandpaper;
- ruler;
- calipers.
The joining operation during the construction of a wall is carried out in two cases: making (linking) the corners of the house and weaving (building up) the beam along its length. A particularly important process is joining in the corners. During its implementation, the reliability of the structure, its dimensions and the quality of the entire wall, as well as the design, are laid down. There are two types of corner joints: with a remainder and without a remainder. Laying with a remainder is based on the fact that the end protrudes beyond the corner joint by a certain length. The main advantage of this type of work is the unique wooden insulation of the corner of the house, which is especially noticeable in the wind. In addition, this design creates a certain design that has its fans.
Plexus without residue implies that their ends are located in the same plane with the surface of the wall. The main advantage is reducing the size of the house and saving material during construction.
Claymers - what are they?
The term clamps means a fastening in the form of a steel bracket used for mounting imitation timber, eurolining or block house. The material from which they are made is iron with a galvanized surface that protects the product from moisture. The clamps must be mounted on the sheathing profile using self-tapping screws.
Advantage of using
Regardless of the fact that a clamp is more expensive than self-tapping screws and nails, it is recommended to use it for fixing imitation timber. Installing boards using this fastener provides a number of advantages:
- reduces time spent on work;
- the outer side of the panel is not subject to possible damage (cracks and chips from screws or nails);
- fixation with clamps is quite simple, all work can be done with your own hands;
- the material from which they are made is not subject to corrosion, which suggests reliability;
- Wide selection of fasteners of different sizes.
When choosing clamps in a hardware store, you should pay attention to some nuances:
- metal strength;
- integrity of galvanized coating;
- correspondence of product sizes in one batch.
Material calculation
You need to understand that high-quality cladding of a house with imitation timber depends on how and with what the boards are secured. Proper finishing requires the right number of fasteners. Before starting work, it is recommended to purchase clamps in the required quantity. There are two ways to make the calculation.
First calculation method
For an approximate calculation, let’s take the following values: finishing 1 m2 requires 20 clamps. The total quantity can be calculated knowing the dimensions of the surface that needs to be sheathed (we multiply this value by the total area of the facade and get the value we need).
Second method of calculation
The method of calculating the material is used if the facade of the house has a large number of decorative protrusions. It uses the calculation of the fastener pitch and takes into account the specific installation location of the block house:
- straight facade, with a distance between the sheathing profile of 40 - 50 cm - 4 pieces are consumed;
- roof edges with a distance of 35 cm - 5 pieces;
- finishing corners at a pitch of 25 cm - 6 pieces.
In addition to the clamps themselves, you should consider purchasing additional elements for fastening them (screws, nails). Their calculation can be made based on the following scheme: 1 clamp requires 2 - 3 screws.