Recently, car owners have begun to build garages made of wood. They are not only beautiful in appearance, but also easy to install, and do not harm the family budget. This design will look especially beautiful against the background of a wooden residential building and the same auxiliary buildings, including a bathhouse.
Building a wooden garage yourself is not difficult - you need to have basic construction skills, special equipment, free time and desire.
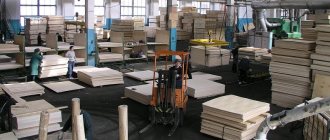
- Bottom harness
- Gable roof
Types of wooden garages
Wooden garages may differ in the material used: you can use rounded logs, boards or timber. Such structures come in such designs as solid and frame.
The frame option is considered the most acceptable, since after it is insulated, it will become a durable and practical structure and will last longer than the same brick or block structure. Its advantages also include:
- ease of installation;
- low costs;
- efficiency in construction;
- building materials are light in weight and volume, so specialized equipment is not required.
Photo
In the provided photo gallery, you can see various options for building a wooden garage:
Stages of garage construction
The entire process of constructing a garage goes through certain stages that must be followed.
| Stage 1 | Design |
| Stage 2 | Choosing a place to build a garage |
| Stage 3 | Foundation arrangement |
| Stage 4 | Construction of the frame |
| Stage 5 | Interior work (cladding and finishing) |
| Stage 6 | Roof installation |
| Stage 7 | Gate installation |
| Stage 8 | Electricity and heating |
| Stage 9 | Paperwork |
Design selection and drawings
Before actually building a garage, you need to choose its appearance and assembly method.
Main types of structures:
- frame;
- national team;
- log house
Frame construction is a modern way of construction. The plane of the frame looks like a chessboard. Also, the internal floors are filled like cells, which increases the strength of the structure.
A prefabricated timber structure is constructed from a parallelepiped to which boards are attached on both sides. This is a fairly simple way to install a garage.
The log house is the most expensive structure of those listed. It is aesthetic and goes well with other buildings. The monolithic design ensures strength, and installation takes no more than a week.
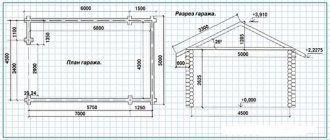
After choosing the type of structure, you need to calculate the dimensions of the frame, gate, and select the type of roof. For convenience, a clear construction diagram with all calculations is required.
Garage design
To avoid errors during the construction of a building, it is necessary to develop a garage design before starting construction. It indicates, first of all, the desired dimensions of the structure. Then you need to decide on the material in order to choose the right type and shape of the base. The choice of foundation is also influenced by the properties of the soil. Then we decide on the ceiling, rafter system and roof slope. Select the type of floor filling.
Garage drawing and project
A project is a combination of all technical aspects of construction. Thanks to it, you can accurately calculate the amount of material needed.
Required Tools
Construction will require both power and hand tools.
When constructing a frame, wood is used, which determines the choice of tools.
Power tools
- Circular (circular) saw. The Hitachi C7MFA-4800 is considered the most durable.
- A screwdriver with two batteries with a power of at least 19W. The optimal choice is “AEG BS 12 XR LMB-3200”.
- Chainsaw. The best budget one is Echo CS-3500-14. Average price 7100 rub.
- Concrete mixer with a capacity of at least 140 liters. Necessary for pouring slab or strip foundations. To build a columnar structure, manual mixing of concrete will be sufficient.
- Angle grinder (grinder), 125 mm.
- A miter saw required to make cuts at a specific angle. Circular will not cope with this task. The purchase of a miter saw quickly pays off in the speed and accuracy of the work.
- Pneumatic nail hammer (optional).
- Sharpener for sharpening hand tools.
Advice! Those who have experience in building frames themselves do not recommend buying a jigsaw. This tool is useless for most jobs and is completely replaceable with the existing manual and electric ones.
Hand and measuring tools
- High-quality bubble levels in lengths of 200 and 60 cm.
- Tape measure with a tape length of at least 8 m.
- Chalk painter's lace.
- Hammers for 500 and 1000 g.
- Two hatchets, small and medium.
- Mount.
- Ticks (medium and large).
- Shoe knife.
- Set of chisels.
- Wood saw.
- Containers and shovels for excavation and concreting.
How to choose a place for a garage
This is an important component of the construction process. If the location for the garage is chosen incorrectly, this can lead to disastrous consequences.
When choosing, you should consider the following nuances:
- how and from where the car will enter the garage;
- how many cars will be in your garage (if the space allows, you should not limit yourself to one parking space, because the family may get a second car, and guests may also come);
- the area should be as level as possible, without sudden changes;
- There should be no trees or shrubs growing on the site or litter lying around.
Choosing a location for a garage is a very important step.
Before proceeding to the next stage of construction, the ground on the site must be well leveled and thoroughly compacted.
Finishing touches: garage interior decoration
Interior decoration can be completely varied. Provided that the garage is insulated, any material can be used without any restrictions. But you should understand that the walls in the garage will get dirty, which means they should be easy to clean. You also need to remember that mechanical damage will be “in the order of things” for them. Therefore, it is better to sweep away the plastic panels immediately. The tile finish looks good, but the cost of such cladding will be significant.
A more budget-friendly option is with clapboard, but it must be coated with wood varnish. In this case, any dirt and stains of fuel and lubricants will be easily washed off.
And we offer to look at the interior decoration of garages, done by craftsmen on their own, without the involvement of specialists.
1 out of 10
PHOTO: yandex.com PHOTO: dekoriko.ru
PHOTO: tunesies.online PHOTO: twitter.com
PHOTO: scottcarrollinaugural.com
PHOTO: doma.life
PHOTO: drive2.ru PHOTO: adgnews.com
PHOTO: stroypomochnik.ru
PHOTO: remontnik.ru
Preparatory work
After developing the project, it is necessary to purchase and deliver to the construction site a certain amount of material. Since a garage cannot be built in one day, the boards must be stored. To do this, an aluminum or wooden temporary canopy is erected to shelter the material from possible rain. As a rule, polyethylene is stretched on top. It is worth remembering that the boards must be ventilated.
Board storage shed
Before starting construction, you should have a minimum set of tools:
- shovel;
- hammer;
- gloves;
- level;
- boards for formwork;
- gloves;
- drill;
- screwdriver;
- Bulgarian;
- brush;
- nails;
- plumb line
In addition to the above, boards and beams for the garage are required in a certain quantity. Moreover, when purchasing building materials, you need to pay attention to the following nuances:
- all boards must be of the correct size and shape;
- their humidity level should not exceed 10%;
- they should not have knots, cracks, or any deformation;
- complete absence of mold and blue stains.
Boards for garage construction
If you purchase boards with high humidity, then after a short time they will begin to rot and deform. Such boards can be dried, but it will take a lot of time, maybe even years, and the construction site will have to be moved.
Immediately discard twisted or bent logs as they have not been stored properly. Do not take logs affected by fungus. Take the length of the logs seriously. Their size must be the same, otherwise it will not be possible to avoid excessive consumption of material, and, consequently, an increase in the cost of the structure.
Key aspects for drafting
Before drawing up a frame garage project, you need to understand all the features of its structure. One of the main advantages is the speed of construction. The time spent on work is reduced significantly in comparison with permanent buildings. In addition, there are the following advantages:
- Possibility of construction at any time of the year .
- Fastening using bolts , which reduces work time.
- There is no need to use expensive heavy equipment to carry out the work.
- Small amount of garbage and waste , which also saves time.
Metal profile for a garage frame Source ar.aviarydecor.com
The only problematic issue that needs to be taken more seriously is the foundation for a frame garage. There are several options :
- shallow slab foundation;
- area previously covered with asphalt ;
- monolithic non-buried slab ;
- shallow tape
When deciding on the foundation, you need to take into account the type of soil. Here you will need specialist advice.
An important point is the choice of material for the structure. It should be remembered that a wooden frame garage has one significant drawback - a high degree of flammability. At the design stage, measures to ensure fire safety are considered.
See also: Catalog of garage projects presented at the Low-Rise Country exhibition.
Choosing a foundation for a wooden garage
You need to start with the markup. To build a frame structure, any foundation will do, since the structure is not very massive and will not put much pressure on the foundation. But the weight of the car, as well as additional equipment in the garage, will also play an important role. It is worth considering the construction of strip, slab, pile or columnar types of foundations. Corner points are determined for any type of base, but the installation principle is different for everyone.
Slab foundation for a garage with a basement
For marking you will need cast-offs and cords. First, one corner point is determined, marking cast-offs are installed at it, which look like pegs or crossbar boards. There should be eight such crossbars: two boards for each corner. If you plan to install a columnar foundation, the number of boards may increase.
Marking for strip foundation
Afterwards, all the pegs are connected with cords. These will be the future walls of the structure. If the base is of a tape type, then the cords are pulled in parallel - this will be the width of the tape. It is worth keeping in mind that the corners must be clearly straight. You can use the “Egyptian triangle” rule. When installing a columnar foundation, the installation locations for supports are additionally outlined.
Columnar foundation
Columnar foundation for a garage
It is quite simple to install, so it can be done without outsiders. This type of base is mainly chosen when it is intended to lay a plank floor in the garage. It is believed that a columnar foundation is a good option for a garage building. To construct this type of foundation, various materials may be needed: concrete blocks, brick, reinforced concrete.
Strip foundation
The frame structure will feel stable on it. However, its installation requires a lot of effort: installing formwork and making reinforcement. This takes some time as the concrete must completely harden.
Strip foundation for a garage
But this option, at the same time, is more acceptable compared to the previous one. This type of foundation has its advantages: the possibility of arranging an inspection hole. The floor can be plank or concrete.
If it was decided to make a wooden flooring, then it is necessary to build additional supports inside the strip base: brick or concrete pillars, wooden beams, pre-treated with bitumen mastic. The bars are dug into the marked places.
Supports for wooden floors
Slab foundation
Slab foundation for a garage
A rather complex foundation option. To build it, you must take the following steps:
- A pit is dug with the necessary parameters, with a depth of 20 cm to 30 cm. This is the space for the future sand cushion.
- The pit is filled with sand and compacted tightly. Then the sand is watered and compacted. The surface should become so compacted that a person’s foot cannot be imprinted on it.
- If necessary, sewerage and water supply systems are immediately installed.
- To prevent the sand cushion from deforming during further work, it is filled with a 10-centimeter layer of cement on top.
- The formwork is being erected.
- As soon as the screed has hardened, it is covered with waterproofing material on top. This can be a film made of dense polyethylene.
- A two-level reinforcement frame is made.
- Concrete is poured and left until completely hardened.
When building a garage, you can use a shallow slab type foundation. It is a little more expensive, but it automatically creates a floor covering that is durable and reliable.
Project, procurement of materials
Despite even the small size of the garage, before starting work you need to develop a project. At this stage, the type of foundation, consumption of materials, methods of fastening structures, etc. are determined. It is recommended to draw up a detailed drawing of the frame garage with references, heights, and the exact location of all parts.
It is important to consider how the lumber will be cut, since most of it is 6 m long. You also need to take into account the dimensions of the sheets of roofing material and sheathing so that a minimum of waste is left. If insulation is intended, the width of the heat insulation slab should be taken as a basis, so as not to cut it in place later.
To install the frame, dry planed boards 50 mm thick and 100-150 mm wide are used. The harness is made of timber 150x100 or 150x150 mm. For the rafter system you will need boards 40x100-50x150 mm, for lathing, bars 40x40-50x50 mm and an inch edged board, natural humidity is possible.
If the frame is made of metal, a 60x60-80x80 profile pipe is used for the racks with a pitch of up to 1200 mm, for the jibs 40x40-50x50 mm. You can use a less powerful pipe, but reduce the pitch. The actual cross-section should be selected based on calculations based on snow and wind loads in the region, the angle of inclination of the roof, and the weight of the finish, so these are general recommendations.
For cladding, OSB, DSP, corrugated board, boards and other materials are used. It is advisable to insulate with mineral wool, it does not burn. It is recommended to install polystyrene foam or expanded polystyrene under cladding made of non-combustible materials.
The roof is mounted from any roofing material - corrugated sheets, metal tiles, slate, seam sheets, etc. When choosing a rafter system design, you need to take into account the manufacturers' recommendations regarding the angle of the roof and the pitch between the sheathing. For example, soft roofing can only be laid on a continuous deck and with a minimum slope angle of 9°.
Galvanized nails, self-tapping screws, steel plates, staples, metal toothed plates, and glue are used as fasteners.
Making a frame for a garage out of wood
The frame can be made of timber, metal profiles, or a combination.
Garage frame on a strip foundation
There are several stages of its construction:
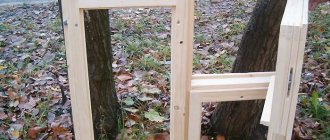
- Bottom trim device.
- Installation of vertical frame structures.
- Top trim device.
- Additional strengthening of the frame.
- Arrangement of the roof structure.
When manufacturing the frame, it is necessary to strictly follow the drawings and design.
Bottom harness
The foundation must be covered with waterproofing material. Most often, roofing felt is used for these purposes. This will protect wooden structures from constant contact with moisture.
Then wooden beams with the following parameters are laid and secured on the foundation pillars, strip foundation, slab base along the perimeter: 120x120, 120x150, 150x150, boards 50x120 or 50x150.
Laying the bottom trim of the garage
If the frame is made of metal, then a steel channel or a 100x100 square profile pipe is used. The beam, as a rule, is connected into half a tree. Anchor screws or studs are used that are mounted into the surface of the base. If metal parts are installed, they are connected by welding.
Wall frame
This procedure can be carried out in two ways:
- Immediately at the installation site. In this case, all individual elements are installed and fixed separately.
- Each wall is assembled horizontally on the ground, and then the finished structure is fixed vertically.
Methods for assembling a garage frame
Upper harness
It is designed to ensure that the frame and walls become a single, durable structure. The top trim is made using a beam or pipe, which will match the size of the wall frame.
Laying the top trim
Garage Frame Sheathing
The frame of the walls must have good strength, therefore, to increase this indicator, it is sheathed on the outside or on the inside using sheet material (OSB, plywood, corrugated board). As a rule, the sheathing is first done on only one side.
Primary garage lining
As for the insulation of the garage or its final cladding, all these actions take place after the roof is installed. To strengthen the structure, the primary cladding will be quite sufficient.
Suitable materials: wood, metal, sheets, panels
Unlike residential buildings, the garage has several features:
- It is not necessary to maintain a constant temperature at 18...25 degrees Celsius. According to SNiP 02/21/99, for heated garages 5 degrees Celsius is taken as the norm; for unheated garages this parameter is not standardized. At the same time, in case of frequent need for urgent departure, the use of heating is recommended;
- constant supply and exhaust ventilation is required. In fact, this requirement is only met for sealed rooms, since there is no possibility of natural ventilation;
- No sound insulation is acceptable. It is required only if the garage is adjacent to residential premises or there are recreation areas nearby.
There is a requirement that is just as important for a garage as for a regular home: high-quality waterproofing. Moreover, unlike residential buildings, here the requirements for a certain level of humidity are especially stringent, since even high-quality cars and other equipment (as well as materials and equipment traditionally stored in the garage) quickly corrode at high humidity and can fail.
It is impossible to meet fire safety requirements in garages made of wood and wood-based panels and slabs: even impregnation with fire retardants does not provide a complete guarantee of non-flammability.
As a conclusion, we can recommend the following materials for the construction of frame garages:
- timber, board, lining. Impregnation with an antiseptic and, if possible, a fire retardant is necessary; surface protection in the form of several layers of paint or varnish is desirable;
- wooden frame (timber, board) covered with OSB, chipboard, fibreboard, MDF, siding;
- rolled metal (profile pipe, angle, channel, strip) covered with slab materials or siding;
- rolled metal covered with corrugated sheets;
- mineral (stone, basalt) wool, glass wool as insulation or expanded polystyrene/foam for cladding.
For roofing, roll materials with mandatory overlap and additional waterproofing, as well as metal tiles, are often used.
Wooden garage roof
Basically, roofs in garages are made gable or single-pitch. The first option is more complicated and more expensive, but it makes it possible to create an attic space where various tools, materials, car parts, and household utensils can be stored.
To build a roof, you need:
- Make a rafter system.
- Sheathe the roof slopes with plywood sheets or make sparse sheathing.
- Cover the roof with roofing material.
Gable roof
The installation of such a roof can be done in two ways:
- assemble the structure on the ground, and then mount it on the wall frame;
- Fix the floor beams directly in place.
The second option is more time-consuming and complex, so many people prefer to go with the first option.
Gable roof covering
If the roof is installed immediately on site, then at the very beginning it is necessary to install the ceiling beams using timber. Afterwards, rafters are installed along the front of the building.
In places where the rafter legs intersect with the front pairs, a ridge board is used for fastening. Then the remaining rafters are installed at a certain distance. For greater strength, the rafter system is reinforced with board sheathing using OSB or plywood.
Garage roof with ridge board
Lastly, the roofing material is installed. If the structure is metal, then for the most part the roof is assembled on the ground, then mounted ready-made on the walls. Moreover, it is screwed to the upper trim using bolts or self-tapping screws. To make the fastenings strong, welding can be used.
Shed roof
This is a more primitive design, so there is no need to assemble it on the ground, but it is installed immediately on site. It must be borne in mind that when installing a pitched roof, one wall must be higher in height than the other.
The most correct tilt angle should be 15-20 degrees. But more accurate data depends on the type of roofing material. These indicators also affect the height of the opposite walls. After finishing the top trim, the rafters are laid on the front and side walls. Rafters are made of boards or timber. The boards are attached at the end.
Such structural elements are installed at the same distance according to previously established markings. A sheathing is fixed on top of the rafters, either solid or sparse (either a board or OSB is used). The final stage is roofing.
The process of laying a pitched garage roof
Frame construction
Wooden garage frame
A typical frame structure for garages of this type usually includes the following elements:
- base trim; frame racks; struts for racks; top trim.
The strapping is the simplest type of supporting structure, designed to secure frame posts, and is usually made of beams and boards. In this case, the boards and beams are installed so that there is a gap between them for the stand.
Frame racks are distributed along the perimeter of the structure at a distance of approximately 0.5 - 1.5 m from each other. To strengthen the skeleton of the entire frame structure, struts made of boards are installed on the sides of the racks, which cut into the frame the width of the board.
The top trim is cut into the frame posts using special spikes, and then attached to them using nails, anchors or staples.
Making a garage floor
It is best to tackle the floor when the roof is already installed and the walls are sheathed. This will prevent the boards from getting wet when it rains.
Plank flooring is generally not made from tongue and groove boards. Moreover, a small distance of 4-5 mm must be left between the floorboards. This is necessary to ensure that the wood does not deform. The boards are attached to the joists using self-tapping screws or nails.
How much does it cost to build a frame garage?
The main advantage of this building is its affordable cost. That is why many land owners prefer to use this particular design to create a garage. The cost of a small object made of wood using corrugated sheeting is approximately 100 thousand rubles. If a design is made for two machines or for a workshop, then the costs increase significantly.
The cost depends on whether wood or metal elements are used to create the frame. Additionally, the type of foundation is taken into account, since if it is monolithic, then you will have to spend more money on its creation than on creating a strip foundation. Sheathing has a direct impact on costs, so you can save a lot of money by using corrugated sheeting. If sandwich panels are used, the cost of the garage will be significant.
Which garage is cheaper to build: frame or foam block? If you use inexpensive wooden slats and corrugated sheets to create a frame structure, the garage will be cheaper than a structure made of foam blocks.
Insulation of a wooden garage
Thermal insulation can be installed both on the inside and outside of the garage. This depends on where the primary wall cladding was originally done using sheet material. But in any case, the insulation is installed between the facing layers.
To insulate a garage, you need to purchase one of the following materials: polystyrene foam (expanded polystyrene), mineral wool, spray polyurethane foam.
The easiest way is to insulate the garage with polystyrene foam . It has an affordable price, good thermal insulation qualities, but it is fire hazardous and flammable. Such material can be installed independently, without outside help. This does not require special experience or complex tools. You just need to get a construction or stationery knife. The slabs can be of different thicknesses, depending on the performance of the frame racks.
Wall insulation with polystyrene foam
You can also use mineral wool . This material is safer, but its cost is high. Moreover, its installation is complicated by the presence of prickly fibers, which negatively affect people’s health. Therefore, this insulation should be carried out exclusively with gloves and a respirator, as well as goggles, so as not to damage the skin of the hands and protect the eyes and respiratory tract. Mats or blocks are mounted between frame elements, which fill all the free space between the inner and outer cladding.
Insulating a garage from the outside with mineral wool
Recently, preference has been given to polyurethane foam spraying . This is the most expensive insulation option, as it requires special equipment. In addition, high-quality components and a special team with experience must be available. But this is the most effective method, since polyurethane foam completely fills all the voids, preventing cold air from entering the space. It combines perfectly with any material and has excellent thermal insulation qualities.
Insulation of garage with polyurethane foam spraying
Roof and walls
Wall cladding
To furnish the roof, a 100x25 mm board is used, which is sheathed with a pre-selected roofing material. Metal tiles or slate can be attached directly to a wooden sheathing, not forgetting to equip a hydro- and vapor barrier system to organize a comfortable microclimate in the garage.
A drain must be installed outside the roofing system, which can be made independently from a plastic pipe cut in two.
For cladding the outside of the building, you can use a special facade lining or a solid wooden board, pre-treated with impregnation to protect it from moisture. The inside of the garage is insulated with mineral wool, always laid with a layer of vapor barrier and covered with clapboard.
Garage exterior cladding
From the outside, the garage is sheathed with a variety of materials, depending on the preferences and financial condition of the owner. Vinyl or metal siding, as well as siding panels and wall corrugated sheeting, are considered the most optimal.
Externally clad wooden garage
Corrugated sheeting has an affordable cost, is easy to install, and prevents the penetration of moisture and ultraviolet rays. Sheets of this material weigh little, so they can be installed independently.
Garage made of corrugated sheets
As for vinyl siding, it comes in the form of boards or panels. The panels can take on the appearance of brick or masonry, giving the garage a richer look. A polymer or metal block house can give the garage the appearance of a varnished log house.
Garage with siding
Foundation structure
The advantage of wooden structures is that they are lightweight. So it turns out that to build them you don’t need to deepen the foundation much and make it particularly stable. You need to make a shallow monolithic slab foundation. The algorithm of actions is as follows:
- The base is being marked. Take pegs and rope. The stakes are installed at the corners of the future structure and tied with rope. Strictly ensure that the markings are even. It should follow the perimeter of the building. Foundation size – 6×4 m.
- Dig a pit according to the markings, going 15–20 cm deep.
- Level the bottom and make a sand cushion. To do this, pour a 10 cm layer of sand, moisten it with water and compact it.
- Lay formwork boards around the perimeter. The height is selected individually. 15 cm will be enough. The formwork is reinforced on all sides from the outside with boards.
- A waterproofing material (roofing felt can be used) is laid inside the garage foundation.
- A reinforcing mesh is laid on top of the waterproofing. It must be placed at a certain height from the floor. The reinforcement bars are Ø 12 mm, and the mesh cells are 20x20 cm.
- The foundation for the 6x4 garage can now be poured.
All you have to do is wait until the base dries. This will take at least a month.
Note! To reduce the cost of construction and make construction much faster, you can use a columnar foundation. Since the structure of a 6x4 garage is not heavy, it will do the job quite well.
Garage door installation
You can install any gate in a wooden garage: sectional, roller, lift-and-turn, swing plan.
Types of garage doors
The simplest type is a gate consisting of two doors, a swing type. You can make and install them yourself. For other types, you will need the help of specialists.
Swing gates can be wooden or metal. To create their frame, you need to have a profile pipe or beam, which must be sheathed using siding, corrugated sheets, metal sheets or boards. They are made in accordance with the opening, the costs are low, and if they are also insulated, this will be a barrier to the passage of cold air into the room.
Swing gates made of timber, covered with siding
It is worth noting that if the gate is made purely of metal, then its weight will be significant. If you cover the gates with sheet steel, they will look too massive for such a structure. Gates made of wood are no less durable, and they will look better. The best option is wooden gates covered with siding or corrugated sheets.
Installation of wooden gates (before cladding) on the garage
Features of frame technology
Frame-based buildings are also economical because they do not require a strong foundation. Even weak bulk soils and peat bogs can withstand them, and the foundation can be the most budget-friendly. In addition, due to the absence of wet processes, assembly is carried out in any weather, with the exception of unfavorable conditions for the builders themselves.
Structures are mounted using two methods:
- "Canadian Platform". First, a horizontal base is laid, usually floors or ceilings. Then large sections are assembled on the finished platform - entire walls or sections thereof. They are installed in the design position and secured. This method allows you to conveniently mount the units on the ground, so the assembly is more accurate and faster.
- Sequential installation. The traditional method, when all elements are installed in stages. Perhaps it is not so fast, but if one person is engaged in construction, it is much easier for him to cope with small-sized structures than with heavy, clumsy blocks.
Main frame elements:
- horizontal - upper and lower trim, floor beams, lintels;
- vertical - racks,
- inclined - jibs, struts, struts.
If rigid sheet cladding is used, inclined braces need not be installed. Stability will be provided by sheet material.
After assembling the frame and roofing, installation of gates, doors, windows, external and internal cladding, and, if necessary, insulation is carried out. In a ready-made covered box, you can arrange lighting and other communications.
The final stage
As soon as construction is completed, the construction site is cleared of remaining materials, construction waste is removed, it’s time to draw up documents for the site.
For this purpose, technical documentation is prepared and, together with the necessary list of papers, submitted to the registration authority to obtain title documents.
You can also watch several videos about building a wooden garage with your own hands :
https://www.youtube.com/watch?v=Ovv3acSM5j0
Cost calculation
The cost estimate will be affected by the cost of materials - wood, fasteners, fittings. It's unavoidable. It is possible that transport services will be added for the delivery of wood or the ordering of a concrete mixture for pouring the foundation, or the supply of crushed stone.
In general, the construction will cost much less than a capital garage, and the labor will be free, thanks to the construction of the building with your own hands. In order to save money, construction can be extended over time (within reasonable limits), gradually accumulating materials and constructing such a necessary, inexpensive and extremely attractive external garage.
Installation of timber walls
Before starting installation, it is necessary to carry out a number of preparatory operations: according to the project, cut the timber to length, number each element, make the necessary technological notches for corner joints, treat the wood with an antiseptic and fire retardant. It is also necessary to level the surface of the plinth or slab (along the perimeter) with cement-sand mortar.
The technology for constructing a log house has the following sequence:
- The base is coated with bitumen mastic and the first layer of roll waterproofing is laid. Bituminous mastic is applied again and a second layer of waterproofing material is laid.
- According to the pitch of the anchors, through holes are drilled in the timber of the first crown.
- In the holes, a larger diameter drill is used to make recesses for the nut.
- The first crown with a corner connection is laid according to the design. Check the level and, if necessary, adjust the position of the timber using roofing felt pads. Use nuts to tighten the harness to the base.
- Roll out the tape insulation and lay the second crown. The remaining crowns are mounted in the same way. For additional structural rigidity, in addition to corner joints, wooden dowels or metal pins are used.
To connect a beam along its length within one crown, a tongue-and-groove joint with additional reinforcement with a dowel is used.
The internal partition for a garage combined with another utility room is usually made from a smaller section of timber or boards. Therefore, it is installed after assembling the common box.