Length splicing
This type of joining of wooden parts has some nuances. At its core, this is the elongation of elements in the horizontal direction. Splicing can be:
- Butt-end - the ends are cut at right angles and aligned with each other. A bracket is hammered into both beams (logs).
- Oblique butt - the cuts are made at an angle, and the ends are fastened with a pin or nail.
- End butt with ridge.
- Direct overlay - the length of the cutting is 1.5-2 times greater than the thickness of the timber (log).
- Oblique trim - the ends are cut at an angle and secured with bolts.
- Overlay with an oblique cut - at the ends of the parts, end ridges are made, having a width and length of one third of the thickness of the beam.
How does a dowel differ from a dowel according to its purpose?
The task of the dowel and dowel is the same - fastening wooden parts together, but the dowel is, in fact, a wooden nail made of hardwood. With its help, the connection between window and mirror frames is strengthened; if it is necessary to obtain a workpiece of greater thickness, two or three are folded together on the surface, holes are drilled in a checkerboard pattern of the required diameter, and then dowels are driven in. Dowels are used where more serious reinforcement of the structure is needed, for example, connecting rafters during the construction of a roof ridge, when assembling a structure from logs or timber, drilling a vertical hole in several logs and hammering in the dowel in order to strengthen the connection of the walls. Dowels come in round, rectangular and square cross-section. It is driven tightly into the hole, so its size is slightly larger than the size of the hole, and the end of the dowel is pointed for ease of penetration into the hole. As a result, the difference is only in the form and scope of application, but in essence, both the dowel and the dowel have the same task - to strengthen the connection of wooden products.
What is
Before you find out the installation details, you will need information about what a dowel is. This is the name for fasteners that allow you to securely fix different parts of furniture. It looks like a small cylindrical rod with rounded ends. The dowel does not complicate the disassembly of objects, but at the same time can withstand even heavy loads. Any material can be used for its manufacture: plastic, metal, wood. For a tighter fit, its surface should be corrugated (straight, helical, transverse).
The optimal circumference of the furniture dowel would be equal to no more than a third of the wall thickness; this will make the assembly reliable and maximally resistant to high loads. The length is selected individually, taking into account the base. Such parts are used both in the production of factory furniture and in self-assembly of the structure.
Installation and removal methods
Furniture dowels make it possible to significantly increase the strength of connections. But this is not as simple a method as it might seem at first: the connection cannot be secured if any hole is displaced. Depending on the size of the offset, the result will be unsatisfactory.
As a rule, tabletops on dining tables and desks are secured with a dowel. Put them in working position like this:
- The parts are first marked on the end side, and then holes are drilled to the required depth. The same holes are made in the countertops. They must match;
- A cylindrical fastener is installed in the end hole, the upper end protrudes at a distance equal to the depth of the hole in the covering part;
- To strengthen the dowel in the hole, it is generously lubricated with glue, fixing it in the desired position. Sometimes glue is poured into the holes, where the fastener is then inserted - this will completely cover its ribbed surface with glue, improving the adhesion strength of the elements;
- The second part of the design is superimposed on the installed dowel.
Drilling the material
We hammer in the dowel. We connect it with glue. The work is ready.
There are 3 main problems in assembling furniture using dowels:
- It is possible to assemble an edge-to-edge connection, but in this case, the planes of the structural parts do not coincide. Solution: The drill guide holes were not aligned with the center edges of the parts. The device must be constantly aligned with the reference planes of the two parts being fastened. Even in the absence of a central location of holes in the connection, no shifts or sagging are formed;
- Holes in one part do not line up with another. Solution: to align the holes, use special markers designed specifically for connections. Initially, holes are made in one part with a drill. A marker is then inserted into each hole and the two pieces are pressed together as they should be when assembled. This way, the second part will have marks with markers in the places where you should drill;
- The holes are made in the right places, but the installation of the dowels is disrupted: the fasteners do not fit through or, on the contrary, fall out. Solution: It is important to make sure that the diameter of the fasteners matches the diameter of the holes. Factory fasteners are mass produced and may have a diameter slightly larger or smaller than stated. In addition, wood can swell or shrink with changes in humidity. When the diameter is verified and it is identical, then the problem is the wear of the drilling jig and, as a consequence, the deviation of the drill. This leads to deformation. It is enough to change the bushings or purchase a new device.
To correctly assemble furniture parts onto a dowel, you will need to learn three basic rules:
- To mark, use a sharp pencil or knife. A pencil with a thick lead will not make marks accurately;
- When drilling holes, you need to use drills with a central point. Twist drills with conical sharpening can deviate to the sides during work, setting the wrong direction;
- To ensure uniform hole depths, a locking ring is placed on the drill and firmly fixed. The depth of the hole is made 2 - 3 mm greater than the length of the dowel.
We mark with a pencil
Use center point drills
Use a retaining ring
You can make cylindrical mounts yourself. Here is a short instruction on how to make dowels: To do this, take birch logs and split them into many pieces - you get square blanks. Next, they need to be trimmed by hand or on a lathe to give them a cylindrical shape and the required diameter. Fasteners can also be made using a circular saw.
It happens that the dowel breaks off and one half remains in the hole. The first thing you want to do is take a drill and drill out the fragment. This is incorrect, since the hole will be larger, and choosing a new mount will be more difficult.
The correct solution is to take a drill of a smaller diameter and drill in the center of the fragment. Then, using a screwdriver, chisel or chisel, break up the remaining debris and remove it from the hole. If difficulties arise, you can use photo instructions - there are a lot of them on the Internet.
So, when used correctly, a furniture dowel is a universal fastening that guarantees reliability. It is used for assembling different types of furniture in combination with other types of fasteners.
Width joining
Used to increase the width of the product
When using bonding methods, it is important to pay attention to the location of the tree’s annual rings. It is important to alternate the boards depending on their direction. The payment options are:
The payment options are:
- Butt-to-end - parts need to be trimmed and jointed using a square.
- In tongue and groove - the height and width of the ridge is equal to 1/3 of the thickness of the board.
- Using a hacksaw - the edges need to be cut at an acute angle to the wide plane of the board.
- With a comb with a height of 1/3 to half of the board.
- A quarter with a ledge equal to half the thickness of the board.
- In a tongue and groove with slats - in each board, select grooves into which you need to insert a rail that is twice as wide as the depth of the groove.
Types of connection
When connecting wooden parts, you need to remember an important point - a thin part is always attached to a thick one, but not vice versa.
According to the relative arrangement of the elements, the following methods of connecting wooden parts are distinguished:
- extension - increasing the height of a part;
- splicing - elongation of the workpiece;
- consolidation—increasing the element’s width;
- knitting - joining at an angle.
The most commonly used methods for joining wooden parts in furniture making are:
- gluing;
- "dovetail";
- end-to-end;
- grooved;
- overlap;
- deaf on spikes;
- through tenon.
Let's look at the technologies of some connections in more detail.
Box connections
Box joinery joins the corner joint category. They are widely used in the production of furniture and carpentry. Such connections can be made using straight or oblique tenons. Their number depends on the width and thickness of the parts (boards). A spike is made at both ends of the parts being connected. The part that has an eye on the edge has one more protrusion.
Box-type connections can be blind, through, flush or semi-flush. The choice depends on the application of the products. Through joints are used for parts that are located inside the workpiece, as well as on the front sides if subsequent coating of the surfaces with plywood is planned.
If the part is open only on one side, the workpieces are connected in a semi-flush manner. If they are open on all sides, the hidden technique is used. Insert tenons can be used. But this type of joint is the least durable.
Box junctions are created using straight through tenons and grooves with a ridge. They can be rectangular, triangular, trapezoidal in shape. Grooves are used if it is undesirable to have protruding ends on the outer edge.
Corner connections
How to wind tow around a pipe thread. how to properly wind flax onto threaded connections. how to wind tow (linen) on a threaded connection (video). plumbing threaded connections
The long life of a structure or building depends on properly laid and connected boards and logs.
Types of corner conglomeration:
- assembly of components without residue (in the paw);
- assembling the components with the remainder (into the bowl).
Assembly without residue involves laying boards with an even, non-protruding angle. There is a separate modification - a warm corner. Assembly with the remainder involves interlacing boards from protruding ends. The second method is considered financially expensive, since it is necessary to calculate the timber for the projections, but the structure is quite reliable and retains heat much longer.
Miter angular joining
To bevel the ends, the angle is divided in half. In a standard joint, the angle is 90°, as a result of which each end should be cut at 45°. But there are variations of the angle: obtuse or acute. In an uneven corner joint, parts with different widths can be joined.
Miter splicing of components and joining of timber with cutting
Miter splicing of components - the technique is used when the ends of the components are straight and lie on the same straight line. Wooden elements are joined without changing thickness. Joining boards with cutting is used when joining two components at an angle to each other. It is practiced when joining two components with a profile in a corner. If, at the moment of joining, the boards move, the resulting gap will become less noticeable than with miter joints.
Corner lug connection
Docking is practiced when assembling intersecting parts located on an edge, or in a corner version. The most popular types of conglomeration are tee and corner. For the durability of the structure, the connection should be strengthened with a dowel or glued.
Tenon to socket connection
The tenon assembly is performed when joining links that are connected at an angle or at intersection. In all carpentry and carpentry, this joint can be called the most durable. In practice, joining is used in the production of window frames, doors, and cabinet furniture frames.
There are two types of splicing with a tenon into a socket:
- conventional docking with a tenon into a socket;
- connections with a stepped tenon into a socket (semi-darkness). Most of the width of the prepared material is occupied by the spike and socket. An expansion is prepared from the side of the groove, and a tenon step from another link enters it. The semi-darkness prevents the tenon from falling out of the groove.
Other tenon assembly of wood material
- Side tenon – door production;
- secret beveled tenon in semi-darkness - practiced when hiding a tenon;
- tenon in the dark - for wide components, such as the bottom frame of a wooden door.
Spikes for fixing timber: which ones to choose and why?
The most popular are dowels made from hard wood. The most durable options are spikes made of oak or birch. It is not possible to deform, bend, or break them. However, there is one condition. They must be properly secured. What are their shape and sizes? The optimal solution is details with rounded contours. Their length should not exceed 25 mm. Wooden dowels must be smooth and even not only at the point of installation, but over the entire surface. It is these nails that guarantee the longest possible service life.
Installing dowels in timber is a mandatory rule for timber and log structures. Birch thorns are the most common option. Such dowels cannot become an analogue of self-tapping screws or primitive nails. If they are used, it is impossible to guarantee the stability and reliability of the structure. It is also worth abandoning the use of reinforcement. Metal versions can lead to a number of negative consequences, which is explained by the direct interaction of materials with different thermal conductivity parameters. What can the use of metal dowels lead to? It could be:
- condensation formation;
- coating the surface of the spikes with rust;
- rotting of the entire layer of wood.
Hole depth and width
When assembling furniture, confirmat size 6.4*50 is usually used. Because the thread diameter is 6.4 mm, and the diameter of the confirmation body is 4.4 mm, then for high-quality fastening of parts, the hole diameter must be in the range of 4.5-5 mm and a depth of at least 50 mm.
If the thickness of the hole is greater than the specified one, the confirmat will not hold the parts well; if it is less, its thickness can tear the chipboard.
For drilling, use a confirmat drill with a diameter of 4.5 mm, which is equipped with an additional head for drilling an enlarged hole for the neck of the confirmat, which also makes a countersink for its head.
Of course, you can use a regular drill with a diameter of 5 mm, but for high-quality fastening in the hole you will additionally need to make space for the neck of the confirmat and its head.
Manufacturing nuances
In addition to the shape, concrete screws have other differences. Depending on the type of protective anti-corrosion coating on the dowel, there are:
- galvanized. This type is suitable for most construction operations: interior work, facade work, basements, roofs, etc.;
- copper-plated or blackened. Both types have reduced resistance to moisture and are unsuitable for use on facades and basements. Used for interior work in dry rooms.
An example of how the dimensions of a dowel for a 6 mm drill can vary:
- outer section – 7.35-7.65 mm;
- diameter with thread – 6.3-6.7;
- thread pitch – 2.55-2.75;
- internal section without thread – 5.15-5.45;
- head height – 2.8-3.2;
- cap diameter – 10.82-11.82;
- slot depth Torx 30 – 2.3-2.7;
- rod length – 50-184.
The use of dowels in the construction of houses and baths
Wooden dowels are used in the construction of various structures with log or timber walls. Their use is approved by the standards of construction organizations and projects of wooden houses. In practice, the use of birch tenons provides a perfect connection to wooden substrates. It is distinguished by the mobility of the vertical level. However, this does not prevent the wood from naturally shrinking.
In the process of building wooden houses, they often resort to making dowels for timber with their own hands.
The build quality and reliability of the walls will be at the highest level and will please anyone.
So, although making dowels yourself seems at first glance to be something complicated and time-consuming, in fact it is a primitive task
It is important to be clear, planned and follow instructions.
The manufacture or restoration of household utensils, furniture and other items made of wood will require the use of various types of basic and auxiliary tools. But not all of them may be at hand, what should you do in this case, run to the store? Not at all necessary. Many craftsmen have long been making the tools they need for their work, with their own hands, from scrap materials, thus saving money.
DIY engraving machine (matte)
This equipment is used not only by professionals, but also by home craftsmen. Despite the fact that you can easily buy it in a store, some people prefer to make it themselves. It is quite simple to make such a device, but despite its simplicity, it also successfully performs its functions as those manufactured at the factory. So, an engraver is needed:
- for milling surfaces (flat and shaped), as well as grooves and holes of various configurations;
- drilling and boring holes;
- for cutting sheets;
- cleaning from corrosion and other contaminants;
- grinding and polishing of parts;
- and of course for applying images and inscriptions on surfaces.
The reliability of a homemade engraver will depend on what materials were used. In order to make the device, you will need:
- flexible shaft or drive;
- a nozzle for it in order to fix the instrument (you can use it from a drill or make it yourself);
- a tube with a freely rotating cartridge consisting of two halves fastened with a screw is inserted into the hole of the nozzle;
- a tool is inserted into the chuck, the shank of which should have a diameter of 2 to 5 mm, and if the parts are not homemade, then one is selected that is suitable in diameter.
Basic methods of connecting timber during installation
At the connection point, you need to choose a specific method that guarantees optimal strength and tightness of the joint. Corner connections can be made:
- with ends protruding beyond the main dimensions;
- without protrusions;
- butt laying, when the beams do not overlap each other;
- T-shaped connection for walls inside the building.
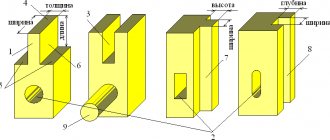
Figure 2. Construction of a rectangular root tenon.
The technology of the method with a remainder provides better quality corner joints, but requires more material consumption. Each beam produces from 0.4 to 0.6 meters of wasted length. With a height of 15 crowns, the total unused length will be from 20 to 36 m. With a beam length of 4 m, this will amount to from 5 to 9 additional products. You can see the corner connection with protruding parts in Fig. 1a.
The first crown in a building is usually placed in a joint with a key groove with a specific name for the joint - “oblo”. This method is used for any method of laying material, with or without protrusions. The sampling is performed at half the thickness of the product. The articulation of the corners of the house without protrusions can be seen in Fig. 1b. To prevent displacement in the main planes, subsequent crowns must be joined using the “root tenons” type with the installation of dowels. The design of a rectangular main tenon is shown in Fig. 2.
The dowel is a round wooden block 25 cm long and about 30 mm thick. In the beam laid on the cushioning material, you need to drill a hole with a depth exceeding the length of the dowel by 20-40 mm, and hammer the part into it.
Butt jointing corners is the easiest way. The quality of such joints is extremely low; creating a warm corner in this way is unrealistic. The timber is fastened with such joining using metal brackets with spikes, nailed down. Laying timber end-to-end is shown in Fig. 1st century How to fasten a beam with a metal bracket can be seen in Fig. 1e.
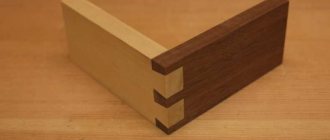
Figure 3. Dovetail.
The T-shaped connection of capital and internal partitions has several options:
- joint using a key groove;
- “groove-tenon” joint in the form of a symmetrical trapezoid;
- “groove-tenon” joint in the form of an asymmetrical trapezoid with a right angle;
- use of a rectangular mortise-tenon joint.
Spikes in the form of trapezoids are designed to maintain the connection during loosening of the structure and efforts aimed at pulling apart in different directions. The design of such joints is complex, but also more reliable. Because of its appearance, the connection is called “dovetail”. The structure of such a joint can be seen in Fig. 3. Making a dovetail requires care and patience in fitting the surfaces.
Many craftsmen prefer to fasten walls using rectangular tenons. Often, T-shaped joints are fastened with special brackets, long bolts with large diameter washers or nails. An example of a right-angle tenon connection is shown in Fig. 1 year
How does a dowel differ from a dowel according to its purpose?
The task of the dowel and dowel is the same - fastening wooden parts together, but the dowel is, in fact, a wooden nail made of hardwood. With its help, the connection between window and mirror frames is strengthened; if it is necessary to obtain a workpiece of greater thickness, two or three are folded together on the surface, holes are drilled in a checkerboard pattern of the required diameter, and then dowels are driven in. Dowels are used where more serious reinforcement of the structure is needed, for example, connecting rafters during the construction of a roof ridge, when assembling a structure from logs or timber, drilling a vertical hole in several logs and hammering in the dowel in order to strengthen the connection of the walls. Dowels come in round, rectangular and square cross-section. It is driven tightly into the hole, so its size is slightly larger than the size of the hole, and the end of the dowel is pointed for ease of penetration into the hole. As a result, the difference is only in the form and scope of application, but in essence, both the dowel and the dowel have the same task - to strengthen the connection of wooden products.
How else to decorate such connections
Corner trims themselves and varnishes allow you to combine different types of wood, and you will be able to create dozens of options, but your creative imagination should not be limited only to them. By adding dowels or plugs to the overlays, you can get a more interesting decorative effect. First, mark on the trim the places where the plugs will be glued (photo D). We positioned the 10mm plugs 13mm from the long side of the trim and 25mm apart. Make stoppers from the same type of wood as the frame, or choose a third type that contrasts with the trim.
These plugs pass through the overlay into the frame without coming out on the other side. The direction of the fibers in the plugs should be the same as in the overlays to reduce stress in the parts when changing sizes due to humidity fluctuations. Glue the plugs into the holes, leaving a small allowance above the surface. After the glue has dried, remove the allowance using a fine-toothed hacksaw (photo E). Then sand the plugs flush with the surface of the frame.
Increase in height
From the name it is clear that the essence is to lengthen the beams or logs in the vertical direction. The axes of the elements are on the same vertical line. Types of extensions are:
- End-to-end extension. To absorb random loads, a barbed pin is inserted on the sides.
- Extension with one or two spikes. The width and height of one tenon must be at least one third of the thickness of the timber. The depth of the nest is slightly greater than the height of the thorn.
- Half-tree extension. The ends of both logs need to be cut to half their thickness by 3-3.5 diameters in length.
- Tongue building. In one beam you need to cut a fork into which you need to insert the correspondingly cut end of another piece. The connection itself must be wrapped in tin.
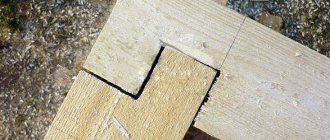
Inset
A mortise, or notch, is a corner or middle connection with which you can securely fasten two boards or wooden beams together. One part is attached end-to-end to the other. The insertion technique is based on a butt connection. Make a cutout in the plastic for the end and then proceed to the main part of the work.
PHOTO: YouTube.com This fastening method is most often used in box or frame connections, for example when assembling a cabinet or frame for building a house
The main types of connections using notches are T-notches, corner in the dark or corner in the rebate. Each of these connection methods has its own characteristics. If you decide to make a corner fold, you need to make a larger recess ─ two-thirds of the workpiece.
DIY Vintelma
A die holder is necessary for working with dies; this tool is quite expensive, but you can make it yourself. For the manufacture of the main part, steel is used, but for the manufacture of dies, high-speed steel R6M5 is required, it contains up to 5% molybdenum. This chemical element increases the wear resistance of parts. Since during operation they are subjected to heavy loads and heat up to 600 degrees Celsius.
To make a universal die holder yourself, you need to prepare the following parts:
- steering rod and end;
- bushing, you can also use a nut;
- bicycle chain;
- M12 nuts, two pieces;
- piston pin.
When all the parts are ready, you need to remove the part of the rod that is screwed into the steering rack. Afterwards, a piston pin is put on the rod, then a metal sleeve (nut) of suitable diameter is put on top, which is fixed by welding. The remaining end from the steering tip should be cut off; this can be done with a grinder. After this, two nuts (M12) are welded onto the steering end, the end is screwed on, then a part of the chain (bicycle) is inserted through the nuts and welded to the piston pin. And the instrument is ready.
Variations on a theme
Feel free to experiment with different combinations of wood species for frames, overlays and decorative stoppers. Or try some of the examples shown here.
A. Leave a spacer about 12 mm wide between the cuts. Then cut the jumper using a band saw or by hand.
B. These overlays are cut to a thickness that is 0.5 mm greater than the depth of the folds at the corners of the frame.
C.Remove excess trim material with a band saw and then sand the face and edges using an orbital sander.
D. Place the plugs at equal distances from the joint line of the frame parts. The size and location of the plugs must match the frame and overlays.
E. Using a fine-toothed flexible-blade hacksaw for this operation, guide it parallel to the grain of the lining to avoid leaving rough scratches.
In preparing the article, materials from the wonderful publication for woodworkers WooDMaster were used
How to join boards with glue
A very popular method of joining boards and bars is longitudinal and transverse gluing. When connecting boards with the wide side, the end can be smooth, although in most cases a tongue-and-groove profile is used. It is very important to tightly fit the parts so that the glue layer is as thin as possible, this is the only way to achieve maximum strength. Sometimes a small amount of cotton fiber is applied to the end, lubricated with glue, this improves the quality of the coupling.
The boards can also be joined in profile, but this will require wedge-shaped gear cutting of both ends with the teeth offset to the floor for different parts. At home, this operation can be performed using a hand router.
To glue the parts together, casein glue or high concentration PVA is used; to give strength, sifted wood flour is added to the adhesive. The surfaces are covered with glue and kept in air for 3–5 minutes, after which they are placed under pressure or squeezed with clamps. This connection is stronger than the wood itself and never breaks along the joint.
Furniture dowels in factory designs
Factory furniture is a vivid example of the correct and effective use of dowels in connecting parts. It is in the “factory” that the dowel will fit tightly into its hole and, even without glue, will ensure a reliable connection of the parts. This is what connections involving dowels in factory furniture look like:
As you can see, factory furniture does not use connecting parts exclusively using dowels. Here the dowel is paired with a minifix. Even in factory furniture, dowels are used in conjunction with confirmations and other connecting fittings. This is exactly how dismountable furniture connections should be made. The dowel is not “set” on the glue, but simply driven into the hole drilled for it. This ensures the strength and rigidity of the structure. And the confirmat or minifix serves as a screed.
That is why the buyer of factory furniture can easily disassemble his structure and, if necessary, transport it to any place.
Why don't garage workers make such connections? And they can't do that. To ensure accurate drilling of holes in parts, industrial drilling machines are needed, which garage workers do not have. But with a hand drill, alas, you can’t drill like that. That is why garage workers simply do not have the moral right to put dowels where they can put a minifix or a furniture corner. Alas, some “craftsmen” continue to make complete “shkanto-slag” instead of furniture in their garages. We hope that the time will come when the defectors will curtail their work, and only conscientious furniture makers who, first of all, think about their clients, will remain on the market.
How to choose the right connection
Splicing is carried out during the construction of load-bearing walls, the construction of interior partitions, the arrangement of the rafter system, and the floor. The type of joining used should be selected depending on the type of load:
compression, it is important to perform it so that the ends touch in as large areas as possible; stretching, a lock connection must be performed; bending, joint is performed at an angle.
For different types, the ends of the parts are cut in a certain way. When joining, jute insulation is placed in the lock. For lengthening, various types of connections are used.
When joining wood using the tenon and dowel method, it is possible to create a durable structure with the required rigidity. It is necessary to make high quality keys. Interlocking joints are used to join lumber from which load-bearing walls will be built.
Wood floor splicing
Is the most basic solution. The ends of the joined elements are cut at right angles, half the thickness of the wooden part. The parts are connected by folding one end to the other. The tightness of the joint is ensured by insulation (jute tape is laid). In construction, the strength of the connection is imparted by installing wooden dowels. Additionally, the knot can be secured with screws.
Connection to root tenon
Scheme for connecting timber to a main tenon
This connection option is somewhat more difficult to complete. A tenon is cut from the end of one of the parts (the size of 1/3 of the section), and a corresponding groove is made on the second (reminiscent of a trapezoid). This labor-intensive connection requires special precision (an angle of 45° is maintained). The corners of the log house are joined in a similar way.
Additionally, the connection is strengthened with dowels. If the elements are joined in this way, the beams do not move horizontally.
Connection in an oblique lock
Splicing timber into an oblique lock
It is most suitable if the node will experience bending load. This is a rather complex type of joining, but in terms of strength such a joint exceeds many. At the ends, an oblique tenon with a groove (with bends) is cut out to the appropriate dimensions. The two parts folded together form a lock. The joint is secured with two dowels.
Splicing by application
Splicing timber into a rim lock
It is a rather complex type of joining. The lock is cut out in two pieces of wood. This is how the two links of the log house are connected to each other. The beam is folded at the ends and spliced with a construction bracket. The dowels are installed in the bottom row.
Connecting beams with dowels
Connecting timber along the length with dowels
It is also an effective way to splice a crown. Grooves are created at the two ends, and after laying, a wooden dowel is driven in. The joining itself can be done in half a tree (dowels must first be made and holes with a smaller diameter must be drilled). The cutting depth should be 2 cm.
If splicing is performed in this way, then it is a very durable method of joining in the construction of buildings. Grooves are cut out in two parts. The ends are folded, a key is installed in the groove (a wooden insert, a wedge, for example, made of aspen, can be made of metal). Its shape may vary (prismatic, rectangular). It tightly holds the two parts together.
All methods of splicing, both the simplest and the more complex, require fairly precise cuts on the timber, thereby ensuring a strong connection.
Drilling rules
One of the most important conditions is that the holes must be drilled strictly perpendicular to the surface of the workpiece. This is especially true for recesses made at the ends of laminated chipboards. Currently, laminated chipboard panels are used, the thickness of which is 16 mm. Therefore, any deviation from the vertical can simply ruin the workpiece. To avoid this, in practice they use a simple device - a template, thanks to which the drill always enters the part at an angle of 90 degrees.
If a hole is simultaneously made in two mating parts, they must be securely fixed, for example, using clamps, to avoid displacement. When drilling through a single workpiece, it is necessary to place an unnecessary object made of wood or chipboard. This will reduce the likelihood of chipping on the surface of the chipboard at the point where the drill exits.
And finally, it is unacceptable to drill recesses for Euro screws with a regular drill. If its diameter corresponds to the smooth part of the confirmat, then when screwing it in, the thread will not be cut, and such a connection will not hold anything. If the diameter of the tool is matched to the thread, when tightening the Euroscrew, the chipboard may burst under the pressure of the smooth part of the fastener.
Modern furniture made of chipboard and MDF is often assembled using confirmatory screws, which among furniture makers are also called Euroscrews or Euroscrews. Before screwing them in, technological holes with strictly specified parameters are drilled in the plates. The process of preparing these holes will be discussed in this article.
The hole for the confirmation is drilled in the thickness of the first part and in the end of the second part, which are joined at a right angle. Along the length it should have a stepped difference in diameters. This is due to the design features of the Euroscrew. Its rod consists of a cylindrical smooth neck and a main threaded part. A hole of a smaller diameter is drilled for the thread, and a larger one for the neck. The fastener also has a countersunk head in the shape of a truncated cone, for which a seat is prepared. In practice, two hole drilling technologies are used.
Application
These products have been used for a long time and are widely used in metalworking. Thus, many machines are equipped with conductors. The need for templates for dowels in the woodworking industry is due to the prevalence of closed furniture joints. In this industry, the devices in question are used both in mass production and during assembly. In the latter case, furniture jigs are used to drill holes for dowels.
In addition to the above-mentioned areas, such devices are in demand in construction, mechanical engineering, and household work.
The scope of application is determined by the type of conductor. Thus, overhead devices are used for processing flat parts, chipboard and MDF boards. Corner ones are applicable both for furniture and for chipboard and MDF boards. Rotary products are designed for making holes in cylindrical parts. Universal models are suitable for small-scale furniture production. Tilting options are designed for simultaneous processing in several planes. Clip-on and sliding jigs are most suitable for home use. In addition, the latter are incompatible with single-spindle machines.
Rigid models are designed for making holes in objects with an uneven surface, such as pipes. In this case, they are secured using a clamp, but this method is not suitable for furniture, since deformation of the surface is possible.
The use of conductors simplifies and speeds up the work due to the fact that it eliminates the need for manual measurements and calculations.
How it's done
Before you start working with the frames, make a simple sled device from slats with a cross-section of 19x25 mm and a piece of MDF board or birch plywood.
Then you will need already glued frames and some test miter joints on which you can practice. To make overlays for frames with a part width of 50 mm, spread cuttings measuring about 120x200 mm across the thickness to obtain thin pieces at least 50 mm wide. The scraps can be from a single board or glued together from different types of wood. Raise the disk to a height of 50 mm and adjust the longitudinal (parallel) stop so that the distance from the cut to the outer edge of the trim is slightly greater than the depth of the future folds at the corners of the frame. For safety and better control when cutting short pieces, use a comb and pusher. Turn the scrap over and make a second cut, leaving a spacer of about 12mm in the middle so that the trim blank remains on the scrap (Photo A). Then separate this workpiece using a band saw or hacksaw.
Link on topic: Veneer finishing - veneering: technology, instructions for surface production
Forming miter angles
One of the best ways to create corners of various volumetric products is a miter joint. It allows you to create a monolithic structure, hide the fibers of the end, thereby providing an attractive appearance. This method is suitable for a wide variety of products, but is most often used for the manufacture of frames and cabinet furniture parts.
To create a joint, cuts are made in each of the wooden parts at an angle equal to half the angle at which the workpieces meet. Most often, this angle is right, therefore, cuts are made at 45 degrees, however, the angle can vary widely. The work is performed according to the following algorithm.
First mark out the details
It is important not to forget that the marking is done along the long side, otherwise you may not guess with the dimensions
On the edges that will be connected, draw a line at the required angle. Using a combination square, the markings are transferred to each side of the workpiece. Then the cut is made, for which it is better to use an electric miter saw, but you can also work with a hand tool
When working with a hacksaw, it is important to control the cutting angle; it would be useful to use a block as a guide
The finished parts are placed next to each other, checking the accuracy of the fit. Unevenness will have to be smoothed out with a hand plane, and the angle will have to be adjusted using sandpaper. Wood glue is applied to both surfaces, and the product is fixed using clamps. Additional strength can be achieved using nails
When working with a hammer, it is important to control the impact force so that the workpieces do not move
Particularly critical connections are reinforced with bars that are glued into the inner corner. A joint that will not be visible can be additionally reinforced with a metal square.
The result of quality work will be a perfect seam. If a small gap has formed, it can be hidden by straightening the adjacent wood fibers using a smooth cylindrical surface. The shaft of a regular screwdriver is suitable for this.