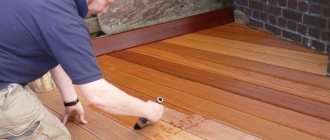
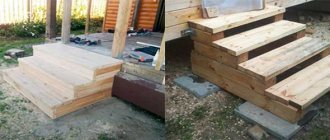
A simple staircase made from decking boards is a relatively inexpensive but interesting design that you can make with your own hands. Such structures are suitable for gazebos and verandas, serve as an excellent addition to the porch, and are used as elements of the interior interior.
In terms of external texture, the deck board imitates natural wood, although it is a composite material. Thanks to the properties and technical characteristics of WPC (wood-polymer composite), it is ideal for exterior decoration, does not require special care, and is resistant to humid environments and temperature changes.
What is a terrace board
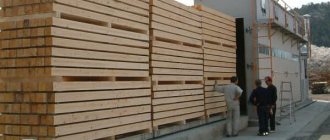
In the assortment of construction stores, decking boards are found under the abbreviation DPK, which stands for wood-polymer composite. Professional finishers call such a board decking. The building material is made from wood chips, polymer resins, pigment components and fillers. Before becoming a finished product, raw materials undergo multi-stage processing, turning into a monolithic material with high strength values.
The advantages of steps made from decking boards are as follows:
- resistance to linear deformation - retains its original appearance and consumer properties even with intensive use;
- textured surface - this structure allows you to save on anti-slip rubber pads;
- neutrality to any external environment - the composite composition does not attract rodents and harmful insects, and is resistant to the appearance of fungus and mold;
- variety – there are no uniform standards in the manufacture of composite boards, so products of all sizes and colors are available for sale;
- safety – the composition does not contain chemically active substances and components, so WPC will not create problems for people suffering from allergic reactions or pathologies of the upper respiratory tract;
- simplicity - installation of the board is quite feasible on your own; during operation, the material does not require special care.
Of course, it was not without some drawbacks. The disadvantages of decking are low resistance to mechanical damage and high cost. The second drawback can be justified by the long service life - at least 15 years, according to manufacturers.
INSTALLATION OF STEPS
Installation of steps from WPC should be done on a pre-prepared base capable of bearing the load (options are listed below). Attention should be paid to a base slope of 1.5% in the direction of the supporting joists to be laid and sufficient water drainage. In case of special need, drainage must be provided.
Installation of the next steps.
1. Plastic or metal clip for mounting CM Decking deck boards, if the step is at the same level as the terrace and joins it.
Installation of the upper step. Screw the steel angle to the step at a distance of 10 mm from the capinos.
Due to the density of the WPC, it is worth using a miter saw and saw blades (carbide tips) with more than 80 teeth.
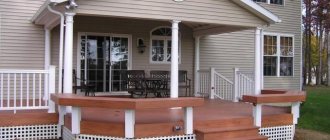
This material is easy to install and implements all decorative ideas, thereby ensuring winning harmony. For example, the Goodeck profile is the best solution for a porch: a solid and fashionable appearance, significant advantages of a wood-polymer composite. Moreover, the profile attracts with its variability of design and abundance of colors. It contains up to 70% wood, which means it gains the appropriate humidity at the usual temperature. That is, installation without the necessary gaps is fraught with swelling of the coating.
When constructing stairs, experts prefer steps made of WPC, although the market is replete with different materials. But this particular decking board is easy to install, practical, easy to clean, affordable, and harmonizes with the design, since it is also used to decorate terraces and paths. The material itself imitates wood - after all, it is a wood-polymer composite (interpretation of WPC). However, its performance is higher than the properties of log steps, which creak and dry out. And its corrugated surface does not require non-slip pads.
Preparing the tool
It is impossible to make a porch from a terrace board with your own hands without a certain set of tools. It is impossible to predict all the nuances that may arise during the work process, but at the initial stage it is better to stock up on the following types of tools:
- screwdriver;
- hammer drill with a set of drills of various diameters;
- a circular saw and a fine-toothed disk or hacksaw to cut the board;
- hammer;
- building level;
- roulette;
- fasteners recommended by the decking manufacturer.
In addition, before starting construction, it is necessary to prepare a project for the future structure and draw up a detailed drawing. Don’t forget about personal protective equipment: gloves and goggles are mandatory attributes for any home handyman.
How to assemble a porch, terrace, veranda
Frame construction is a very interesting and exciting thing. However, mastering the basic principles is not very difficult. If you have the tools, many home craftsmen can build a porch with their own hands. In the second part of the article we will cover this issue in detail.
Structure base
As with any structure, a secure porch will require a foundation. It consists of a drainage pad through which precipitation will go into the ground, a foundation that holds the entire structure and piping.
Foundation before installing decking
By piping we mean a horizontal system of jumpers and joists, on top of which the decking will be installed. Let's take everything in order and start with the foundation. For terraces and porches, three types are usually used.
Table. The main types of porch foundations.
| Porch foundation, photo | Description |
| Metal piles | One of the quick and reliable solutions is a pile foundation. It can be installed on any type of soil, but it is especially good on unstable soils. There is a considerable variety of pile structures, but for a terrace you should use only two types: metal screws and TISE (when a hollow pipe is driven into the ground, which is then filled with concrete). On a note! Another advantage of piles is the ability to quickly raise the structure to a greater height. |
| Pillars | The columnar foundation also does not require a large amount of materials and is in the forefront in terms of speed of construction. To organize it, it is enough to dig holes in the ground and install pillars from various blocks in them. This type of foundation has good load-bearing capacity. Full-fledged frame houses are placed on it, and it can definitely cope with the load from the terrace. |
| Monolithic concrete tape | A strip foundation is a powerful, reliable and durable solution. Its installation will take a lot of time, and it will be the most expensive in terms of cost. Whether the game is worth the candle, see for yourself, but if you cover everything with decking, it is better to choose one of the first two solutions. |
Sometimes the terrace foundation is made of slabs. It will be even more expensive and massive, but installing terrace flooring on it is very simple and convenient.
Scheme of a monolithic foundation slab for a porch
The supporting part of the structure is designed to hold the deck. In principle, it can be a foundation, for example, a strip foundation, but more often we are talking about a metal or wooden frame. Such frames are also called strapping - their strength should be enough to support the weight of the flooring, the furniture on it and the weight of moving people.
The drainage part of the base is designed to drain water from the porch and is made in the form of sand and gravel pads. To prevent precipitation from remaining on the surface of the porch, gaps are left between the boards, which improves the ventilation of the structure. If there is a concrete slab below, then its surface should have a slope.
Screw racks as a base for joists
Special screw polymer racks (adjustable supports) can also be used as a base - they are mounted on a concrete slab or wooden flooring. Rotation of the parts allows you to level the height of the supporting platform, accurately aligning the logs to the horizon.
Installation of the terrace base
Now let's get more specific about assembling the porch. As an example, we will take a low base made of wooden beams. The foundation will be columnar.
Table. Instructions for assembling the porch base.
| Steps, photo | Description |
Step 1 - marking | A site is selected in front of the house. You need to remove the fertile layer of soil from it, selecting the soil to a depth of 20-30 cm. 1. Then a sand and gravel cushion is made in the pit - it needs to be compacted well. Geotextiles can be placed at the bottom to prevent plant growth. 2. Next you need to mark the outer corners of the future frame. To do this, you can use pegs and stretched nylon thread. 3. The task is to obtain right angles without distortions. The Pythagorean theorem about the hypotenuse and legs will help to set everything up - remember the school geometry course. Advice. Before continuing work, additionally measure the internal diagonals of the future site; they should be the same. |
Step 2 - marking intermediate posts | Depending on the thickness of the strapping beam, we divide the sides of the area into segments. For example, if you use 100x100, then the distance between the posts should be no more than a meter. We place pegs around the perimeter in the right places, as shown in the diagram. |
Step 3 - drilling holes | Based on the marked points, we begin to select holes. You can use machinery or do everything with a hand garden auger. The depth of the holes should exceed the freezing depth of the soil. This figure is different for each region, so look for the necessary data yourself. |
Step 4 - concrete base | Concrete pillars will be used. First we pour crushed stone under them - the layer thickness will be 10-15 cm. |
Step 5 – Pole Installation | Then we immerse the pillar itself. If the required height of the product could not be found, you can use asbestos-cement pipes, install a reinforcement cage inside and fill it all with concrete, having previously made mortgages to connect the foundation with the frame. Backfilling is done around the pillar with the same soil that was obtained during drilling. We lay it in layers, tamping each time. |
Step 6 – Wooden Supports | The used poles have metal plate releases for installing wooden posts. We select the thickness of the post, place it inside and securely fasten it with “wood grouse” (self-tapping bolts). 1. Please note that there is a spacer on the post to prevent direct contact of the tree with the concrete base. This will protect the material from premature rotting. 2. Before screwing in the screws, be sure to drill holes of a slightly smaller diameter. This measure will prevent the wood from cracking from internal stress. 3. The racks are aligned strictly vertically in two planes. If you work alone, you can use bevels and various spacers for temporary fixation. All pillars must be strictly in line. It is easy to check their position using a stretched thread. |
Step 7 - determining the height and level of the site | The supports are trimmed to one level after installation. 1. To do this, you need to make precise horizontal markings. You cannot use a bubble level here; it produces a significant error. 2. A laser axle builder and a water level will give an accurate result. We mark the corner posts, then stretch the dye thread and knock off the marks on the middle posts. 3. Next, on each post, using a carpenter’s square, we draw a closed marking on all sides so that the cut is even. 4. The entrance door to the building will serve as a reference point for the height of the porch. You will know the thickness of the WPC, joists and other elements. Calculate the value so that the finishing finish does not reach the bottom point of the door 5 cm. |
Step 8 – Attaching the harness to the house | We begin to form the strapping from the board, which we attach to the base of the building. Depending on the base material, various fasteners can be used. Installation is carried out strictly according to the markings. |
Step 9 - Exterior Boards | We attach the outer trim boards to the same wood grouse, focusing on the previously marked marks. If you don’t have a water level or a laser level, you can only work with a bubble level. It needs to be placed on top of the jumpers, set their position and only then fastened. There is no need to leave the bolt heads protruding beyond the plane of the boards. Make a countersunk hole for them using a wood drill bit. |
Step 10 – midline dressing | The pillars installed in the middle of the site also need to be tied together. This can be done in different ways. In our example, the craftsmen attach the boards under the external trim, having previously made cutouts for the embedded posts. Now the logs can be laid on top without cutting them into pieces. Visually, such a solution will not look the best, but if you cover everything with WPC, nothing will be noticeable. |
Step 11 – Trimming the Posts | Now you have to cut off the unnecessary parts of the supports. Use any convenient tool, the main thing is that the cuts are as even as possible. |
Step 12 – installation of logs | The logs are placed in increments of 50 cm. They are attached to the frame using special steel brackets at the house, and at the end with self-tapping screws along the external board |
On this basis the foundation can be considered ready. This may also include installing the staircase frame. This is not difficult to do, since you only need to form stringers and jumpers between them. From below, the staircase will rest on the ground or a pre-prepared concrete base.
uncoated deck board
Installation of WPC
Now let's look at what principles the decking is attached to. Nothing difficult should arise in the work, since the material has an even geometry. All fastenings are made using a screwdriver. Among other tools, we note the following.
- Circular saw – for high-quality longitudinal cuts of material.
- A miter saw or miter box with a hacksaw - these tools will allow you to accurately cut boards at the ends at angles of 90 and 45 degrees.
- Spacers to accurately adjust the space between boards.
Mounting clips for WPC
If you look at the end of the decking, you can see that it has an H-shaped profile. There are grooves on the sides for special “GvozDECK PRO” fasteners. The next photo shows it close up.
Decking fasteners
In front of you is a T-shaped plastic insert. With its blades it falls into the grooves on the boards. On top there is a hole for a self-tapping screw, which is wrapped into the logs.
Logs for decking can be made not only of wood. There are products made of aluminum. For the latter, special clip-type fasteners are provided, which simply snap onto the profile.
Compensation fasteners
Technically, the most thoughtful solution would be the fastener shown in the photo above. It has compensation antennae. What are they needed for?
Decking does not change its size from exposure to moisture, but when heated, like any other material, it also expands. When this happens, the tendrils contract, preventing the fasteners from being pulled out and the boards from heaving. When cooling, the reverse process occurs.
So, this is the sequence in which the decking boards are assembled.
- The first board is placed on the outer edge of the porch - you can choose the orientation yourself. To fix the outer edge we use self-tapping screws. To do this, the board is first drilled with a thin drill, then a countersunk hole is made on top. The head of the screwed screw is then hidden under a decorative plug.
Example of a cap for a decking board
- The ends of the flooring should protrude 5-7 cm beyond the structure. We will cut them off last.
- We install the selected fasteners on each joist. Don't push them too tightly, remember that the material should have room to expand. Fixation will be performed by pressing. If necessary, the new board is beaten with a rubber mallet. Do not use a hammer as this may damage the material.
- Insert spacers of the same thickness between the boards each time.
- Gradually continue the siding towards the house.
- If pillars for fencing the porch are provided in advance, we carefully go through them, making holes in the boards of the desired shape and size.
Decorative corner made of WPCDecorative corner made of WPC
- Having passed the entire area, mark the edges of the boards in one line and cut them at once with a circular saw.
- You can carefully frame the edges using a 45x45 mm WPC corner. It is attached with self-tapping screws on the sides so that it is unnoticeable.
- You can also lay boards around the perimeter, connecting their ends at 45 degrees. This technique will require the installation of additional logs or the creation of a solid base. What it looks like is shown in the next photo.
The holes in the boards will be closed with plugs
During the cladding, you should already know exactly how the railings will be attached. The porch is a single structure where all the parts are interconnected. Finally, we invite you to watch several videos that show the WPC flooring installation process in action.
Video - Terrace to the house in Swedish
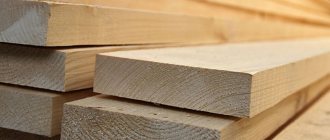
Building materials and additional elements
The staircase is part of the building structure, so such flights must comply with the requirements of SNiP. Without going into technical details, the following standards apply to the steps:
- width from 250 mm;
- height no more than 200 mm;
- the recommended angle of inclination of the stairs is 26–45 degrees;
- railing height no more than 110 cm;
- the distance between the vertical elements of the barrier is 100–150 mm.
It should be clarified that these are not mandatory, but recommended requirements, so each master can design a staircase from a decking board according to individual dimensions. However, the characteristics listed above are considered optimal for convenient and safe operation.
In addition to the tools and basic materials listed above, the work process may require hardware, clamps (metal or plastic clips), end caps, profiles and corners.
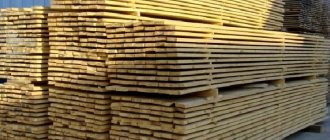
Arrangement of steps from decking
When creating a porch, it is recommended to use expensive types of material, since these boards will last at least twice as long as those made from hardwood (read: “Which board is best for a terrace”). But if this is not possible, you can purchase cheaper material.
When purchasing larch decking, it is recommended to also buy end caps for the boards, since inexpensive products are hollow from the inside. If you don't install caps on them, the appearance of the finished porch will seem unfinished.
Stages of installation work
Installation of decking begins with preparing the base. To prevent the porch steps from sagging after a certain time, a small foundation is poured under the stairs. While the base dries and gains strength (on average 1–2 days), you can start preparing building materials and sawing the WPC according to the required dimensions.
Installation work is carried out according to the following scheme.
First, the logs are laid. These elements are mounted directly to the base, fixed to the foundation with self-tapping screws or dowel nails. The location of the joists should always be parallel to the staircase descent. Recommended distance between individual elements: 40–50 cm. Logs are necessary for laying the porch and steps.
When the installation of the frame is completed, steps are laid from the prepared decking board.
Note! Work is always carried out from the porch to the base, the starting step is attached to the surface of the porch with clamps.
After the first, the second and subsequent stages are installed. The second decking is also attached to the joists with connecting clips, maintaining a small gap between the steps of 15–20 mm. This distance is maintained throughout the entire flight of stairs. The gap is designed to compensate for the expansion of the board caused by temperature.
Install risers. A metal corner is placed between the steps, which will serve as the basis for attaching risers: vertically located boards that give the stairs a more interesting and complete look.
At the last stage of construction, the end parts are covered with decorative overlays, which are screwed to the terrace board with self-tapping screws.
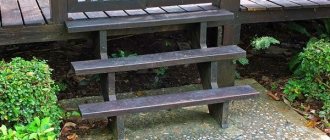
Interior staircase trim
Before you begin covering the interior stairs with WPC material, you should clean and level the surface using a jigsaw. When finishing the concrete base, the surface is ground, and after removing the cement chips, the concrete steps are wiped with a wet rag and primed. Before installing the steps, wooden bases are checked for defects.
- You need to start installing steps (or treads) from the top.
- The riser is attached vertically under the installed board with glue so that there is a gap left to the bottom threshold equal to the width of the panel used for the steps.
- The bottom step is attached with glue and pushed under the riser into the gap formed.
- The corner formed by the steps and riser can be closed with a special decorative corner.
You cannot walk on the sheathed stairs during the day, so as not to move the fixed elements.
Don’t forget about covering a certain part of the stairs
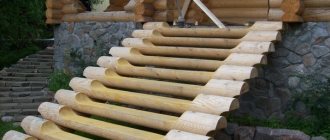
Design options
The attractiveness of WPC for the construction of stairs is due to the fact that this material allows the implementation of any design solutions. From the decking you can make a standard rectangular staircase for the porch to the house or make a twisted composition that will gracefully go to the second floor.
It is noteworthy, but risers for decking stairs are not a prerequisite. The free space between the steps gives the structure an original appearance.
As a fence, you can use traditional vertical balusters made of solid wood with figured cutting and wooden or plastic railings. If funds allow, you can order a metal fence, for example, artistic forging.
What is the C3 cladding installation technology and why is it preferred?
The technology for installing concrete stair cladding C3 was developed and patented from Tver. In the workshops of the enterprise, monolithic overlays for street steps, facing slabs and finished flights of stairs on concrete and metal stringers are manufactured. The main distinguishing feature of all offered products is the high strength of M1200, and in this indicator they can only be compared with granite.
High frost resistance and low water absorption also deserve attention, but the choice in favor of C3 stairs is often made because they do not slip in any weather. The surface of the coating has a pronounced structural surface with a relief pattern, as in the photo. The appearance of the structures also benefits from this, and we wrote about how decking boards are combined with C3 cladding here:.
Video of cladding using C3 technology: