A wooden house (dacha), not connected to central heating, needs a heat source that allows it to be lived in at any time of the year. Traditionally, fireplaces or stoves are used for these purposes, which can have a variety of designs.
The order of arrangement of stoves in a wooden house is regulated by current standards (SNiP), and is also specifically stipulated by fire safety requirements.
By what principles is the installation location determined?
It is worth understanding that the question of where the stove should be located in the house is extremely important and responsible, and therefore it is worth approaching the search for an answer to it with special care.
The principles for determining the location are as follows:
- Any stove should be located as close as possible to the central part of the house so that the external chimney pipe does not extend far from the ridge.
- The correct location of the device will be if there are no other communications under it, for example, water supply.
- When installing two furnaces in one zone, it is better to construct a foundation for each in order to protect yourself from the rapid destruction of the products.
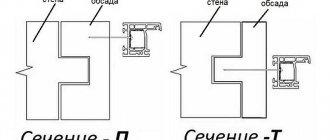
Location of the pipe relative to the ridge of the house
In addition, it is worth clearly understanding that one structure must heat at least two rooms, otherwise its installation will not be advisable.
Channel and ductless furnaces
Channel and ductless furnaces
The peculiarity of channel furnaces is that their design includes channels made in horizontal and vertical planes. Heat moves through them, which in direct-flow structures simply goes up. It should be understood that the movement of heat through the channels may be difficult. Therefore, the design of the furnace provides for the presence of elbows. To prevent stagnation of warm air, certain devices are installed that regulate combustion modes. There is a summer mode, during which the stove warms up and after that you can switch to full heating.
Varieties and types of fireplaces
Depending on the material used, fireplaces are:
- steel or cast iron;
- stone;
- brick.
Steel or cast iron. Fireplaces with a metal firebox consist of a glass door. As a result, in appearance they look like both a stove and a fireplace. Such equipment is in demand due to its availability, compactness and speed of installation.
Steel or cast iron fireboxes are incorporated into decorative fireplaces made of wood, stone and brick. Drywall is used to disguise the chimney.
Stone is rarely found in residential premises, since the installation process is quite complex and lengthy. In addition, a stone fireplace needs a special foundation. For this reason, it is recommended to install it in larger rooms.
Fireplaces made of stove bricks also have large dimensions and require the construction of a foundation that is separate from the base of the walls. Thanks to the unique properties and characteristics of the material, uniform and pleasant heating of the entire room is ensured.
Despite the high heat capacity of stove bricks, the fireplace must be insulated from the wall. To do this, the thickness of the masonry closest to the wall must be at least 25 cm. In addition, the outermost masonry is insulated from the walls of a wooden house using vermiculite, basalt wool and perlite.
Fireplaces of all sizes and types ideally complement the interior of any living space with their sophistication, atmosphere, warmth and comfort.
Depending on the fuel used, fireplaces are:
- Wood-burning. They use real logs to make them work. Fuel needs to be prepared and a storage location provided. And clean the fireplace itself after each use.
- Gas. They can operate on mains or bottled gas. To install gas-using equipment, a permit is required, and for connection, a representative of the gas service is required. Maintenance is extremely simple.
- Electrical. Easy to operate and run. They are powered from an outlet, but with daily use, the monthly electricity consumption is considerable.
- Eco-fireplaces are easy to maintain and use. They are safe, but their cost is quite high.
There are many options for placing a fireplace in a wooden house. Basically, it depends on the location and its shape.
Corner fireplaces fit perfectly into the free space in the corner of the room, helping to make the most of every square meter.
By type of location, fireplaces are divided into:
- Isolated. Most often they are installed as a separate part of the interior. Insulated fireplaces come in all shapes and are often placed right in the center of the living room because they require a lot of space.
- Direct. Quite popular at the moment. They can be built-in or attached to the wall.
- Angular. Fireplaces of this type are very compact and fit harmoniously into the interior design. They come in small sizes, so their use in small wooden houses is recommended.
Direct fireplaces are divided into built-in and wall-mounted. Built-in ones are often installed between two rooms. Their power allows you to warm both rooms. As for wall-mounted ones, they are placed against the wall and do not require much space.
Fire safety requirements (FPR)
The PPB requirements stipulate the conditions under which correct installation of any type of furnace equipment is possible. To a greater extent, they relate to the protection of the floor and walls of the building from accidental fire (due to contact of wood with hot surfaces).
The following protective measures will ensure the safety of housing and people:
- The use of special fire-resistant materials that protect the walls and ceiling in the area where the stove and chimney are located (if the house is two-story, the ceiling between floors should also be protected);
- Impregnation of elements of wooden structures bordering the hot parts of the furnace with special compounds.
Compliance with all fire safety requirements and proper use of fire protection equipment is the main condition for the safe operation of home heating equipment.
Video description
Video example of professional installation of a metal fireplace in a finished wooden house:
All work can be divided into main stages:
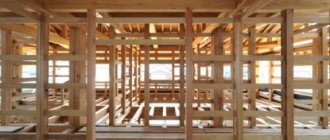
- Construction of the foundation. It is isolated from the foundation of the house, but is poured simultaneously with the latter even before the construction of housing begins. If it is necessary to introduce a fireplace into an already completed structure, craftsmen remove the floor covering and dismantle part of the ceilings. The depth of the pit should reach the freezing line of the soil; a layer of crushed stone and broken brick is formed at the bottom. The finished height of the formwork should exceed the floor level by 10 cm. When pouring the solution, reinforcing ligaments are used, leveled, and waterproofed after hardening.
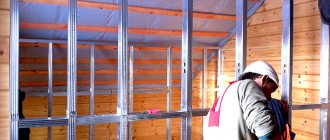
- Preparing the walls. They are sheathed with insulating materials, often in multilayer form. The sheets are fixed on metal guides, the joints are sealed using adhesive foil tape. An alternative solution for insulation could be additional brickwork laid flush against the wall.
- Fireplace assembly. The masonry is carried out according to the project, starting from the base, using a special heat-resistant mortar. The internal surfaces are formed from refractory bricks, the rest from solid bricks. The components that form the firebox and door are gradually introduced.
Assembling a fireplace in a wooden houseSource et.aviarydecor.com
Formation of the chimney. It can be internal, passing through the ceiling up to the roof, or external, removing combustion products from the fireplace. In the first case, a combination of two pipes inserted into one another is used
At this stage, special attention is paid to sealing.
Floor finishing. The space around the fireplace with a radius of up to 150 cm is protected using non-combustible materials - marble, porcelain stoneware, facing tiles.
A budget finishing solution is metal sheets. But over time they become uneven and give the room a utilitarian look.
Ceiling and wall protection in the form of sheathing
In addition to treating elements of wooden structures with fire retardants and mastics, they can be protected from the hot parts of metal furnaces by covering them with fire-resistant materials. When preparing for this procedure, it should be taken into account that the ceiling lining in the area of the roof outlet is carried out only with non-combustible materials that do not spoil the interior of the room.
Important! It is strictly prohibited to use flammable panels for upholstery.
The optimal cladding option is gypsum fiber boards treated with fire-resistant putty. To protect the walls, basalt cardboard can be used, covered with steel sheets on top. Most often, special decorative screens made of stainless steel are used. They not only protect surfaces well from burning, but also look quite aesthetically pleasing.
Another option for protecting walls from hot stove parts involves covering them with bricks placed on edge.
TOP design ideas: what a fireplace might look like in a wooden house
The budget category of projects is based on the use of ready-made metal fireplaces. For their harmonious implementation, it is enough to calculate the compatibility of the models with the characteristics of a particular structure, create a foundation, install components and lay the chimney. Such solutions do not always look like the notorious potbelly stoves: manufacturers offer an assortment of elegant products that can fit into both urban and classic interiors.
A laconic copy that only needs proper installation. Source pinterest.com.au
Models mounted in a niche trimmed with stone/brick, on a pedestal, are recognized as slightly more complex in terms of labor and material costs.
Here, when designing, it is necessary to take into account the load created by the materialSource fumat.lt
A fireplace in a wooden house, assembled according to an individual design project, belongs to the premium segment. Non-standard shapes predominate here - fireplaces in the form of an elongated oval, having a decorative panel framing the firebox, or a vertical orientation of the active zone.
Stylish solution implemented into the heating system of the houseSource pechiexpert.ru
Installation Requirements
Before equipping a wooden house with a fireplace, you need to take into account a number of fire safety requirements. The equipment should be located at a safe distance from wooden walls, and also away from curtains, drapes, clothing and other flammable products and objects. Open fire and heated surfaces pose a potential threat to the safety of the log house.
In addition, it is necessary to act on the basis of SP 55.13330.2016, which contains information on the relative position of various equipment and furniture in residential buildings. This set of rules emphasizes that the house must be designed to withstand the load from a factory-made fireplace. Combustion products must be discharged into the chimney.
All chimneys and chimneys are placed on the basis of SP 60.13330. The chimney should not pass through the living space. Its surface temperature is strictly 20 °C less than the ignition temperature of the material.
To install the chimney, it is recommended to use materials and metal structures that have not been previously used.
A brick fireplace has a unique appearance and a simple installation process, and it fits harmoniously into any part of the house.
Preparing for assembly
Before installing a stove in a country house with a pipe exiting through the wall, you need to prepare. Work requires special clothing and gloves. If you will be cutting metal products, it is advisable to wear safety glasses.
Selection of tools and materials
To complete the work, the following tools are required:
- drill, equipment for cutting material;
- heat-resistant sealant;
- riveter;
- clamps, dowels, corners;
- foil construction tape;
- screwdrivers;
- level, plumb;
- knife;
- ladder;
- When working with concrete walls, you will need a hammer drill.
Components for installing a chimneySource vse-postroim-sami.ru
The materials required are a steel pipe, with which the horizontal fragment is connected to the boiler. You also need a tee for connecting pipes, an elbow (with its help the structure is directed upward), and a support console. Brackets and dowels are used to mount products on the wall. The connection of several pipes is carried out using clamps. You also need thermal insulation material and a protective cap.
Choosing a location
The house has central and side walls. The second is located on the side of the slopes and under the roof overhangs. Liquid gets onto this part when it rains (if the drainage system is not fixed). There is a small roof overhang above the central walls, so the risk of liquid entering from the roof is minimal.
It is better to mount the smoke exhaust structure on the front wall. Here it is taken into account that there should be no windows or balconies on it along the line of the chimney. If you have to install a pipe through an overhang, then high-quality fire protection is installed.
Choosing a location for the chimney outlet through the wallSource stroychik.ru
Calculation of chimney height
Since it is possible to correctly bring a chimney through a wall to the street in a wooden house only if technical requirements are met, the first parameter that is taken into account is the height of the structure. It depends on the number of floors of the house. If the height of the building does not exceed 5 m, then the minimum parameter for the height of the structure is 5 m. If this value is neglected, the structure in the house will smoke in the house, the draft will deteriorate, and the performance of the heating device will decrease.
If the pipe is too long, fuel consumption will increase. When the height of a building exceeds 10 m, the main reference point is its ridge: it should be 0.5 m below the chimney. This characteristic is affected by the cross-section of the pipes and the power of the heating equipment.
Chimney heightSource vosaduly.ru
Pipe diameter calculation
The internal diameter of the structure must correspond to the dimensions of the pipe. Any narrowing of the internal volume of the pipe affects the formation of draft. The presented value is affected by the power of the equipment: the higher it is, the larger the internal diameter. You need to follow standard building rules:
| power, kWt | Internal section, cm | Minimum diameter, cm |
| up to 3.5 | 14×14 | 15,8 |
| 3,5-5,2 | 14×20 | 18,9 |
| 5,2-7 | 14×27 | 21,9 |
If we take into account all the technological features of installation, the structure will last for decades without significant problems.
How to properly heat the second floor
Supplying heat to the second floor of a house is a rather difficult task. As an option, you can consider installing a fireplace equipped with additional equipment. The fireplace has a number of advantages. Among them are the following:
- ease of operation;
- small sizes;
- use of almost any fuel.
How to properly heat the second floor
In fairness, it should be noted that most of our people consider it a luxury item, but this design is capable of combining democracy, aesthetic properties, and excellent performance of its main task - heating the room.
Heat supply to the second floor due to air convection. That is, passing by a heated fireplace wall, the air receives thermal energy and continues to move upward through a special box. Warm air is supplied to rooms located on the second floor through air ducts, which must be covered with thermal insulation. This is necessary to minimize heat losses and ensure fire safety.
Where is the best place to install it in the house?
You can stop at a place that is clearly visible from the outside, or at some inconspicuous corner. The main criterion for choosing a place for a good potbelly stove is access to it from literally all sides. The user needs to check whether everything is in order with the device during use.
Try to stick to this pattern
There should be at least half a meter between the pawn, the wall and other objects, including furniture, pipes, etc. This rule must be observed due to the fact that a potbelly stove for a summer house will get very hot, up to 500 degrees (usually up to 200-300, but the result depends on the features of the installation).
What types of surfaces are suitable for installing a potbelly stove for home on it:
ceramic tile; concrete floor; brick flooring (natural or synthetic composition - there is a difference, so it is better to approach substitutes and artificial imitators with caution); tin covering.
An example of installing a potbelly stove in a house
On what surfaces is it prohibited to place a potbelly stove in a country house:
- laminate;
- linoleum;
- soft coverings;
- parquet;
- a floor made of boards (wood, chipboard, fiberboard - does not matter, it is prohibited to install on any wooden surface).
Why is this restriction in place? A potbelly stove in a country house can cause a fire by constantly coming into contact with incompatible material for a long, and sometimes even short, time.
When choosing a place for a potbelly stove in a country house, you need to take into account the height of the room. Choose points that allow you to install the chimney pipe in a vertical position without the need to make joints, turns, or slopes. Please note that you will have to open the door to add fuel, so there must be enough space for the person adding fuel.
More installation examples in the photo:
Photo 1
Photo 2
Photo 3
Wood processing
The most common protective agents include special impregnations (fire retardants) and transparent mastics. The following elements of wooden structures are usually processed by them:
- ceiling beams;
- floorboards in the area where the stove is installed;
- walls adjacent to it.
Additional Information! When choosing products, you must keep in mind that mastic has a higher fire protection rating than colorless impregnation.
Fire retardant treatment of wood elements can be carried out not only by representatives of the Ministry of Emergency Situations, but also by the owners of the house themselves. In the second case, they will need to obtain a special certificate confirming the correct installation of the stove.
Manufacturing recommendations
The easiest way is to make a small portable stove with your own hands - the Robinson rocket, whose drawing is presented below. You will need cutting profile pipes, metal for legs and stands, as well as welding skills. Moreover, compliance with the exact dimensions indicated in the drawing is not necessary. You can take pipes of a different section, but you just need to reduce or increase them proportionally so that the parts fit together.
Drawing of an improved “Robinson” camping stove with nozzles made of a profile pipe, cut lengthwise into 2 parts
The most common versions of large rocket stoves are made from a gas cylinder or a two-hundred-liter metal barrel. You must understand that these ready-made elements are used as an outer hood, and the internal parts of the stove must be made from pipes of smaller diameter or laid out from fireclay bricks. Moreover, from a cylinder you can make both a stationary heater with a small bench, and a unit that can be moved.
Please note that calculating the thermal power of a rocket-type furnace is quite difficult; there is no single calculation method. It’s easier to rely on ready-made drawings of already working samples and assemble according to them. You just need to compare the dimensions of the future stove with the dimensions of the heated room. For example, to heat a small room, the size of a cylinder is enough; in other cases, it is better to take a large barrel. The selection of internal parts for them is shown in the diagram:
2 options for potbelly stoves - from a gas cylinder and a standard iron barrel
Stove rocket from a cylinder
In addition to the gas cylinder itself, to assemble the stove you will need:
- profile pipe 150 x 150 mm for the firebox and loading hopper;
- steel pipes with a diameter of 70 and 150 mm will go to the internal vertical channel;
- the same with a diameter of 100 mm for the chimney;
- insulation (basalt fiber with a density of at least 100 kg/m³);
- sheet metal 3 mm thick.
For a master skilled in welding, this work will not be particularly difficult. The top of the cylinder should be cut off along the seam, after first unscrewing the valve and filling it to the top with water. Openings are cut on both sides for installing a firebox and inserting a chimney. A profile pipe is inserted and connected to a vertical channel, which is discharged through the bottom of the cylinder. Further work on the manufacture of the rocket furnace is carried out in accordance with the drawing:
At the end, the upper part must be welded into place, then carefully check all seams for permeability so that air does not flow uncontrollably into the oven. After this, you can attach a chimney with a water jacket (if available) and begin testing.
Masonry of a rocket-type heater made of bricks
This stove option will require the purchase of fireclay bricks; ordinary ceramic bricks will not work for a rocket stove. The masonry is done using fireclay clay mortar; it is also sold as a ready-made building mixture. How to make a stationary rocket stove:
- First you need to dig a hole, compact the bottom and pour a foundation measuring 1200 x 400 mm and 100 mm high, as shown in the photo.
- After hardening, the foundation is covered with a sheet of basalt cardboard and the combustion chamber, a bunker for loading firewood and a vertical channel are laid. A door is installed at the end of the combustion chamber to clean the ash pan.
- After the clay has dried, the pit is filled up, and a pre-selected pipe or small barrel with a diameter of 450 mm is placed on the vertical channel. The gap between the brickwork and the pipe walls is filled with fire-resistant insulation, for example, basalt wool, expanded clay, vermiculite.
- At the last stage, a cap made of a large metal barrel with a diameter of 600 mm is put on the structure. First, a cutout is made in its upper part and a pipe is installed to connect the chimney. When the barrel turns over, he will be at the bottom.
Then it’s a matter of technology; you can take the chimney directly outside or build another bench with smoke circulation. For this purpose, ordinary ceramic bricks and clay-sand mortar will do. The order of the brickwork of a rocket stove with a small bench is shown in detail in the video:
Stages of fireplace construction
After familiarizing yourself with all fire safety requirements and proper installation, the process of constructing a fireplace becomes clearer. But, in addition to this, it is necessary to take into account all the features of a wooden house and select the optimal building materials. Let's look at this using the example of a brick fireplace.
Stage #1 - necessary materials
The following materials are required for its construction:
- Fire-resistant and solid stove bricks, grates, doors, dampers.
- Fireproof materials for floor coverings (ceramic tiles, sheet iron).
- Basalt slabs, mineral insulation sheets (with reflective screen) for walls.
- Chimney (sandwich, ceramic or other), fire-resistant wool.
When constructing a fireplace, it is necessary to protect the wood from the potential threat of fire.
When all the building materials and a rough work plan are ready, you can safely begin work. However, you need to take into account the nuances of each stage of work.
Stage #2 - foundation construction
Before installing the foundation, a special place for the fireplace is prepared. It is advisable to provide for this point during the construction of the house. Otherwise, it is necessary to dismantle the required part of the floor covering.
Now you can start digging a pit. Crushed stone, stones and brick remains are poured into the bottom. The formwork must be more than 10 cm above the floor surface.
Next, the reinforcement is installed and the mortar is poured, the surface is leveled as much as possible. It must dry and only then can you continue installing the fireplace.
Proper installation of the fireplace foundation will ensure safety in the room, so it is extremely important to familiarize yourself with the diagram in advance and follow the recommendations
Stage #3 - assembling the fireplace itself
In addition to bricks, the fireplace will also need grates, a glass or regular door, and dampers.
Brick laying should be carried out on the basis of a pre-developed fireplace diagram. It is optimal if this is done by a builder with experience in bricklaying. It is recommended to use a solution that can withstand high temperatures.
When laying fireplace bricks, there is no particular need to rush, but it is best to act as carefully, carefully and leisurely as possible
Stage #4 - installation of the chimney
This stage is one of the most important - a well-constructed chimney guarantees safe operation and good ventilation. Experienced craftsmen recommend installing chimneys with outlets to the outside. Smoke must not be vented to the second floor or attic.
When choosing materials for a chimney, it is important to take into account the temperature difference inside it. After all, the temperature of gases sometimes reaches 400 °C or more.
This can be a double-circuit or steel pipe (if the gas temperature is up to 400 °C), brick, ceramic pipe, fire-resistant glass. It all depends on the design of the fireplace and the personal preferences of the owner.
When installing a chimney, it is important to leave a gap between the chimney and the ceilings of at least 15 cm. When passing through the ceilings, the chimney is additionally insulated with fireproof material.
If the chimney is brick, then it is constructed according to the same scheme as the fireplace itself. A solution with high heat resistance is prepared, and the bricks are laid according to a previously drawn up pattern. Particular attention is paid to the tightness of the structure. We recommend that you read the detailed instructions for laying a chimney.
If the fireplace is installed incorrectly, the fuel will burn poorly and the firebox will smoke. In some cases, improper installation can cause a fire.
When installing a fireplace chimney, it is important to leave a gap between the chimney and the ceilings, which will be at least 15 cm
Even if desired, it is impossible to install a chimney that does not require constant cleaning. Over time, soot forms on its inner surface, which must be removed.
Construction device
The main parts of the fireplace are the firebox and chimney.
The main functional parts are the firebox and chimney. There are also other important components:
- heating device;
- valve;
- ash pan;
- lining;
- grate;
- forced convection system;
- safety doors;
- fire cutter.
The external device consists of a cladding and a portal. The latter serves for decoration and maintaining a certain style of the room.
Installation of the fireplace can be done using separate parts purchased in the store, or you can create it yourself from the necessary building materials. An industrial firebox is usually made of cast iron or steel. Do-it-yourself masonry is possible using refractory bricks.
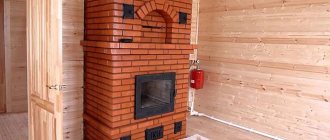
Russian brick stove
The Russian brick stove has the following specific advantages:
- maintaining heat in the home due to long cooling;
- the ability to maintain heat in a room of any size;
- fire resistance.
Meanwhile, these devices also have a set of certain disadvantages:
- To build a furnace, you must have certain skills and knowledge, which is why it is advisable to invite specialists to construct it.
- To build a furnace, it is necessary to first build a separate, buried foundation.
- The oven is quite large in size and can take up quite a lot of space.
- This circumstance must be taken into account when determining the location where the stove will be installed.
Russian brick stove
For the manufacture of stoves, two materials are used - metal and brick (plain red, and fireproof, also called fireclay).
A stove for a house made of wood, for the manufacture of which I use steel or cast iron, the thickness of which is from 3 to 5 mm.
The wall of this design consists of two layers of metal. There is an air gap between them. This layer is designed to protect the room from so-called thermal shock.
Installation of a stove-fireplace
The simple installation process consists of several steps:
- floor preparation (the base is laid out of brick);
- installation of fire-resistant walls;
- laying tiles on the base;
- construction of a flue or chimney.
How to install the stove? This question is asked by every summer resident who has just built a summer house. First of all, prepare the base. A flat base is mounted with plasterboard, plywood or glass magnesite using self-tapping screws. The base with slabs looks great, smoothly transitioning into a ceramic floor or podium.
Walls in heat-reflecting tiles are made according to the same instructions as the base. Heat-reflecting sheets are primed and tiled. The primer is applied in two layers, and the tiles are glued with heat-resistant glue. Again, it is appropriate to make decorative elements in transition areas. The same ladle can be beautifully decorated so that it does not seem out of place next to the stove.
It is now fashionable to collect smoke waste from ready-made “sandwich” chimneys. They are already ready, they just require assembly into a single structure and mounting. In addition to sandwich chimneys, you can make brick and asbestos chimneys. Brick ones will last you longer than all other types because they do not deteriorate from prolonged use. Exiting a chimney through the ceiling is labor-intensive, but through the wall it is more convenient.
The sequence of actions when installing a chimney looks like this:
- The first part of the chimney without insulation is attached to the pipe so that it does not melt due to prolonged burning.
- The hole for the pipe is made in the right place and, if necessary, treated with thermal insulation around the chimney.
- The height of the pipe is 4-5 meters; as it rises, the chimney is secured with brackets.
- A spark arrestor with a mesh is installed at the upper end of the chimney. It prevents moisture and snow from entering the chimney.
Types of foundations
Among the known types of foundations for arranging furnaces, the following are suitable:
- concrete pillars;
- strip foundation;
- monolithic slab.
Each type has its own characteristics. Concrete pillars are suitable for both a heavy metal stove and a massive brick fireplace. The number of supports is selected based on the total weight of the structure and the condition of the soil at the installation site. To install them, holes of the required size are made in the floor, and after installing the posts, a frame of welded metal channels is laid on them.
Strip foundations are erected according to the classical scheme. According to the method, when constructing them, formwork is first made around the perimeter of the supporting structure, into which liquid concrete is then poured. All other operations are performed in exactly the same way as described in the previous case.
Important! The strip base should not be connected to the foundation of a wooden building, since due to its small mass in winter it can be squeezed out of the ground.
The monolith is mainly used when installing fireplace-type stoves in dachas. Its thickness can reach 15–20 cm, which is quite enough to withstand the design pressure on the foundation.
Any of the types of foundation discussed above must sit for some time after pouring. You can begin installing the stove on it in about 28–30 days.
Video description
This video clearly shows an example of violation of the rules for installing a sandwich chimney:
- The position of the pipe is not observed. It is installed strictly vertically. When insulating main walls with foam plastic or mineral wool, long dowels are used to secure the chimney.
- There is no ebb on the side roof slope. In this case, precipitation can get on the insulation and impair its functions.
- Insufficient overall vertical height. This error leads to poor traction.
Problems arise when using low-quality insulating material. Cheap insulation shrinks over time, so there is a possibility of local overheating of some parts of the chimney.
Conclusions and useful video on the topic
Visual video instructions for installing a fireplace:
To ensure that the fireplace causes less trouble in the future, it must be installed correctly. It is important to take into account fire safety standards and requirements. In addition, each stage of fireplace installation must be designed based on mathematical measurements and calculations. Only compliance with the instructions and all installation rules will ensure safe and comfortable operation.
Still have questions about the stages of installing a fireplace? Or do you want to talk about your personal experience of building a fireplace in a wooden house? Share your story - the comment box is below. Also here you can ask questions to our experts and other site visitors.
Expert advice
Before purchasing the necessary materials for arranging an external chimney, the power of the equipment is determined. It affects the diameter of the pipes. You can also use these expert tips:
- if the heating equipment is equipped with forced draft, then it is not necessary to increase the vertical section of the structure; it is enough to remove the horizontal pipe;
- a horizontal section that is too long helps slow down the smoke flow (the value should not exceed 1-1.5 m);
Rules for installing chimney pipesSource krovgid.com
Inspection holes are installed not only on the outer part of the structure, but also on the internal horizontal element.
Let's sum it up
So, there are not so many options for the correct location of a brick or iron wood-burning stove. They depend on the layout of the house and the design of the stove itself. It is necessary to choose a location at the design stage and it is better to have a real specialist do this, who can calculate both the heat loss of the house and the heat transfer of the furnace located in one place or another.
But no matter what option you choose, wall-mounted, corner, in an interior partition, with a hob or fireplace, fire safety measures should not be neglected under any circumstances.
And then your home will be warm, cozy, fun and festive, no matter what bad weather is raging outside the window.
Service life of the external chimney
The service life of the structure depends on the material of its manufacture and correct installation. When used correctly, ceramic pipes will perform their function for up to 40 years. A brick chimney can be used for more than 50 years. Stainless steel will have to be replaced after 15-20 years, but it all depends on the thickness of the metal. Galvanization has the shortest service life: up to 10 years.
The durability of the structure is affected by the heating temperature of the exhaust gases. A high-quality sandwich system will last up to 20 years. Structures last longer if heating equipment runs on gas or pellets.
Selection and installation of a chimney
Ceramic chimneys have the best performance characteristics. They are durable, provide good traction, and condensed moisture does not settle on the walls. Shelled brick options also reduce the fire hazard.
If a galvanized pipe is chosen as the base, care must be taken to insulate the joints with wood and roofing with non-combustible materials.
In sandwich chimneys, after 10 years of use, the layers may begin to separate from each other. But they do not require additional insulation.
Regardless of the material chosen, the chimney must be equipped with a hatch to clear soot accumulations.
Briefly about the main thing...
Chimneys can be single- or double-walled. Based on the material of manufacture, metal, brick structures and structures made of sandwich pipes are distinguished. The last option is optimal for private houses. When installing a chimney, the rules for its placement in the room are observed. Its functionality, as well as the presence of draft in the heating equipment, depends on the correct determination of the diameter and height of the structure.
The installation technology through a wooden and brick wall is the same, but there are some nuances: wood is more susceptible to ignition and requires maximum protection.
During installation, you must comply with fire regulations, and also take into account possible errors. Date: September 25, 2022
Installation of a metal furnace
When considering the features of the placement of metal and brick stoves, approaches to their installation are somewhat different. Iron stoves may not weigh too much, so during installation they do not need a foundation.
Important! According to the provisions of SNiP, only metal stove products with a mass exceeding 80 kg need a reliable foundation.
With a lower weight indicator, such a product is installed on a substrate made of refractory material directly on the floor. Once the location has been chosen and the issue with the foundation has been resolved, you can proceed to the procedure for installing a metal furnace. When installing a heating device, all requirements specified in the section on the protection of wooden structural elements of the house must be met.
For this purpose, a metal stove with a water boiler is sometimes simply lined around the entire perimeter with ordinary bricks. In all other respects, its installation comes down to installation in an already prepared place. The only thing you should pay attention to is compliance with the rules for venting the chimney outside.
Beautiful examples in the interior
Decorative, spectacular finishing options for beautiful and stylish stoves.
A massive stove-heater covering the entire wall will become a bright accent of the steam room. It can be decorated with tile inserts, finished with stone and original brickwork. The rest of the interior details, including basins with ladles, are made of light wood. Brooms are an organic accessory.
If you want to decorate a bathhouse in a high-tech style, you need to use a laconic small heater, possibly a mini one, and shiny metal sheets in the interior. The latter can also act as protection for wooden walls.
The correct choice of stones will not only improve the quality of steam, but also decorate the interior. Experts recommend giving preference to river pebbles, basalt, and porphyrite, which are not afraid of high temperatures.
How to install the stove correctly
Already at the time when they are building a house, the owners are thinking about the place where the heating system will be located. The installation process itself occurs later. In the foundation of the dacha, space is specially allocated for a heavy structure of approximately 200 kg. in finished form. In a two-level house, it is worth considering the possibility of heating the second floor by installing a mini-oven or potbelly stove on the second floor, or by installing steam heating. The latter will cost you a pretty penny, as it requires cooking and installation of oven appliances. Keep a ladle in the house to replenish the boiler with water in a timely manner. If it is high, then the bucket should have a narrow spout for convenience.
A good location for the stove is an outer wall , so you will create comfort and be able to use it for cooking. To heat the entire room, it will be convenient to place the stove in the center.
Calculate the dimensions of the fireplace correctly
When designing and creating a drawing of a future fireplace, it is very important to correctly calculate its width and height
| Dimensions of elements, mm | Room area | |||||
| 12 m2 | 15 m2 | 20m2 | 25 m2 | 30 m2 | 40m2 | |
| Portal width | 400 | 500 | 600 | 700 | 800 | 900 |
| Portal height | 420 | 490 | 560 | 630 | 700 | 770 |
| Firebox depth | 300 | 320 | 350 | 380 | 400 | 420 |
| Rear wall height | at least 360 | |||||
| Rear width | 300 | 400 | 450 | 500 | 600 | 700 |
| Smoke collector height | 570 | 600 | 630 | 660 | 700 | 800 |
| Section of a chimney with a rough inner surface | 140*270 | 140*270 | 270*270 | 270*270 | 270*400 | 270*400 |
| Section of a chimney with a smooth inner surface | 140*140 | 140*270 | 140*270 | 270*270 | 270*270 | 270*270 |
The size of the firebox depends on the area of the room. There is a simple formula that will allow you to correctly perform all the calculations:
We measure the area of the room and divide it by 50.
The resulting value is the size of the combustion window.
To heat a small room of 20 square meters, a fireplace with a combustion opening of 0.50 m2 is sufficient.
We also suggest using the table to correctly calculate all the necessary parameters for your future fireplace.
After calculating the width of the firebox, you need to decide on its depth. The heating efficiency of the fireplace directly depends on this parameter. According to the standard calculation formula, it is equal to 2/3 of the height of the firebox.
If you ignore this factor and, for the sake of appearance, decide to increase the depth of the firebox, this will directly affect the heat transfer of the fireplace.
Almost all the heat received from the combustion of wood will go through the pipe to the street. In this case, the fireplace will serve more of a decorative function, delighting you with the beautiful glow of the fire. You will only have time to add firewood to the firebox.
When the depth of the combustion chamber is reduced in relation to its height, there may be a risk of smoke in the room.
In addition to the correct calculation of the firebox, great attention must be paid to the arrangement of the chimney, on which fire safety and good draft depend. First of all, you need to correctly calculate the diameter of the pipe outlet and its height
First of all, you need to correctly calculate the diameter of the pipe outlet and its height.
According to SNiP standards, the diameter of the chimney must be at least 150:170 mm. If you have chosen a chimney with a rectangular cross-section, then its width should be equal to 1/10 of the size of the combustion chamber.
The height of the chimney should not be less than 5 meters. But sometimes, with high floor heights, you will need to raise the chimney even higher. In this case, we focus on the roof ridge and the pipe outlet location.
The figure shows how to correctly determine the height of the chimney.
Chimney height above roof
Therefore, carefully calculate all these parameters before you start building a fireplace with your own hands.
Things to know before choosing a location. General provisions
The main thing we found out is that it is necessary to determine the location for the stove when designing the building. This is explained by the fact that it will be necessary to install a chimney pipe to remove combustion products. During your planning, you should be guided by the following requirements.
- As for the location of the chimney duct, in most cases the pipes are installed next to the internal main walls.
- Installing a stove involves arranging a special foundation, the depth of which can vary between 50-100 centimeters (the specific figure depends on the design of the chimney - whether it is mounted or free-standing).
- The number of floors is also taken into account and whether there is a need to heat the upper floor.
- Even when choosing a specific location, you should definitely remember that the beams should not be located either above or below the stove.
- The layout of the building and the number of rooms that will be heated are also taken into account.
- The heat transfer of the stove surface is calculated (this indicator must correspond to the heat loss of the building).
- The approximate design of the heating device and its dimensions are determined.
- If the entire house will be heated using stove heating, then the optimal number of stoves and chimney ducts should also be calculated.
Note! According to experts, stove heating should be arranged in such a way that the number of chimney ducts is minimized. To do this, you can do, for example, the following: install one stove that will heat several rooms at once. In this case, the stove should be located in a corner, next to the main wall, so that the percentage of free space in the room is maximum.
In addition, the fact that coal or firewood will need to be constantly brought into the room is taken into account, which means that the heating device should be located as close as possible to the entrance. This way you will provide yourself not only with free access to the structure if inspection is required, but also with a minimum amount of debris and dust.
Installation instructions
The high-quality construction of a fireplace in a house made of timber depends on the competent choice of building materials. Heat-resistant fireclay bricks are selected for the firebox. To build the building, you will need red brick. For the construction of the structure, special heat-resistant mixtures are used.
Foundation and walls
During the construction of wall-mounted fireplaces, the wall connecting to the heating equipment must be made of heat-resistant materials. Metal sheets are used for the smoke exhaust device. The dimensions of the brick wall should be 50 cm larger than the dimensions of the fireplace.
It is best to make a base for the hearth that is independent of the building. This will make it possible to prevent shrinkage and the formation of cracks. During operation, wooden elements begin to gradually deform due to the evaporation of excess moisture.
To organize the safety of the heating system, it is necessary to correctly organize the units in which the chimney passes through the roof and ceilings. The holes must be insulated with heat-resistant materials.
https://youtube.com/watch?v=f6ZylrT8Hto
To create a foundation you will need to dig a pit. Its dimensions should be 20 cm larger than the dimensions of the structure. The depth is approximately 80-100 cm, this will depend on the size of the fireplace. Broken bricks and crushed stone are poured into the pit. Next, you need to pour concrete mortar into the base. To fully gain strength, this foundation must stand for at least a month, only after which can the construction of the fireplace begin.
Brick construction
The laying should be carried out strictly taking into account the scheme. Solid brick is used for the frame, fire-resistant brick is used when laying the internal combustion chamber, and a special heat-resistant composition must also be used. There are certain rules for installing a fireplace in a log house:
- When laying a new brick row, you need to control the horizontal plane using a level.
- Laying is done using a trowel and trowel.
- The solution layer is 3-4 mm.
- The building composition should not extend beyond the edges of the brick.
- During the construction of the firebox, it is necessary to ensure its horizontal position. The combustion chamber in open fireplaces is made using brick, and in closed ones the inner surface is lined with metal. For cast iron fireplaces, it is advisable to install a window made of heat-resistant glass. Closed fireboxes are considered the most effective, since they make it possible to control the combustion in the hearth.
- The masonry is made at positive temperatures, this ensures better strength of the entire structure.
Installation of a chimney
A universal chimney is considered to be a design made of ceramic pipes. To carry out installation correctly, you need to adhere to certain rules:
- The installation of the chimney is carried out with control of the verticality of the pipes and the straightness of the entire system.
- The internal surfaces of the chimney walls must be treated with liquid clay.
- A cement-sand mortar is used to construct the chimney.
- When arranging the chimney, non-combustible materials are used, and foil wool is placed inside.
To build a safe fireplace, it is recommended to install a three-layer chimney. If there is not enough free space, then a double-circuit stainless steel chimney is used. Wooden parts must not touch the pipe.
This is interesting: a do-it-yourself chimney.
Floors and external cladding
The covering on the floor near the fireplace must be made of non-combustible materials. For the area in front of the combustion chamber, you can use fire-resistant stone. The floor covering can be made of stone or tiles. The simplest method is laying sheet metal.
If the firebox is not equipped with a glass door, you can additionally install a metal grill. To give the home a unique style and original appearance, tile or plaster finishing is used. Finishing is especially important for fireplaces with a closed combustion chamber. The use of brick, marble or tiles is allowed.
Advantages of a simple stove
All simple type ovens have many unique advantages. For example, a minimum of time is spent on their construction. Some models can be erected in just an hour, while others take 1-2 days to install. Small structures are lightweight, which means they do not require a foundation, which saves time, money and effort. You can choose any place to install the structure; if mobile versions are made without using a binder solution, then it can be disassembled at any time, moved and installed in a new location. Any materials can be used for fuel - pine cones, logs, stems of large plants, and so on.
Option for decorating a fireplace stove Source o-remonte.com
It is also important that such designs have lower fuel cell consumption. For example, compared to potbelly stoves, you will need several times less firewood. If you use the simplest stove without binding stones with clay, you can increase the heat transfer, which will be greater than from an open fire. This is a great option for hiking, but not very convenient if you travel without transport. Since the brick is heavy and capacious, it is inconvenient and difficult to carry.
An additional big advantage is the minimal level of smoke, and the fuel itself practically burns without waste. After good heating, the temperature of the stones can reach 1 thousand degrees, which guarantees not only good and fast heating, but also quick cooking of various dishes.
How to build a stove with your own hands - drawings and construction technology: step-by-step instructions, video
Despite the fact that many private houses today are equipped with one or another heating system, brick heating structures do not lose their popularity. On the contrary, engineers and craftsmen are developing more and more new models of stoves, more compact, including various functions. Indeed, stove heating will never be superfluous for a private home, as it can help out the owners in different situations. For example, in autumn or spring, when the nights are cold, but it seems too early to turn on the autonomous heating, a heated stove will create a cozy atmosphere in the rooms and relieve them of excess humidity. The stove will help maintain an optimally favorable atmosphere and temperature balance in the house that is comfortable for humans.
How to build a stove with your own hands drawings
Therefore, the search query about how to build a stove with your own hands, the drawings of which will tell in detail about the correct sequence of masonry work, does not leave the pages of the Internet. Today, even those people who have no experience as a stove maker at all show a desire to try their hand at this craft. If you decide to install a stove in your house on your own, then beginners are advised to choose a simple version of this structure with a clear procedure.
In addition to the availability of the design, when choosing a stove model, you should pay attention to its heat capacity, that is, how much area it is designed to heat. It is important to take into account the functionality of the structure and decide what you would like to get from it.
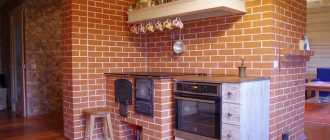
Types of brick kilns
There are several main types of stoves - some of them perform only one main task - heating the house, others are used only for cooking, and others include several functions at once in their “set of capabilities”. Therefore, in order to decide on the right model, you need to know what each of the varieties is.
- A heating and cooking structure can not only heat one or two rooms, but also help cook food and boil water. If the model is equipped with an oven and a drying niche, then it becomes possible to bake bread and dry vegetables and fruits for the winter.
The most versatile are heating and cooking stoves.
A heating and cooking stove is often built into a wall or acts as a wall itself - for this, it is turned with the stove and firebox towards the kitchen, and with the back wall towards the living area of the house. You can solve two problems at once - heating the premises and making it possible to cook food in a separate room.
If the structure is additionally equipped with a fireplace, then the stove will work not only as a functional structure, but will also become a decorative decoration of the house.
- The heating type of stoves is designed only for heating the premises of the house. Some models have not only a combustion chamber, but also a fireplace. Thus, the oven can operate in two modes - when only one of the functions is used, or they are both activated simultaneously. Most often, heating stoves are built into the wall between rooms or installed in the middle of one large room, dividing it into zones.
Heating stove
A similar structure is erected both for the main heating of the house and as an additional one, which is used in the spring and autumn to maintain normal temperature and humidity in the rooms. Heating stoves are usually installed when the kitchen has already realized its own cooking capabilities, or in a house with a large total area, where several stoves are being built that perform different functions.
On a summer cottage in a small house, it is better to install a multifunctional structure that can help out in several situations at once.
- The cooking stove is built in the kitchen, and its design is designed specifically for quick cooking. However, this function does not deprive it of its heating capabilities, since its entire body, back wall and cast iron stove are well heated, releasing heat into the room.
The main function of this stove is cooking.
The cooking stove is usually compact, so it is perfect for installing it in a country house or in a small kitchen of a private house.
Having such a compact but functional unit, you can eliminate the risk of freezing or being left without dinner and hot tea even if the electricity and gas supply is turned off.
Many different models of all listed types of furnaces have been developed. They can be very miniature and occupy a large area. Therefore, having settled on one of the models, before stocking up on materials for its construction, you need to measure and draw its base on the floor of the room in which it is planned to be installed. This way you can visually determine how much free space will remain in the room.
How to choose the right place to install the stove?
In order for the stove to work efficiently and transfer maximum heat to the premises of the house, and also be fireproof, it is necessary to choose the right location for it.
It is especially important to think through this point if the stove is built into a finished building, since the chimney pipe must pass between the ceiling beams and not accidentally bump into them, so the installation option must be calculated as accurately as possible.
A brick stove structure can be installed in different places in a room or between two rooms. Which place is better to choose will be discussed further.
- To get the maximum effect from the stove, you should not install it near the outside wall of the building, as it will cool down quickly and is unlikely to heat more than one room.
- Some stove models are installed in the center of the room or offset from it to one side or the other. This location is chosen if the room needs to be divided into separate zones. Moreover, different sides of the stove structure may have different decorative finishes, made in a style that matches the design of a specific area of the room.
- Quite often, the stove is built into a wall between two or even three rooms, which allows for the most efficient use of the generated heat. In this case, for fire safety purposes, it is very important to provide reliable insulation of the walls, ceiling and attic floor where the chimney pipe passes.
- When choosing an installation location, it is also necessary to ensure that each side of the foundation for the furnace should be 100÷150 mm larger than the base of the furnace itself.
- To accurately determine the size of the base and height of the stove, it is recommended to always choose a model that comes with an order diagram.
Having chosen the stove model and the place for its installation, you can purchase all the necessary materials and prepare the necessary tools. The amount of materials will depend on the size and functional features of the stove model, and the tools for masonry are always the same.
Tools required for masonry work
To work you will need to prepare a very “solid” set of tools
Tools for laying bricks and pouring the foundation will require:
- Rule - This tool is used to level the surface of a concrete foundation.
- A hammer-pick is necessary for splitting and trimming bricks.
- Veselka is a wooden spatula that is used for grinding clay and lime mortar.
- A stove hammer is used to split bricks and remove dried mortar that has protruded beyond the masonry.
- A broom made from sponge is intended for cleaning the internal channels of the furnace from sand and solution that has got into them.
- A lead scriber is needed for markings if the stove is finished with tiles.
- A building level is necessary to control the evenness of the rows and the surface of the walls.
- A scriber is a rod used for markings.
- A plumb line is a cord with a weight designed to check the verticality of the output surfaces.
- A construction angle with a ruler to check the correctness of external and internal angles, as they must be perfectly straight.
- Pliers are used for bending and biting off wire to secure cast iron stove elements in masonry seams.
- Rasp - this tool is used to remove beads and grind in lumps in dried masonry.
- The chisel is used for splitting bricks and dismantling old masonry.
- A rubber hammer is necessary to level the bricks laid on the mortar using the tapping method.
- Trowels (trowels) of different sizes are used to apply mortar when laying bricks and remove the mixture protruding from the seams.
- Joining is a tool for leveling mortar in masonry joints. It is used if the masonry is done “for jointing”, without further cladding.
- Manual tamping will be required to compact the soil and backfill layers into the foundation pit.
- Containers for mixing solution and clean water.
- A sieve with a metal mesh for sifting sand.
Goats will make it easier to lay out the top rows
- A stand for the convenience of working at heights, called “goats”. The surface of this device is of sufficient size not only for comfortable movement of the master, but also for installing a container filled with solution.
Arrangement of the foundation for a brick stove
The foundation for the stove is usually prepared together with the foundation of the house, but they should not be in contact with each other, much less be combined into a single structure. New foundations tend to shrink, which can lead to deformation of one of them, which will lead to damage to the other. That is why they must be installed separately from each other.
If you are building a stove in an already built house with a wooden floor, you will have to do quite a lot of work. In the place where the stove will be installed, the floor boards will have to be removed by cutting a hole to the size of the future foundation.
If the foundation under the house is monolithic, and the selected stove model is not too massive, then the structure can be erected on it, having previously laid waterproofing material on the installation site.
The foundation should have the shape of the base of the furnace, however, as mentioned above, each of its sides is made larger than the side of the furnace by 100 ÷ 150 mm.
- If the floor in the house is wooden, markings are made on it along which the boards will be cut.
- Then a pit is dug in the subfloor soil according to the shape of the future foundation, the depth of which can vary from 450 to 700 mm, depending on the composition of the soil.
- The bottom of the pit is compacted, and its walls are lined with plastic film or roofing felt.
A pit with a layer of waterproofing on the walls and a sand and gravel cushion at the bottom
- Then, a sand cushion 100÷150 mm thick is laid on the bottom, depending on the depth of the pit, and compacted well using a hand tamper.
- The next layer, on top of the sand, is filled with crushed stone, which is also compacted, if possible. This layer can be from 150 to 200 mm.
- Next, wooden formwork in the form of a box is installed along the perimeter of the pit. Moreover, polyethylene or roofing felt remains inside it, and then is fixed to the walls using a stapler and staples. This waterproof material will preserve the mortar poured into the formwork, preventing moisture from leaving it, which will give the slab the opportunity to dry and harden evenly.
- The foundation should have a height of approximately 250 mm below the level of the “clean” floor, that is, two rows of bricks will need to be laid on the finished foundation so that it rises flush with the floor surface.
- Some craftsmen, on the contrary, raise the foundation above the floor by 80÷100 mm in order to save bricks. The convenience of this solution also lies in the simpler joining of the side walls of the foundation with the surface of the floor covering.
- The next step is to install a reinforcement grid made of steel reinforcement 4÷6 mm thick into the formwork, to its entire height. The rods are tied together with wire twists.
- Next, in the lower part of the formwork, to a thickness of 250÷300 mm, you can pour a coarse concrete solution mixed with cement and gravel in the proportions 1: 3, or cement, crushed stone of the middle fraction with the addition of sand, in the ratio 1: 2: 1. But, in principle, you can use a regular concrete solution of sand and cement.
- If a coarse mixture is poured down, then immediately, without waiting for it to set, a finely mixed solution is laid out on top.
- The poured concrete mixture is leveled according to the rule along the upper edges of the formwork boards, after which it is recommended to lay and sink 15÷20 mm into the solution a reinforcing mesh with cells of 50 mm.
The upper reinforcing belt can simply be sunk into freshly poured concrete mortar
- The surface of the foundation is leveled again, and if necessary, concrete mortar is added to the formwork, on top of the mesh.
- Next, the foundation is left to harden and gain strength - this process will take from three weeks to a month, depending on the thickness of the layers of the poured mortar. To make the concrete more durable, it is recommended to spray it with water every day during the first week, starting from the second day.
- Waterproofing is laid on top of the frozen foundation, consisting of two or three sheets of roofing material, which are laid one on top of the other.
Laying will be carried out only on the layer of laid waterproofing (roofing felt)
- To begin laying the first row, it is recommended to make markings on the waterproofing material, indicating the location of the stove base. Thanks to the outlined perimeter of the base, it will be much easier to install the first row of bricks and maintain the evenness of the sides and corners.
After these preparatory works, you can proceed to the masonry.
Dry masonry
Even experienced craftsmen, when starting to lay a previously unfamiliar structure, first do it dry, that is, without mortar. This process helps to understand the intricacies of the internal channels of the furnace and not make mistakes during the main masonry. The entire structure is raised dry, and each of the rows must be laid out in accordance with the order applied to the stove model.
When performing dry masonry, it is necessary to maintain the thickness of the horizontal and vertical rows. To keep this parameter the same throughout the entire masonry, you can use slats 5 mm thick. Of course, it will be difficult to measure vertical seams with small pieces of slats when laying dry, so they will have to be determined visually, but for horizontal seams, slats must be used. By applying them, after laying out the last row of the structure, you can see the actual height of the stove.
As an example of using slats, you can consider this photo.
Maintaining the width of horizontal and vertical seams using calibration slats
It is especially important to adhere to a uniform thickness of the seams if the masonry is being made for jointing and will not be finished with additional decorative materials in the future.
When making dry masonry, it is important to understand the configuration of the channel through which the smoke will leave the firebox and rise to the chimney. If a mistake is made when laying out this passage, then you will have to reposition part or even the entire structure of the stove, since backdraft may form and smoke will flow into the room during kindling.
Having raised the stove dry before laying the chimney pipe, the structure is dismantled. Moreover, if not only whole bricks were used in the rows, but also their small fragments, then when disassembling each of the rows can be folded into a separate stack, putting the row number on one of the bricks. Sometimes, in addition, the number of the brick in each row is also indicated. Such a system will speed up the work, since all the material will be adjusted and laid out in the required order, and all that remains is to soak it one by one and place it in the rows of the oven, but already on the solution.
When performing the main laying, two slats are installed on the edges of the previous row, between which a solution 60÷70 mm thick is applied. Then the brick of the top row is placed on it, leveled and tapped until it rests against the slats. It is necessary to have such calibration devices for three rows, since it can be pulled out of the seam only after the solution has set. So, having laid out three rows, the slats are pulled out from the lowest seam, cleaned and laid on the fourth - and so on. If you are not sure that the vertical seams will be the same thickness, you can also prepare a short strip for them, which will be rearranged into the next seam immediately after leveling the two adjacent bricks.
It is optimal to have a set of calibration slats for three rows
After pulling the calibration strips out of the seam, there will be a fairly deep gap between the bricks. It is filled with mortar, the excess of which is removed with a trowel, and then put in order using jointing.
Processing seams for jointing
If the calibration slats were laid on both edges of the brick, then on the inside of the wall there will also be recesses between the seams. They also need to be carefully sealed, since the seams must be sealed, filled with mortar across the entire width of the brick.
It is very important, when laying on mortar, to check each of the laid rows with a building level so that the entire structure does not warp.
Such simple auxiliary devices as calibration slats will help to carry out the laying accurately with the same width of the seams. Therefore, the entire surface of the stove will look as if the design was made by a professional craftsman.
These nuances will help simplify the process of constructing a furnace structure and avoid mistakes that may lead to the need to redo the entire work.
Schemes for the construction of brick kilns
Yu. Proskurin's stove with heating and cooking functions and a drying chamber
The model developed by engineer Yu. Proskurin can be called one of the simplest designs of heating and cooking stoves, which even a novice master can easily master. Despite the compact size of the structure, the stove is capable of performing all the functions necessary for a small house, as it is equipped with a hob and a drying chamber, which, if desired, can be replaced with a water heating tank.
Compact but very functional stove by Yu. Proskurin
Such a stove is capable of heating one or two rooms with a total area of 17÷20 m², so it can be built into the wall between the kitchen and one of the small rooms of the house. At the same time, it certainly needs to be oriented in such a way that the structure faces the kitchen area with the slab.
The dimensions of this heating structure, excluding the height of the chimney, are 750x630x2070 mm. The stove has two operating modes - winter and summer, which allows you to use only the hob during the warm season, without unnecessary heating of the entire house. The heat transfer from the stove when it is fully fired is 1700 kcal/h.
To construct this heating structure, the following materials will be required:
| Name of materials and elements | Quantity (pcs.) | Element dimensions (mm) |
| Red brick M-200 (excluding pipe laying) | 281÷285 | 250×120×65 |
| Fire-resistant fireclay brick, grade Ш-8 | 82÷85 | 250×120×65 |
| Fire door | 1 | 210×250 |
| Doors for cleaning channels | 2 | 140×140 |
| Blower door | 1 | 140×250 |
| Summer damper for chimney | 1 | 130×130 |
| Fire valve | 1 | 130×130 |
| Stove valve | 1 | 130×130 |
| grate | 1 | 200×300 |
| Single burner hob | 1 | 410×340 |
| Steel strip | 1 | 40×260×5 |
| 1 | 40×350×5 | |
| 1 | 40×360×5 | |
| Steel corner | 1 | 40×40×635 |
| 3 | 40×40×510 | |
| 4 | 40×40×350 | |
| Roofing iron | 1 | 380×310 |
| Pre-furnace metal sheet | 1 | 500×700 |
To fill the foundation, it will be necessary to prepare cement, crushed stone, sand, gravel, roofing felt, reinforcing rod or steel wire 5-6 mm thick. If you decide to replace the drying chamber with a hot water tank, you will have to purchase or manufacture one as well.
In order for the work to be successful, before starting it, it is strongly recommended that you study the order very carefully, and during the laying process, keep this diagram always at hand.
Diagram of the Proskurina furnace with sections
This illustration shows this furnace schematically in several sections. Here you can clearly see how the chimney channels run inside the structure and trace the movement of smoke from the firebox to the chimney.
| Illustration (order) | Brief description of the operation performed |
| The first row is continuous, it is laid out according to the configuration shown in the diagram. The row must be perfectly even, since the reliability and durability of the entire structure will depend on its correct laying. A row consists of 15 bricks. | |
| Second row. At this stage, the shape of the ash pit (ash chamber) and the bottom of two channels that will run vertically are laid. When laying out a row, openings are left for installing the doors of the blower and cleaning chambers. They are installed on the same row. A row is laid out of 13 bricks. | |
| To secure them in the masonry, cast iron doors are equipped with special lugs into which prepared pieces of wire are inserted. Next, their ends are twisted together and embedded in the seams between the rows of side walls. To prevent the door from moving from its installation location until it is completely fixed, it is temporarily supported with bricks. | |
| The third row is laid out according to the diagram. The walls of the blower and cleaning chamber are raised in it, and the ends of the wire are fixed in the seams between the rows of bricks, with the help of which the doors are fixed. To lay a row you will need 13 red bricks. | |
| Fourth row. The chamber of vertical channels is divided into two, since later they will be laid out separately. The cross-section of the channels along their entire height will be 80×120 mm. In addition, the installed doors overlap in this row. You need to prepare 13 red bricks. | |
| The fifth row is laid with refractory fireclay bricks, as the lower part of the firebox is formed. In the bricks that determine the location of the grate, a cut-out is made at a right angle from their inner edge. The cutout size should be approximately 10x10mm ± 1mm. The prepared bricks are laid above the blower chamber. To lay a row you will need 16 fireclay bricks. | |
| After this, on the fifth row, a grate is installed in the prepared recesses in the bricks. It is sometimes mounted on a clay mortar, but often without any mortar at all. In the latter case, the gaps between the grate and the brick, which should be about 3÷5 mm, are filled with sand. | |
| Sixth row. The walls of the two vertical channels continue to form, and the walls of the firebox begin to be built. Masonry is carried out only with fireclay bricks. The row consists of 12 fireclay bricks. | |
| Next, on the sixth row, a combustion door is mounted, which, like the blower door, is fixed with wire in the seams of the side walls. However, before installation, the firebox door is equipped not only with wire fastenings, but is also wrapped around the perimeter with asbestos cord. This process must be carried out to create a thermal gap that will allow the metal to expand when it is very hot. | |
| The seventh and eighth rows are laid out from 12 refractory bricks each and correspond to the ordering pattern. During their laying, the walls of the firebox continue to rise and vertical channels are formed. It is clear that the bricklaying in the rows is intertwined. | |
| When laying the ninth row, the combustion chamber door is closed. To remove the load from the cast-iron door, the edges turned towards the combustion chamber are cut off from the bricks installed on the side walls at the same angle of 30˚. These cuts will serve as a kind of support for the middle brick, cut on both sides at an angle of 60˚, that is, it should fit perfectly between the two outer bricks. You will need 12 fireclay bricks per row. | |
| On the tenth row, the fuel chamber is combined with the outermost vertical channel, since the smoke generated in the firebox was directed into this hole. In order to ensure the smooth flow of hot air, a protruding corner is cut off on the middle brick separating the combustion hole and the closed channel. This row will require 11 fireclay bricks. | |
| On the eleventh row, the masonry going around the combustion chamber is different in that it uses bricks with a cutout to a brick depth of 10 × 20 mm. This step is intended for laying the hob. For masonry you will need 11 fireclay bricks. | |
| After the 11th row is laid out, the step on the bricks is lined with asbestos strips or a layer of clay, 3÷4 mm thick (assuming a hob thickness of 5 mm). These spacers will serve as a cushion and thermal gap for the hob. Then, the hob is installed in the place prepared for it. On the side where the cooking chamber will be formed, the corner part of the masonry is reinforced with a metal corner. | |
| From the twelfth row, masonry will be made only with red brick. At this stage, the walls of the cooking chamber are laid, and the previously open vertical channel is again closed with a jumper. To lay this row you need to prepare 10 bricks. | |
| The 13th row is laid out according to the diagram, but in the outer part of the first vertical channel a place is formed for installing a valve designed to switch the furnace modes to winter or summer operation. To do this, cutouts are made in the brick to deepen the metal element. Next, the stationary part of the chimney valve is fixed to the prepared area using a clay-sand mortar. A row is laid out from 10 bricks. | |
| 14th ÷ 18th rows - each of them will require 10 bricks. The masonry on these rows has the same configuration, taking into account the dressing, and forms vertical channels and a cooking chamber. | |
| On the 18th row, the cooking chamber is covered with three steel corners, which form the basis for laying the next rows. One of these elements is installed on the edge of the “ceiling” of the cooking chamber, the second is rotated towards the first and installed at a distance of 250 mm from it (the size of a brick), and the third corner is pressed with its back side against the second. Looking at this design, it is quite possible to understand how the bricks should be laid. | |
| 19th row. When laying it out, 12 bricks cover the cooking chamber, but above it a steam exhaust hole is formed into which the valve will be installed. To install this element, cutouts are made in the edges of the bricks installed on three sides, and a layer is removed from the outer brick, making its thickness smaller. Next, a valve is secured to the prepared site using clay mortar. | |
| The 20th row is laid out according to the presented diagram. At this stage, the installed valve is closed and channel openings are formed. The side brick in the first vertical channel is cramped for a smooth flow of heated air. A row will require 15 bricks. | |
| On the 21st row, the first vertical channel and the hole for removing steam from the cooking chamber are combined into a common space. The masonry is carried out around the perimeter of the furnace, the brick is installed in the form of walls, and the second vertical channel is also framed. Moreover, the corner inner brick is cut off to ensure smooth escape of steam into the chimney. For laying you need to prepare 11 bricks. | |
| Next, on the same row, the resulting space is covered with steel strips, which will provide the basis for installing a metal plate and laying the next rows. | |
| The next step, which is carried out on the same row, is the installation of a roofing iron plate. With its help, a chimney hole is formed, located on the opposite side of the window for steam to escape from the hob. | |
| On the 22nd row, the brickwork is covered with a metal plate. Next, the laying is carried out according to the scheme. Only the channel openings remain open. Then a metal corner is installed on the outside of the oven, which will strengthen the front part of the bottom of the drying chamber. Laying a row will require 15 bricks. | |
| 23rd row - the walls of the drying chamber are formed. Its back wall is made of brick, installed on its side - it will separate the chamber from the opening of the chimney duct. 12 bricks are used. | |
| On the 24th row of 11 bricks, the walls of the chimney and two vertical channels, as well as the drying chamber, are formed. | |
| 25th row - work continues according to the diagram, the masonry is made of 12 bricks. The second brick of the back wall of the drying chamber is installed in the same way as the first, on the side. | |
| 26th row. At this stage, the vertical channels are prepared to be combined into one space, therefore, to direct the smoke in the desired direction, the bricks in the vertical channels are cut at a slight angle. To lay a row you will need 11 bricks. | |
| On the 27th row, two vertical channels are combined using masonry, and a cleaning door is installed on this common chamber. The back wall of the drying chamber is raised by another brick, which is installed on the side. A row consists of 11 bricks. | |
| On the 28th row, consisting of 10 bricks, masonry is performed according to a pattern similar to the 27th row. And then three metal corners cover the space of the drying chamber. | |
| On the 29th row, almost the entire area is covered with brickwork, which is installed in accordance with the diagram. Only the hole above the drying chamber is left open, where the valve will be installed in the cuts made on the bricks framing this opening. The outer brick is cut off, making its thickness smaller. A valve is installed in the prepared “nest” on the clay mortar. The row consists of 17 bricks. | |
| The 30th row, consisting of 16 bricks, completely covers the surface of the oven. The only exception is the chimney hole, the size of which is equal to half a brick. | |
| On the 31÷32nd rows, a chimney begins to form. |
If you decide to install the stove yourself, then the work should be carried out slowly, approaching each stage of the process with all responsibility and maximum accuracy. Provided you follow all the recommendations and the provided ordering diagram, even a novice master will be able to cope with this work and gain experience for new creations.
And at the end of the article - another example of laying a miniature brick oven for a country house.