For every building, one of the most important elements is a strong and durable foundation at the base. And the foundation itself begins with its markings, on the basis of which excavation work is carried out. Let's figure out how to mark the foundation and the best way to draw a diagonal. You will learn about the features and all stages of marking, the correct execution of which greatly affects the quality and durability of your home.
Finding points using the Pythagorean theorem - school formulas, without which you cannot lay out the foundation Source doma125.ru
Choosing a foundation type
Before you start marking the foundation, you need to decide what type it will be. Each of them has certain differences in design and arrangement methods.
Columnar foundation
The most affordable and simplest option, but it is considered less reliable compared to other types of foundation. Along the future perimeter of the walls, pillars are made of suitable material. They are placed in the most important places at intervals of 1.2-2.5 m from each other. A beam is mounted on top of them, forming the foundation for the structure. There is a second option - deepening: holes are made in the supports, they are reinforced and concreted.
The pillars are made wider at the bottom, which gives greater stability. This type of construction can only be used on strong soils and only for light and low-rise structures. The arrangement of the basement is completely excluded.
Columnar foundation made of blocks Source fundamentt.com
Slab foundation
The most reliable, but also expensive, is distinguished by its versatility and durability. A whole slab of reinforced concrete is poured onto a specially prepared sand and crushed stone bed. It is made directly to the parameters of the structure or a little more. If the soil moves, the cushion “floats” with it, eliminating damage to the walls of the house.
There are several arrangement options:
- buried - a hole is dug according to the size of the future building, a slab is poured onto the bottom, you can build a basement;
- shallow - it is located on the surface of the soil; it is not possible to make a basement.
Slab foundation Source ustanovkasvai.ru
Pile foundation
Suitable for uneven and weak soil. Piles penetrate very deeply and are installed in durable layers of soil. A frame of beams is placed on the piles for the stability of the structure.
Piles are:
- screw - made of metal, pointed, with a screw at the end, easily deepened, used mainly for oversized small buildings;
- bored - wells are drilled, concreted, height adjustment is carried out in accordance with the plan, they can be reinforced or erected without reinforcement;
- driven - heavy, necessarily reinforced and very long piles, which are necessarily pointed at the end; deepening occurs with the use of special equipment; they are practically not used in private construction due to expensive equipment.
Pile foundation with grillage Source remoskop.ru
See also: Catalog of companies that specialize in foundation work
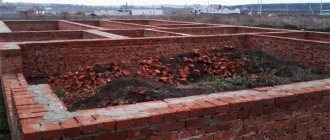
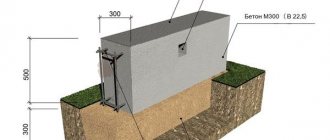
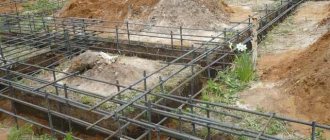
Strip foundation
Trenches are dug, with walls on top, and filled with the selected material, depending on the characteristics of the soil:
- cast concrete or slabs - for clay soils;
- rubble concrete - for sand and rocky soils;
- brick - rarely used, used for the outside, used for clay, use is prohibited when groundwater is close.
This design option can be used for different types of soil and basement arrangement. Creation is simpler and cheaper than slab.
Shallow strip foundation with additional reinforcement Source full-haus.ru
Figuring out how to correctly mark a strip foundation is quite simple. First you need to choose one of the options for creating it, which can be:
- prefabricated - not poured with concrete, but mounted using slabs;
- monolith - the internal edges are concreted;
- recessed - used only for very large structures, the depth of the created trench must be below the freezing point of the soil, with sufficient weight of the building it is resistant to soil displacement;
- shallow - for stable soils, only light buildings can be built on it, the trench is no deeper than 70 cm.
Rules for the location of buildings on the site
After purchasing a plot of land, some homeowners immediately begin developing it. But there are regulatory documents that determine the rules of development. And only guided by these requirements can buildings be located throughout the development area. If the site is intended for individual development, then when distributing auxiliary structures on the land plot, one must be guided by the requirements of SP 30-102-99. If a dacha is built on the site, then SNiP 30-02-97 must be studied.
Distances between buildings on the site relative to the neighboring site
In the construction industry, the concept of “red line” is used. This is the line that separates buildings from roads, driveways, etc.
The rules for constructing a building on an individual housing construction site allow the house to be located at a distance of at least 5 meters from the red line of the street and at least 3 meters from the driveways. Outbuildings must be located at least 5 meters away from the street.
In addition to the distance to the red line, these documents determine the distances from buildings erected on the land plot to the neighboring house. For example, the distance from the house to the fence should be 3 meters, and for buildings for other purposes from 1 to 4 meters. All distances must be measured from the windows of one building to the wall of another.
How to place buildings on a plot of land without violating fire regulations
Before planning a plot of land, you need to study fire safety rules. They also indicate the distances between houses and buildings. So, between houses located on neighboring plots the minimum distance should be 6 meters. These rules determine the permissible distance between buildings located on a plot of land.
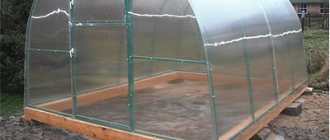
Video description
Marking the base for a bathhouse:
See also: Catalog of house projects
Marking
If you neglect the markup or make serious mistakes, this will lead to the following consequences:
- prefabricated parts will not fit existing dimensions;
- deviations of structures lead to disruption of the functioning of the structure;
- large measurement inaccuracies;
- there is a violation of the geometry of the building.
The markings make it possible to position all the supports in full accordance with the project.
Marking a right angle in a designated area Source rusolymp.ru
How to measure the diagonal of the foundation as accurately as possible - only using special tools and materials:
- rods, pegs and long slats;
- cord, tape measure, level, square;
- nails or other options for fixing the cord.
When constructing a large number of buildings, it is worth purchasing a level. With this device, work is carried out much faster and easier.
Marking techniques
How to correctly mark the foundation for a house - step-by-step instructions for all design options are very similar. The simplest option is a slab structure, where it is enough to determine the sides and angles.
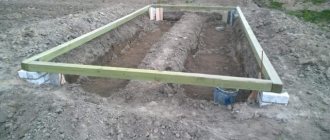
For a strip structure, you must do the following:
- Determination of the first point. This is any corner of the future building. It is necessary to determine the external side, so in the drawings the building is linked to the parameters of the site/object on it.
First point Source www.dom-tips.ru
An alternative way to construct a rectangle
In addition to using the Egyptian triangle, marking the foundation can be done using the “spider web” method. To do this you will need twine, pegs and a tape measure. Actions are performed in the following order:
- Blanks are made from cord, the lengths of which are equal to the sides of the rectangle and its diagonals. These blanks are connected in the correct order and the intersections are securely fastened.
- One of the sides is pulled and secured into the ground with pegs at two points (the one that is parallel to the fence)
- Next, pull the cord corresponding to one of the diagonals. It is also secured with a wooden stand.
- Stretch the string of the second diagonal. Fix the last point of the rectangle. It is important that the cord does not sag anywhere and is tightly stretched. If you perform all the steps correctly, you will get a figure as close as possible to a rectangle.
Advice! For this method, twine is used, which does not cause deformation (does not stretch). If this condition is not met, we cannot talk about the accuracy of the constructions.
Free configuration
If the future building is of any shape, then it has its own characteristics. To know how to mark the foundation for a house of irregular configuration, you need to remember the following:
- a rectangle is marked;
- the necessary structures are added;
- a rectangular base is made for the chimney and porch;
- marking of arcs and circles is carried out from their center;
- When marking a polygon, a square is outlined, and then the figure itself is formed, castoffs are placed near all corners, and the perimeter is outlined using a cord.
Sometimes irregularly shaped supports are used. A coordinate grid is superimposed on the drawing, and reference points are marked. Then a coordinate grid is stretched on the site, and the points are transferred to the ground.
Irregular shaped foundation Source eurodom-ural.rf
Why is markup needed?
There are legally defined standards regulating the distances between buildings, boundary fences, your own and neighbors’ buildings, roads and driveways. They must be observed, but this will not be possible unless the foundation is tied to the terrain. Also, with the help of markings, the building is given exact dimensions - and most importantly, you can control the squareness of the corners before construction begins. If the building has a regular shape in plan (square, rectangle), the easiest way to do this is by comparing the lengths of the diagonals. If they are the same, then the markings are done correctly.
Even to simply remove the fertile layer of soil, markings are needed
Method of intersection of two curves
When marking, it is important to ensure that the corners of the building for which it will serve as the basis are strictly straight. This method allows you to achieve this with maximum accuracy, without much effort. The procedure is:
- A base corner is selected and a cord extends from it along the first wall.
- Then, from the corner along this line, but in different directions, two equal segments are laid out; marks are placed at their ends.
- After this, a sufficiently long cord is taken and a peg is tied to one end.
Marking with thread and supports - A cord with a peg is used like a compass: with their help, two arcs are drawn in turn, for which the centers of the circles are the marks made earlier along the line of the first wall.
- Through the point where the drawn arcs and the vertex of the base angle intersect, a straight line is drawn, which, according to the rules of geometry, will pass at 90 degrees to the first wall. The length of the second wall is measured on it. This is how the 2nd angle is determined.
- The result of successive iterations of this kind is the appearance of a complete “closed” contour, which, in fact, is required in the task at hand.
As in the previous method, it would be a good idea to check the correctness of the markings by measuring the diagonals.
This method is good for everyone, but has the disadvantage that its implementation requires quite a lot of space to “unfold”.
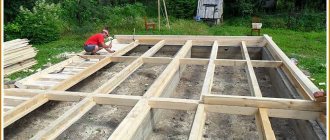
Cast-off device
A cast-off fence is a wooden fence that is installed at the site of future construction. The cord is attached to it when broken using nails. And on it are marked marks that determine the position of the axes. The classic cast-off fence is a fence made of a row of pegs that stand 60-70 cm apart along the entire perimeter of a leveled area. An edged board is nailed to them on top. The pegs are also tied together with a board at the bottom.
The cast-off may not be complete. For example, if your future house has only four axes, then you can put cast-offs only in the corners. At the same time, the thickness of the walls of the future house must be guaranteed to fall into disrepair. In principle, the cast-off is placed perpendicular to each axis and must grasp it in both directions at a distance of at least a meter, that is, a piece of cast-off made of three pegs is placed. In this case, it is necessary to take into account the distance to the trench - if it is an angle, extend it approximately beyond the edge of the trench by a meter, so that during excavation work it does not slide into the trench along with the ground.
It is advisable to install cast-off pegs at a regular building level or plumb line. The top cast-off board is attached from the outside from the middle of the construction to the pegs on the side, using self-tapping screws and a screwdriver. The top board should be installed at the same level along the entire perimeter.
If the cast-off is solid, make passages in it where possible. You will need to remove the earth and transport concrete in a wheelbarrow to the construction site, and perform other work - it will be inconvenient to step over cast-offs.
How to level to zero when concreting?
The first step is to set the zero point correctly. To do this, a mark is made from the inner area of the formwork, preferably in one of the corners, which will be the alignment boundary. Next, we use the hydraulic level to determine the remaining three points. If such a tool is not available, an ordinary transparent hose will do as an alternative. To mark the corresponding boundaries, the latter is stretched from the marked area to opposite corners, after which water is released. The zero level is fixed at the primary point; in the process of balancing the liquid, a second point is selected and a mark is placed in this place. The remaining points are located according to a similar principle; no difficulties arise at these stages:
In the finished formwork, it is necessary to make holes for the hose in the middle section of the planned walls. A cord or twine is threaded through the holes, after which the structure is fixed until tension appears. The zero level is measured and the concrete solution is poured. The construction rule is to level the mixture; it is important to distribute it evenly over all areas of the surface.
After the concrete solution has completely hardened, the ideally flat area of the foundation is completely ready for further construction of a basement or possible basement. In this case, do not forget about regularly checking the compliance of the horizontal and vertical levels of each brick row or building block.
List of tools
Marking the foundation of a bathhouse or house is quite simple if you prepare the following tools in advance:
- rope, fishing line or cord - the main element limiting the work space;
- measuring device - an ordinary tape measure;
- To place the corners on the ground, you will need wooden or metal pegs. Some builders recommend using the so-called. “benches” - 2 pegs knocked together with a board. The cord moves well over such cast-offs, which facilitates the adjustment process.
A simple set of devices is all that is required to ensure that the markings for the foundation of a private house or bathhouse are done correctly.
Marking by stages
Recommendations from experts
Thanks to the experience of professionals, the process of marking the site can be simplified and done using the following tips:
- the thread should be tightly stretched, without sagging or tearing out pegs; a damaged thread will not give the exact dimensions of the base;
- pegs can be made independently from remnants of reinforcement; they are perfectly installed in the soil and firmly fixed;
- always focus on the external boundaries of the land plot and the design of the house or extension;
- do not remove the threads until all work is completed;
- If possible, use professional equipment;
- If you are not confident in your abilities, seek help from professionals.
Working with a laser level
This instrument consists of several functional blocks, each of which is responsible for a specific function: focusing, balance calibration, powering the device. It is also equipped with laser elements that emit light waves. Sometimes the level is compared with a building level, which serves to check the evenness of geometric configurations. The device is equipped with a laser catcher, which simplifies the task of catching a signal when it is clear outside. The level costs about 3 thousand rubles, so it is quite affordable for anyone who wants to start building their own home.
Before making markings, you need to study the instructions supplied with the device and then follow its recommendations. Before use, the level must have working batteries installed. The location is chosen so that there are no obstacles in the path of the beam (refraction from objects reduces accuracy). The device is mounted on a well-centered tripod.
To properly mark the foundation, you should take care of additional equipment. It is advisable to take a laser receiver and glasses with you. You also need a marked strip.
Sequence of work:
- Set up an orientation line. Often it is parallel to the road or fence. It is designated XY (the letters are stakes, and a string is stretched between them).
- The tool is placed and centered over stake X. Having chosen a right angle, the marker is directed with a staff and a laser receiver to the end of a line perpendicular to XY and abutting at point X. Having caught the perpendicular mark at a set distance, mark it with a stake.
- The fourth point is found in the same way. Then they are combined with twine so that they form the outline of the perimeter of the building.
The internal walls should be marked similarly. The level is also used to check the horizon of demolition posts located along the design line of the planned foundation. Then the boundaries of the foundation are marked on the ground with twine.
Marking axes and angles - placing benchmarks outside the perimeter of the foundation
The starting point of all markings should be a point on the ground that is precisely “tied” to the site plan. Most often, this is a corner point, usually associated with the so-called “red line” - the border of your site and public territory, on which neither you nor anyone else is allowed to build. The intersection of the border of your and the neighboring plot with the “red line” will give such a point. Your property's fence should be located inward from the red line.
Typically, the house is located from this fence and from the neighbor’s fence at the following distances:
- according to sanitary standards defined by SNiP 30-02-97, clause 6.7: at least 3 m;
- according to fire safety standards SP 42.13330.2011p.7.1: at least 6 m from windows to the walls of a neighbor’s house or garage, bathhouse, barn, etc., at least 3 m from a residential building to the border of the neighboring plot.
Therefore, you need to retreat to the specified distance or further and you can begin marking the foundation with your own hands.
A. A “red line” is established on the ground. If the owner is going to build a house exactly at the normalized distance from the “red line,” then it is better to invite a professional land surveyor to mark the future corners of the house. But most often they retreat by 1 - 1.5 m from these restrictions.
Accurate orientation to the cardinal points. It is possible at a great distance from the “red line”. But they usually focus on the center line of the street or road.
If you mark the corners of the foundation with pegs, driving them exactly at the points of the future corners of the house, then when digging a trench, the marking pegs will definitely fall into the trench.
Therefore, marking the area for the foundation begins with the installation of wooden support frames outside the trench or pit, or more precisely, outside the excavator operating area. They are called cast-off boards or beams, or simply cast-offs. Some "experts" call them "stools." Cords or wire are pulled over them. The places where the cords intersect will provide the necessary marking points, but not on the ground, but “hanging” in the air. These “points” are later transferred to the ground or to the formwork.
Three or five nail marks are hammered into the top bar of the cast-off:
- in the center - an axial mark for the axis of the foundation wall;
- to the right and left of the axial line are marks for the width of the foundation wall;
- even further - the width of the pillow under the foundation.
Step 1. Marking the starting side.
We start from the side that is closer to the “red line”.
We hammer two cast-offs 1 - 1.5 m outward from any corner. We tighten the axial cord. Using a water level, set the upper part of the cast-off bars at a height of “0”. Having retreated 1 - 1.5 m, we hammer the first peg into the ground - we make a starting point. From it we use a plumb line to “raise” the point onto the cord. We measure the length of the wall along the axes on the cord and make a mark on it. We lower the point to the ground and hammer in the second peg. Between the pegs is the axis of the first wall.
Step 2. Marking the side perpendicular to the starting one.
Using the Pythagorean theorem and knowing the lengths of the sides of the foundation, we calculate the length of its diagonal (along the axes). On the cast-off of the perpendicular side, on the axial nail we fasten the end of the cord and pull it over the opposite cast-off. From the intersection with the axial cord, measure the length along the axes of the second side and make a mark on the axle cord of the second side. On a free piece of cord we tie knots along the diagonal length along the axes. We fix one knot on the axis mark of the third side and pull the second knot towards the opposite cast of the second side. By aligning the second knot with the mark on the cord of the second side and pulling the cords, we get the first right angle.
Another way to construct a right angle is the “Egyptian triangle” method. On the cord of the first axis, from its intersection with the second axis, we measure 4 meters or a distance that is a multiple of this value. On the cord of the second axis we measure 3 m or an equal multiple of the distance. We make marks on the cords and measure the distance between them with a tape measure. It should be 5 m. By moving the second cord relative to the point of intersection with the first, we achieve the exact value - 5 m. The angle in this case will be straight.
Step 3. We perform these operations two more times and get two more right angles.
The last actions must take place in the zone of one point - the virtual corner of the foundation opposite the first corner. If all measurements were made carefully and the calculations were made without errors, then the last two nodes should coincide.
How to mark the foundation depending on its type
Moreover, it can be used not only by amateurs, but also by professionals. Some aspects may not be clear to them when building a foundation, but by looking at this article, you can find the answer to almost any question related to pouring a foundation and preparing for it.
How to correctly: How to properly cut men's haircuts video 7 How to properly mix cement mortar for the foundation 7 Description meta tag how to fill it correctly 3 How to spray cucumbers correctly 2 How to properly install a sidewalk curb 2 Proper nutrition to eat and lose weight 2. Correctly take care of your job. How to properly put the nozzle on your penis. How to use a penis attachment Published: 27 further How to tan properly and quickly in a solarium.
Tanning in a solarium: how to tan beautifully and further Get a worm egg tested correctly.
Distances between buildings on a plot of land
In order to properly place buildings on their own land, the developer must strictly comply with all rules related to development. To minimize errors, it makes sense to perform zoning of the site. That is, divide it into zones in which buildings for different purposes will be erected.
The following zones are distinguished on the land plot:
- residential, a house will be built in it;
- utility zone, which will house auxiliary buildings;
- a recreation area where you can build a playground or gazebo;
- area for placing garden trees, bushes and a vegetable garden.
Existing standards have determined the following requirements for the distance between a residential building and auxiliary buildings:
- from buildings with an area of up to 50 m2 - 15 m;
- from the location of latrines, compost pits, waste collection pits - 15 m;
- from a well, with a productivity of up to 1 m3/day - 8 m, with a productivity of 3 m3/day - 10 m;
- from a septic tank with a throughput capacity of up to 1 m3/day - 5 m, if the amount of waste is from 1 to 3 m3/day - 8 m.