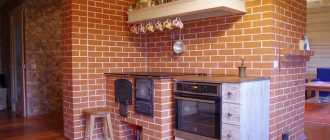
Houses made of wood mean comfort and coziness, a special microclimate and positive energy. In order for it to serve for a long time, you need to carry out routine repairs on time and efficiently.
Experience in operating wooden buildings shows that without special tools, experience and knowledge, it is extremely risky to touch the structural elements of a building. When replacing crowns and repairing the foundation of a wooden house, the cost of professional services will be paid off by the durability of the structure.
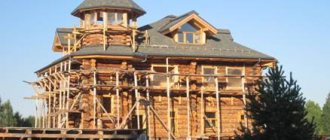
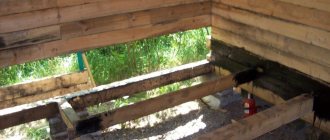
Raising a house even to a small height requires professional tools, knowledge of technology and work experience Source cutala.free.bg
Is it possible to replace the lower crowns of a wooden house
The lower crowns of a wooden structure are subject to the harmful influence of the external environment. They come into contact with precipitation, suffer from temperature changes and freezing, and in regions with a lot of snow, they also remain in the snow for a long period of time.
On average, the service life of a wooden structure is 50 years, but if the wood is of poor quality, the lower logs will rot even earlier: in two to three decades. To extend the life of your home, you should replace rotten crowns.
Periodically you need to inspect them to see if they are damaged. One way to find damaged areas is to tap the butt of an ax or hammer on the logs. If the sound is ringing, then the crowns are fine. A dull sound indicates damage to the logs.
Not only the lower crowns must be replaced, but also two or three logs on top of them. The deformed foundation also indicates the need for repairs. Its deformation can be determined by the test performed. Small cracks in the foundation are sealed with paper (painting) construction tape. If after some time the paper tears, then it is necessary to change the lower rims and repair the foundation. You can replace the timber with treated wood, brickwork or foam blocks.
Destroyed brick foundation
Tips and tricks
Professionals recommend following the rules:
- Do not use roofing felt for waterproofing the lower crown.
The material will last a maximum of 4–5 years, after which it will no longer cope with its functions, therefore, the logs will become damp and after some time they will have to be replaced again. It is better to give preference to euroroofing felt, it is more expensive, but the overpayment is justified by its long service life.
- It is mandatory to treat logs with antiseptics that protect the wood from rotting, fungus and mold.
Ideally, the entire house should be built from treated wood.
- To protect the walls from rain, you need to install metal canopies on the roof and equip a drainage system.
When carrying out work, safety precautions must be observed:
- ascent is carried out only in dry and windless weather;
- the lifting capacity of the jack must exceed 5 tons;
- temporary supports are made of high-quality material; chips and cracks are not allowed here;
- when the house is on temporary supports, it is better not to be under it unless absolutely necessary.
The average cost of work to replace the lower crown varies between 30,000–40,000 rubles. The price depends on overhead costs and the cost of lumber in a particular region of the country. If you are not confident in high-quality work done on your own, it is better to turn to professionals. Yes, this will increase the cost of the work, but it will help maintain the integrity of the house and avoid other troubles.
Methods of performing work
To answer the question of how to change the crown of a wooden house, it is important to know the nuances of its repair. There are different replacement methods, which depend on the degree of damage to the logs. There are temporary measures that will only extend the life of the home for a while. These include: cosmetic repairs, dismantling the upper part of the foundation. Sometimes it may be necessary to completely dismantle an old wooden house or replace the crowns when lifting the house with jacks.
Redecorating
This method is used only in extreme cases, as a temporary measure, because cosmetic repairs reduce the strength of the crowns and their thermal insulation properties. This method is used for partial damage.
Sampling of partial damage using a chisel and antiseptic treatment
Before carrying out work, it is important to inspect the logs, find damaged areas and mark them with a marker. In order not to miss damaged areas, you need to inspect 3-4 crowns above them. Rotten areas are cut out, taking part of the undamaged area. Pieces of appropriate shapes are cut out of timber or logs and glued to the cut area.
The glue must be moisture-resistant, and the patch must be made from pieces of wood of similar hardness. Waterproof wood glue Kleiberit has proven itself well.
Recently, gluing onto polyurethane foam has become popular. However, we do not recommend doing this, since the foam absorbs moisture from the environment and then releases it into the wood. The areas adjacent to the foam will quickly rot.
Dismantling the upper part of the foundation
Dismantling the upper part of the foundation can also serve as a temporary measure.
It is necessary to clean loose layers of concrete
It is carried out in the following sequence.
- A hole is made in the foundation at a distance of 70-100 cm from the corner. It is necessary for the location of the jack in it.
- Using a jack, raise one, two or four corners to a height of 7-10 cm. It is best to choose the latter option to avoid distortion.
- They dismantle the upper part of the foundation and restore it.
- Replace the lower rotted crowns with new ones.
Brickwork instead of rotten crowns
An excellent replacement alternative is brickwork. Its installation is carried out with the help of jacks and without them. If the building is new and the foundation is in good condition, then it is not necessary to use jacks.
- Using a chainsaw, cut out the rotten sections of the crown.
- The sawn area is cleared of debris.
- The connections at the ends of the building are cut off.
- Brick supports are placed in the corners.
- Brickwork is laid around the perimeter of the building in several rows. In this way, you can replace not one, but several damaged crowns.
- Brickwork can be loaded after three days at above-zero temperatures.
Repair without raising the house
Repairs without raising the building are carried out in the following ways:
- patches are installed on remote rotten sections of logs. The patches must fit exactly under the cut out part. They are made with moisture-resistant glue;
- rotten areas are replaced with brickwork, blocks or concrete;
- The log house is completely dismantled, rotten logs are replaced and waterproofing materials and insulation are restored.
Complete replacement of supporting elements with raising of the structure
Complete replacement of the lower crown of a wooden house with your own hands should in no case be done alone. It is strongly recommended to invite a specialist knowledgeable in this matter to perform such work.
In what cases is it justified to repair the foundation of a wooden house with piles and are there any advantages to installing them?
The work takes place in this order:
1. All contents are removed from the building and the floors are dismantled.
2. The stove is disassembled if it does not have its own foundation, its chimney is separated from the roof, and the window and door frames are removed.
3. Extensions are separated.
4. Supports are installed on the outer sides of the building or ties are installed to secure all healthy elements that will not be replaced.
5. Additional cross braces are installed on the rafters.
6. New parts are prepared: bowls are cut out and joined together for a tight fit.
7. Sockets are cut out in the components that need to be replaced (at least 1 m from the edge of the wall, 2 sockets on one side of the structure).
8. The section of the foundation (if there is one) under the nest is dismantled.
9. A concrete slab is installed at the bottom of the nest, and a jack is placed on it. A jack is used to lift the healthy element located above the socket through a metal gasket. A large diameter block of wood is inserted into the opening and the jack is removed.
10. On the side of the structure on which the lower element rests on the ends of two parts from adjacent walls, logs are not placed. The entire structure stands on 6 logs (on three sides).
11. Unnecessary old trimmings are removed from the free side, and a new element is started. It is first supported with jacks tightly to what is located above it. Blocks of wood are placed and jacks are lowered. The manipulation is repeated in a circle with all components requiring replacement.
After replacing all the parts, a new foundation is raised, which is covered with two layers of roofing felt. The building goes down the same way it went up: smoothly, carefully and slowly. These works are very dangerous and you should not undertake them yourself without extensive experience in construction.
Lifting with jacks
Work to raise the house is being carried out in stages.
The first stage is preparatory. To make it easier to lift the house, it is freed from unnecessary things and materials, and reinforced with brackets to give greater strength.
The second stage is the main one. Work is underway to raise the house and replace rotten logs.
The third stage is the final one. Completion of work.
Let's consider each stage separately. To prepare the building before lifting it is important:
- remove furniture and household appliances from the home;
- remove door sashes and windows so as not to damage them;
- disconnect the chimney from the roof. Usually a stove or fireplace is placed on a separate foundation. If construction rules are not followed when lifting the structure, damage may occur;
- separate the floors from the wall. If the floor is located above the lower crown, then this is not necessary;
- To ensure that there is no distortion during the lifting of the house, undamaged crowns are fastened with boards 40 cm wide. They are fixed to the upper and lower crowns with their edges. The fastening pitch between the screws is 50 cm. They are located vertically at a distance of 50 cm from each other.
Lifting with jacks is carried out in a certain order.
- On the lower crown of the strip foundation, niches are cut into which jacks are inserted. If the foundation is columnar, then a dig is made and a jack is installed. A board or brick is placed under it so that the equipment does not sink into the ground.
- Jacks are used to lift the frame of a house.
- Supports made of timber or logs are placed under the corners.
- The lower crown is removed.
- New logs are prepared, placed on a jack, lifted and stapled to the logs located above.
- The house is raised to a certain height to remove temporary supports.
And at the end of the work, waterproofing is laid on the foundation. The frame is lowered into place.
Which jack to choose
Two types of jacks are used: hydraulic (its load capacity must be at least 7 tons) and screw (load capacity must be at least 10 tons). Before lifting a house, it is better to check the functionality of the jack, for example, lift the car.
Hydraulic jack is preferable
How to install correctly
Jacks should only be installed in adjacent corners. Lifting the house with jacks from opposite corners will cause the house to tilt. To level the jack, metal pads are placed under its heel. Steel plates are placed at the top of the jack to prevent the wood from being pressed under heavy loads. Rails with markings in the corners are necessary to determine the lifting height.
Crown replacement technology
Replacing the lower crowns of a wooden house with your own hands is carried out as follows:
- Each crown consists of four logs: two upper and two lower. When replacing the crown, the jacks support the upper logs without touching the lower ones, so the lower ones can be easily removed.
- After the house is raised with jacks, a temporary support is placed.
- The jacks are lowered and the top logs are removed.
- To replace the upper logs, you need to select them according to size, treat them with antiseptics and fire retardants, and cut out the parts so that they adhere tightly to the lower ones.
- Place the top log on jacks. The top is covered with caulking material (usually jute) and raised to the counter log.
- Remove the supports.
- Place the lower log in the same way.
- Repairing the foundation. The log house with the replaced crowns is lowered.
Replacement of crowns in a frame house is not carried out, since they simply are not there. The design is completely different.
Security measures
- To prevent the structure from skewing, it is better to lift the house from four corners with four people at the same time.
- Raising the house should be done in calm and dry weather, preferably in summer, spring and autumn.
- If the house has one floor, then the lifting capacity of the hydraulic jack should be -7 tons, 2 floors - 10 tons.
- If the soil is loose, then wooden boards 50 x 50 cm are installed under the jack.
- Jacks are placed at the same distance from each corner.
- There should be no cracks on temporary supports.
May be interesting: DIY timber house
Features of reconstruction
Before starting work, you should clear the premises of furniture and belongings. They take out the window frames, remove the doors and dismantle the door frames.
The chimneys of a stove or fireplace are separated from the ceilings and roof. They do everything possible to facilitate construction and avoid distortions. Undamaged rows are fastened.
Illiterate actions can lead to damage to the roof, chimneys and attic floors. Therefore, it is not recommended to carry them out on your own.
The technology is quite complex and depends on the following points:
- foundation conditions;
- degree of wood destruction;
- dimensions of the building, number of storeys;
- the size of the free space near the building;
- presence of outbuildings,
- design and condition of chimneys.
If the stove does not have a separate foundation, which is provided for according to the construction technology, it will not be possible to raise the house. A specialist who has the necessary knowledge and experience in this field will be able to choose the right method of restoration work.
If possible, materials are used that are as close as possible to the original ones; sometimes it is advisable to replace rotten parts with brick.
After replacing the lower crowns with brick, the house can last for many more years. Source woicetosh.blogspot.com
Sometimes wooden facades are covered with siding or covered with brick to hide reconstruction elements. A waterproofing layer is laid between the foundation and the new rows, and the wood is treated with an antiseptic.
Partial replacement of logs
If the log is partially damaged, then the technology for replacing this section is as follows.
- They find a place on the log where the log has rotted.
- At a distance of 40 cm from each edge of the damage, place ties on three crowns. The edges of the boards are secured through drilled holes with pins with a diameter of 8-10 mm. For this, a board 40 mm thick is used. They are installed on the outside and inside of the house.
- The damaged part of the wood is cut out.
- Cuttings 2 cm wide are made on part of the remaining log.
- Cut out the element that will cover the damaged area.
- Notches are also made on it so that they fit tightly into the notches on the log.
- Fix the new block using dowels.
- If there are cracks in the log, they need to be caulked.
GENERAL PROVISIONS
The method of repairing the lower crown of a wooden house will depend on the features of the building:
— is there a stove and chimney;
- dimensions of the house;
— are there any additional extensions that have a common roof with the house;
— condition of the lower crowns;
- type of base;
— availability of free space around the walls of the building.
The most common method of updating is using a jack (Fig. 1).
Fig.1. Jack installation diagram
Before starting repairs, it is necessary to assess the degree of destruction of the lower crowns. In case of renovation with your own hands, you need to tap the logs with an ax. A dull sound will indicate a rotten log. To accurately determine the size and depth of the rotted area, a chisel is used to clear the edges of the log (Fig. 2).
Fig.2. Assessment of the degree of destruction of the lower crowns
The next step is to assess the possibility of lifting the structure using jacks. The main point is the state of ligation of the corners, since they preserve the strength and geometry of the log house. If the dressing has rotted, you will have to use a stationary support frame.
Good crowns that cannot be replaced are fastened inside and outside the house with special boards about 40 centimeters thick: they are nailed in a vertical position about half a meter from the corner of the building.
Before lifting begins, it is necessary to decide which antiseptic agent will be used to treat the new lower crown.
Replacing the crowns of a house on a pile or columnar foundation
Replacing crowns in a wooden house on a pile foundation begins with the installation of jacks. The distance between the piles or posts should be sufficient for their installation.
To prevent the jacks from falling into the ground, a wooden shield 50 x 50 cm is placed under them. The wood of the top log of the dressing is protected by a metal plate from being crushed.
They raise the house from four corners. The lower logs of the wooden house are released. They can be removed. A support made of wood or bricks is installed. The jacks are lowered, and with them the upper logs of the crown. They can be replaced. The supports are removed. The log house is lowered.
How to protect crowns from rotting?
In order for the replacement of log crowns to achieve its goal and not lead to repeated work, the wood must be protected.
To do this you should:
- Treat the logs with an antiseptic.
- Cover the base with a water repellent.
- Use a reliable waterproofing tool.
- Cover the lower rims with a galvanized metal canopy.
This way you can protect the lower crown of the building from the aggressive influence of external factors. But in order for this protection to bring maximum efficiency, it is advisable to replace the lower crowns with logs made of larch or oak - wood that is not subject to rotting processes.
On a strip foundation
The work is more complicated because it requires partial destruction of the foundation and cutting out niches for jacks. Niches are cut into the rotten crowns, affecting the floor and part of the foundation. This installation is necessary so that the jack can move up and down freely.
An alternative option can be used: a lever system. As a lever, you can take a hardwood log or a metal channel number 10-12.
- A niche is made in the upper log of the lower crown for a channel or rail. To do this, wood is selected at a distance of 1-1.5 m from each corner.
- The channel is inserted into the niche.
- The corner of the house is raised with a jack.
- Wooden wedges are driven between the foundation and the channel.
- When the lower log is free from load, it is removed.
- The wedges are knocked out, the jack is lowered, and the channel is removed.
- Temporary supports are installed.
- The upper logs of the lower crown are removed.
- Again they take the channel, hammer in the wedges and raise the house.
- The temporary supports are removed, the logs are replaced, the wedges are removed, and the frame is placed on new crowns.
Possible errors and safety measures
Errors during work often lead to the destruction of building structures, and violation of safety measures can lead to injury or death.
Security is ensured:
- working in calm weather;
- serviceability of lifting mechanisms;
- reliability of supports and racks;
- installation of safety bars;
- a ban on working under a raised load (do not put your hands under the walls, do not move under the crowns in and out of the house);
- installation of spacer beams;
- using steel bearings between the jack rod and the log against which it rests.
Using a steel jack support
The durability of the repaired structure is achieved by:
- thorough examination and identification of all crowns requiring replacement;
- choosing a quality material - the lower crown, or better yet two, is made of larch;
- waterproofing with modern materials;
- arrangement of storm drains with water drainage as far as possible from the log house.
Possible reasons for replacement
The lower crowns rot due to a number of reasons:
- moisture that gets from the soil onto the logs if the foundation is low. Moisture appears due to high groundwater, precipitation, untimely removal of snow from the blind area and its melting. Moisture gets into the soil and the frame of the building;
- poor waterproofing between the foundation and the lower crown;
- lack of ventilation in the basement and underground;
- lack of antiseptic wood treatment. As a result, insects appear in it: ants and bark beetles, which damage the tree, as well as microbes that cause putrefactive processes.
Causes of destruction of the integrity of the lower crowns
Ideally, a wooden building will last for half a century without major repairs. The “weak link” of the structure is the bottom rows. Moisture seeps through cracks inside the tree and through gaps between logs. In damp places, fungal spores begin to develop. Mold appears, then rot. Internal destruction of wood is completed by insect pests.
The reasons why wood is destroyed may be the following:
- Use of unprepared material. Raw wood harvested “out of season” quickly loses strength and begins to collapse.
- The type of wood is of great importance. For example, when choosing larch for the construction of lower rows, you don’t have to worry about high humidity; the tree will only become stronger. It is not recommended to use linden logs as lower crowns.
- Poor quality waterproofing of the foundation, performed in violation of technology.
- Failure to comply with antiseptic technology for building materials.
- Insufficient air exchange in the underground space, lack of ventilation ducts.
If there are no vents in the foundation, then moisture will accumulate on the lower crowns Source zen.yandex.com
- Incorrectly constructed foundation that does not correspond to the type of soil, topography, without taking into account the depth of groundwater, and the climatic conditions of the region.
- Ill-properly installed façade panels covering the crowns.
All the reasons come down to two main factors: improper operation of the home or unprofessional approach to the work of the builders.
Determination of the degree of destruction
Crowns with mold and dark spots that make a dull sound when tapped need to be replaced.
The choice of restoration method depends on how much the house is affected by rot or destroyed by insects. The picture should be as objective as possible, since a superficial approach will not give the desired results, but will only aggravate an already difficult situation.
Diagnostics of the structure is carried out using the following methods:
- Visual inspection. Evidence of wood loss of quality are dark spots, dents, and narrow passages made by insects. The defective areas are soft and slippery to the touch and produce a faint dull sound when tapped.
- Taking samples. This is done using a drill with a narrow crown or a feather drill. The condition and color of the core or shavings determine the extent, depth and area of damage to the log house.
Based on the data obtained, a decision is made on the choice of building restoration technology. In some cases, this is not easy, but it is better to make labor-intensive repairs than to build a new building while living in a dilapidated old one. It is impossible to return wood to its original state, and destructive processes will continue. The pathology also spreads to neighboring fragments of masonry, which can lead to the complete destruction of the structure.
Laying the first crown
Laying the first crown looks like this:
- It is necessary to lay slats on the layer of waterproofing material. They must first be treated with an antiseptic solution. The distance between the slats should be 30 cm. The width of each slat individually is 15 mm;
- It is necessary to lay beams on top of the slats. They will form the first layer. Thanks to the use of slats in this process, it is possible to provide reliable protection to the beams and also prevent them from direct contact with the fundamental surface. If this process is carried out correctly, the durability of a log house will be significantly increased;
- A gap will be formed between the timber and the foundation. Under no circumstances should it be left, otherwise the building will quickly deform and become askew. This void can be filled using polyurethane foam. It will firmly and securely fasten both sides for a long time, guaranteeing tightness;
- Next, you should again determine the surface evenness using a hydraulic level. If the horizontality of the surface is disrupted after the installation of the first crown is completed, the walls will be assembled unevenly. This problem can be solved through additional surface leveling.
Repairing rotten sections of the building crowns without raising the house itself
It often happens that the log of the lower crown of a wooden building, located closest to the ground, is not completely rotten - only a certain area can be affected by damage. This means that repairs can be made only in certain areas, without changing the crown completely. In this case, doing the work yourself will be much easier. This is especially true in cases where raising the house can cause serious problems. For example, a strip foundation under a log house that was raised to carry out repairs runs the risk of being destroyed. During “local” work, only the damaged section of the log is changed.
Repair of the lower crowns is carried out as follows:
- Step 1. Determine which area is damaged. We take a chisel and find out how much the wood has rotted. We clear the wood on both sides of the damaged area. Quite often, the use of a chisel makes it possible to understand that the area is much more damaged than is visible upon first inspection with the naked eye.
- Step 2. From the edges of the damaged area, make an indent of 40 centimeters in both directions. We place ties whose height coincides with the height of two or three crowns.
- Step 3. We take the “magpie” boards and nail them to the frame; such manipulations should be done from the inside and outside. We drill holes in the first crown, which is pulled together, and in the last one. We install special tie rods (they must pass through, and their diameter is 12 mm or more).
- Step 4. Take a chainsaw and carefully, but carefully, cut out the damaged part. In the crown, which required repair and replacement of rotten areas, we create notches, the width of which is 2 cm. Such notches are required in order to firmly connect the log with the new element, which will be inserted subsequently.
- Step 5. Make an insert using a log of the same diameter. The length of the insert is exactly the same as the length of the cut section. Don't forget to make counter cuts on the insert.
- Step 6. We insert a new element in place of the area that we previously cut out. Having placed the block, we carefully finish the insert into place using a sledgehammer.
- Step 7. In the places of notches, we make three holes all the way through from different sides, then we drive in dowels, which will then give us the opportunity to firmly connect the insert and the old log. All cracks must be caulked with tow; moss or jute are also often used for this purpose.
This way you can renovate multiple areas. Corner joints can also be repaired this way. However, such measures can be resorted to only in extreme cases, if the house cannot be raised, since the strength of the structure after repairs is somewhat reduced.
Technique for laying crowns
The trim crowns are laid first and are made from thick, powerful and durable timber or logs. After this, the lower trim is placed. At the same time, it is very important to use a building level to check the evenness of the rows and lay the lumber evenly. In addition, you need to check the angles using the diagonal method. To do this, measure the diagonal of the crowns and, if necessary, change the position of the row by moving the desired end.
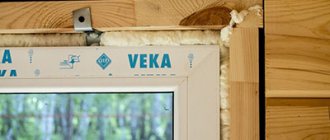
Special attention should be paid to window crowns and installation of window frames. To install these rows, shortened materials are used. A frame or casing is installed in the already assembled log house. This is a wooden frame that is installed in the window opening. It prevents the formation of cracks and deformation of the window structure during shrinkage.
Article on the topic: How to lift a wooden house with a jack
Experts recommend assembling the log house in separate parts. And only then the assembled parts are laid on the installed foundation. And to strengthen and stabilize the structure, the first row of the building is cut from the bottom side. After shrinkage, the log house is insulated. To do this, make caulk and lay insulation between the crowns. Jute and acrylic sealant are perfect for insulation. Read more about how and how to insulate log or beam walls here.
Assembling a log frame and laying crowns is a rather difficult task that requires certain knowledge and skills. Without following construction technologies, the walls will turn out uneven, and the frame will be moved. In addition, improper masonry will not provide reliable thermal insulation. The house will be blown out, and moisture will accumulate on the lumber. This will lead to the formation of mold and rot, and the gradual destruction of wooden walls.
To avoid problems, contact professionals. The “MariSrub” craftsmen will reliably and quickly assemble the log house and lay the crowns evenly, competently and correctly. We carry out the construction and finishing of wooden houses according to standard and individual designs, produce lumber, install foundations and roofing, install and connect utility networks, and insulate the log house.
In frame version
Frame preparation
Any frame must be strengthened for successful lifting. To achieve this, it is enough to attach the boards on both sides at the level of the window blocks. Boards can be taken with a thickness of 50 millimeters, and they should be secured with studs or long bolts. First of all, the boards are attached to the frame posts with nails, and only then they begin to drill holes so that the boards can later be attached with bolts. In the event that we are dealing with a strip foundation, it will have to be partially destroyed in order to prepare a place for installing a jack. Typically this is done from both corners of the house.
Next, you need to install the jack itself and make sure that it works properly - without necessarily lifting the house itself. This will ensure that the rod is coming out of the hydraulic cylinder.
In this case, you should carefully check the height of its exit - it should not exceed half of its length. This is necessary for security reasons.
If everything is in order with the jack, support posts are prepared, with which you can fix the house after it is lifted. In these cases, a beam of 100 by 80 centimeters is usually used. As a rule, racks are installed on only one side - the outer one, and this does not require dismantling the floor, and, therefore, significantly saves time on replacing the embedded crown. In the illustration, the support block (B) strengthens the support post (A) and ensures that the support post will not tip over when loaded. In order to increase the support area of the rack, a special transverse connecting beam (B) is used.
Replacing the bottom beam
To lift the house, four people will be required, since this process uses two jacks, which are installed at the corners, and the distance from the corners should not be more than a meter. The only exception is a log house, which can be lifted with one jack. In order to eliminate the possibility of the house skewing, it must be lifted simultaneously from both sides. Two people will work with the jacks, and two more will place a piece of timber under the side walls of the house being lifted so that the beam of the lower frame does not break while the house is in a raised state. After the house has been raised to the required height, support posts should be installed, the distance between which should not exceed one and a half meters.
With one side these supports are inserted under the attached board, and with the other they are rested against a pre-prepared base, and this must be done securely so that the support cannot move to the side after the jacks are pulled out. If you want the supports to stay securely in place, you should make angled cuts at their ends. In the event that it is assumed that the support may rest against the blind area, it is necessary to make appropriate recesses of 3 or 5 centimeters in the blind area itself, suitable in size for the corner cut. Next, we take out the embedded beam, for which we use a hacksaw with large teeth or a chainsaw, with which we cut it at the junction of the crown. You can further make the task easier for yourself if you cut the embedded beam into several parts. It is necessary to make notches in advance on the new embedded beam, and when installing the notches should be facing upward. After the timber is in place, the jacks should be re-positioned in the folded state. When lowering a house, synchronized operation of the jacks is also very important to avoid distortion or damage to the frame. After changing the embedding beam under one wall, you can move under the next.
In a panel house
If you purchased an old panel house, it is likely that the panel connection is not that good. In this case, it is recommended to raise the house to the minimum possible height without using support posts, but in this case you can forget about replacing old logs with new ones.
Everything happens as in the first option, except that due to the slight elevation of the house, the window and door blocks do not need to be removed. Once access to the embedded crown is cleared, it should be carefully inspected, since the logs may become unusable. If the crown needs to be changed, then the shields must be fastened together. This is done using 50 millimeter boards, and, regardless of which side you lift, you must fasten the boards along the entire perimeter. Next, niches are made for the jacks - the distance between them should be at least three meters. The house is thus raised only 2-3 centimeters, thanks to which the remains of the timber can be removed. The old timber is replaced with a new one, prepared in advance. After the central part is installed, you can move on to the side parts. After the timber has been completely replaced, the jack is removed and the beams located at the front of the house are secured with studs or bolts.
Waterproofing
Waterproofing before laying the first crown
So, before you start laying waterproofing, you need to check and inspect the top of the foundation. To perform this action, you will need to prepare a hydraulic level. If the difference is more than 1 cm on the surface of the foundation, then it is worth carrying out additional work related to its leveling. As a rule, this will require preparing a concrete solution.
Experts recommend initially laying two layers of waterproofing material, then a laying board and then another layer of waterproofing. The materials used for this process must be fastened so that they extend beyond the edges by 25 cm on either side.
Search for quality material for the first crown
The material for building a house made of timber for laying should be prepared in advance. The first crown should be made of high quality material. It should be:
- With a minimum number of knots on the surface;
- With a perfectly flat surface;
- The material should not have a blue tint; this is not suitable for laying the first crown;
- The density of the beam rings should be maximum - then it becomes clear that this material is made from the middle of the tree.
Before placing the first crown (larch), it must be treated with an antiseptic
After selecting the timber, you need to thoroughly lubricate it with bitumen mastic, previously mixed with the waste. A similar composition is needed so that the impregnation is well absorbed into the wood. It is not worth treating the ends of the timber, otherwise the moisture will not be able to “leave” the tree. The thoroughness of processing and impregnation will influence many factors, including the durability and reliability of the first crown, and, consequently, the entire house made of timber.