- Benefits of shingle roofing
- Using gontines
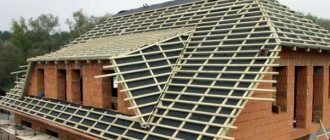
- Scheme for laying shingles in three layers
- What does shingle look like and how is it different from shingles?
- Raw materials for shingle production
- Shredded shingles
- Additional protection and processing
- Professional installation
- Technology for replacing worn out elements
- High quality material
- Wooden roof slope
- Tips for installing shingles yourself
- Technology for installing shingle roofing on a solid base
- Roof repair
- Where is it sold?
- Price of shingles for roofing and facades
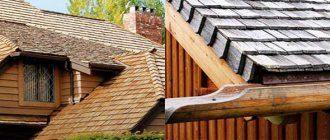
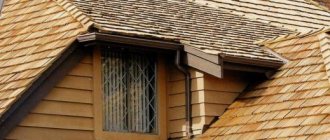
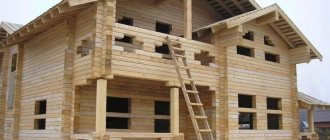
Covering the roof with pieced wooden elements, called shingles, shingles, shindels, ploughshares, has been practiced for several centuries.
Moreover, such natural roofs were popular not only in Russia, but also in many European countries and America.
Shingles satisfy consumers with their environmental friendliness, wide range of colors and small sizes, which make it possible to quickly install a wooden roof covering of any level of complexity without any problems.
Benefits of shingle roofing
- Authenticity and beauty. Wooden roofs are not only strong and durable, but also unique in their beauty and characteristics. They are truly authentic and simply cannot help but attract attention. Interesting glances always linger on them, even in cases where shingles, shingles or shingles are used on typical roof projects. It's not just the manufacturing method, but also the way wood roofing looks that makes shingle roofs unique. No other material can imitate this coating either in appearance or in its properties.
- Versatility. As mentioned above, the use of pieced wooden elements on the roof makes it possible to install roofs of complex shapes - multi-gable, hip, conical, domed, pyramidal.
- Environmental Safety. There is no need to even talk about the fact that natural materials are valued not only for their natural beauty, but also for the fact that they do not emit any harmful substances into the environment. It is no coincidence that wealthy people today are trying to build houses for themselves from natural wood and stone, since synthetic materials have filled everything around them, and the best way to minimize their negative impact on health is to live in an environmentally friendly and safe home.
- Excellent performance characteristics. Everyone wants their home to be cozy, warm and dry. A roof made of shingles, shingles or shingles will help create a unique atmosphere for comfortable living. You will not be disturbed by the obsessive sound of rain or the howling of strong winds, since the wooden covering has good soundproofing properties.
Roofing made of shingles, wood chips and ploughshares
Roofing made of shingles and wood chips is much more labor-intensive, but at the same time more beautiful and durable . With proper installation, it can last 100 years or even more.
The difference in laying shingles and wood chips is insignificant and is determined only by size. If the length of shingles is on average 40–100 cm, then for wood chips this figure does not exceed 50 cm. This means that wood chips require a smaller lathing pitch. However, in both cases, you can make a continuous sheathing. This will increase the cost of the structure as a whole, but at the same time simplify installation.
The sheathing pitch for roofing is calculated by dividing the length of the element by 3. Rounding is done downwards
The shingles and wood chips are laid offset so that the upper element overlaps the joints of the lower ones. Installation can be carried out in two, three, four or even five layers (the more, the better). Overlaps must be made both horizontally and vertically. Each plank is secured with shingle nails. This is a rather long, labor-intensive and therefore expensive process.
The technology for laying chips and shingles is also valid for ploughshare - figured tiles that are hewn out by hand. Unfortunately, this fabulously beautiful material is practically never found in private housing construction due to its high cost. Much more often it can be seen on the domes of old Russian churches and other monuments of wooden architecture.
Shingles and wood chips are extremely lightweight roofing materials. Therefore, for lathing you can use timber with a cross-section of only 40 × 40 mm
Note that neither shingles nor wood chips are usually painted. The fact is that these materials are produced by splitting, preserving the natural structure of the fibers. When applying paint with a brush, these fibers will lift up and the coating will take on a sloppy appearance. Decorative treatment using a spray gun is theoretically possible, but this technology is almost never used. Wooden tiles are impressive on their own and do not require additional decoration.
Using gontines
The facades are finished with shingles and shingles, which allows these materials to be used to give the building its own unique style. Small architectural forms in the form of wells, gazebos, doghouses and children's houses have recently also become decorated in some unusual way, and shingles are ideally suited for these cases.
! Reasons for popularity! Gontines are planks of certain sizes. They are made using wood from coniferous trees, as well as oak and beech.
A wooden roof weighs very little, so there is no need to build heavy sheathing for it. The purchase of any waterproofing materials is also not important, since their improper use can cause rotting of the shingles due to limited air supply, which is simply unacceptable in cases with wooden roofs.
Scheme for laying shingles in three layers
Modern materials imitating shingles
The construction industry today offers many materials that have little external resemblance to real wooden shingles. Products that imitate natural material are easy to use, cost less, but do not have the properties of natural wood.
The following options are produced:
- copper shingles: a painted metal geometric profile imitating shingles, in the form of squares, scales or diamonds, equipped with special fasteners. Such tiles are fireproof, resistant to destruction, but do not have high soundproofing qualities;
- wood-look plastic siding: used for finishing facades, has good moisture resistance, and is lightweight. Disadvantages include low environmental friendliness;
- polymer imitation made of PVC: close in quality and appearance to natural shingles, it contains wood shavings, but resins and mineral additives can release toxic substances.
Each type of coating has its own advantages and disadvantages. Natural material has clear advantages over the most skillfully executed imitation.
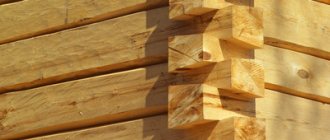
Raw materials for shingle production
- Mature, high-quality wood is harvested as a material suitable for use in the production of wooden piece roofing elements. The annual rings should be fairly close to each other, and the number of knots and other defects should be very minimal.
- The species that are most often used for production are, as a rule, widespread in our country: aspen, Siberian larch, pine.
- Some manufacturers make custom shingles from Canadian red cedar and other exotic species, but not too often, since the cost of such material is prohibitively high.
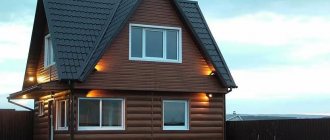
Façade cladding with Block House
Block House (BH) is a type of lining that imitates a rounded planed log. Sometimes this material is also called wood siding. It is made from spruce, larch, pine, cedar, aspen, and birch wood.
How do you get BH? A beam is cut from the central part of the log, and the edges go to the drywall. Like regular lining, the ends of the BH are processed for a “groove-tenon” connection. There are cutouts along the inner flat part of the BC. Adjacent to a flat surface, they form channels (warping grooves) through which the façade is ventilated. In addition, they relieve tension in the wood and increase its heat-saving ability. In Figure 5 you can see the BH in cross-section.
Choosing Block House
- for external work 40 - 45 mm;
- for interior work 20 - 25 mm;
Advice from the “façade designer”
When purchasing, pay attention to what width is indicated on the label - general (with a spike) or working (without a spike). The amount of BH that you will need for cladding the facade is calculated according to the working width
Advantages of Block House
BH is an environmentally friendly and strong material, it looks aesthetically pleasing (the house cannot be distinguished from a real wooden frame). If wooden siding has undergone special treatment, then the service life of such a facade will be about 70-80 years. But this facing material also has disadvantages. The low vapor permeability of this material can lead to condensation forming between the walls of such houses and the dry storage room. BH requires painting once every 1-2 years, otherwise moisture will penetrate into the tenon-groove joint, and the wood will swell and crack.
Installation of a facade from a Block House
Cladding houses with Block House is somewhat reminiscent of installing a roof - the same principle of a multi-layer cake:
- We attach a vapor barrier (membrane films, polyethylene) to the wall of the house. We make the sheathing from wooden beams treated with an antiseptic and fire-resistant compound. The spacing of the sheathing should approximately correspond to the width of the insulation slabs.
- We lay thermal insulation boards. We fasten them with dowels.
- We cover the insulation with waterproofing and fasten it to the beam with a stapler.
- We make a leveling sheathing from 50x50 mm timber.
- We begin installation of the BH. At the same time, we install each board with the tenon facing up so that no water gets into the groove.
- We fasten the siding with self-tapping screws to the sheathing, and we do this as close as possible to the tenon, so that the upper block house covers the attachment points of the lower one.
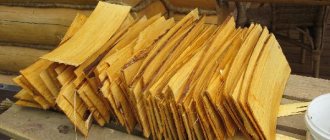
Shredded shingles
Roofers prefer split shingles.
It can also be made at home. To do this, you need to cut a log, the diameter of which is 30-40 cm, into several parts so that you get blanks 40 cm long.
Then they are cut with an ax into blocks 8-10 cm thick. Next, with special devices - a blade and a mallet, the blanks are split into shingles, 0.8 to 1 cm thick. The shingles are clamped in a vice and the hammer is struck with jerky movements blade mounted on the gontine.
Replacing old shingles
To remove a damaged roofing element, use a peg to lift the solid shingles located above the one being replaced. The defective part is split into pieces with a chisel and removed. The remaining screw heads are cut off.
If several rows are to be replaced, then work begins with the lowest elements. New tiles are cut according to the parameters of the resulting void so that there is a gap of at least 6 mm at each edge of the strip.
If the new element does not fit into the opening or enters at a different angle, it is enough to cut off part of its thin end. The shingles should be started by tapping on the block.
Roofing shingle service life
Among the factors that have a great influence on the lifespan of the roof are:
- selected wood,
- harvesting technologies used,
- features of raw material processing.
Subject to the rules of wood harvesting, when sawing of the material is completely eliminated, a shingle roof can last for many decades, up to 100 years. If the material was obtained by cutting immature wood, then you will have to think about replacing the roof in a few years. An important point is the maintenance of the finished product. Thus, with timely processing of wooden elements, a long service life can be achieved.
The service life of shingles is about 100 years
Wood roofing is at great risk from exposure to sunlight and wind. This leads to drying of its fibers. Loss of moisture is fraught not only with external changes in the coating, but also with the loss of its original properties. The tiles are gradually cracking, the tightness of the roofing layer is broken, and the roof needs repair.
No less dangerous for shingles is high humidity. If during installation some areas were laid in violation of the technology, then when the wood swells, proper ventilation will not be provided, which will lead to distortion of the entire canvas.
Ways to increase the service life of shingles
Wood is a raw material that reacts strongly to temperature fluctuations and changes in humidity levels. Therefore, the layer of varnish on it will quickly crack with constant expansion and contraction of the structure. Moisture will begin to penetrate through the resulting defects without the possibility of natural evaporation, which will lead to the proliferation of microorganisms and rotting. In order for wooden shingles to retain their pristine beauty and technical characteristics for a long time, it is enough to process it periodically. A large number of construction companies supply the market with special products for treating wooden structures to prevent rotting, drying and bacterial damage.
- Translucent penetrating oils occupy a leading position in the market. They impregnate the top layer of the coating. This treatment guarantees the preservation of the wood texture for many years.
- Water-repellent compounds - transparent impregnations on a wax or acrylic-resin basis help maintain the appearance of the roof, but due to their short protective effect they must be applied at regular intervals.
- The use of varnish and paint is the most controversial way to treat a roof.
A flawless finish is achieved by completely immersing the wooden elements in a protective compound before they are secured to the roof. In the future, it will be enough to cover the surface with a protective agent using a brush or spray.
Additional protection and processing
The shingles are pre-treated with fire retardants and antiseptic solutions if pine wood was used in the production of the material.
It is she who is most susceptible to rotting and damage by bugs, and discoloration. Special impregnations and oils will help preserve or change the color of pine shingles and prevent damage to wooden shingles.
Aspen, larch and cedar shingles do not need to be treated, since they will last for decades even without additional protection.
How to make shingles production technology
Shingles are made both manually and industrially from lumps of wood. The core poses the greatest risk of cracking, so this is removed first. Each piece of log must be split into parts - 2 or 4, and, accordingly, the core must be cut out, and all that remains - into thin planks. They are prepared, one might say, all year round, with the exception of the winter period.
The industrial production of plates occurs somewhat differently: the logs must first be sawn into logs of double length, after which, in accordance with the width of the product, a beam is prepared, which is cut into plates approximately 800 mm long. This makes it possible to cover roofs with a large area with similar material. Obviously, for standard roofs, the plates are first sawn into two equal parts.
Sawn plates are less durable compared to chipped ones. This is due to the fact that when cut, the fibers are not preserved, since their splitting does not occur naturally. Obviously, this violates the integrity of the structure. That is why many who prefer to make shingles themselves often use splitting technologies that have come to us from time immemorial.
The log pieces are peeled using a special plow. This is a knife equipped with two handles, although preparing roofing material in this way is too time-consuming and labor-intensive.
The industrial shingle machine was invented in 1939, although this is not the first invention of its kind. The simplest and oldest version of it was called “mahalo”.
What is a mahalo ↑
They take a log with a length of three to four meters and a diameter of 120–160 mm. Stepping back 200 mm from the end, drill a hole ø 3 mm into which a metal pin is inserted. The length of the rod should be sufficient to secure the log in the wooden block. He must also move calmly. Approximately one meter from the end with the hole for the pivot, a 60 cm staple knife with a blade sharpened on one side is attached along the length of the log.
The angle of attachment should allow plates of the required thickness to be removed when the master and assistant pull the log by the free end. It is necessary that the “waving” during work does not pull the block out of place, the dimensions of which allow raw materials to be placed on it under wooden plates.
The second end is equipped with a 400 mm wooden handle. It helps move the log if necessary. You can attach a rope to the handle, then the shoulder will increase, which will make the work much easier. After chopping, the finished plates are placed in a “block bag”.
Professional installation
The installation of a shingle roof, as in the case of all other roofing materials, follows certain rules that take into account some nuances.
Professionals must comply with the following conditions, neglect of which can lead to a significant reduction in the service life of a wooden roof:
- The minimum permissible slope when installing shingles starts from 18 degrees, and the larger it is, the better for the roof. The steeper the slopes, the longer the shingles should be.
- When using waterproofing in a structure, it is necessary that it be vapor-permeable. This is necessary to ensure proper ventilation inside the roofing pie.
- The shingles are laid in such a way that the sharp edges fit tightly into the grooves of the adjacent ones. In addition, the parts that make up the upper rows must overlap the joints of the underlying shingles that were connected earlier.
- The shingles are secured by nailing them to the sheathing at the top.
Technology for replacing worn out elements
High quality material
! It is important to know! It is necessary to comply with the condition that the nails enter the bar approximately 2-2.5 cm. The eaves overhang is finished using a board, the thickness of which must correspond to the thickness of the shingle covering.
Board roofing
The easiest to work with and the most affordable wooden material is tes. Unfortunately, it is also the most short-lived. If earlier boards were hewn, that is, they were made by splitting the trunk along the grain, now they are usually sawed out, destroying the natural structure of the wood.
The plank roof is assembled from edged boards 19–25 mm thick. The optimal width is 150–200 mm. Wider wood members are prone to warping.
The boards can be laid both longitudinally and transversely, but the second option is only suitable for temporary buildings due to its fragility. When installing longitudinally, the boards are laid from bottom to top. The overlap of the rows should be at least 5 cm.
When installing a plank roof, the lower boards are laid with the core down, and the upper boards with the core up. This increases resistance to moisture
Regarding longitudinal laying, there are two technologies. Single-layer involves placing the boards end-to-end. In this case, the gaps are closed with flashings - wooden planks with a cross-section of 20 × 50 mm.
Double-layer installation is much more reliable and durable. The bottom boards can be laid end to end, and the joints between them can be covered with boards from the top row. But there is another technology that allows you to save material and make the structure as a whole much lighter. In this case, the lower boards are placed at a distance of 50 mm from each other, and the upper ones cover these gaps.
Regardless of the installation technology, the boards are attached to the sheathing with stainless nails or self-tapping screws. Moreover, self-tapping screws are preferable. Firstly, they provide a more reliable fixation (nails may not hold a board warped by water). Secondly, thanks to self-tapping screws, the roof can be easily disassembled if necessary.
Wooden roof slope
! Note ! The slope of a shingle roof and, in general, any roof made of shingles, shingles, or ploughshares is recommended to be no less than 30-50°. If it is even steeper, this will have a positive effect on extending the life of the shingle roof, since the amount of time during which water will remain on the surface of the covering will be minimal. This means that the tree will not have time to gain more moisture.
! Secret information ! The humidity of the shingles before laying them on the roof must reach certain levels, since the covering of overdried planks can become very warped after the first rain.
Wood selection
In order for a shingle roof to serve no less than soft tiles or corrugated sheets, it is necessary to choose the right material for the manufacture of dies. High quality raw materials ensure durability and resistance of the coating to external influences. To make shingles, oak, aspen, spruce, fir, cedar, beech and larch wood are used. The following requirements are imposed on the quality of the material:
- Absence of a large number of defects. For the manufacture of shingles, flat, smooth wood without cracks or knots is used. It is better to use the butt part of the log, since there are practically no branches and, accordingly, no knots on it.
- Humidity no more than 21%. To make a high-quality wooden roof, you need to use it dried to 19-21%, otherwise it may rot.
- High density of annual rings. If the annual rings in the tree structure are located tightly, it has greater strength and resistance to mechanical damage.
- Hardness. Hard wood is denser and stronger than soft wood, so it is better preserved in conditions of constant exposure to precipitation.
Preparation of shingles
Note! Most often, the main criterion for choosing wood is the price of the material. Experienced craftsmen note that larch has the optimal ratio of cost and performance characteristics. Wooden roofing made from this type of wood has a long service life and is resistant to rotting.
Tips for installing shingles yourself
A professional installation of a shingle roof can only be carried out by a specialist who has been engaged in this work for more than one year and, thanks to extensive experience, is familiar with all the nuances of constructing a wooden roof.
But, if you decide to cover the roof of a gazebo or outbuilding with shingles without outside help, then you can try to do it yourself.
- The principle of laying ready-made planks is somewhat reminiscent of how a lump is constructed: the fastening of the gontines occurs according to the principle of placing the thin edge of the die in the groove of the adjacent plank. Thus, each element of the upper row overlaps the joint of the underlying plate.
- The shingles are fixed to the sheathing at the top.
- The sheathing pitch when laying shingles in 2 layers is equal to half the length of the die; if the coating is single-layer, then it is 4/5.
- The eaves overhang is finished with a board, the thickness of which should be equal to the roof covering.
- The connection of the shingles on the ridge is end-to-end, after which it is covered with boards.
- When using additional insulating materials when installing a shingle roof, a ventilation gap is created to prevent wood rotting processes. Ventilation is necessary to ensure that all wooden tiles on the roof dry quickly after precipitation.
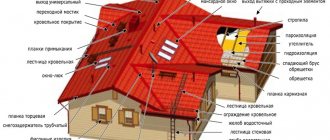
Construction with wooden roof
Roof structure diagram
There are many options for the “pie” of a roof with a wooden covering. Let's look at one example that provides high thermal insulation and moisture protection. And let's start analyzing the structure from the room side. The first is a layer of vapor barrier, then a lathing made of wooden blocks 50 x 50 mm, two layers of insulation with a total thickness of 200 mm and a windproof film.
Now let's look at the layers on top of the rafters. First, an anti-condensation film is laid, then a solid base is assembled from OSB boards 22 mm thick and 20 mm sheets of moisture-resistant plywood are laid on it.
Next, they begin to create waterproofing, for which they use two layers of self-adhesive roll bitumen-polymer waterproofing. It is this coating that performs in the structure of this roof a function that in traditional roofing structures belongs to tiles, metal tiles, flexible tiles, etc. A carpet of bitumen-polymer waterproofing prevents the penetration of atmospheric moisture into the “pie”.
Then the workers install the sheathing to create a ventilation gap and nail the counter-lattice bars to it. The final stage of work is covering the roof with pine boards.
Price of shingles for roofing and facades
Since various types of wood can be used in the production of shingles, the price of this material, which is purchased for roofing and facade finishing, depends primarily on this factor.
Pine shingles are the most affordable, larch and cedar shingles are elite and prestigious.
Larch and cedar shingles are roofing and facade materials that belong to the category of the best, and are used in the construction of expensive country houses, cottages, and estates.
- Larch - from 650 rub./pack
- Aspen - from 710 rub./pack
- Canadian cedar - from RUB 4,000/pack
How to make a simple machine for shingles
You can make a special machine yourself. To do this, you will need rolled metal (channels, angles, fittings), the assortment does not matter, you can use everything that is at hand. If the channel or I-beam is small, then it is reinforced with angles, rods, etc. It is much cheaper to make a machine from scrap ferrous metals; you can visit recycling collection points and find excellent rental products there at bargain prices.
A knife from a printing guillotine is used
Step 1. Make a bed. The height is approximately 1.0–1.3 m, the main condition is that it allows comfortable work. The frame is welded from rectangular profile pipes 20x40 mm; if they are not available, then any durable rolled steel can be used. It must be borne in mind that quite large loads will be applied to it during planing of shingles; all welded joints must be made reliable. The length of the bed is approximately 2 m, this is quite enough to ensure maximum stroke of the knife and guaranteed stability of the machine during operation.
First you need to make a bed
Step 2. Make a movable table from 50x50 mm corners. It should be smooth, rigid and stable. The knife, drive lever and bearings are subsequently fixed to the table.
Making a movable table
Step 3. Weld the strips at an angle in the middle of the table and attach the knife to them.
The knife should be at an acute angle
Step 4. Place the table on the bed. The table moves on closed ball bearings. Do not install simple bearings; chips quickly get between the balls and races, and the bearings jam. Check the smooth movement of the table; there should be no hitches or wobbles. If problems are found, fix them. Attach wooden boards of appropriate length, approximately 20 mm thick, to the surface of the table.
Possible problem - this part needs to be sawed off, but you can’t do this with a grinder
To solve the problem, use a reciprocating saw
Step 5. Use a cylindrical grinder to remove all burrs and scale, and paint the metal surfaces.
The excess part is cut off
Step 6. Place ball bearings on the table axles and finely adjust their positions taking into account the width of the bed.
All parts of the structure are painted
One of the axles to be fitted with bearings
Step 7. Proceed with assembling the machine elements into a single structure. Check the table stroke and install limiters if necessary. Secure the knife, adjust its position in relation to the surface of the table. This must be done carefully; the thickness of the shingles depends on the height of the knife. Make sure that the cutting edge of the knife is positioned strictly parallel to the plane of the table. If this condition is not met, then the thickness of the shingles in different places will be different. Deviations up to a millimeter are considered non-critical, but more cannot be allowed.
The knife is secured with bolts
Assembled structure
Step 8. Check the operation of the machine while idle. If vibrations or fluctuations are detected, the frame should be strengthened. Use any available metal for these purposes.
Photo of the assembled machine
At the end, you need to check the machine for functionality.
The machine is ready, you can start making shingles.
The performance of the machine is demonstrated by the example of such a small block
The workpiece must fit freely into the supports
The walk-behind tractor starts
Blank attached
Gradually the workpiece disappears
Result of work
Do-it-yourself antique mahalo machine
Antique mahalo machine Instructions for making a machine with your own hands:
First of all, you will need a log with a diameter of approximately 14 centimeters and a length of 3-4 meters. In this log it is necessary to drill a hole 3 millimeters wide from one edge of the log, retreating 20 centimeters from the end.
You need to insert a metal pin into the resulting hole, making sure that it moves easily. Its length should be sufficient to secure it in a wooden block.
On the same side where the hole for the kingpin is located, you need to secure the knife a meter from the end. The knife will be a sixty centimeter staple. It must be fixed at such an angle to ensure that the shingles are cut to the required thickness. On the other side of the log, a handle 45 centimeters long is made. With its help you can conveniently move the log.
For convenient and safe work, you need to correctly set the length and width of the wooden block. This must be done in such a way that, as a result of working with the laid block of wood, the “mahalo” does not move from its place.
It is not recommended to work with dried wood. First you need to soak it in water, or even better, boil it in boiling water for half an hour. This can be done in an ordinary metal barrel.
Shindel (wooden plates)
- one of the types of wooden roofing, which has a long history. Its name (from the German Holzschindeln) is typical for Western European countries adjacent to the foot of the Alps. Siberian larch wood is used to create tiles.
Shingles, shingles (shingles) are piece roofing materials , where each plank is made almost by hand, using German technology in compliance with all the norms and conditions of the German standard DIN 68119.
The shingle is made using the splitting method, the whole secret of the durability of split wooden tiles lies precisely in this. In the process of splitting into planks, the wood fibers are broken and the internal capillaries of the wood are not disturbed.
Unlike sawing, this method extends the service life of the coating by almost 30% and gives a natural, original relief surface, which dampens the noise of hail and rain. Shindel allows you to create a beautiful, completely sealed roof.
Wooden tiles have little weight (1 m2 weighs 15–18 kg) and can be used at temperatures from –70 to +40°C. The planks are laid on the roof like scales of conifer cones - overlapping, in two or three layers.
After the rain dries, the boards bend slightly and rise into a dome, which ensures complete ventilation and removal of excess moisture.
Due to the fact that wood itself breathes, and if during construction an additional air gap is created between the covering and the supporting structures of the roof, the roof is ventilated, which significantly extends the service life of the supporting structures and the covering itself.
Thanks to this, in the summer it will be cool in such a house, since the wooden covering itself will not heat up very much, and some of the warm air that still collects under the roof due to ventilation will simply be blown out. In winter, especially in snowy areas, ventilation will eliminate the problem of ice formation on the eaves line, and a thick layer of wooden covering will retain some of the heat emanating from the house.
Wooden shingles are suitable for roofs with a slope of 18–90°, and can also be used for exterior walls of the house. The most common wooden tiles are 40 cm long. it is used on roofs with an area of 100 to 500 sq.m. The end of the board is wedge-shaped, its thickness at the thick end is 9-10 mm and at the thin end 5-6 mm. The width varies from 6 to 20 cm. It depends on the piercing. In the process of laying three layers per 1 sq.m of wooden roofing, an average of 75-80 planks are used. The shingles are packaged in a bundle of 27 x 30 x 45 cm with two tapes at the rate of 1 sq.m of three-layer roofing.
Price overview
Wood shingle roofing can vary in price depending on the material, city of installation and the specific company. We propose to consider the average cost per 1 square meter of larch shingle roof installation:
| City | Price, rubles |
| Krasnoyarsk | 1250 |
| Novosibirsk | 1300 |
| St. Petersburg (SPb) | 1400 |
| Moscow | 1400 |
| Kyiv | 1300 |
| Minsk | 1300 |
| Krasnodar | 1250 |
13 May 2014 Author: Vladimir Bakaev
Shingle Roof Maintenance
The best tools for caring for the surface of a wooden roof are a brush with a long handle and stiff polypropylene bristles and a ladder. High-quality wood does not require human intervention; it is enough to treat the shingle roof with an anti-fungal solution only once every two years.
With the arrival of spring, caring owners sweep the shingle roof from any remaining sand and dirt, and the seeds of trees and grass that have spent the winter on the roof are swept away, and the color of the coating is lightened. Periodically you have to check for breaks in the coating; if any of the elements are cracked and falling apart, it needs to be replaced, otherwise the entire row will sag.