The use of natural materials for roofing is one of the most popular solutions. They are able to provide the roof with a beautiful appearance that attracts the attention of everyone who sees the house. Deciding on a specific coverage option can be difficult.
Roofing shingles most often become the final choice, as they have many advantages and positive characteristics. And you can install it yourself.
Features of shingles
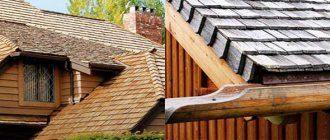
Shingles stand out from other materials due to their appearance and manufacturing method. It consists of small wooden plates made from natural wood. Aspen, cedar, oak, pine or spruce are best suited for this. They retain all the resins, preventing harmful bacteria or fungus from forming, which could become a serious problem.
Split shingles are considered the most reliable and durable. It is made by splitting using a special mechanism. There is sawn shingles, which are cut with a saw, but are of lower quality and have a rough surface. Both options are widespread. In more rare cases, a mosaic type is used, which is intended to serve a decorative function. This type of shingles is most suitable for building facades.
Advantages and disadvantages
Shingles, like any other roofing material, have their pros and cons. They are directly related to the wood from which the plates are made. Therefore, it is important to use fresh and high-quality raw materials to obtain beautiful products.
Advantages:
- environmental friendliness, no need for additional processing;
- resistance to temperature changes and moisture;
- absence of rotting processes, durability;
- high noise and waterproofing;
- versatility, the ability to be used for gazebos or facades;
- ease of operation, permissibility of self-production and installation.
The main disadvantage of shingles is its high cost. Even if you make your own plates, you will have to spend a lot of money on purchasing raw materials. The second drawback is related to the installation process - you will need to have certain skills to be able to lay out the panels yourself.
Advantages and disadvantages of the material
Wooden planks, overlapped in several layers, form a dense, reliable coating. Made according to all the rules, it lasts a long time, does not crack, and can withstand high temperature changes. Wooden roofs do not interfere with air exchange, do not create a greenhouse effect, do not emit harmful substances, maintain a healthy indoor microclimate, and block out extraneous noise well . The natural color and texture of natural material are beautiful. Such roofs look very picturesque and original.
In addition to being decorative and environmentally friendly, the advantages of shingles include practicality, ease of processing, the possibility of making it yourself, and versatility. It can be used to decorate not only roofs - walls, facades, fences. It is not difficult to restore shingles by sanding down the rough edges . Disposing of obsolete coatings also does not create any difficulties.
The disadvantages are: significant fire hazard, painstaking manufacturing, low productivity when laying large-scale surfaces, high risk of defects as a result of improper wood processing.
Performance characteristics
The plates have a thickness from 3 to 8 mm. Their width varies from 8 to 16 cm, and the length can be either the classic 30–50 cm or the extended 80–100 cm. They are distinguished by noticeable flexibility, due to which the installation of a special sheathing is required for durability.
Shingles are free-breathing materials. Periodically, it swells and dries out under the influence of the external environment, which allows air to penetrate through the product. Even sudden changes in humidity and temperature will not have a negative impact on the appearance or basic properties of the coating.
Light weight is one of the most important properties of shingles. Thanks to it, the overall load on the foundation and rafter frame is reduced. This ensures reliability and safety for the entire building, not just its roof.
This type of roof prevents heat loss during the cold season. Therefore, the house will always be comfortable. And in the summer heat, overheating will be excluded, which is no less important for the well-being of all residents.
Interesting! The sound insulation of shingles is so high that people inside the house will not hear the impact of raindrops on the roof.
Advantages
We will talk specifically about fiber cement siding, because it is more common than slabs (due to the price, mainly) and there are more reviews and operating experience. In general, the material is recognized as worthy and not difficult to use. But this is subject to one condition: with proper installation. Each company has installation instructions and it has more than a hundred pages. It describes specific nodes and processes. If you do everything according to the rules and recommendations (or deviate quite a bit), then a good result is guaranteed.
It is important to follow technology. Painting cuts and places where fasteners are installed is one of the key points. In general, the advantages of fiber cement siding are:
In general, the advantages of fiber cement siding are:
- Dimensional stability. There is thermal expansion, but it is small.
- Fiber cement slabs and boards are not hollow, without voids. Corners and joints can be made end-to-end, without the use of additional elements, as when finishing with vinyl siding.
- Does not burn.
- The material is dense and hard. When the frame is assembled correctly, it almost doesn’t “play”, it doesn’t press through, you can lean against it, but it’s difficult to break it.
- High frost resistance - 50 cycles for Rospan, 150 for Enterit, 300 for Japanese Nichiha.
- If the installation rules are followed (painting the ends, saw cuts, fasteners with suitable paint), the water absorption is low - no more than 8 (Japanese slabs) - 18% by weight when immersed in water for 48 hours.
- Low maintenance requirements. The attractive appearance remains for a long time, no paint renewal is required. For example, Kedral guarantees color fastness for 10 years. One more point: if you connect fiber cement boards without a joining profile, leave a gap
- Can be installed at any time of the year. Only touch-up of seams and chips can be done at above-zero temperatures, which still imposes certain restrictions on the installation time.
- You can cut with a hacksaw - a blade with hardened teeth, a circular saw or angle grinder (grinder), or a jigsaw. When using an angle grinder or a circular saw, the recommended disks are Leitz or Bosch for fiber cement. A jigsaw also requires special fiber cement files.
This is what fiber cement siding looks like when cut
It's all about merit. In short, we can say that with normal quality, there are no complaints about fiber cement siding. It can be used for years and require absolutely no attention.
Manufacturing Features
The technology for making shingles is quite simple. You can do it yourself. To do this, you will need to create a special machine, which you cannot do without. No hand tool will allow you to obtain plates of the required thickness.
It is equally important to take into account the properties of the tree itself. Often spruce or pine is used for manufacturing, but they have many knots that will cause difficulties during the work process. It is recommended to give preference to deciduous trees.
Wood requirements
When choosing source materials, a tree trunk, it is worth considering several important requirements. If they are not followed, then there is a risk of encountering problems not only during the manufacturing process, but also during the operation of the roof.
Primary requirements:
- Hard center in the barrel - if it is soft, durability will be compromised.
- Lack of knots - an excessive number of branches will increase the risk of rotting.
- Freshness – freshly cut wood is damp, making work much easier.
- The length of the logs is from 40 cm - it is recommended to cut the tree into equal parts with a length of 40 cm.
- Tree health – it is important that the tree shows no signs of disease.
Only about 40% of the starting material will be used to make the plates, and the rest will become unusable. If desired, you can find another use for it (cut out decorative elements).
Conclusion
Using wooden shingles for plastering work reduces costs. It is not difficult to work with it, the main thing is to choose the right strips and fill them onto the surface. When applying the solution, its maximum thickness must be observed, otherwise it will cause rotting of the load-bearing structures.
The video in this article will provide an opportunity to expand your knowledge on this topic. If you have any questions while reading the publication and after it, please ask them in the comments, we will be happy to answer them.
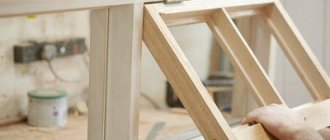
Making a simple machine
To manually create the plates, you will need to make a special machine. It is made quite simply, but you will have to visit a store or market to purchase the necessary materials. The channel, angles and fittings are especially important. The only thing you should buy ready to buy is a knife, since making it yourself will be extremely difficult, and the final quality will be too low for creating shingles.
Algorithm for creating a machine:
- Create a frame about 120 cm high by welding rectangular profile pipes measuring 20 by 40 mm. Its length should be approximately 2 m.
- Make a movable table from corners measuring 50 by 50 mm. Weld strips in the middle at an angle and place a knife.
- Place the table on the frame and install ball bearings. Remove burrs and scale by grinding, paint the metal.
- Adjust the bearings on the table axis, taking into account the width of the bed. Install travel limiters if necessary.
- Fix the knife, adjust its position in height and tilt. Connect all the elements together.
Afterwards, all you have to do is make sure the machine is working and start making shingles. If the system turns out to be too noisy, you can place a rubber bushing under the table. You need to wait until the device is completely dry after painting.
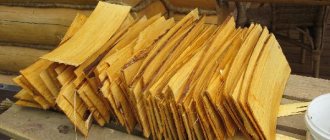
Independent production of blanks
Creating plates is not as difficult as it might seem at first glance. Their dimensions should be approximately the same, but deviation from the specified parameters is allowed within 5 cm. Otherwise, you should adhere to the production technology and not violate the step-by-step instructions.
You can make shingles with your own hands if you follow the algorithm:
- Split the block into two parts, then each of them into several more. The arc length of each element should be 5–10 cm greater than the planned width of the shingles.
- Place the workpiece on the table at one of the corners of the cylinder arc sector. Remove excess wood particles so that a flat area is about 10 cm long.
- Repeat for the other side of the workpiece. Turn it with the other side towards the knife, remove the surface with the bark. The result will be a sector in the workpiece that has parallel edges, the distance between which is the width of the shingles.
- Collect planed plates and sort by width. Align all the parts several times in a row so that they are as similar as possible.
During the manufacturing process of plates, all production waste should be removed from underfoot. This is required by safety precautions, as there is a high risk of tripping, tripping or accidentally jerking, which will lead to material damage and injury.
Important! The material should be cut along the grain. This will avoid unevenness and damage to parts.
Installation technology
To perform the installation correctly, you need to carry out a number of actions:
- Prepare the surface of the walls.
- Glue stone wallpaper.
- Treat the surface with special means.
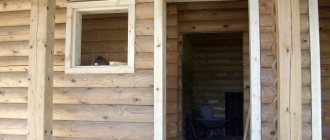
Installation
When checking the wall, you need to make sure that it meets the requirements. Namely: cleanliness and adhesion of the wall. In order for the material to adhere reliably, there should be no oily, greasy stains or old paint residues on the surface.
If the wall surface is not level, it needs to be leveled with plaster or putty (depending on the damage). When finished, apply primer.
Before installation, you need to prepare the glue. If you don't want to make it yourself, buy a ready-made mixture at the store.
Analogues of wooden shingles
Roofing shingles are the closest analogue of shingles. They belong to the same category of materials, but have some differences. The procedure for manufacturing the plates is the same in both cases. The cut is most often made trapezoidal, rectangular or in the shape of a swallow's tail. Laying is done in three layers from bottom to top, and the plates are fixed with self-tapping screws or nails.
Can also be used:
- shidel - mounted overlapping with a slight offset along the rows, leaving a small screw;
- ploughshare – has a spade shape, is made from spring aspen, laying is done vertically and horizontally with small gaps;
- board - made from pine needles, laid along or across the cornice, a groove is installed in the central part to drain rainwater, and attached to nails.
Other types of materials are sometimes used to make shingles. They have their own characteristics, and creating them at home is almost impossible. Therefore, this option can only be considered if you purchase ready-made plates. There are two types of alternative shingle materials used:
- copper – fixed using special cutouts, available in a variety of shapes and sizes, very durable;
- PVC - sold in the form of siding panels, they create the illusion of real wood, are impact-resistant and reliable.
PVC siding can be used not only for the roof, but also for finishing the outside of the wall. A special basement option is designed for cladding the lower side of the house. The elements are used for buildings with high foundations.
Laying technology
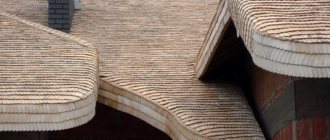
Shingled roofing differs from other coverings not only in its properties, but also in its installation technology, which is determined by the nature of the material. The shingles are placed on the roof in the same way as the scales of a fir cone are laid.
When exposed to precipitation and high humidity, wooden plates swell slightly and increase in size. Thanks to this, the material closes on the roof.
The roof looks like a bump. During the drying process, the plates, bending, are raised by a dome, which ensures the removal of moisture from under the roof of the house.
This natural coating exhibits its unique properties in sunny weather. If we compare materials such as metal and tiles, then a wooden surface does not transfer heat. This keeps the house cool during the hot season.
The outer surface of this coating is characterized by a relief structure.
This circumstance protects the under-roof space from noise resulting from:
- hail;
- rain;
- gusty wind.
Roof installation
The shingles are most often fixed in the middle using nails made of stainless materials. And the lathing is made of slats measuring 20 by 30 mm with a step along symmetrical lines of 200 mm. The distance between them is calculated based on the dimensions of the plates. As an example, 45 cm long shingles will be used.
Installation process:
- Nail the board to the roof at a distance of 15–50 mm from the edge to control the evenness of laying out the shingles and the amount of overhang.
- Install the first row of shingles, aligning with the bottom line. You can adjust the amount of overhang using a piece of slats up to 10 cm long; it must be applied to the board, exercising control over the position of the plates.
- Lay out a second layer of shingles. This is necessary to extend the service life of the coating, since a lot of liquid accumulates below, which gets into the cracks between the plates. The top layer should extend beyond the bottom by about 1.5 cm.
- Lay out the next row, installing it in such a way that the joints of the previous shingles overlap by at least 3 cm. The gap between the plates should be about 5 mm, which is necessary for future expansion of the wood from getting wet.
- Having reached the last row, you will have to lay it out along a stretched rope. After fastening, you need to cut off the protruding part with a circular saw.
When laying shingles for subsequent plastering of walls, the installation procedure is much simpler. You just need to fix it with nails on the tree, installing the plates in the form of identical rhombuses.
Important! During the installation process, you need to pay attention to the direction of the fibers. Water must flow along them, and not against them. Where they are directed can be seen at the slightest bend of the plate.
How to apply the solution?
How to plaster wooden walls with shingles? If you want to achieve an ideal surface, you need good plaster and primer, and everything will be applied in several layers. The sequence is:
- The felt is slightly moistened with water; it should be slightly damp before starting work.
- The surface is marked with markers where the grid has unevenness. In these places you will need to apply a thick layer of plaster. You need to make a layer of 1 level - this is extremely important. The maximum thickness should not exceed 1.2 cm. The recommended thickness of the rough layer is only 9 mm.
- The first layer is a spray, it must dry, after which a layer of primer is applied. If you use lime and gypsum, then the layer will be 7 mm, and if the base is cement, then no more than 5 mm.
- When applying the spray, you should try to fill all the voids as best as possible. At this stage there is no need to level the surface; it is enough to maintain approximately the same level.
- Let the primer dry a little, but not completely, it must be damp so that the next layer is properly fixed. If you plan to install tiles in the future, this is where the finishing work ends. If not, you will need to perform 3 layers.
- The top layer of plaster must be clean with the finest fractions possible. To do this, the solution must be sifted through a fine sieve. This way you can get rid of lumps and debris. A finishing layer is applied to the soil, carefully distributing the entire solution, using a trowel and a rule. The plastered area is rubbed with a foam or plastic trowel in a circular motion - this way you can get rid of bumps and small irregularities.
- If the primer is dry, you can lightly cut it with a spatula to form grooves and then moisten it.
Plastering on the shingles is completed, the finishing layer is drying.
Replacing old shingles
After some time, the plates may lose their properties. Taking into account the fact that even new shingles partly evoke a feeling of antiquity, time-worn ones will become completely unattractive. In this case, you will need to replace the damaged parts. You can work with one or several roof elements at once.
Plate replacement process:
- Drive a wedge under the plate that is installed above the damaged one and lift it slightly.
- Chop the plate to be replaced with a chisel and remove it, cutting off the nail heads with a hacksaw.
- Drive in the new plate by lightly tapping it, nail it with nails scalded in drying oil.
- Apply roofing adhesive to the nails.
In some cases, it is not possible to install the new plate evenly. Then you need to cut it off from the thin end and repeat driving in again.
Price
The final price of natural material depends on the type and quality of the raw materials, production method, purpose and markup made by the seller. The thickness and width of the dies matters. Solid shingles for roofing and exterior wall decoration are the most expensive, costing about 2000–3000 rubles. for 1 sq. m. Beech, cedar or oak shingles are valued at up to 4,000 rubles.
Decorative panels for interior work are cheaper: depending on the size, their cost varies between 400–1900 rubles.
Imitation materials made of metal, PVC or plastic, taking into account the technologies used, have no less cost than natural shingles.
Advantages
If you look closely, you can guess that the shingle roof visually resembles the structure of pine cones. The dies, laid overlapping each other, swell when exposed to moisture during rain, preventing liquid from flowing into the rafter frame. The unique properties of wood give wooden roofing the following advantages:
- A light weight. One square meter of shingle covering weighs no more than 15-16 kg, which makes it possible to use a sparse base for the flooring, and also not to reinforce the roof frame.
- Breathability. Wooden roofing, due to the properties of this natural material, has high ventilation, which, together with the high content of phytoncides in wood, creates a healing microclimate in the room.
- Low thermal conductivity. Wood retains heat well, so a wooden roof does not require additional thermal insulation.
- High noise absorption capacity. In terms of noise-absorbing ability, shingles are not inferior to soft roofing, effectively dampening the sounds of falling drops during rain.
- Long service life. Contrary to the fears of developers, a wooden shingle roof, provided it is properly installed and high-quality material is used, lasts more than 100 years.
- Environmental Safety. Wood is a unique building material that does not harm human health, but on the contrary, has a healing and restorative effect on the body.
Shingles and shingle roof structure
Modern imitation
Modern imitation of shingles On the modern construction market you can find an amazing variety of roofing materials designed to imitate shingles. Thanks to advancing technologies, they produce, for example, copper shingles. It is worth noting that such material is not very similar to its ancestor. Copper plates are made of diamonds, squares or “fish scales” of different sizes with a thickness of less than 1 mm. They have “ears” designed for fastening to the sheathing. They are similar in cost to handcrafted wood plates. Although among the advantages we should note fire resistance, ease of installation, and a variety of colors. But the disadvantages can be noise and low environmental friendliness.
American manufacturers have a special collection of bitumen shingles made to look like shingles. Along with this, you can find polymer imitations made from PVC, resins, and mineral additives. They are most similar to their historical counterpart in color, size and shape.
New items
Currently, the range of wood is very diverse. Among the new products, Finnish siding, including spruce and pine, deserves attention. This option is widely used as a finishing material for walls, ceilings, facades, has an affordable price and is of quite decent quality for Russian operating conditions.
Among the new products we can also note siding made of meranti wood. This tree is mined in Indonesia and Malaysia. Due to the abundance of tannins and resins, this option, in comparison with coniferous wood, does not absorb moisture and is almost not susceptible to rotting. It is distinguished by its wear resistance, beautiful color - from a brownish-pinkish tint to brown. This variety is more often used to produce imitation timber.
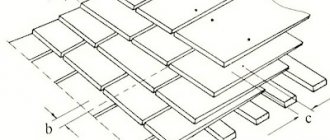
Shingle roofing
Layout of shingles
Roofing shingles are lightweight. The flooring is carried out over a continuous or thin lath, for the manufacture of which bars 6 cm thick are taken. The distance between the 4-layer covering and the bars is 25 cm.
The shingles are laid towards the ridge. Shortened plates are used for the first row of the first and second layers. The wooden plates of the first layer are fixed with the lower end to the board, and the upper end to the block.
The material is fastened with nails 5 cm long so that they go through the layer that precedes the one that is being laid.
- environmental friendliness. Roofing shingles do not emit harmful substances into the atmosphere, and therefore are absolutely safe for humans and the surrounding area;
- low thermal conductivity. Houses with such a roof do not require additional insulation or heating;
- moisture absorption. Such a roof does not need waterproofing, since wooden plates provide complete sealing of the coating.
- Ventilation of the space under the roof is carried out naturally due to the movement of air between the rows of shingles. This avoids the formation of condensation.
- When installing a shingle roof, virtually no waste is generated;
- such a roof can easily cope with severe frosts (down to -70 degrees) and the scorching summer sun;
- If you lay the shingles correctly, it can easily cope with heavy loads from snow and winds.
- such a roof reliably protects the house from rain, noise and temperature changes.
A more complex type of wooden roofing is shingles - plates 40-70 cm long, produced by chipping or sawing.
Roofing shingles
The sheathing should be of good quality, but not heavy, with steps that allow each plate to be attached to the beam. The cross-section of the timber is 5 by 5 centimeters.
Shingles are usually laid in three layers, but for utility rooms they can be laid in two layers. The roof is covered from bottom to top. The top row of plates is laid so as to cover the joints and nails of the bottom row.
At home, shingles are made by cutting a log with a diameter of 30-40 cm into several pieces of 40 cm each. The pieces are then cut with an ax on a block 8-10 cm thick. The blanks are clamped in a vice and, using a mallet and blade, are split into plates of 0. 8-1 cm.