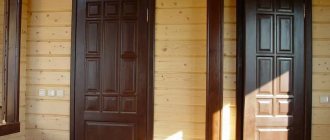
Setting up a secure garage not only ensures the safety of the car, but also prevents intruders from entering the vehicle. Every car owner strives to have his own garage, since in large cities many cars spend the night in the open air, being exposed to the harmful effects of the environment and being the object of increased attention from scammers. For owners of country houses and dachas, the task of erecting the said building occupies one of the first positions on the list of priority activities. But the excessively high cost of manufacturing this design in some cases discourages any desire to implement the plan. The use of wood and the manufacture of some structural elements with your own hands will significantly reduce costs when constructing a garage. An integral part of any building of this type is the gate. For their high-quality construction, you need to familiarize yourself with how to make wooden gates yourself without involving the labor of specialists.
Types of wooden gates
Like metal gates, wooden ones are divided according to the type of opening into the following groups:
- swing,
- sliding,
- lifting,
- folding (accordion).
Moreover, in all types, you can install a gate if the opening is large enough, or install it next to the gate as a separate element of the barrier structure.
Regardless of which type was chosen, the design of wooden gates consists of support posts to which the gate leaves will be attached. The second element is the canvas itself, made from a frame and covered with wooden boards (less often with plywood or OSB).
The main difference between the types is the method of opening, and, accordingly, the method of fastening.
Swinging ones are hinged to the support posts, sliding ones are attached to the guides along which they will move (there are two of them: lower and upper).
For lifting gates, you will have to specially purchase a lifting kit, which includes an electric motor, a rod in the form of a chain or belt, as well as guides made of metal profiles.
Folding ones are assembled from several vertical sections connected by hinges. But the two outer sections are attached to the support pillars.
All of the above models are installed in the form of fencing openings not only on the street, but also indoors, for example in garages. Therefore, when the task is to build a wooden garage door with your own hands, you can choose any of the types.
As practice shows, most owners of private plots, houses and garages give their preference to swing gates as the simplest, cheapest and most convenient to use. We will talk about them.
What kind of poles are suitable?
Various types of posts can be used on gates:
- wooden - timber or round timber;
- metal pipe, the cross-sectional shape is not important;
- brick or concrete pillars.
A tree immersed in the ground has the lowest durability. Features of the installation of such pillars will be discussed below.
If possible and the appearance of the gate will not deteriorate, it is better to choose supports made of metal or brick.
Manufacturing and installation of wooden swing gates
First of all, the dimensions of the gate are determined. Usually these are two identical doors, although there are options with different canvases. The width of the opening is determined taking into account the diameter of wooden pillars, which are used as logs or beams, round or rectangular pipes, and other steel profiles. The minimum cross-sectional size of wooden posts is 30 cm, steel – 10 cm.
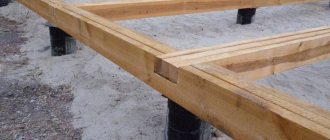
Along the edges of the opening on one line, holes are dug with a depth of at least 1 m, with a diameter of 10–20 cm larger than the pillars. Sand 15 cm thick is poured into them with a tamper. Wooden posts are treated with bitumen mastic or covered with roofing felt over a 1 m long section. The posts are installed in holes and filled with concrete mortar.
Let's get started
So, lumber and metal parts of the structure have been purchased and are waiting in the wings. How to make swing double-leaf gates with your own hands?
Installation of pillars
- Using a garden drill, we prepare holes for the posts. Depth – 1.5 meters, diameter – 30 cm.
Note: of course, holes can be dug with an ordinary shovel. However, their size willy-nilly will turn out to be much larger; After installing the support, you will have to dig a real pit.
- We impregnate the pillars with antiseptic primer.
- After drying, we cover the underground part and the lower 10-15 centimeters of the above-ground part of the pillars with bitumen mastic. It will provide waterproofing.
Below ground level, the pillar is protected with bitumen.
- We wrap the underground part of each pillar in roofing material, install the supports in the hole and fix them with spacers.
- We fill the holes with crushed stone and compact it as tightly as possible. A section of the same timber with a handle nailed to it on top can act as an improvised tamper.
- Fill the holes with liquid cement-sand mortar. It is prepared in the proportion of 1 part M400 cement to 3 parts sand. While the solution is setting, we proceed to making the sashes.
Frame
The frame of each door has the shape of the Latin letter Z. As you know, a triangle is a rigid figure; the oblique lintel of the frame forms a pair of triangles with the sheathing and horizontal beams, which prevents any deformation of the sashes.
The Z-shaped frame ensures rigidity of the structure.
The frame elements are spliced into half-timbers and tightened with threaded rods or bolts with countersunk heads, with nuts and washers inserted into pre-countersunk holes.
Please note: the total width of the sashes, taking into account the canopies, should be 2 - 2.5 cm less than the width of the opening. The instructions are related to the swelling of wood in wet weather: the clearance ensures that the sashes will not cling to each other even after heavy rain.
Sheathing
To fasten it, it is better to use the already mentioned bolts with semi-countersunk heads without cutting. Of course, strictly stainless steel: black steel will instantly become covered with untidy rusty streaks. The boards are attracted to the frame with small (1 - 2 mm) gaps, which in wet weather will again serve as expansion joints.
An important point: if forged overhead canopies are used, they are also fastened not with self-tapping screws, but with bolts; Moreover, the bolts pass through both the casing and the gate frame.
Attaching the overhead canopy.
Decor and protection
So, the gates - sheathed with wood or solid wood - took their rightful place at the entrance to the yard. Have we forgotten anything?
Forgot. We missed the fact that we planned to create not just a gate, but a gate in a retro style. Forged fittings are good, but don’t you think that the new doors are in striking contrast with them?
No problem. Wood can be aged.
For this purpose, there is an operation called “wood brushing” (from the English brush).
- We impregnate all non-metallic structural elements with an antiseptic.
- We process the wood with a metal brush or an appropriate attachment for a drill/grinder. The brush will remove the softest fibers, highlighting the texture and highlighting the growth rings.
The photo shows the brushing process.
- Sand the surface with sandpaper. This is necessary so that the wood looks old and not just unkempt.
- We cover the wood with stain and let it dry, then we go over the surface with sandpaper again. As a result, the texture will stand out not only in relief, but also in color, as happens on heavily worn wooden products.
The result of aging.
- We impregnate the wood with a protective oil-wax composition. Regular drying oil will also work. It is better to apply it heated in a water bath: then the composition will penetrate deeper into the wood fibers.
Drying oil is an inexpensive and effective protective agent.
Now the work is completed. You can enjoy a well-deserved rest.
Manufacturing of sashes
To assemble the frame of the doors, you need boards 50 mm thick and 100–150 mm wide. Instead of boards, wooden blocks are also used. The main task is to accurately adjust their dimensions to the dimensions of the structure. Everything will depend on the height of the gate and the width of the opening. Therefore, four boards are prepared with a length equal to the height, and another four with a length equal to half the width.
A rectangular frame is assembled, where the method of attaching the boards to each other matters. Previously, connections with various cuts and additions in the form of dowels were used for this. Today, metal fastening profiles are used, which are screwed to the wood with self-tapping screws. By installing such profiles on both sides of the boards being connected, we obtain a fairly reliable fastening.
For reliability, you can install a jib (at 45°) in each corner from the same boards as the frame itself, and add a crossbar across the entire width of the sash. Often, instead of a crossbar, a diagonally installed element from a board is mounted.
Note! Everything must be done to ensure that wooden gate leaves do not become loose at their fastening points during long-term use.
So, the frames of the canvases are ready, all that remains is to sheathe them. There are a huge number of options here, the simplest is to install vertical boards 20–25 mm thick and 80–100 mm wide. They can be installed tightly to each other or leave small gaps. As for the length of the board cladding, it should be 20–25 cm greater than the height of the gate and protrude beyond the frame on each side. Fastening is done with self-tapping screws, the length of which must be at least twice the thickness of the cladding boards.
Is it worth insulating the house from the inside?
Regulatory documents say the same thing, for example, SP 23-101-2004, dedicated to the design of thermal protection.
Typically, this method is considered justified only for residents of apartment buildings who cannot convince their neighbors to chip in to insulate the entire facade.
If external insulation is still possible, installing a heat insulator inside is a big mistake.
Why are experts so categorical? The inconvenience of interior work for residents and the reduction in living space have already been discussed. But there are also more serious negative effects. Here they are:
The service life of the wall is significantly reduced
If the wall is insulated from the outside, it is heated by the heating system and never freezes. If the insulation is placed inside, the wall will be in a zone of low temperatures and will either freeze or thaw as the weather changes.
Any building material contains a small amount of water, so this mode of operation is detrimental to it.
In the characteristics of a material indicating its frost resistance, for example, M100, the number indicates precisely the maximum permissible number of freeze-thaw cycles.
Condensation may form inside the wall
If air, usually containing a large amount of water vapor, penetrates into the wall from a room, the position of the so-called dew point is important. Before we talk about it in more detail, we remind the reader that the solubility of steam in air depends on the temperature of the latter
Before we talk about it in more detail, we remind the reader that the solubility of vapor in air depends on the temperature of the latter.
The warmer the air, the more steam it can hold. If the air cools, the excess steam turns into condensate.
It is obvious that in the thickness of the wall the temperature gradually decreases from the inside to the outside. The dew point corresponds to the temperature at which the relative humidity of the air entering from the room reaches 100% and excess steam in it begins to condense. Much depends on in what part of the wall the steam turns into water and in what quantities.
Under certain conditions, the result of internal insulation can be abundant release of condensation at the insulator-wall interface or inside the wall itself. In a damp zone, thermal conductivity increases sharply, and if it is on the surface of the wall, then mold also appears here. If moisture has condensed inside the supporting structure, it will cause cracks to appear when it freezes.
In order to insulate from the inside and not encounter the problem of dampness, you need to choose the right thermal insulation material.
Installation of sashes
First, metal hinges are screwed onto the doors. There are two of them, the installation location is slightly offset to the middle from the lower and upper frame elements. The sequence of actions is as follows:
- loops are applied at the fastening site;
- marks are made through the mounting holes;
- through holes are drilled through them in the frame;
- the hinges are installed in place with precise alignment of the holes;
- Bolts are inserted into the latter, onto which nuts with a wide washer are screwed on the opposite side.
The second part of the hinges is attached to the support posts. To do this, the doors are installed on bricks near the pillars with their exact location in height. The second parts are applied to the attached loops. Their mounting plate is applied to the racks, to which it is secured with long self-tapping screws. Such installation is possible if the pillars are wooden logs or beams.
If steel profiles are used, the mounting plate is attached to them by electric welding or bolts. In the latter case, you will have to drill through holes in the racks.
All that remains is to install the lugs for the padlock and the pin to secure the doors in the closed position. All these devices are attached to the frame elements with self-tapping screws.
Useful tips
Galvanized or brass fasteners are optimal for wooden gates.
The length of screws and nails should not allow through holes during assembly.
To prevent rainwater and snow from lingering on the top of the gate, it is made with a slope (at an angle).
A small gap between the ground and the lower edge will allow water to drain during heavy rain and prevent the formation of an ice crust in winter.
Finishing wooden gates
Since the gates are installed outdoors, they are exposed to the negative effects of natural loads. Therefore, they are treated with several layers of protective compounds. The first layer is an antiseptic. Its task is to protect wood from the negative effects of microorganisms.
The second layer is drying oil. This paint and varnish material consists of 95% vegetable oil. It covers the wood with a thin layer that protects against pests, microorganisms and moisture. Today, drying oil is used less and less, because manufacturers offer other modern materials.
The third layer is paint, varnish or stain. There is a huge selection of colors, textures and composition.
Protecting wood from environmental influences
A wooden sliding door will last a long time if additional protection is applied to it. The impregnation should be suitable for outdoor work and be oil-based only. It is best to use septic tanks that have a combined effect; such products protect from both moisture and the sun. And from harmful insects.
It is recommended to use glaze or yacht varnish as a finishing coat. For more complete protection, you can use these two products together, first apply the glaze, and only then the varnish.
It must be remembered that the validity period of any protective agent does not exceed six years, which means that after the specified period, the treatment will need to be repeated to maintain the proper level of protection of the material.
Original finishing methods
Antique wooden gates are one of the popular types of decoration. There is a huge variety of options offered, where many people prefer carved gates.
This type of finishing is complicated. To carve even the simplest figures from wood, you need special tools with the skills to work with them, experience and imagination. If neither one nor the other is available, then it is better to order a ready-made trim, which you can attach to the frame of the doors yourself. Hand cutting is expensive.
Advice! Stores sell carved elements made from thin boards or thick plywood, which you simply need to nail with small nails to the elements of wooden gate leaves.
To make it look antique, you can use painting. It also requires imagination and the ability to paint, although you can do without it. You need to buy stencils, since a wide range is sold in art stores. They can even be ordered for a specific design. And already applying painting through a stencil is a simple matter.
Another option for antique fitting is forged elements. This finish is the height of respectability. Even the most inconspicuous wooden gates, lined with forging, become a masterpiece of art. It is impossible to forge iron with your own hands if you are not a specialist in this matter. Fortunately, forged elements are sold in construction stores today. They are attached to wooden gates with nails or self-tapping screws.
Popular materials used
Gates are manufactured after preliminary selection of high-quality material. Valuable types of wood are rarely used to fill the frames of doors and gates. Pine parts are most often used. However, even they will not allow you to create a simple, lightweight garden gate if the frame is made of metal. Although this option will be highly durable. He will be able to provide the necessary level of security. After all, this is a stronger option than gates made of only one wood.
The use of pine is the best option in terms of cost and quality. Structures made from such wood have an attractive appearance and are resistant to various influences. If your budget is limited, then it is recommended to choose the picket fence option.
Gates and wickets made of picket fence Source zabor-tgn.ru
Electric wooden gates
The fruits of civilization haunt most owners of private plots, houses, cottages and garages. Moreover, they become more affordable every year. For example, devices for automatic gate opening allow you to operate the gates without leaving the car.
Essentially, it is a low-power electric motor and metal ties that work on the principle of levers. The automation package also includes a control unit and a key fob that operates on the principle of a remote control.
The electric motor is installed on support posts, a fence or a wall. A solid, reliable surface is important for its installation. Tie-levers are attached to the cross member of the frame of the sashes.