Tool for screeding floor boards
If possible, post a picture of these devices and the addresses where these devices can be purchased.
They advised me that a tape tie for laminitis could be used for these purposes; anyone who has tried it is better to use a jack or a tie.
Somehow I was also interested in this issue. This is what the bourgeois came up with:
And here's how this thing works
You can buy it on Amazon. It costs about $65.
Unfortunately, I did not find this in Russia. You can, of course, if you wish, construct such a thing yourself; there is nothing complicated about it. Yes, you can order from Amazon, they also send it to Russia
In general, I am a supporter of staples and wedges. If you get the hang of using them, you don’t need any more equipment.
Thanks Meehan. I agree about the staples and wedges. But the devices are more convenient. Maybe there are some homemade ones. Maybe someone can tell me?
Yes, now, of course, many different devices have appeared and the prices are also different, people are used to working comfortably and having everything at hand.
I want to tell you how the old carpenters used to lay the floor and they didn’t have any jacks or special tools at hand, and they used an ordinary ax to pound nails with - these were the specialists!
This is done like this: the first board is placed under the wall and nailed, then the second board is pressed against the first by an ax, which, resting its tip against the beam, pressing the blade towards the board, presses it against the first.
The first row of nails pounded towards the first board, and when they hit them, they additionally pressed the board to the board, and the control nails of the second row were driven straight.
And so, board after board, it didn’t turn out bad, no worse than when using special tools.
When laying wooden floors, it is advisable to tighten the floor boards so that the gaps between them are minimal.
There are many ways to do this, for example using:
- wedges and various staples;
- ax and hammer;
- special clamps;
- pry bar or jack.
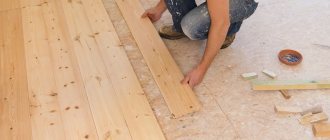
But it is best to use a special device for screeding floor boards, as in the pictures below:
I didn’t find any special devices for screeding floors in stores, so I found an old Soviet hydraulic jack, which I could easily use to pull together at least five boards at once, whatever, but it has enough strength. I found a similarity of such a jack on the Internet, and I’ll post this photo. So, I think this option is the cheapest and most effective.
Car jacks were used with my father-in-law. Very convenient if the boards are not completely level.
Thanks builder. Can you give more details?
The technology is obvious. Bars were nailed onto the joists, and jacks were inserted between them and the board being laid. When the board was pulled together well, it was screwed on with self-tapping screws at an angle. And so on with the next board. As the boards were laid, the bars were either sawed off or torn off and new ones nailed.
Thank you very much, builder. But still, maybe there are other devices besides jacks?
Devices for screeding floor boards
Do not think that devices for screeding plank floors are an invention of recent years. Our grandfathers and great-grandfathers also wanted a flat floor. Old textbooks describe ways to eliminate cracks during installation. For this purpose, metal staples were used - ordinary or of a special design. Modern devices and techniques are just variations of old methods.
Bowrench and Special Automation
We describe these two devices together, since the Belarusian Spetsavtomatika made some changes to the Bowrench design, which is produced by the Americans. But, in essence, it is also a device.
You can tighten the boards using Bowrench
So, there is a part with two protrusions that is fixed to the joist. A metal stop and a handle are movably connected to it. By pressing the handle, we ensure that the board fits tightly and install the fasteners. The disadvantage of this device is that it blocks access to the end of the board. When laying a tongue and groove board, you will have to move it several times if you need to fix it to each support.
Logs can be of different thicknesses. To be able to “rest” against them, there are replaceable nozzles. The stop can be easily removed: you need to remove the two studs that secure the mounting bolts. However, the set consists of three or four attachments, so there are not many options.
The Belarusians have made some changes to the design: one part of the joist grip is movable and adjustable
In the device produced by Spetsavtomatika, the log grip is adjustable. There is an adjusting bolt at the end that allows you to extend or retract one of the clamps. There are more adjustment options, but there is also a higher chance of damage. In operation, both are quite convenient, although the “American” is more refined. But the difference in price decides the matter - Bowrench costs 3.5-4 times more.
How to tighten floor boards using a clamp and wedges
You can tighten the floor boards using a clamp and two wooden wedges. The clamp is fixed on the joist at some distance from the board being installed. Two wedges are made from a piece of board 40-50 cm long by sawing the piece diagonally.
A device for tightening boards from a clamp attached to a joist and wedges that press the board
The clamp is installed on the joist, turning the arc towards the board. Wedges are installed between the arc of the clamp and the board. They hit the wide side of the wedges with a hammer or sledgehammer until the gap between the two boards disappears. Then you can fix the board. If you need to install fasteners in a tenon or groove, a “window” is made in one of the wedges, which is placed above the joist and through which a self-tapping screw is screwed.
Thrust board and wedges
The previous method is good for everyone, but the board is attracted only in one place. You can, of course, install several clamps, but this is time. And there are usually not many sufficiently powerful vices on the farm. The problem can be solved using boards and similar wedges.
A support board about a meter long is nailed at some distance from those being mounted. They are nailed to the joists above which it is located. It is not necessary to drive the nails all the way to the heads, but the support should hold well. The distance for installing the support is chosen so that three or four boards can be laid without moving it.
Backing board nailed to joists and wedges are another way to hold floor boards together.
A piece of “lining” with a window through which you can tighten the self-tapping screw is attached to the board being installed. In order to be able to tighten the floorboards, scraps are inserted between the support and the wedges. First you need long pieces, then smaller ones. The entire structure is assembled so that the wedges stand in such a way that by knocking them down, the boards can be held together.
How to lay a floor step by step instructions
To make your own floors with joists, you need to develop a plan. In the plan, you can indicate the parameters of the beams, all kinds of preparatory work and devices that will be useful during the installation process.
Tools required for work: hammer drill, drill, wrench, hammer, jigsaw, axe.
You will need:
- Axe.
- Rule (or level).
- Hammer.
- Jigsaw (or saw).
- Drill.
- Screwdriver.
- Claw hammer.
- Wrench (size: 13-14).
- Board.
- Logs (dimensions: 50×50 mm).
- Insulation.
- Anchor bolts 1 cm.
- Self-tapping screws 5 cm.
- Nails 7 cm.
The beams are laid at a pre-calculated interval between them for sound insulation. A level should be used to ensure the surface is as level as possible. If the surface is concrete, then anchor-type bolts are used to fasten the logs. If the base is made of any other material, then dowels are used.
What are the advantages of wooden joists?
The log does not require any additional care. In addition, floors on joists have a presentable appearance.
The advantages of lag include:
- no effort is required to make the floor level;
- the beams have thermal insulation properties;
- installation is done quickly, in several stages;
- excellent sound insulation;
- possibility of locating communications.
Laying thermal insulation
As described earlier, logs are mounted with a certain step. Insulation (super-thin basalt fiber or expanded polystyrene) is placed in the remaining gaps. You can use roll insulation for these purposes. In addition, expanded clay can be used for the insulating layer.
Clear flooring
Laying boards on joists.
Laying the wooden beam begins from the corner part of the room. The first row is positioned tongue-and-groove relative to the wall, while the gap between the wall and the joist should be no more than 1 cm, since deformation of the wood is possible under the influence of the environment.
Next, a row of lags is laid offset relative to the first row by approximately several beams. In order for the boards to be firmly attached to the base, you need to lightly tap the wood with a construction hammer, which is adjacent to the end of the beam.
You attach the boards along the wall and secure them with screws. They may be on the surface, but no one will see these details - the baseboards will hide all the imperfections.
Thus, all deformed boards are covered with this decorative element. Irregularities will also not be visible. However, this does not mean that you do not need to follow the instructions; over time, if installed incorrectly, the structure will collapse.
Do-it-yourself floor leveling
Chipboard floor on joists.
Surely you have encountered a similar problem. It is especially often observed in old houses, where the height can exceed the level of evenness by up to 20 cm. Concrete screed is not always the solution: the structure may not withstand such a load. Here it would be wise to use adjustable lags. The installation process is carried out according to the following scheme:
- Special bolts are screwed into the drilled holes in the joists. There should be 5 such holes for every 2 meters of the beam.
- Plan the gap you want to make between the joists, lay them out and secure them.
- For dowels, drill small holes. This must be done so that the drill reaches the depth of the rack bolts.
- Next, you should check the surface for evenness. Cut off the excess parts of the post bolts. After this, hammer in the nails.
- Lay the floor on joists. This is the final stage of work.
Finishing work
Do-it-yourself subfloor on joists.
Now that the main work is done, you can begin to complete the installation of the joists. Your task is to get rid of irregularities on the surface, as well as eliminate roughness. A scraper or grinder is ideal for such work. You start the process with sandpaper, which will effectively and quickly remove all excess. Then you should take sandpaper, which will polish the surface of the base.
To increase the service life and wear resistance of such a floor, you need to cover it with one of 3 types of impregnations:
- Oil impregnation.
- Varnish intended for parquet.
- Mastic (preferably wax).
You have familiarized yourself with the material on laying lag, all that remains is to get to work. Such floors will delight you with thermal insulation properties, durability and long service life. You can achieve a good result if you strictly follow the installation diagram. Despite the simplicity of the work, installation has its own characteristics and nuances. Today, craftsmen prefer to lay floors with joists, and for good reason - they will create a more impeccable appearance in your home.
Elements for fastening
How can I attach a board to the joists or subfloor? Today, manufacturers offer various types of elements so that the flooring material can be properly fixed. The most common are:
- nails;
- self-tapping screws;
- screws.
Nails are often used to install floors, especially if the material used is oak or larch. But they tend to break out during intensive use, which can lead to damage to the surface.
Self-tapping screws securely fix the wooden base to the joists. But, given the fact that they are made of steel, the fasteners are subject to corrosion.
Using self-tapping screws to fasten boards
Screws made of galvanized material have a cutter at the end, which ensures high-quality and fast screwing. You can use these fasteners for floors made of any wood. The coating prevents the screw from rusting even when in contact with moisture.
You can use any type of fastener for wooden floors, the main thing is to take into account some points during work:
the distance between screws or nails should be no more than 25 cm; the boards are pulled together as much as possible, but it is important not to forget about the technical gap of 2 cm, which is necessary in case of wood expansion; if a non-galvanized fastener is used, then its caps must be treated with sealant.
A device designed for joining floor boards together with your own hands is a great help. But, in addition to this, to install the floor you will also need a level that is at least 1 m long. It will be convenient for them to check the evenness of the exposed joists. This tool is also useful for preparatory work.
It is very important to have a chisel, a screwdriver, a metal hammer and a hacksaw in your arsenal
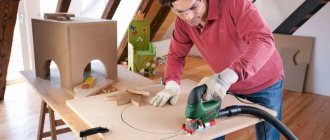
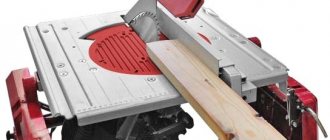
When laying flooring, it is a good idea to have a cutting machine, especially if the flooring will be laid over a large area. This tool will make the job much easier. It performs various functions. They will be able to cut off excess pieces from the boards or make a cut not in a straight line, but along an oblique line. The advantage of this tool is that the blade size can be adjusted. This helps with large and wide boards. The machine makes very precise cuts, which is very valuable when laying floors.
Cutting machine for work
To make a cut at a certain angle, you should set the required angle on the scale and fix the blade in the desired position. If millimeter precision is required, this tool is simply irreplaceable. You need to step back a little from the edge, then mark the line where the cut should take place, fix the disk and only then turn on the machine.
You can use this tool if you have a board that is too wide. To do this, attach a special stand to the cutting machine. The frame will extend and thereby support the long board.
Second stage installation of beacons
Not every instruction describes the installation of beacons, but if you do not have experience and special equipment, it will be difficult to level the mixture relative to the horizon without errors. Not only leveling, but also walking on the loose layer is impossible, since the foot gets stuck and the even layer of backfill is disrupted.
A certain transitional technology using beacons is proposed. To do this, you will need a U-shaped profile, turned upside down with sharp edges. In this position, the profile is laid flat on the floor, and expanded clay is poured between the edges. Then the contact between the profile and the gypsum fiber sheets will be minimal, which means that the soundproofing benefits of the dry screed will not be impaired.
Features of floor screed using various devices
You can buy professional tools at any hardware store. Since it is not cheap, many home craftsmen make do with what they have on hand. Some methods of screeding floorboards are quite labor-intensive and require carefully thought out and precise markings.
To avoid spending money on such an expensive tool, you can use a car jack.
The principle of operation is the same: one side of the jack rests, for example, on brackets or a wall, the other on the edge of the board. The only significant drawback is that such a device is difficult to install correctly. Among the advantages, it should be noted that in this way you can compress several floorboards at once without much effort.
The old method of compressing boards using wooden wedges, which our ancestors used, is also relevant. For emphasis, modern craftsmen use staples rather than bars. The hardware is subsequently easier to dismantle (remove) than to remove the nails to free the persistent wedge or block. And the work process is faster.
As for the clamp, for a one-time job it is too expensive to then lie around in the garage after installation. You also need to make sure that it is securely fixed so that it does not fly off later.
A few tips from the master
Is it worth buying a device such as a bowrench for one-time work? Most likely not, since this tool costs 10,000-15,000 rubles, which may not be affordable for everyone. But, if you are planning to lay 50 square meters of flooring or work professionally in this direction, you cannot do without it.
For one task, for example 1-2 rooms, it is best to use a jack; this is one of the most reliable and proven “folk” methods. It can compress boards of any cross-section with sufficient force.
Wedges or a pry bar simply won’t cope with large-section floorboards. It takes considerable effort to compress them to the required degree.
Methods for fixing floorboards
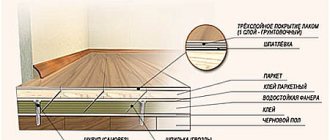
Floorboard with grooves for secure fixation
Boardwalks come in single-layer and multi-layer construction. In the first case, a layer of boards 25 - 35 mm thick is laid on the joists resting on the beams. There are elements with grooves and tongues (tongue-and-groove), others are distinguished by vertical side surfaces. Laying a tongue-and-groove floor differs from attaching planed rectangular elements.
A two-layer finish includes a face covering that is placed over the subfloor components. The first layer is made with a simple slot or substandard board installed on logs, while the width of the elements is 75 - 145 mm.
Finishing boards are connected in the following ways:
- secret method;
- on glue;
- using clamps.
Secret method using screws or nails
Secret method of fixation using self-tapping screws
Nails are cheaper, so their use is justified over large areas. Hardware forms a permanent joint, which, when disassembled, leads to cracks and destruction of the board. When loaded, the nail becomes loose, the floor creaks and springs. When humidity decreases, lumber dries out and the heads of hardware become exposed.
Self-tapping screws have the best application characteristics:
- it is possible to disassemble the coating, while boards and hardware are reused;
- ensure a tight fit of the boards to the base.
The cost of self-tapping screws is higher; fixation will require work with a screwdriver, and not just a hammer. The hardware is twisted at a distance of 25 - 30 mm. The boards are ideally joined using a secret method, but you need to remember that 8 - 10 mm of free space is left along the entire perimeter to the walls. The head of the screws is recessed into the body of the board, and a piece of wood is inserted into the hole at the top and sanded. Flooring manufacturers sell such plugs along with their products.
Using glue
Laying floorboards with glue
The technology is used when installing plank flooring on concrete without cushioning material. Cracks and height differences on the surface of the screed are not allowed, and it should not peel off or move under pressure. To eliminate defects, cracks are repaired and the base is primed.
One- and two-component adhesives are used. The first type of polyurethane composition is used when installing wide lumber, and the second type is intended for narrow boards.
Sequence of actions when gluing:
- cut blanks of boards;
- apply the adhesive composition to the concrete base with a spatula;
- put 2 - 3 longitudinal elements, they are pressed against each other and to the floor;
- work continues after the glue has set;
- the last part is cut to the required width.
Fastening with clamps
This method is considered fast because several parts are connected at once. In this case, each element is not attached to the joists, but hardware is inserted into the layer of boards.
Bonding is done with different compressions:
- Smolyakov bracket;
- construction compression;
- lever-toothed;
- movable and wedge bracket.
Work is carried out with wooden wedges along the thickness of the board with a cone of 15 - 20°. The spacer counter wedge is pressed to the end side, and the working part is inserted between it and the bracket itself. The first type is made from any wood, and for the worker they take hard wood, because they beat it to compact it.
The lumber is laid outward with a groove so that when compressed, the ridge of the board does not deform. The Smolyakov bracket is distinguished by three sharp ends, two of which serve as stops. The first board is placed against the wall and secured to the joists, then several panels are joined side by side, connecting the grooves and protrusions. The brackets are attached to the joists so that the narrow ends of the wedges can be inserted. Knock on the wedges until the boards are tightly connected, then tighten the screws at an angle or hammer in nails.
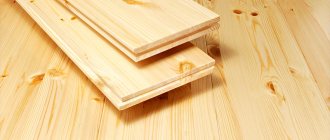
Choosing materials for plank flooring
Warm floor under a wooden board
The quality of the material determines the comfort of living, the budget for repairs and operation, and the service life of the flooring.
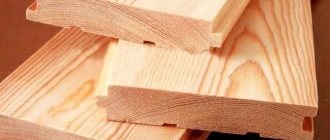
Dimensions of tongue and groove boards
When manufacturing sheet piles, manufacturers are required to comply with the requirements of GOST 8242:
- marking BP or DP - block and floor covering board, respectively;
- lumber thickness - 2.7 cm block, 2.1 cm, 2.7 cm or 3.5 cm board;
- tongue width - 4 - 6 cm block, 6.4 - 14 cm board;
- dimensions of the locking connection - groove 6 x 7 mm for a block, 7 x 7 mm for a board 2.1 cm and 2.7 cm, 7 x 10 mm for a board 3.5 cm thick;
- board length – 2.1 – 4 m for hardwood, up to 6 m for pine.
Lumber quality
The tongue and groove is made from edged boards of Extra, A or B grade, the output parameters are controlled in accordance with GOST 8242:
- integrity - boards 6 - 14 cm wide are usually solid, wider products are glued using furniture board technology;
- cleanliness of processing - roughness 120 microns for varnishing, 200 microns for painting, back surfaces of lumber have 500 microns;
- humidity – 8% when packed in film or 12%;
A wide board is more convenient to work with and is usually made by gluing, so it is less susceptible to warping. Coniferous species pine/spruce are considered budget, larch and cedar are valuable species, by default impregnated with a natural antiseptic. A solid-length tongue and groove made of hardwood without splicing is always shorter than a coniferous one. This is due to the structure of the wood.
Prohibited breeds for flooring are:
- linden, poplar for the entire range;
- BP-27 and DP-27 made of aspen and alder are suitable exclusively for residential premises;
- DP-35 is not made from alder and aspen.
How to tighten floor boards when laying wooden floors
How to tighten floor boards when laying wooden floors?
Please tell me what can be used to tighten the boards when laying wooden floors? I know about staples and wedges too, but maybe there are some more modern devices. If possible, post a picture of these devices and the addresses where these devices can be purchased.
They advised me that a tape tie for laminitis could be used for these purposes; anyone who has tried it is better to use a jack or a tie.
Somehow I was also interested in this issue. This is what the bourgeois came up with:
And here's how this thing works
You can buy it on Amazon. It costs about $65.
Unfortunately, I did not find this in Russia. You can, of course, if you wish, construct such a thing yourself, there is nothing complicated there. Yes, you can order it from Amazon, they also send it to Russia
In general, I am a supporter of staples and wedges. If you get the hang of using them, you don’t need any more equipment.
Thanks Meehan. I agree about the staples and wedges. But the devices are more convenient. Maybe there are some homemade ones. Maybe someone can tell me?
Yes, now, of course, many different devices have appeared and the prices are also different, people are used to working comfortably and having everything at hand.
I want to tell you how the old carpenters used to lay the floor and they didn’t have any jacks or special tools at hand, and they used an ordinary ax to pound nails with - these were the specialists!
This is done like this: the first board is placed under the wall and nailed, then the second board is pressed against the first by an ax, which, resting its tip against the beam, pressing the blade towards the board, presses it against the first.
The first row of nails pounded towards the first board, and when they hit them, they additionally pressed the board to the board, and the control nails of the second row were driven straight.
And so, board after board, it didn’t turn out bad, no worse than when using special tools.
When laying wooden floors, it is advisable to tighten the floor boards so that the gaps between them are minimal.
There are many ways to do this, for example using:
- wedges and various staples;
- ax and hammer;
- special clamps;
- pry bar or jack.
But it is best to use a special device for screeding floor boards, as in the pictures below:
I didn’t find any special devices for screeding floors in stores, so I found an old Soviet hydraulic jack, which I could easily use to pull together at least five boards at once, whatever, but it has enough strength. I found a similarity of such a jack on the Internet, and I’ll post this photo. So, I think this option is the cheapest and most effective.
Car jacks were used with my father-in-law. Very convenient if the boards are not completely level.
Thanks builder. Can you give more details?
The technology is obvious. Bars were nailed onto the joists, and jacks were inserted between them and the board being laid. When the board was pulled together well, it was screwed on with self-tapping screws at an angle. And so on with the next board. As the boards were laid, the bars were either sawed off or torn off and new ones nailed.
Thank you very much, builder. But still, maybe there are other devices besides jacks?
Video text
Device for screeding floor boards.
To tie together boards when installing a floor, I used to use wedges, a pry bar, a puller, and even a car jack. But with such old-fashioned methods, installing the floor takes a lot of time, and therefore, to save money, I decided to make a device for screeding the boards.
Dimensions Main lever 750 mm - square aluminum profile 25x25 mm. Small lever for the 180 mm beam - square aluminum profile 25x25 mm. Pressing bar - square steel profile 25x25 mm. M10 stud, self-locking nuts, washers, regular nuts.
The device is very convenient, it is advisable to use two of these, but you can get by with one.
I saw the manufacturing instructions on Andrey Shaiter’s channel https://www.youtube.com/user/Andrey40.
There are a lot of useful ideas for construction there.
Purchase, transportation and storage of wood flooring material
Wood is a material that is afraid of moisture. The purchased boards and timber for the floor should be stored at the seller’s place under sheds, or better yet, in closed warehouses. The boards should not be exposed not only to precipitation, but also to direct sunlight. When transporting boards and timber, it is also necessary to prevent the material from getting wet.
Important! In the room where it is planned to lay a wooden floor, all wet work must be completed, and in winter the heating must be on; if a screed was made in the room, it must dry completely (28 days). Before installing a wooden floor, material for work stored in open areas or at low temperatures must be kept in the installation room for at least 14 days
Before installing a wooden floor, material for work stored in open areas or at low temperatures must be kept in the installation room for at least 14 days.
In the room where installation will be carried out, the air temperature should be no lower than 8 degrees and no more than 20 degrees from the constant operating temperature. Of course, it is better that the temperature in the room when installing a wooden floor does not differ from the temperature of the subsequent operation of the room.
Advice from professionals
There are some subtleties in laying tongue and groove floors that can only be mastered with experience. To give you a better idea of how each stage of this work is performed, we have selected several useful videos. Please read them carefully before starting work:
If you decide to lay tongue-and-groove flooring yourself, take your time while working. Perform each operation efficiently and frequently check the geometry of the resulting flooring. With this approach, you will promptly notice any mistakes made and will be able to quickly correct the matter. Good luck with your work!
Why do floors creak?
You need to check the flooring by applying intense pressure, visually inspect the floor, cracks.
A building level or rule will help you find the problem area: creaking usually occurs in places of greatest differences in height. In this case, it is best to remove a couple of floorboards and look under the flooring: this way you can accurately assess the condition of the joists, the degree of their wear, and the quality of the rough foundation.
Checking the levelness of the base
Creaks near the wall are often caused by incorrectly fastened or dried out skirting boards. Inspect them carefully, pressing your hand in several places, check whether nails come out of them when pressed, and whether there are cracks in the material. To make sure there is a gap between the boards and the wall, you should carefully remove one of the plinth fragments.
Inspect the baseboard along its entire length
So, when the reason is determined, you can choose the optimal method of strengthening the floor. There are several effective methods that have long been tested in practice by home craftsmen.
| Ways to strengthen the structure | Causes of squeaking | Peculiarities |
| Using dowels | Small gaps in the flooring, loose end connections | Minimum labor costs and financial investments with high efficiency |
| Strengthening with anchors | Gaps between the subfloor and joists | The method is expensive, but very reliable |
| Pulling with self-tapping screws | Loose connection of floorboards to joists | Economical and fast method, no need to spend a lot of effort |
| Floor bulkhead | Worn material, drying of floorboards, presence of large cracks and other damage | The method is time-consuming and labor-intensive, but it allows you to effectively eliminate squeaks and other defects |
| Bonding floorboards | The presence of wide cracks in the flooring as a result of drying out | The method is effective and durable, but requires some experience and physical effort |
| Foam blowing | Small gaps in the floor, loose fit of elements | Expensive, but quick and easy. The method allows you to remove squeaking for a maximum of 3 years |
| Using self-tapping screws as supports | Deflections of boards due to large distances between joists | Easy to implement, but not suitable for high traffic areas |
Floor board tightening device, pair
The resulting wedges are used as a kind of stop, with the help of which the boards can be tightly “fitted” to each other before fixing them to the base of the floor.
In a similar way, the floor board is screeded using staples, which also serve as clamps and stops during installation. In this case, the bracket is driven into adjacent boards, ensuring their tight fit to each other. The deeper the bracket is “recessed”, the stronger the screed effect will be.
Both methods are successfully used both with the traditional option of laying a wooden floor on logs, and with adhesive installation of the flooring using tongue-and-groove joints of elements.
In addition, there are so-called “old-fashioned” methods that allow you to achieve the desired result without the use of any additional tools or equipment. It is enough to use the most ordinary ax as a stop, which provides the necessary force to move the boards, and quite effectively tightens the boards no worse than wedges or staples.
What are they needed for?
Laying wooden beams as lathing under the future floor allows you to strengthen the entire floor structure as a whole. In addition, noise and heat insulation materials are placed in the distance between the joists, which greatly improves the characteristics of the floor.
Properly installed beams and the distance between them ensure sufficient ventilation of the underground space of the house, which means that the wood will not rot over time. Especially if the building is located on an area with high groundwater. How to properly install logs and calculate the optimal distance between the sheathing beams is discussed below.
Laying on a plywood base
Joists, screed or an existing wooden floor can be used as a base for plywood. Installation of plywood is done using dowels, screws or glue.
When laying boards on a plywood base, choose moisture-resistant plywood with a thickness of 18 mm or more
Table 5. Laying boards on a plywood base
| Illustration | Description |
| Plywood sheets are glued to the cleaned and level screed. | |
| For gluing, a 2-component adhesive composition specially designed for these purposes is used. Apply it in a thin layer using a notched trowel. | |
| Plywood is laid with seams staggered in each subsequent row. Holes for dowels are made in each sheet in three places - along the edges and in the center. In this case, the hole should be located at a distance of several centimeters from the edge. | |
| The plywood is pulled to the screed with dowels. | |
| After laying, the plywood is sanded. | |
| After this, use a vacuum cleaner to remove wood dust. | |
| Before laying the boards, prepare an adhesive solution. | |
| Starting from the corner, apply glue with a notched trowel. | |
| When laying diagonally, work begins from the corner, not forgetting to leave a gap from the wall. | |
| Additionally, the board is fixed with a self-tapping screw to the plywood base. |
Floor fixing methods
After compressing the floorboards, it is important to secure them correctly and carefully. If they come apart they will start to creak.
There are 3 methods of fixing wooden flooring:
- Adhesive (only suitable for plywood flooring);
- Secret (hardware is hammered or screwed not vertically, but at an angle into the end of the board);
- Clamping (after screeding, the floorboards are fixed with special self-tapping screws or self-tapping screws).
Thus, when choosing a tool for floor screeding, you need to rely on the feasibility of spending your budget and time. Sometimes it is enough to use the help of craftsmen who already have their own tools and everything necessary for high-quality work. If you want to save money on hiring specialists, then you need to purchase everything you need yourself and decide on the method of screeding. If you have work experience, things will go quickly, because there is practically nothing complicated about screeding a wooden floor!
White version
It is much more labor-intensive to produce “white” floors from specially treated floorboards. As a rule, a so-called tongue-and-groove board is used for this. In some cases, it is permissible to use floorboards whose ends are chosen as a quarter. But the source material must first be dried in a chamber.
The main thing that must be observed is the layout of the floor boards. They must be placed “in the light” - in other words, perpendicular to the wall in which the number of windows is maximum.
When laying a “white” floor, there should be no gaps between the boards. To do this, the canvas must be “pulled.” Each subsequent board is tacked to the previous one with special wedges, and then, if the joint is of good quality, it is attached to the joists. Sometimes you have to touch the end with a plane. To consolidate the floor, you can also use special screeds, but this is already a professional tool, which does not make sense for a home craftsman to spend money on.
When laying such a floor, completely different methods of attaching the floorboard are used. This is the so-called parquet seam, when the fasteners are installed not all the way through, but flush into the end of the board.
Ordinary construction screws 35-55 mm long are also suitable for this. But it is best to use special screws for floorboards currently on the market. They have a different pitch and length of the thread, a “spoon”-shaped thread that imitates a drill, which makes it possible to avoid pre-drilling channels with a drill, and a flatter angle of the head (it does not split the edge of the floor board into which the self-tapping screw is wrapped). They cost, of course, significantly more, but the overpayment is justified.
When laying, it is often necessary to join the floor boards lengthwise. The docking options are not particularly diverse. As a rule, the joints are “guessed” so that they fall on one of the lags. This helps prevent the floor from weakening. The edge of each board is overlapped with a joist half its thickness.
But this method, as a rule, is accompanied by the appearance of a considerable amount of scraps. There is a method that gives greater freedom, but requires, however, the use of a professional tool.