by Alexey | For Kids Crafts Gifts Decor Workshop Cheap Accessories | Wednesday, September 07, 2016
| Follow Make-Self.net on Facebook and be the first to read our articles. |
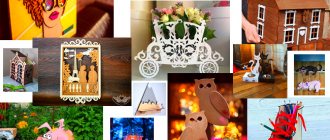
Handmade gifts for children are beautiful, cheap and pleasant. Every child needs original and educational toys, but it is not always possible to purchase them. Today we will show you 5 examples of toys that you can make yourself. They can be made of cardboard, paper or wood... In general, get inspired and make your children happy more often.
Signs of a true master
A true master will immediately determine:
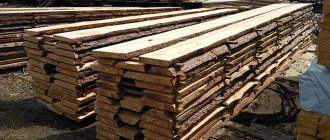
- what type of plywood sheet is best suited for sawing and processing. Wood varies in quality and properties. Some types are easier to work with, but some types are more difficult due to delamination, sudden appearance of cracks and other negative aspects.
- what thickness of material to choose for a specific design of a future craft;
- what jigsaw files to buy in order to use them for a long time.
This experience develops over a longer period. But the more interesting it becomes to advance along the path of self-improvement.
Hand-made plywood crafts, at first simple and unprepossessing, but over time acquiring real features that confirm the high class of a home craftsman, can become an objective reflection of the formation and development of artistic wooden decorating skills. Sometimes this is expressed in a very original way.
Over a certain period of time, plywood crafts are displayed in a row one after another, and then a picture of the gradual passage of the entire path from a student to a real specialist begins to emerge.
Subtleties that need to be learned to create quality crafts
- When attaching transfer paper to plywood, you should position the pins or nails so that you can easily lift the drawing to check the quality of the image.
- Lay the thinnest elements along the grain to increase their strength.
- When should not move exactly along the lines, but pass next to it, from the outside.
- The diameter of the hole should be slightly larger than the nails used to allow them to rotate freely.
- You should not drive the nails in completely; you may need to move certain parts to improve the model.
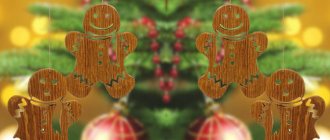
Set of decorations in Christmas style
A set of three ornaments inspired by traditional Christmas motifs. The set includes a pair of stylized angels and an openwork Christmas tree assembled from two halves. The latter can be used as a pendant or as a free-standing decoration.
Such toys look good in their natural form, with an open wooden texture. Therefore, linseed, mineral or any other non-tinted oil is best suited for finishing.
Stencils for cutting
The width of the central slot should correspond to the thickness of the workpiece used. To ensure a good fit between the two halves of the plywood Christmas tree, cut the groove a little smaller, then carefully file it with a file or sandpaper until it fits snugly.
What is a jigsaw: general description
A jigsaw is a tool designed for cutting various contours from plywood, including curved ones. It is equipped with a blade with fine teeth that can make an even cut of plywood without the formation of significant burrs.
Hand tool
The ancestor of this type of tool is a manual jigsaw. It consists of a metal arc in the shape of the letter “U”, between the ends of which a sawing blade is stretched and attached to clamps. They securely hold the file during operation and allow you to adjust its tension. On one side of the frame there is a handle.
The clamps on the tool can rotate, creating different planes for sawing, thereby providing the opportunity for wood carving of varying complexity.
When cutting from plywood with a hand jigsaw, you need to be careful: its design is quite fragile, and during intensive work, the blade often breaks from force and heat, so it has to be replaced. To do this, each master must have several dozen spare files.
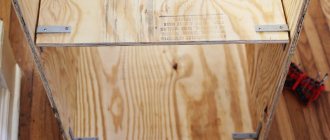
When working with a jigsaw to carve internal contours, it is convenient to use such an auxiliary board as in the photo: it will help both protect the table and solve the problem of convenient placement of the workpiece.
Jigsaw
The tool operates from an electrical network. It is a housing in which the working mechanisms are located, and there is also a handle for control on it. The sawing organ is located in the lower front part. The blade is often protected by a foot, which allows you to cut the contour exactly along the line without deviation. Advanced and professional jigsaw models have various attachments that facilitate the cutting process and straighten the edges of plywood.
Blades can have different teeth in shape and size. It is necessary to select saw blades that are appropriate for the material being processed so that damage and damage to the plywood sheet does not occur during operation of the mechanism.
Classification of jigsaws by power and application:
The instructions on how to use a jigsaw, or the technical data sheet, should describe the main parameters of the tool that must be taken into account when using the mechanism.
Christmas tree made of plywood with a themed openwork pattern
A voluminous New Year's decoration contains many small details and requires a certain perseverance from the performer, but the beauty of such a craft justifies all the effort expended. You can complete this project as a full tabletop decoration or small pendant by reducing the size of the original drawing.
The project is designed primarily for the use of a jigsaw. The parts are cut out serially, placing two wooden blanks in a stack. This way you will not only spend half as much time cutting, but you will also be less likely to damage fragile openwork parts. For the same reasons, it is more advisable to use thin plywood as the starting material - it is stiffer and easier to work with when cutting detailed patterns.
When both halves are ready, according to the markings on the diagram, two longitudinal slits are made on each part. Through these grooves, the two halves are connected together, forming a free-standing three-dimensional structure. If desired, you can glue both parts together, but practice shows that it is better to leave the decoration disassembled - this way you can more conveniently and safely store the plywood Christmas tree until the next holidays.
Types of wooden toys
Children, as a rule, begin their acquaintance with wooden toys with cubes and pyramids. As soon as the child sits down, you can offer him cubes - this way he will get acquainted with shape and color. It’s okay if your baby wants to try a new pastime: the eco-profile of wooden products ensures the safety of babies. It is also impossible to bite off a piece of a cube and choke, but parents should still, of course, watch the child’s play.
What other types of wooden toys are there:
- construction sets are useful and interesting, the child develops logic and imagination, from about 1.5-2 years old children begin to actively play with this;
- sorters, inserts and frames - during the game the child analyzes, sorts, classifies, and truly learns;
- puzzles made of wood - unlike traditional cardboard ones, such puzzles will not tear, will not become a victim of a cup of compote spilled on them, and will serve more than one generation of kids;
- lacing – develop fine motor skills;
- gurneys and transport - captivate, contrary to stereotypes, both boys and girls;
- interior - sometimes they are called wooden figurines, variations, designs, shapes - the greatest variety.
And these are just the main types, but today a lot of gaming “offline content” for children is made from wood. And kids play with pleasure with the same traditional nesting dolls, and they arrange interesting games with Russian folk craft toys.
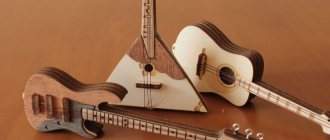
Tools and materials
If you are seriously interested in manufacturing, without purchasing wooden blanks for painting, the master’s set will be quite large.
Professionals need a lot of tools, beginners can make a toy out of wood armed with a jigsaw and sandpaper
The tools used are:
- saw;
- drill with a choice of drills;
- jigsaw (ideally electric);
- cutters, knives and chisels;
- grinder with a set of attachments;
- pliers;
- hammer;
- self-tapping screws, furniture screws, rods and wire - fasteners.
Our article will help you choose the right tools for the job: “What electric tools are used in wood carving: pros and cons of use, best manufacturers, cost.”
Wooden toys can be painted or tinted with wax and wood oils. The last option, by the way, has become especially popular. Work must be carried out with paints whose quality certificate is EN 71. The color is selected according to the tinting fan.
The main requirements for wood are as follows: the selected species should not form long chips and sharp edges. Pine is completely unsuitable in this case, but birch, linden and poplar are convenient materials. The wood should dry well, have no knots, and not exhibit rotting processes.
"Exhibition" of skill
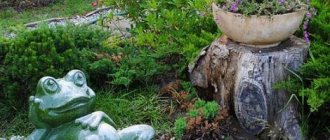
The arrangement of a house or apartment involves making a personal contribution to feeling the aura of inner beauty. And sometimes even externally, since the placement of objects made of plywood can be located, for example, on the territory of a summer cottage.
Of course, the result of fruitful work will always find its rightful place. Be it a carved lampshade for a table lamp or light plywood crafts in the form of figures, located on bookshelves and acting as book dividers.
More complex elements are performed with a solid knowledge of working with wood material. To rush and immediately start cutting out such objects means wasting time and ruining the material.
Photo: children's educational boards
You can share or save for yourself:
Discussion of the article:
- Any:
01/28/2019 at 08:38Yeah, everything is written out so simply. We waited a year for our dad to “give birth” to a business board for his son. It didn’t go further than buying a board and a couple of locks; the blank was just lying around on the balcony. There was no time to study. In the end, we bought it ready-made and everyone is happy. Both our son and our father.
- Stanislav:
02/07/2019 at 09:24
But my friend turned out to be stubborn. I did it, but clumsily - I have no skill in such work. At first glance this is what you want. In general, my friend’s wife spat on the expenses already incurred and bought a factory bodyboard at 1.5 times cheaper. If your hands grow from the wrong place, then you shouldn’t take it
- Julia:
12/14/2021 at 23:53
And our dad made it with all the bells and whistles he found in the pictures, my son likes it, he will be as smart as our dad. This business board will then be torn off and sold.
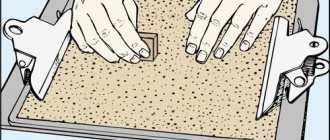
Instructions for assembling a busy board
- Level the surface and paint it in the chosen color. The corners should not be left sharp, so it is recommended to round them.
- If you decide to cover the board, choose acrylic varnish - it is suitable for children's items.
- Secure the large elements in the center and the small ones on the sides.
- Before attaching, disinfect and wash all parts.
- Objects need to be fixed with screws or superglue. Check the strength of the items so that the child cannot remove them.
Wooden rocking horse
Even a novice master can make a simple, standard-sized rocking horse. The author of this MK was inspired by a picture from the Internet, made a drawing based on one photo and created the first rocking horse in his life.
How to make a wooden toy with your own hands - an example of a horse:
- You can simply attach the sheet to the monitor and copy the horse from the photo. This is how patterns are made, the scale is increased, and the drawing appears on the newspaper.
- Before this, you can purchase a standard furniture board at a hardware store (its price ranges from 550-600 rubles on average), a cutting, and wood glue.
- Trace the patterns onto the shield and cut out the parts with a jigsaw. After cutting, you can evaluate whether the future toy is emerging.
- The next stage is sanding. The parts need to be sanded in pairs, creating shapes.
- In the places where the horse is attached you need to make holes with a drill. At this point, special care will be required.
- The horse is ready for assembly and gluing of parts.
- The saddle can be attached to special sticks for greater strength.
- And then - ideas for decor that are right for you. You can cover the horse with colored water-based paints or colored wax. You can decorate it with artistic painting (for example, using a stencil).