Today, pyrography (the art of wood burning) is gaining increasing popularity among fans of non-standard ideas for home creativity. And there is a simple explanation for this - with the help of a compact electrical device you can burn not only patterns and primitive drawings, but entire paintings that are fully worthy of becoming masterpieces of art.
A portable household electric pyrograph with replaceable brass nozzles or a “loop” made of nichrome wire allows you to burn on different materials: wood, plywood, leather and cardboard. There are many models of burners on the market, but many of them are not satisfactory either in price or in quality. Therefore, more and more people prefer to make wood burners with their own hands. There is nothing complicated here, the main thing is to remember the main points and approach this issue correctly.
Making a burner
If you don’t want to buy an electric burner, you can make it yourself.
You will find many options on the Internet. According to the manufacturing principle, almost all devices are the same; they differ only in the set of design elements. When working at home on the manufacture of a device, you need to study the electrical circuit and determine the sequence of actions, as well as prepare all the items and devices that will be needed for the work.
To make a portable electric burner using nichrome thread, you will need:
- phone charger at least 5V–2A,
- soldering iron,
- flux,
- heat shrink tubes,
- drill with a small drill or screwdriver,
- wooden strip approximately 10 cm long,
- nichrome thread (plays the role of a needle),
- insulating tape.
First, we prepare all the necessary equipment and tools. Nichrome thread and flux can be bought at a hardware store, at a radio market, or you can take it from an old soldering iron. In a soldering iron, the thread is located under a metal casing on the “tip” - after disassembling the device, you can easily remove it.
Why wooden slats? Wood is the best material for creating an electric burner. The market also offers carbolite, which is a good option, but it conducts heat more, and on powerful devices the holder will heat up. Plastic - in appearance, one might say, is a cheap substitute for wood. But heat-resistant varieties are expensive. If you try to save money on this material, the device will eventually become unusable.
Stages of work.
Soldering iron handle. We make it from a regular slats and select the length to suit ourselves. On average, 10 centimeters is enough. We make a slot inside the handle using a drill or screwdriver. The hole should be the width of the wire. The place where the wires will come out needs to be slightly widened. Nichrome wire is installed here. Connect the charger to the handpiece. To do this, you need to divide the two-core wire from the charger into two ends and insert it through the hole in the rail, then bring it out. Solder the nichrome tip at the ends to the lead-out wires. You need to put a heat shrink tube in place of the soldering joint. We attach each part of the tip to a separate end of the wire. Nichrome is difficult to solder; use flux solder for this. The thread size is at least 5–6 centimeters - otherwise, the pyrograph will heat up the tip and will not perform the job properly for its intended purpose. We isolate the burner handle. We wrap the rail in 4-5 layers of electrical tape and squeeze it tightly in our hands until the winding completely adheres to the wood.
Care must be taken to ensure that no electrical tape gets on the tip. Testing the device
We plug the charger into the outlet, then your homemade device warms up. The color of the tip becomes dark red. We check how the device works on the board by carefully applying the burner to it.
The second option has more filling, but there is no need to look for nichrome thread.
For this we need:
- wooden block,
- nails (2 pieces),
- wires with a connector from the power supply,
- wire cutters,
- insulating tape,
- soldering iron and tin (solder),
- connecting terminals for wires,
- syringe needle,
- power unit.
We make marks on the wooden piece with a marker and hammer the nails into the block, removing the heads with pliers. We cut grooves for the cord along the base and file them for smoothness.
We install the wires with the connector from the power supply into the grooves and fix them with liquid glue. Using electrical tape, we insulate the base where the cord will be inserted. We attach wires to the nails and solder them. We take connecting terminals for wires that are attached to nails. We install the terminals on the nails. We insulate the wires.
Then we take the needle from the syringe from which the heating element will be made, and sharpen its center a little so that it heats up exactly in the middle. We blunt it and bend it into a triangle shape. We install the resulting part into the terminals. We connect the power supply and test our device. We wait for heating, try the burner.
Tips for choosing
To choose a high-quality and convenient device, you must understand the principle of operation of the device, its design features and its properties. The device works very simply. The needle heats up when exposed to electric current, then the master draws with it on the surface of the wood.
All types of devices are characterized by the presence of almost identical parts. These are a holder, a housing, an electrical wire, a burning needle and a metal screen. The tool operates on a 220 V network. For amateur burning, pyrographs with wire and hard pens are used. People call them soldering irons.
When choosing a burner, focus on your preferences. There are some tips on what to look for when purchasing a device that you will be comfortable using. Therefore, your money and time will not be wasted.
The first thing we pay attention to when choosing is the length of the rod. If it is large, it will be inconvenient to operate the pyrograph and it will be impossible to work out fine details when burning. To check, take the burner in your hand and try to draw something.
It is better to give preference to a higher-quality device, but with fewer attachments, since several basic ones are often used in work. Choose a device with high power.
Flaws
The disadvantages of this process are:
- This is a time-consuming and costly process that can have a significant impact on your home's energy bill.
- There is no way to repeat any action. Any wrong movement leaves a mark on the surface of the wood that can no longer be corrected.
- During a long process, high loads are created on the welding machine, which can lead to its failure.
Tools and materials for burning
Before you start direct burning, you need to prepare everything in advance. Basic tools and materials required.
Of course, beginners and professionals may have different arsenals. Basic tools needed:
A soldering iron with adequate power (the presence of different modes, a thermostat, the ability to change the tip and other features do not play an important role, although they can make the burning process more comfortable); Tips of various thicknesses and shapes or special nozzles for burning; Holder or tool holder. Aluminum oxide, used to clean tool tips and tips;
Next, you need to choose what you need to record. The wood must have a smooth surface on both sides. On the one hand, this is necessary for straight drawing, and on the other hand, for a stable position. Beginners are advised to use soft wood, while experienced pyrographers can work with harder wood. Soft stones are lighter in color and the pattern will be more visible on them. Any unnecessary material at hand is suitable for training.
How to burn correctly?
Next, it is worth considering the features of how to burn wood with a soldering iron, so that this process is simple and its result is of high quality. The device must be connected to the mains and wait until it reaches maximum temperature. During heating and when not in use, the soldering iron should be kept on the stand. If there are any irregularities on the surface of the wood, they can be sanded with sandpaper when the tool is heated.
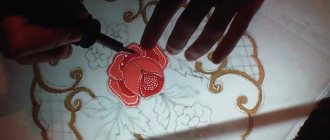
Before burning through wood with a children's soldering iron, you can apply a design to the material. Sometimes people immediately begin to create a composition without a sketch, but for beginners it is advisable to make a preliminary sketch with a simple pencil.”
When the soldering iron is completely hot, you need to press the tip against the wood itself. When exposed to high temperatures, the surface of the wood begins to dull. This only happens to the top layer, which only affects 1-2mm of the total thickness. Almost any technique involves constant pressure of the tool on the working surface of the workpiece. This is not the time to rush. Smooth passage of the puncture along the contours with visual control of the result will help to achieve excellent results. If you do everything quickly, you can get irregular cauterization, not to mention the possible mistakes that happen quickly. The longer you hold the pen in one place, the deeper and brighter the burn becomes. Adjustment of colors and shades occurs precisely by changing the intensity. Of course, it will not be possible to achieve smooth transitions and thin lines at the same time, but with experience this skill will come.
If you position the workpiece so that the wood fibers run vertically, this will make the process easier, since during combustion very often the movements go from bottom to top.”
To understand new burning techniques and techniques, you need to experiment frequently. By taking unnecessary pieces of wood, you can train and work on new elements. This also applies to replacing the tip and soldering iron. If we are talking about simple inexpensive models that do not have a removable tip, then sometimes you have to use different tools for pyrography.
Burning with hot sand
To lightly color light wood into a warm, soft shade, you can apply hot sand treatment. This is done as follows.
Pour clean sand into a certain container and heat it up strongly. A wooden product is “buried” in the sand. Under the influence of hot sand, a wooden product acquires a warm, interesting shade and shape.
The time of exposure of sand to a wooden product cannot be specified. It will have to be determined experimentally.
Wire burner and its advantages
If you burn with nichrome (wire or so-called thread made of this material), then the following “advantages” are available:
- The result is “live” images, where there are shadows, penumbras and tints. Halftones are achieved by changing the temperature (the nichrome thread is heated more or less, while simultaneously adjusting the time of contact of the wire tip with the surface;
- actually control the saturation of the image on the CNC itself to obtain images with different intensities;
- The master burned the same 20x20 cm portrait in about 2 hours, 5 times faster compared to a laser machine. And this is a great advantage when burning large format paintings on wood using CNC.
- it is easier to prepare the workpiece for work;
- bright light does not harm the eyes;
- no tar is released, which means no blowing is needed.
The nichrome burning device has a drawback: the need to maintain a stable temperature in the room. But there is a way out - close the window so that there is no draft. There is a slight smell when burning, the room will have to be ventilated after finishing the work.
Another disadvantage is that the nichrome thread in the burners must be changed after 5-7 pictures. It does not affect expenses, so business will not be affected. 1 sting made of nichrome costs 2-3 rubles.
Therefore, if you decide to assemble a burner with your own hands, then it will be with nichrome thread.
What will you need for this?
It all depends on what kind of wood burners you decide to make. The only thing that will be useful in any case is nichrome wire. The next required spare parts are a battery and a wire. The battery is preferably a rechargeable type, since constant use of the device will use up a lot of regular batteries, which can significantly hit your pocket.
There are also requirements for the wire. A good wire is the key to your safety, so you should approach this issue very responsibly.
Preparation of materials for manufacturing
To make a home burner you need to have a minimum set of tools and components.
To make a pyrograph you will need:
- Wooden glazing bead 10 cm.
- Duct tape or electrical tape.
- The electronic unit is no less than 5 Volt 2A.
- Nichrome thread.
- Soldering iron.
- Electric drill with suitable drill bit.
- Flux for soldering.
- Solder is tin.
The manufacturing process begins with the preparation of all tools and necessary materials. First you need to find a nichrome thread, which can be sold at any hardware store. If there is no thread on sale, the material can be obtained from an old electric soldering iron.
You will need to disassemble the heating part of the electrical appliance. The nichrome thread is located on the “tip” of the soldering iron under a metal casing and is easily removed by winding without the use of third-party tools.
Making a spoon-shaped nozzle
A spoon nozzle is essentially a regular wire nozzle with a small loop at the tip. This attachment, just like the previous one, can be easily made independently, and from the same beak-shaped attachment. To do this, it is enough to flatten its tip (beak) on something hard, for example, a small anvil or on the head of a hammer mounted in a vice or on the body of the vice itself, if they are strong enough.
Wire nozzle for burning
When flattened, burrs may appear that distort the profile of the nozzle and must be removed by carefully treating the nozzle with sandpaper or a needle file.
Many burning kits you can buy in stores come with a set of wire tips, so don't forget that.
Source
Buy a wood burner (pyrograph) or make a wood burner with your own hands, the choice is yours
First of all, you need to prepare the fasteners and wires:
• In the piece of wood near one of the ends, drill 2 holes on opposite sides. They should be slightly narrower than the screw threads
If the thickness of the piece of wood does not exceed the total length of the screws, then it is important that the holes do not run along one straight line, but are offset relative to each other. Then the screwed-in current-carrying screws will not contact, and we will avoid knocking out the circuit breaker due to a short circuit
• It is advisable to put 2 washers on the screws (depending on which fastening option is used) and screw them into the proper place, leaving a gap of about 2 mm.
• Cut the wire in half, stripping all ends approximately 1.5 to 2.5 cm.
• Tighten either end of the nichrome wire and the stripped copper wire firmly with a screw between the washers (or between a screw and one washer).
Then you need to determine the point at which the nichrome wire will be clamped with the second screw, that is, determine the length of the tip. If it is too short, the nichrome resistance will be low and the power supply will burn out. If the tip is left too long, the resistance of the nichrome wire will be high and the heating of the spiral will be weak. To find the “golden mean”, we do this:
• Feed the fixed wire with the free end to one of the poles of the transformer.
• Hook the end of the second power wire with a crocodile.
• Place a board under the tip so that when it becomes hot, it does not lead to a fire or other problems.
• Place an alligator clip on the free end of the nichrome tip.
• Connect the wire coming from the crocodile to the free end of the power supply for 6–7 seconds. In this case, current will flow through the closed circuit, and the nichrome will begin to heat up.
The color of nichrome should stop at orange, which means the length is optimal. And if the color change stops at red or there is no glow at all, then the tip of the nichrome wire is too long.
If the wire, having reached an orange color, continues to glow, then the tip is too short and the circuit should be opened immediately.
When the optimal length of the tip is found (the point of the second wire attachment is determined), what remains is:
• Give the wire a shape convenient for drawing, such as an arrowhead.
• Clamp the wire and 10cm wire into the second set of fasteners.
As a result, the wire located between the fasteners should be the optimal length just found and should not come into contact with itself in different areas. Otherwise, the current will flow only through part of the tip and will be exceeded. For the same reason, you should not allow, say, the corner of the tip to come into contact with the fastening elements.
Finally, it is necessary to take care of the convenience of reliable closing and opening of the circuit. To do this, it is advisable to install a mechanical switch in the gap of one of the wires.
Where can I find a diagram for development?
You can develop the scheme yourself. In our article you can find many different types of schemes - from the most basic to quite complex. All these inventions were designed to suit the nature of the developer, naturally. You can easily choose any of the schemes and work according to it.
It is worth recalling that each person is an individual, which means that each has his own character and his own requirements for life. In this case, it’s worth remembering this, looking through the large number of proposed scheme options and creating your own, even if it is a little more complicated and more demanding than the others.
Naturally, it will be easier for people who are closely familiar with physical laws, and especially with electrical circuits, to implement their idea. If you don’t understand this, no problem, you can find information about graphical representations of circuits, understand the images and find out what is what in reality.
How to burn wood
When starting to get acquainted with the art of wood burning, prepare all the necessary tools: a burner, a tool stand, a work piece and means for coating the finished product. For trial work, choose regular plywood. During the learning process, try different types of wood, start with soft species (birch, maple, linden, pine, juniper). These woods have less resistance to the soldering iron, therefore, they are easier to work with. Soft ones also have a light surface, which increases the contrast of the image.
Hard varieties of trees (oak, hornbeam, yew) usually have a dark surface. To make the design lighter, you can treat the surface with paint before burning. Another option is to choose a leaf of wood with an interesting natural texture and incorporate it into the design of the painting.
Try to choose a working surface without knots. The wood must be sanded before use. To do this, take sandpaper and sand along the grain. The workpiece will be smooth and easy to work with. Afterwards, wipe the board with a damp cloth and let dry.
The next step is to make a sketch of the future masterpiece. For sketching, you can use stencils and carbon paper. The drawing should be slightly noticeable.
While working, do not forget about the tool stand. This could be a specially made stand or a clay pot.
When burning wood, do not rush, this process requires concentration and painstaking work. To avoid damage to the workpiece, avoid excessive pressure with the burner pen on the surface of the product. All work must be done with the same force, this will help to avoid gaps. Draw downwards, in the direction of the grain, so the needle will encounter less resistance. After applying the design with a burner, it is necessary to cover the product with a protective layer: oil varnish, sunflower oil or nitro varnish.
In conclusion, I would like to say that the burning process is a fun activity, it is a great way to relieve stress and take your mind off all problems. When choosing an instrument for yourself, do not rush to listen to the advice of others. Remember, wood burning, like any creativity, is a matter of individual preference. Think about what parameters of the burner you need, and don’t forget that you can always make the tool yourself.
Workflow Recommendations
- It is important to choose a comfortable place for the wooden plank. You need to place it so that you can easily reach any part with a burning device.
- It is recommended to start burning the design from the bottom or along the outer edge.
- It is necessary to go through places several times. If you touch the wooden surface softer, it will be easier to move the device. You should try to keep your wrist on the board.
- First of all, you need to finish drawing the main lines, and then move on to the rest of the details.
- To make a regular 2D drawing, and for a 3D one, you need to purchase different attachments.
- Once the sketch of the drawing is ready, you can move on to adding colors. But you need to remember that an additional color will not always look beautiful. To do this, you can use watercolor paints.
- Each attachment requires regular cleaning. This can be done using a sanding block for quick cleaning. Remove the nozzle with pliers and, to be safe, immerse it in cold water for a few minutes.
- When the drawing is completed, you need to apply a special varnish coating to it and wait until the surface dries completely. It must be applied in a well-ventilated room or outdoors.
Wood burning device
Good afternoon, friends of the Samodelkins! I want to share with you how easy it is to make a wood burning device with your own hands. For this homemade product we will need the following materials and tools. This:
a step-down transformer, with a voltage on the secondary winding of 4V, and a current of at least 2-3 amperes, a power cord with a plug – 1 m long, as well as a power cord with a cross-section of at least 0.75 mm, two meters long; for connection to the burner handle; a small wooden strip measuring 1 * 2 * 15cm, you can also use plywood; electrical terminals – 2 pcs; electrical military clamps for connecting the terminals of the secondary winding of the transformer - 2 pcs; any nichrome wire from any heating element; electrical tape, toggle switch. Tools you will need:
wood hacksaw;
soldering iron, solder, tweezers, wire cutters, pliers, screwdrivers, small screws and nails. We assemble it as follows:
The connection diagram is shown in the photo.
Step 1
. We check the transformer for operability, for which we find the network winding, connect it to a 220V network, and measure the voltage on the secondary winding - it should be about 4-5V. Step 2
. From a piece of plywood or board, cut a strip of the dimensions indicated above. We process its edges, making them semicircular.
Step 3
. We attach two mounting terminals to one end of the resulting handle using self-tapping screws, as shown in the photo.
We attach a piece of nichrome wire, 2.5-3 cm in size, to the outer ends of the terminals, select it experimentally (make sure that the wire heats up to a bright cherry color and does not burn out). We connect 2 meters of multi-core network wire to the opposite ends. We connect the second ends of the wires through mounting clamps to the secondary winding of the transformer.
Pressing the wire to a wooden handle, wrap it with electrical tape, as shown in the photo.
We connect the power cable with a plug to the primary winding of the power transformer via a toggle switch. Step 4
. We make a body of suitable dimensions from plywood or any other material. We place the assembled homemade product in this case. Next, we check the operation of the burner by connecting the power cord to a 220V network. With the help of this homemade product you can make good crafts, and even paintings, after first applying the desired design to a treated sheet of plywood. That's all, the homemade product is ready. Good luck to everyone in your work. Until next time.
Become the author of the site, publish your own articles, descriptions of homemade products and pay for the text. Read more here.
Summarizing
It is worth noting that now burning is not only a way of spending time, but also a way of earning money. The demand for burning portraits and landscapes is increasing every day. Now this activity competes with wood carving. Wood carving was originally created to diversify the interior of ancient houses of the nineteenth and twentieth centuries. After all, when there was no beautiful furniture in stores, they created it themselves. Recently we started trying to use burning on furniture instead of wood carving. This solution will make the interior not only beautiful, but also unique.
The price depends on the number of strokes required and the quality requirements of the work.
In fact, you can make any wood burners in a short time. A drawn sketch or drawing will greatly simplify the assembly or even the creation of your own model of the device.
It doesn’t matter how complex the model is; the most important thing in this device is the correctness of the tip. This is what can affect the quality of your future paintings. The wood burner performs patterns very accurately, so the image can be of any degree of complexity. By the way, as shown in the previous photographs, the shape of the tip for this electrical device can be changed depending on the complexity of the work.
So, we found out how to make an electric wood burner with your own hands.
| We make an electric wood burner from a pulse transformer. Once upon a time as a child, it was considered a given to have an electric wood burner at home. And now, I thought about making a similar device for my son (4 years old). After all, a drawing on paper may not be preserved, while one burned on wood will delight you years later. Yes, and it will be useful for me, as a radio amateur. They can be used to cut plastics when making cases, they can also be soldered, and even cut out PCB. Also, carefully cut the ropes (if you are a climber :-). The device has two operating modes. In the first position of the switch " norm"(I), it operates at half power: approximately 30-35W. In the second " turbo"(II) – 65-70W. The yellow LED shines in both modes, red only in the second. Indication LEDs are any, not bright (AL307). In order to make an electric burner, you will need a cheap ($2-2.5) Chinese-made switching power supply (UPS), 50-60 W, for halogen lamps. You can find them in furniture stores or hardware stores. |
Final processing
After receiving the image, the surface is treated with sandpaper. You can protect wood from the negative effects of the environment as follows:
- The wood is varnished. This substance significantly extends the life of the product. At the same time, the drawing does not lose its outline, remains bright and saturated.
- If necessary, partial or complete painting of the space formed between the drawn lines is performed.
Final processing of the product can be carried out using a wide variety of protective substances. The choice is made based on the result obtained.
Sources
- https://electrod.biz/informatsionnyie-stati/vyizhiganie-po-derevu.html
- https://ArmRinok.ru/oborudovanie/payalnik-po-derevu.html
- https://pcity.su/izgotovlenie/mozhno-li-vyzhigat-payalnikom-po-derevu-ili-kozhe-rekomendacii.html
- https://npf-tvorchestvo.ru/derevo/mozhno-li-payalnikom-vyzhigat-po-derevu.html
- https://gktsg.ru/derevo/mozhno-li-payalnikom-vyzhigat-po-derevu.html
- https://generator98.ru/delaj-sam/payalnik-po-derevu.html
- https://gazsnabstroy.ru/prochee/mozhno-li-vyzhigat-po-derevu-payalnikom
First stages of preparation. How to start burning?
Alas, you won’t be able to rush into battle right away and there’s no escape without initial preparation. To prevent your passion from becoming covered with a layer of disappointment, carefully read all the subparagraphs below.
Selecting a base
As mentioned above, modern technologies have made it possible to improve the device, and the scope of use has expanded significantly. And yet, most often, experts recommend taking on wood, since it is more pliable and better suited for beginning burners.
When choosing a wooden material, it is best to give preference to soft larch over spruce species. For example, ash, maple, linden or birch are good options.
And the softer the chosen breed, the more comfortable and high-quality the design will be burned.
Wood processing
Let's say, in our case, a cutting board or a box from a set of screwdrivers. Before you pick up the tool and get down to business, treat the work surface.
The surface must be dry and smooth, without visible flaws and roughness, otherwise the quality of the work will deteriorate. If necessary, dry wet areas with a hairdryer and use sandpaper where necessary.
Then carefully, barely noticeably transfer the image, outlining the sketch using a pencil or a thin-tipped knife blade. If you wish, you can use ready-made templates to apply smooth, aesthetically beautiful lines.
When working on complex drawings or photographs of people, carbon paper is used. Unfortunately, it gets too dirty, and experts additionally transfer the contours onto transparent tissue sheets.
After which the picture is tightly glued using glue made from boiled starch or wheat flour. They burn directly on top of the paper, after which the sketch is easily separated from the main surface.
Additional recommendations
Beginning artists are recommended to take on easy images that do not require serious skills and abilities. Gain experience, be sure to attend professional master classes and train, the more the better.
Don’t be afraid to take advice from masters, attend their classes and get better at it. Over time, the clarity of the lines will improve. It’s even better if you order tools from a special store - the success of your future work depends on a high-quality burner.
Use non-flammable materials as a stand. For example, ceramics or thick glass. Make sure your workspace is clean and free of creativity.
Do not start work until the element of the electrical appliance is heated to the required temperature. If uneven heating is clearly observed, this indicates a problem with the instrument or the need to replace the nozzle.
When starting work, be extremely careful and careful. It is impossible to erase or remove the drawn lines; try to avoid blots and inaccuracies.
For even greater convenience, secure your leading hand on a stable stand to avoid uneven lines and accidental sketching errors.
The volume of artistic work is given by using lines of varying thickness and shades depending on the intensity of burning.
To achieve a thin, burnt outline, move the burner quickly across the “canvas”, and do not stop in a specific place for more than a few seconds.
Accordingly, adjust the heating temperature to control the shades of the resulting result. Movements should be light, no heavy pressure or pushing, and do not stop in one place for a long time.
Try to draw from top to bottom, but not vice versa. If desired, you can use curly attachments when making decorative crafts.
Remember, good, high-quality projects are a combination of several skills, including experience, knowledge and skills, and attentiveness to your health.
Don’t neglect comfort: if you feel your neck, back or arms numb while working, it means you urgently need to adjust your position. Do not place the board too far away from you; your hands should move easily along the “canvas”.
And finally, try to start work from the outside. It is believed that initially the eye is drawn to the central contours, where errors will be much more noticeable than if they were located closer to the edges.
CNC burner
The burner will help add originality to the interior, diversify it with handmade products, but not only. You can make good money by making paintings created by fire. Landscapes, decorative panels, portraits, household items and kitchen utensils with elements of burning are in consistently high demand.
The use of modern technologies will significantly simplify the creation of masterpieces using the burning method. Computer-controlled machines have long become commonplace in wood and metalworking shops. There are similar solutions for pyrography. Such a burner can be connected to a personal computer, transfer the required image to it, and it will do the rest itself.
To make your own CNC wood burner, you will need significantly more knowledge and materials. Typically, such machines are purchased for production purposes. But for those who want to assemble the device themselves, you can use a laser for burning.
In general, there are two directions in the development of CNC burners. They differ in the main working tool.
Laser burner
As the name itself suggests, the main part of the machine is the laser. It is from this that its main advantages emerge:
- high accuracy of drawing due to a small contact patch;
- versatility, the machine can be used when working with wood, leather, films, paper;
- The burner is immune to changes in temperature and humidity.
Disadvantages include the low speed of the laser burner and difficulties in drawing halftones. In addition, the cost of such devices is high.
Burner with nichrome thread
The working part of this device is a nichrome filament. Actually, this is a unit transformed from an ordinary wood burner into a more functional and modern device. Its advantages:
- saturation of the picture;
- the machine works on wood and leather;
- high speed;
- lack of graininess characteristic of a laser device;
- no harmful radiation.
With all the visible advantages, there are also some disadvantages. This burner is sensitive to the microclimate of the room. The slightest change in the basic indicators will entail a decrease in the temperature of the tip, as a result, a decrease in the contrast of the pattern. In addition, the working tool has an extremely short service life.
Pyrography as an art appeared in the 18th century, and since then its popularity has only grown. Classics multiplied by modern technologies give excellent results
Burning is worth adding to your list of hobbies, no matter how the work is organized. You can buy a simple device, you can make a wood burner with your own hands, the main thing is that the result pleases you and the process brings pleasure
What does the store element consist of?
We can only consider it externally. And the inside can be seen in the drawing. The wood burner diagram is shown in the photo below.
By the way, stores most often sell power tools. Therefore, it is worth looking at the main parts, including the transformer for the wood burner. Also, for an expanded understanding of these elements, you should pay attention to the operating instructions. The main parts and the material from which they are made will definitely be specified there.
PyroPrinter is the pride of our engineers
It took us two years and the work of 5 engineers to develop. We conducted hundreds of tests and burned thousands of images, simplifying the process of operating the device as much as possible before we finished developing this nichrome burner. All this is so that every time you make a board you get a high-quality image. Such products are practically no different from the work of an artist who can work on a painting for a week. The Pyroprinter will create high quality A4 in 2 hours.
This type of business is becoming popular in Germany, Ukraine, Kazakhstan, Russia and a number of European countries. Already more than 25 people from Russia, the CIS and Europe have bought a nichrome CNC burner to create their own home business and are successfully producing custom paintings.
How to make a wood burner with your own hands - a homemade pyrograph from a soldering iron
Have you ever wanted to capture a beautiful design or pattern on your wood work? Do you have an old, unused (but still working) soldering iron? So you're in luck. In this tutorial, you'll learn how to make your own wood burning stove and how to turn ordinary nails into versatile, easy-to-use (wood-burning) pyrography tools. This project is also great for those who want to learn how to start a fire but don't know where to start.
We use an old soldering iron tip as a template when making new pyrography tools, but the length has been shortened to reduce heating time.
Next step
Next, you need to take a high-quality double wire. It must be cleaned on both sides and two holes made in the cap to bring the wire out. Having done this, you need to connect each wire to the corresponding needle. It is advisable to screw the wires very tightly, since the quality of the current flow depends on this.
For safety and quality, it is necessary to finally secure the wire (including threads) with insulating tape.
At the end of the work, you need to use an unnecessary button (preferably from an old tape recorder) and a rechargeable battery. The main thing is not to confuse the polarity, otherwise the homemade device will not heat up (more precisely, its tip).
All is ready! All that remains is to try out the made device in operation.
Wood burner diagram.
The wood burner is assembled using a simple dimmer circuit, the load of which includes a 220/4 volt step-down transformer.
In principle, you can buy a regular dimmer - a regulator for incandescent lamps for indoor lighting. Its diagram is identical to the one shown here.
The transformer was taken from the original old ELM burner - 220/4 volts. However, you can use a similar transformer or wind it yourself, using a wire about 1.5 mm in diameter for the secondary winding. Select the number of turns experimentally so that the output is 4 volts.
Installation is carried out using a hinged method, without the use of any board. A power switch and a variable resistor for adjusting power (in our case, the temperature of the burner tip) are attached to the front panel of a homemade burner. The installation is actually done at the switch and variable resistor terminals.
The triac is installed on a minimal radiator.
There are several types of burning
– Using a store-bought device (meaning purchased in a store developed by a company). – Using homemade wood burners (that is, the element that you make from your own materials). – With the help of the sun and a lens. This method is used by many children who have nothing to do in the sun, but it was used by ancient people to get a fire or transmit any information to other tribes using a drawing on the bark.
Today, the most relevant thing is a homemade wood burner, since the sun is not always there, and we are not ancient people in a hopeless situation. And when buying a new device you will have to spend a considerable amount of money.
To make it yourself, you need to have an understanding of the structure of any store-bought analogue. With the right approach, you can develop more functional and high-quality wood burners.
Characteristics of a CNC burner with nichrome thread for wood:
Control program of the same name. More about our Program ->
The machine automatically turns on before starting to apply the painting and turns itself off when finished, adjusting the heat of the burning head.
The drawing is raster (line by line), shades are created at the expense of speed. For each shade, the pyroprinter selects the required speed, so it moves along the dark elements of the picture at a reduced speed, and the light ones at an increased speed.
Without additional independent adjustment, the machine works with wooden surfaces from 4 to 10 mm.
The device is equipped with a contactless sensor that will monitor unusual situations and will be turned off if they occur. This reduces the likelihood of fire to zero.
Specifications:
- Working field size: 42 x 40 cm (easily increased to 90 x 40 cm)*
- Power consumption: 150 W
- Power supply 110 V/220 V (switch on the rear wall of the unit)
- Supported files: bmp, jpg, tiff, gif
- Table in working position: 75 x 75 cm
- Boxes in transport position: 75 x 16 x 20 cm
- Speed (depending on the darkness of the picture):
| A4 (21*30 cm) | 1.5-2.5 hours |
| A3 (30*40 cm) | 3-4.5 hours |
| A2 (60*40 cm) | 6.5-7.5 hours |
| panel (90*40 cm) | 8.5-10 hours |
- The software runs on Windows XP, 7, 8, 10 (all updates are free, can be installed on any number of computers)
- Connection is via USB port
* - to increase the working field, it is necessary to replace a pair of M8 studs with meter-long studs (sold in hardware stores and fasteners stores, cost 50-70 rubles per piece). We do not put long pins in the box due to the fact that they do not fit into the shipping container. When sent second place, they were often bent, which rendered the studs unusable.
Dimensions
The unfolded table, which is assembled from a box, measures 75x75 cm.
Fits easily into the trunk or back seat of a car
Burner with nichrome thread
Each piece of equipment is shipped in a plywood box that converts into a table. To assemble, you will need about twenty minutes and a simple screwdriver (or screwdriver).
We provide video instructions for assembling and setting up equipment on a computer. Among our clients there were girls who easily coped with self-assembly.
Burner body.
The body of the burner is made of 10 mm plywood. The necessary parts of the body were cut out with a jigsaw, the ends were sanded with a belt sander to the size required for assembly, coated with PVA glue and tightened with self-tapping screws with countersunk heads. Drying for about a day. After drying the body, the parting plane of the two halves – the cover and the body – was polished with a surface grinder. The body and lid are mounted on miniature canopies. This entire assembly is also processed by a belt sander to a single form - factor with the removal of a certain certain amount of chips. As a result, we have an excellent homemade housing for the burner with a well-fitted parting plane and smooth sides.
We open the body of the burner with stain several times until the desired shade is obtained.
Dry the body. As the stain dries, the wood fibers rise to form a velvety surface. Such a surface cannot be opened with varnish. Expanded wood fibers will look terrible. The body needs to be polished. To do this, we take a small wooden block that is convenient to hold in the hand, press its corner against another piece of wood, and then rub it on the wooden body. That is, we rub the body with the rounded corner of the bar - as if we are crushing the swollen fibers raised by the stain. Polishing should be carried out along the direction of the wood grain using uniform moderate force over the entire surface of the body. The process is long and painstaking, but the result is worth it. It is also recommended to first practice on a sample to prevent damage to the burner body in the absence of experience.
After finishing polishing, we coat the body with varnish. I recommend semi-matte parquet varnish. It gives a great look and scratches will not be so noticeable in the future.
Me and Diode. yaidiod.ru.