Useful tips and tricks
Please note that the ax handle should be made so that its cross-section has a characteristic oval shape.
Only by observing this condition will you be able to successfully hold it without straining your hand too much. In this case, blows with an ax will be more accurate and easier. It is recommended to make wood blanks for creating an ax handle in late autumn. It is during this period that the movement of sap is reduced to a minimum (almost stops), which means that the tree becomes, as it were, dehydrated. Many inexperienced craftsmen neglect drying wood to build an axe. As a result, this ends up with the handle changing in size, and the metal part with the butt on it holds very poorly. It is permissible to use undried material only in special situations, when the handle needs to be built urgently, and this spare part is made as a temporary one.
When making a brand new ax handle yourself, you need to draw up a detailed drawing/template of the future tool. If you have a very convenient old ax in your arsenal, then you can remove all parameters from it. This will make it much easier and more convenient. Do not rush to turn the cutting edge of the tool. First you need to make sure the metal is sufficiently hard. If it turns out to be too soft, then it will need to be additionally hardened under the influence of high temperatures.
It is very important to use a ready-made ax (both homemade and store-bought) correctly. Experienced craftsmen strongly do not recommend trying to cut various metal parts with such a device.
Even if you plan to cut wood, it is better to make sure that there are no solid particles inside that could harm the tool.
It is strongly recommended not to throw the finished tool onto hard surfaces, especially from a great height. It is not recommended to leave the ax in the open air. Precipitation or aggressive sunlight can negatively affect the quality of the wooden part. Keep this tool in a dark and dry place. Only under this condition will the ax serve you for many years.
If the ax handle fits into the eye too easily, this may indicate that during the work the master made a serious mistake somewhere (most likely in the calculations). An incorrectly prepared template often leads to this problem. In such a situation, even one more installed wedge will not change anything
This is why it is so important to take your time to do all the calculations and make the template correctly
Do not forget to process the wooden ax handle at the end of all work. Please note that processing of this part must be carried out in several approaches. Each new protective layer should be applied only after the previous one has been completely absorbed. This is the only way to reliably protect wood from rotting and destruction. Stock up on enough wood to make an axe. You don’t need to make just one piece - it’s better to build several pieces. This is necessary because during the work some of them may not work out and be rejected. There should always be at least one more blank in stock.
To make an ax handle, you cannot use a wooden block that has a large number of knots. Because of them, noticeable cracks may form on the material. Over time, the branches begin to dry out, and the entire material loses its strength. Making an ax handle yourself is not at all difficult. If you doubt your abilities, are afraid of making a mistake and translating natural material, then it is better to refuse experiments. Buy a ready-made model or contact an experienced craftsman who will make a good tool for you.
To learn how to make an ax handle with your own hands, see the following video.
A little about sizes and shapes
Each master made an ax with his own hands, focusing on his height and specific application. It is no secret that a tool designed for chopping wood will be somewhat different from a similar product intended for cutting down trees. In this case, a small carpenter's hatchet for small carpentry work will be the exact opposite of the two categories listed above.
Despite this, a professional ax with a wooden handle always consists of three main parts:
- working part made of metal with a sharpened front part;
- ax handle - a handle made of wood;
- wedge - a spacer element that connects parts of a structure together.
When making it yourself, special attention is paid to the metal part, otherwise the tool simply will not cope with its main function. Here, not only the shape and material are taken into account, but also the aspect ratio and sharpening angle.
Modern axes are usually made from medium-alloy tool steel, which has been heat-treated and hardened.
The blade shape is selected depending on the application. For example, products designed for arborists are often used for cutting down tree trunks and removing large limbs. This kind of work requires a great depth of penetration, so the shape of the ax should be wedge-shaped. Cleavers that are used for chopping wood have a similar shape, but have thicker “cheeks” and a sharper sharpening angle.
The length and size of the ax directly depend on the impact loads. If significant impact force is required, the handle is made longer to provide a larger swing. Here the dimensions are 700-900 mm. The length of the handles of log axes (carpentry tools) usually does not exceed 500 mm; a good cleaver is attached to a shaft of about 800 mm.
The shape of the ax should provide a comfortable grip, so the middle part is always made curved, the seat and shank have thickenings. The blade angle usually varies between 70-90 degrees.
Each master made an ax with his own hands, focusing on his height and specific application. It is no secret that a tool designed for chopping wood will be somewhat different from a similar product intended for cutting down trees. In this case, a small carpenter's hatchet for small carpentry work will be the exact opposite of the two categories listed above.
Despite this, a professional ax with a wooden handle always consists of three main parts:
- working part made of metal with a sharpened front part;
- ax handle - a handle made of wood;
- wedge - a spacer element that connects parts of a structure together.
When making it yourself, special attention is paid to the metal part, otherwise the tool simply will not cope with its main function. Here, not only the shape and material are taken into account, but also the aspect ratio and sharpening angle.
Modern axes are usually made from medium-alloy tool steel, which has been heat-treated and hardened.
The blade shape is selected depending on the application. For example, products designed for arborists are often used for cutting down tree trunks and removing large limbs. This kind of work requires a great depth of penetration, so the shape of the ax should be wedge-shaped. Cleavers that are used for chopping wood have a similar shape, but have thicker “cheeks” and a sharper sharpening angle.
READ How to prune juniper correctly?
The length and size of the ax directly depend on the impact loads. If significant impact force is required, the handle is made longer to provide a larger swing. Here the dimensions are 700-900 mm. The length of the handles of log axes (carpentry tools) usually does not exceed 500 mm; a good cleaver is attached to a shaft of about 800 mm.
The shape of the ax should provide a comfortable grip, so the middle part is always made curved, the seat and shank have thickenings. The blade angle usually varies between 70-90 degrees.
Photos of the best cleavers
Classification of axes
In practice, many types of axes are used, which are designed for working with wood. Conventionally, they can be divided into three types:
- cleavers;
- for logging;
- construction or universal.
Accordingly, there are various designs designed to solve specific problems, for example, a firefighter is equipped with a pick, with which you can pull beams and other structures away from the source of fire.
In addition to this classification, we can offer another one - according to the size of the blade, or more precisely, according to the size of the butt:
- wide;
- average;
- narrow.
The first ones are used in logging, the second ones solve many problems in construction and in everyday life, and the third ones have found their application in carpentry. These tools are also distinguished by the length of the ax handle. That is, the larger it is, the stronger the swing and, accordingly, the blow. There is a difference between the width and shape of the blade. That is, if the tool has a direct sharpening, then it is intended for chopping blows. If the cutting part has a curved sharpening, then it can both chop and cut.
Steel, wood, and polymer materials are used to make ax handles. But as experience shows, nothing better than a wooden (birch) handle has yet been invented. Other materials do not always cope with vibration damping.
The list of existing and widely used tools can be listed for quite a long time, the following can be mentioned:
- Tourist, it has small overall and weight characteristics, its weight is just over half a kilogram, and its length is 350 mm. With its help, you can prepare dead wood and perform simple work, for example, put together a ladder or a raft.
- Hunting. It is used for cutting dead wood and butchering harvested carcasses.
- Scandinavian. This tool is intended for professional woodcutters. It weighs 1.2 kg, with a length of 640 mm.
- Cleaver-sledgehammer. Its use allows you to split any log.
GOST 18578-89 normalizes the main dimensions of the product, maximum tolerances, and roughness parameters of the cutting part. According to the requirements of this document, each product must be marked. This GOST defines the procedure for acceptance and shipment of finished products to the consumer.
How to remove an ax from an ax handle
During finishing, the mounted ax will need to be removed more than once. And if everything is done correctly and it fits tightly, then it won’t be easy to do. In this case, you cannot do without a vice. You can easily clamp the metal part in them and, using a wooden wedge and a hammer, carefully knock out the ax handle.
But you shouldn’t remove the metal part by hitting it with a hammer. Then burrs and dents remain on both the handle and the ax handle.
The correct technology for sharpening an ax blade
The blade of a hand-made ax will perform its function only if the sharpening angle and chamfer width are maintained correctly.
The sharpening angle affects the convenience of the ax and the degree of its functionality. If you plan to cut damp, freshly cut wood, then the sharpening angle should be approximately 20°. If there are dry trees, then 25-30°.
The width of the chamfer is also very important, but an ordinary home craftsman cannot change it in ready-made blades purchased. However, there is a way out: sharpen the ax blade with a double “trigger.” The first angle is turned at 15°, the second at 25° (average value).
Sharpening an ax: a - sharpening angle, b - chamfer width (should exceed the thickness of the blade by 2.5-3 times)
The ax is sharpened using an electric sharpener. At the same time, make sure that the blade does not overheat too much - this leads to a deterioration in hardness near the cutting edge. Therefore, when starting the sharpening process, you should place a container of water next to the sharpener to cool the metal. It is advisable to immerse the blade in water after each pass along the circle.
It is necessary to reduce the runout of the grinding wheel to a minimum by regularly correcting it using special cutters. When sharpening, hold the ax so that the blade is directed towards the rotation of the electric sharpener. The butt is held at 45°. The blade is sharpened by smoothly moving the ax along the circle. The sharpening angle is carefully sharpened and the chamfer is polished.
Sharpening an ax on an electric sharpener allows you to quickly get a sharp blade
The final sharpening of the ax (grinding) is performed using a sharpening stone regularly moistened with water. Instead of a block, you can use a piece of plywood covered with sandpaper. Remember that working with a sharp ax is a pleasure, while a dull tool will force you to exert more effort, leading to rapid fatigue.
Making a form
Now we must give the desired shape, also according to the instructions:
- On the blade we draw a contour according to this template. If there is no printer and there is no way to transfer the form, then you will have to work according to calculations. We retreat a centimeter from the top of the butt and put a dot. Now we draw a straight line from the selected place to the toe. We also step back a centimeter from the heel and make a mark. We apply any round object so that it simultaneously touches the selected point and the beard. Let's circle.
- How to make a Viking ax straight? Is it not so easy to cut a circle by hand? We draw rays along the inner circle and cut along them. Now we cut out the circle.
- All that remains is to polish it. We take special grinding attachments for the grinder and polishing pastes. Cheap ones include GOI or diamond pastes.
Hardening
A handmade ax must be hardened and this is best done using technology. The metal can be burned, causing it to become brittle due to carbon burnout. In general, everything consists of 3 stages:
- Annealing. It is necessary to remove the tension from the steel, which is there in any case. This is easy to do - heat it to 760-800 degrees. The metal will be red-burgundy. Then we put it on a brick and let it cool. Next we remove the scale.
- Hardening. A much more complex process. Initially, prepare 2 buckets of water. One contains water, the other contains oil. Anything will do, including working off. Heat the blade to 830 degrees and lower it 4 centimeters into the water for 5 seconds. Then completely lower it into the oil. Don't forget to make circular movements to knock down air bubbles.
- Vacation. After hardening, the steel is hard but brittle, like glass. If it falls, it will simply break and need to be released. You need to heat it to 200 degrees and let it cool slowly with the oven for an hour. Even a regular oven will do.
By the way, you can harden an ax from rails or reinforcement in the same way.
Now the blade can be sharpened. There is no point in doing this in advance, since heat treatment will remove the cut anyway. Moreover, the blade can also lead.
Sharpening an ax is a simple matter. We take a grinder with an abrasive disc and try to maintain an angle of 20 degrees.
Making an ax handle
How to make an ax handle with your own hands? Very simple, you only need a block, a marker or pencil, a bow saw, chisels and sandpaper.
We take the sketch of the ax handle and apply it to the block. Cut out the handle along the contour. We remove sharp corners with chisels and round them with sandpaper.
Now you can decorate it. We apply the design to the ax and cut it out in any convenient way. This could be wood carving or engraving.
Adjusting the ax handle to the blade
There is only one thing left - to connect the handle and blade. How to place an ax on an ax handle correctly? According to the instructions:
- The head of the ax is adjusted to the size of the hole in the blade. To do this you will need a saw and sandpaper. There is nothing complicated about this.
- After fitting, if it fits correctly, it's time to wedge. If we make an ax from reinforcement, the hole is made at our own discretion.
- We make cuts at the end of the planting. A simple option: 1 longitudinal cut and 1 wedge. But it's not that effective. The optimum is a cross. 1 longitudinal and 1 transverse cut. Wedges are cut into them according to size and driven in with a hammer. Professionals say that it is better to make wedges from the same wood.
- We saw off the excess with a saw.
Making a storage case
A handmade ax case is needed for safe transportation. Moreover, you can’t do without it on a hike.
Detailed instructions for PVC bags in the video.
Save time: selected articles delivered to your inbox every week
The importance of the handle
You can choose the optimal length of the ax based on the height of the master and the force of the blow. Strength, in turn, directly depends on the length, so when working with a large ax, it will be easier to chop logs of firewood.
Before making a choice, you should decide on the desired result:
- heavy version of the tool (total weight 1 kg - 1.4 kg, handle length from 55 to 65 cm);
- lightweight version (weight 0.8 kg-1 kg, with a length from 40 to 60 cm).
The quality of the wood from which the ax handle will be made is of great importance. Not every type of wood is suitable for manufacturing. Often, birch is used for these purposes (parts located near the roots or stem growths).
There are also handles made of oak, acacia, maple and other hardwoods. All selected workpieces require long-term drying.
After the wooden blank has dried well, the contours of the handle are drawn on it, according to a pre-made template. To avoid hand slipping during operation and to increase the convenience of the ax, it is necessary to provide a thickening at the end of the handle.
A knife, chisel, or electric jigsaw will help you cut out the outline.
After trying on the ax head and not finding any signs of a loose fit of the parts, you can safely continue improving the ax handle. Glass will help you scrape the tool, and sandpaper will be useful for grinding.
Preparatory activities
Wood selection
Tips for choosing a tourist axe, description of the best models
It is clear that not every breed is suitable for making an ax handle. It is advisable to focus on ash, oak, maple, hornbeam, acacia, rowan (necessarily old), beech and even apple trees. But the best option is still considered to be birch, namely, the root part of the tree or growths on its trunk. This wood is characterized by maximum density. Consequently, the durability of the ax is guaranteed.
It is better to harvest lumber in late autumn. At this time, the movement of juices practically stops, which means that the wood is relatively “dehydrated.”
Sample exposure
Even an experienced craftsman may not be able to make a quality ax the first time. Therefore, it is necessary to stock up on several blanks for the ax handle. Opinions vary on the length of their storage before processing, but everyone agrees on one thing - drying should be done for at least 3 - 4 years. Moreover, it cannot be accelerated artificially. The process should proceed naturally, and it is advisable to choose a dark and dry place for storing raw materials.
It makes no sense to use “fresh” wood on the ax handle. As a result of the material shrinking, it will become deformed, which means that the handle will have to be constantly wedged, otherwise the metal will fly off. Undried wood is used only as a last resort, as an exception to the rule, when there is an urgent need to make an ax handle, at least for a while.
Preparing the template
A good ax handle must have a strictly defined shape. Trying to withstand it “by eye” is a futile task. The same applies to linear dimensions - they should be as close as possible to the recommended values.
Axes have different purposes. As a rule, a good owner has at least two of them. Cleaver and carpenter are a must. The dimensions and shape of the ax for each are clearly visible in the figure.
What to consider:
- The “tail” is made somewhat larger in cross-section than the gripping part. This ensures that during the work the ax handle will not break out of the master’s hands.
- Since we all have different heights and arm lengths, the linear parameters of the ax are not standard. They vary within certain limits. First of all, this refers to its length (in cm). For a cleaver - from 750 to 950, for a carpenter's tool - about 500 (±50). But it is necessary to leave a so-called allowance, first of all, on the side of the butt fastening (8 - 10 cm is enough). Once it is firmly seated on the ax handle, without splitting the wood, it is easy to cut off the excess.
If you have an ax on the farm, which is convenient in all respects, then it is enough to transfer the contours of its handle onto a sheet of cardboard and cut out a template using them.
Sharpening the piercing part of the taiga ax
Excellent performance of the hatchet is ensured by a properly sharpened blade. The sharpening angle depends on the activity you will perform with the axe.
The taiga ax is sharpened at an angle of 30-35 ̊. If they will be working with fresh wood, then we sharpen it at an angle of 25 ̊.
If you use a sharpening wheel for sharpening, then the ax handle must be held at an angle of 40-45 ̊. We reproduce the sharpening slowly and carefully.
If you have all the necessary tools in stock, a photo of the step-by-step production of an ax, then its creation will not take a lot of time, effort and money, and in return you will receive a high-quality ax made by yourself.
But do not forget that with a piercing part made of high-quality metal, the ax will last much longer and if the handle is treated with linseed oil, it will not rot and deteriorate.
Subtleties of sharpening
Sharpening the blade of a cleaver differs from sharpening a regular axe. It is not the sharpness that is of primary importance, but the angle. The cleaver has a blunter angle - about 70 degrees.
In this case, on the side that is closer to the handle, it is sharper. On the opposite side - as blunt as possible. This allows you to achieve the best splitting results. The sharper part meets the wood first and penetrates it. This allows the thicker side to penetrate deeper into the block and increase the sliding effect. So with fewer blows you can achieve more splitting.
How to make a cleaver from an ax with your own hands, see the video below.
Placing an ax on an ax handle
At first, such a procedure seems simple. This false impression is formed due to the simple connection of elements - mounting and wedging. However, the procedure is quite labor-intensive and has a number of subtleties that in no case should be ignored. To make this job easier, a professional and experienced carpenter always follows strict step-by-step instructions.
Preparatory work with the tool
First of all, you need to get an ax handle. You can buy it at any specialized store or make it yourself. The ideal material is pre-dried birch. Carpenters with extensive experience prefer wood of this particular species. It has the necessary set of properties and that is why it is so popular
When choosing a handle, it is recommended to pay attention to its density and shape. An important criterion is grip comfort.
If you do not take this point into account at the initial stage, your hands will experience discomfort while working with an ax, which will quickly lead to severe fatigue.
Next, you will need to purchase a handle of suitable dimensions that will fit tightly into the metal hole. Using a woodworking device or a sharp knife, it is necessary to trim the handle so that it acquires the required shape (straight or ellipsoidal). The ellipsoidal hole in the ax is considered more reliable due to its fastening. Small cuts are then made on the top surface of the handle. Visually they resemble longitudinal grooves.
The most important nuance at this stage is the depth of the grooves. The cut grooves should be hidden in the hole of the axe. Otherwise, during the wedging process or during use, the handle may simply crack. It is necessary to strive to ensure that the width and thickness of the wedges are the same.
Creating wedges
The reliability of fasteners is largely due to high-quality wedging. The use of wedges made of metal and wood will help with this. As in the case of an axe, wedges can be purchased in a specialized department of the store or made at home. An important condition is compliance with the shape and size between the wedges and the material used in the manufacture of the axe. The best wooden wedge, according to professional carpenters, is made from dried birch, and the best metal wedge is made from hard tin, the so-called shovel.
Hammering
Perhaps the main difficulty faced by everyone who decides to mount an ax on a handle themselves is driving in steel or wooden wedges. In fact, this process is not as complicated as it might seem at first glance. This stage can only be started after the handle and wedges have been completely prepared. To begin with, the longitudinal wedges are hammered in using light blows with a hammer. It is not worth making strong blows due to the fact that the wood may be deformed. And this can subsequently lead to instability of further fastenings.
Once the wedges fit snugly into the grooves, use a hacksaw blade to carefully cut off the remainder. You can verify the successful completion of the work by the strength of the grip of the ax and the handle.
Wedging
There is an opinion that a wooden wedge must be made from the same type of wood as the handle. However, this is a misconception. The main condition when choosing a material is its strength. In turn, the direction of the wood fiber should also be taken into account, since it is recommended to maintain parallelism in the narrowing of the wedges. This will protect the weapon from possible damage.
Successful wedging can be considered complete filling of the groove space with wedges, and removing the ax from the ax handle is considered impossible.
Sometimes it is still not possible to avoid gaps in the ax hole. Then an ordinary piece of gauze, which has been previously treated with epoxy resin, will come to the rescue. This composition allows you to provide wood with protection from moisture and impart reinforcing properties. To remove any gaps that have arisen before mounting the ax, its upper part is wrapped several times with treated gauze. Thanks to epoxy resin, any gap, crack or gap is filled, forming a reliable and strong attachment of the ax to the handle.
Preparatory stage
Drawing for making an ax handle.
Every job, even the simplest one, consists of several stages. Assembling an ax is no exception. In order to get a ready-to-use tool, you need:
- pick up an ax handle;
- fit it correctly to the eyelet;
- make the required number of cuts;
- prepare wedges, wooden or metal;
- plant an axe;
- wedge the ax handle in one of the ways.
We recommend: Small panel formwork - we build without lifting and transport mechanisms
The first four stages can be considered the preparatory stage.
So, before placing an ax on an ax handle, the latter must be selected and purchased. As for the material, professional carpenters and woodcutters recommend well-dried birch. This material is quite common and also has properties that make it convenient to use the tool. Harder woods are good for decorative purposes, but not for work. The most convenient shape of the axe, which gives the least impact on the hands, has long been determined. Ideally, the axis CD (Fig. 1) intersects with the center of the gripper P or there is a slight displacement back and up. In the other two cases, when hitting, you have to make unnatural movements to compensate for the recoil.
To fit an ax handle to an eye means to trim it to the required shape. For this, some kind of woodworking tool will be useful, for example, another axe, a sharp knife, and the like. And here there is one point that must be taken into account.
The axis of the ax blade and the longitudinal axis of the ax handle must be in the same plane. Simply put, the blade needs to be aligned with the ax handle.
A few words about the eyelet. It can be either straight or conical in a certain part of the ax. The conical shape of the eye is considered more suitable for good fastening. Before trimming the ax handle, you need to carefully adjust the shape.
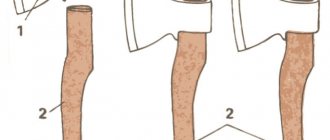
It was time to make cuts at the upper end of the ax handle. Their number is determined by the chosen wedging method, of which there are quite a lot. This can be just one longitudinal groove, maybe two or three lateral, one longitudinal.
Many people consider one longitudinal and four lateral to be professional. This can be seen in photo 1, but these are not all options. You can choose a slight offset of the cuts and a longitudinal cut divided into several parts. Many people solve this issue based on their own ideas about the mechanical properties of this type of connection.
Particular attention must be paid to the depth and width of the cuts. The depth should be such that the resulting groove is completely hidden in the eyelet
Otherwise, the ax handle may be split during wedging or during operation. The width of the cut should be related to the thickness of the wedges. The wedge should not enter the cut too easily, then there will be no point in it, but it should not enter too tightly, then it will not be possible to drive it in.
Wooden or metal wedges (Fig. 2) can be purchased or made independently. Either method will work equally well. They are inexpensive, but if you have nowhere to buy them, you can simply cut them out of well-dried birch. The shape and dimensions must correspond to the parameters of the cuts. A metal wedge can be made from fairly hard sheet metal, for example, from an unnecessary shovel. (Fig. 2)
If the preparatory stage is completed correctly, no further problems should arise.
Preparing the template
When you have ready-made material, you can begin to create the ax itself. To do this, they think over and make a sketch of the handle, thanks to which the manufacturing process of the product in question is facilitated. The shape of the ax is determined by the type of tool. If a handle is required for a light ax weighing 0.8-1 kg, then its length is 0.4-0.6 m. The length of heavier ones can reach 0.6-0.9 m. Axes are classified according to their purpose:
- carpentry;
- lumberjacks;
- loppers;
- cleavers;
- butcher's
Based on the purpose of the tool, the length of the ax will depend. When making it, you should adhere to the following rules:
- to prevent the ax handle from slipping while working with an axe, the tail should be slightly wider than the handle itself;
- the cleaver's ax handle is made 0.75-0.95 m long, while for a carpenter's ax it is 0.5 m long;
- 10 cm is added to the length of the handle for allowance. This part is cut off after attaching the butt.
The future handle of the desired shape and size is drawn on cardboard, after which the image is transferred to wood and cut out with carpentry tools.
Impregnation of the ax handle and ax attachment
The upper part of the finished handle must be impregnated with a water-repellent composition. There are two options:
- drying oil;
- linseed oil;
- ski resin.
Lubricate the wood with the chosen product and leave it until it dries. The treatment is repeated several more times until the fat is absorbed. Ski resin can penetrate deeper layers of the workpiece, but it is difficult to find in stores. Therefore, the first two options are often used.
Advice. You can add a bright dye to the impregnation agent. This way it will be difficult to lose the finished tool.
The ax attachment to the handle is done as follows:
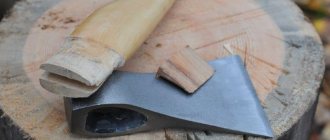
- The ax handle is clamped vertically in a vice.
- On the wide upper part a wedge cut is made. The thickness of the wedge should be 5-10 cm, the length should be equal to the depth of the cut, and the width should be the size of the eye.
- An ax is placed on the board upside down. Put on the ax handle and tap it on the board, regularly turning the product over.
- After the ax handle has entered, a wedge is inserted into the cut and hammered in with a mallet.
- They inspect the product well. If any shortcomings are noticed, they are corrected.
- Remove any remaining seam allowance and give the final shape to the bottom of the handle. If any roughness is detected, go over it well with sandpaper again.
Watching videos and photographs will help you better understand the manufacturing technique. Making an ax handle with your own hands is more difficult than buying it ready-made. However, if you have the desire and some skills, it is quite possible to get a high-quality tool.
How to choose the right wood for a handle
It’s curious, but not all tree species are suitable for making an axe. It is recommended to use only hardwood that has been previously dried in special chambers or kept in a dry place. Failure to comply with these requirements will lead to the fact that during use the handle will dry out and securely attaching the blade to the ax handle will be very problematic.
Home craftsmen use several types of wood to make wooden handles, each of which has its own advantages and disadvantages. Let's try to figure out which wood makes the best ax handle.
Birch
This is a “come and take” raw material, but the availability of the material does not guarantee high quality. To make a high-quality birch ax handle, the wood will have to be dried for 10-12 months. Even after this, the material remains sensitive to humid environments.
Maple
It is also an accessible and widespread material with a limited scope of application. In particular, maple handles are not suitable for making quality tools for a carpenter or lumberjack. However, the wood has a beautiful texture, making it ideal for decorative and souvenir wooden products.
Hickory
This unusual name hides an American walnut that grows in Canadian forests. For the manufacture of an ax handle, this is the best option, successfully combining strength, elasticity and durability. However, only American and Canadian loggers can truly appreciate these benefits.
Jatoba
This is a type of wood unique in its properties, which is used for the manufacture of sports equipment and furniture. Jatoba is easy to process and has a presentable appearance. At the same time, such solid wood is not inferior in strength to oak, so ax handles made from it are very reliable.
Ash
Among the listed options, ash is considered the optimal balance between availability and quality. At the same time, the wood has an interesting texture, so after appropriate processing, the wooden ax handle will have a presentable appearance without loss of strength and elasticity.
Choosing wood for an ax
When choosing materials, preference is given to hard rocks:
- oak;
- ash;
- maple;
- acacia;
- birch.
Most often, the templates are based on birch. 80 cm is the required length to carve the handle. The girth width of the tree varies from 40 to 60 cm. With a smaller value, the fibers will be unreliable and the handle will quickly break. If the trunk is too wide, you can get rotten material.
The wood is thoroughly dried so that the ax head does not become loose. The wood is harvested a year before the handle is produced. Oak takes 3 or 4 years to dry.
It is important that the room is ventilated. Otherwise, mold forms and the process of rotting begins.
Maple breed
Canadian maple looks beautiful. An ax handle made of this material is easy to polish and dry. The texture is different:
- hardness;
- strength;
- elasticity.
A maple ax handle is an excellent solution.
Jatoba tree
Increased impact resistance makes this breed indispensable in the manufacture of handles not only for axes, but also for knives. The wood is stronger than oak. Is different:
- hardness;
- viscosity.
Jatoba lends itself well to processing. The breed is considered one of the most expensive and beautiful. Suitable for those craftsmen for whom appearance is important.
hickory tree
Handles are made from it for:
- ax;
- knife;
- hammer.
The tree is resilient and durable.
Not particularly used in our country. This is due to the high cost.
Popular in countries such as:
- Canada;
- North America.
Oak and beech trees
These breeds have in common:
- easy processing;
- inexpensive cost.
The disadvantages of an oak ax include:
- heavy weight;
- severe drying of hands when working.
By increasing the length of the oak handle, the friction force is absorbed. A shorter handle is easier to cut from solid timber. Each ax handle shape has its own differences.
The porous texture of beech has a smooth and beautiful surface. It's easy to cut. However, this breed is not resistant to moisture absorption. The wood needs to be double impregnated with oil. Thus, hygroscopicity is reduced.
Birch
This is an ideal option for producing high-quality pens. The only drawback is the long drying time. The minimum period is 1 year, the maximum is 2 years. Birch is hygroscopic. At the same time, a pattern can be easily cut out of it. Cheap material is often used to make homemade handles.
Selecting a workpiece and making an ax handle
The length of the ax is selected based on the height and strength of the master. The quality of the wood also plays an important role. Lightweight axes, weighing about 800-1000 g, have handles from 40 to 60 cm long. For heavy tools (1000-1400 g), the length of the ax varies from 55 to 65 cm.
Latest posts 5 unusual zucchini dishes instead of the boring pancakes and stews 8 folk remedies for fighting the Colorado potato beetle: for those who are against “chemicals” in the garden 5 ways to use garlic arrows, which experienced gardeners know
The force of the blow depends on the length of the axe. The longer the ax handle, the easier it is to chop wooden logs. The strength and height of a person also matters
Not every type of wood is suitable for making an ax handle. For this purpose, a true master searches the entire forest before finding a suitable tree. Most often, a blank for an ax handle is made from the root part of a birch tree, or better yet, from growths on its trunk, which are distinguished by their special twisted and very dense wood. Instead of birch, you can use maple, oak, acacia, ash and other hardwood deciduous trees. The workpieces must be dried well in natural conditions, which will take a lot of time.
On the prepared blank, the contours of the future ax handle are outlined according to the selected template. There should be a thickening at the end of the ax handle, designed to “braking” the hand in case the tool slips. Then the excess wood that is outside the contour is removed with a knife, an ax with a perfectly sharpened blade, a chisel or a jigsaw, which is much faster. After fitting the ax on the ax handle using a mallet, and making sure that these parts fit tightly, you can continue further finishing of the tool handle. Glass is used for scraping, and fine-grained sandpaper is used for grinding.
Above is a drawing of an ax handle (a) that meets the requirements of GOST 1400-73, and below is a marching ax handle (b) with an area of unbroken fibers of 40 mm
Making your own ax
The tool manufacturing process can be divided into several stages. In order for the instrument to fit well in the hand, serve for a long time and not become dull, it is necessary to carefully and thoroughly perform each of them.
Ax head selection
How long the ax blade will work without sharpening depends on what steel the cutting part of the ax blade is made of. Good tools are made from high carbon steel, which has optimal hardness and toughness.
In the Soviet Union, steel grades U7A, U8, U8A, and U8GA were used to produce axes. The steel grade was stamped on the side of the blade.
To check the head for integrity before purchasing, you can simply hit it with a metal object. A long, ringing sound indicates high-quality hardening of the blade and the absence of internal cavities and cracks in the steel. The hardness of the blade is determined by quietly scratching it with a file. On high-quality hard steel, the needle file leaves small scratches; on soft steel, a notch immediately forms.
When purchasing an ax head, you need to pay attention to the following:
- the blade must be of the correct shape, without shells or cracks;
- the eye should taper into a small cone;
- the butt end must be perpendicular to the blade;
- The walls of the butt should not be too thick.
READ DIY epoxy resin table
On a note! High-quality instruments can be purchased for relatively little money at so-called “flea markets.” They often sell old instruments pulled out of grandfather's closets. By purchasing an old tool and making an ax handle, you can get a high-quality tool for little money.
Making an ax
To ensure that the tool fits well in the hand and is comfortable to work with, carpenters prefer to make an ax handle with their own hands. To make an ax you will need the following tools:
- wood hacksaw;
- square, pencil, tape measure;
- small hatchet;
- hacksaw for metal;
- blunt knife;
- skins of different grain sizes.
Large tool stores sell already made axes. The easiest way is to buy a ready-made pen and create a tool, but a factory product rarely “fits in your hand.” To make your own ax handle, hardwoods are used:
Trees are harvested at the end of autumn, when sap flow stops and the tree becomes dense and dry. A piece of the required length is sawn off from the trunk, split along the fibers and laid to dry. Dry the workpieces in a dry, dark, ventilated place for 3-4 years.
On a note! During drying, wooden blocks can bend, so it is advisable to have a supply of blanks for work.
Before work, they find out the dimensions of the future ax and make a drawing. The length of the ax depends on the length of the master’s hands, the weight and purpose of the tool:
- for light carpenter's axes (800-1000 g), the handle length is 40-60 cm;
- for heavy two-handed axes (1000-1500 g) – 60-70 cm;
- for light cleavers, the length of the handle is 40-45 cm, for heavy ones - 60-80 cm.
You can download a sketch of the drawing from the Internet or take an existing ax and adapt its dimensions to your hand. Several options for drawings of ax handles are shown in the photo below.
Operating procedure:
- the workpiece is trimmed with an ax, making a rectangular block;
- The contours of the future ax handle are drawn on the plane of the block with a marker. The length of the workpiece should be 5-7 cm longer than the axe. The allowance is necessary for the correct attachment of the ax;
- the block is hewn along the contour. Rough processing of wood is carried out with an axe, finishing with a plane or a jamb knife;
- the final polishing of the homemade ax handle is carried out with fine-grained sandpaper;
- After grinding the ax handle, it is impregnated with linseed oil or natural drying oil to prevent rotting. The liquid is brought to a boil and rubbed into the ax handle. To make a homemade instrument stand out better against the background of grass, a bright acid-colored dye is added to the oil. After drying, the process is repeated until the oil is absorbed into the wood.
Placing an ax on an ax handle
Removal of excess wood from the upper end of the ax handle is carried out carefully, constantly applying the butt of the ax to the workpiece. After the eye is pressed ½ of the way onto the ax handle by hand, planing is stopped. Craftsmen have developed several ways to securely attach an ax head to a handle.
A wedge is used for mounting. It is carved from hardwood. Operating procedure:
- the butt of the head is applied to the top of the ax handle and a mark is made;
- the ax handle is clamped in a vice. In its upper part, along the fibers, a cut is made with a hacksaw for metal to a depth equal to half the distance to the mark;
- A wedge is cut out of hardwood (birch, oak). The thickness of the wedge is 0.5-1 cm, the width is equal to the width of the ax handle, the length is equal to the depth of the cut;
- The ax handle is installed vertically, and the ax blade is placed on top of it;
- the wedge is moistened with PVA glue and hammered into the slot on the butt with a mallet;
- The part of the wedge that does not fit into the slot is cut off.
On a note! Each master wedges his tool in his own way. Some people make two diagonal cuts for two wedges. There is an option for fixing the head with five wedges. To do this, one longitudinal and two transverse cuts are made in the end part of the ax. First, a regular large wide wedge is driven in, then four narrow ones are driven perpendicular to it.
For installation you need gauze or thin calico. Operating procedure:
- the upper part of the butt is trimmed until the head begins to fit 2/3 onto the ax handle;
- the eyelet is degreased from the inside, wiping with a solvent;
- Epoxy glue is applied to the upper part of the butt, wrapped with gauze or a calico rag, and another layer of glue is applied on top;
- the ax head is placed on the ax handle. In order for the head to finally settle, it is pressed down on top with a mallet;
- The epoxy resin will dry within a day. The remaining fabric and resin are cut off with a knife.
How to carve a toy ax
A homemade plywood ax can serve as an interesting toy for a child or be an excellent addition to a New Year’s costume. Often young children, teenagers and even adults want to make wooden axes, like in computer games like Minecraft. You can make such a product in 1.5-2 hours with minimal financial costs.
Making an ax from solid wood will take more time because the wood will be more difficult to process than plywood. The parts are cut out with a special cutter or a sharp knife, removing the chips layer by layer, ensuring that the dimensions and proportions are maintained.
With plywood everything is simpler. First you need to find a ready-made template or draw it yourself in full size. The drawing is transferred to a plywood sheet. The blade and handle are cut out separately with a jigsaw.
To make the wooden toy look more natural, it is better to glue the blade from two halves, after cutting a groove for the handle.
Then both halves of the plywood ax blade are placed on the handle, secured with pins and glued together with PVA glue for wood. After drying, the wooden blade is given a sharpening angle. This operation can be performed with an ordinary file. At the final stage, all surfaces are sanded and the blade is coated with several layers of silver paint. You can apply a custom design or stick a sticker. The finished wooden toy looks very beautiful.
How to place an ax on an ax handle
The procedure for assembling an ax may seem simple, but this is only at first glance. To do it correctly, you need to know some nuances that are not recommended to be overlooked. Therefore, it is necessary to follow certain instructions.
Preparing the ax
After purchasing or making an ax handle, it needs to be adjusted to the ax hole. The handle under the eye is trimmed with a sharp knife, achieving a straight or ellipsoidal shape. After this, cuts are made in the form of longitudinal grooves on the upper part of the handle.
The depth of the grooves should be such that they are hidden in the eye of the ax. Otherwise the ax handle may crack.
Making wedges
The reliability of the tool attachment is largely determined by the quality of wedging. The material for the wedges is wood or metal. These elements can be purchased or made yourself. Professional carpenters are of the opinion that the best wedge is the one made from dried birch. The metal element is made from a piece of a shovel.
Driving wedges
After preparing the ax and wedges, you can begin wedging. First, the longitudinal elements are driven in and light blows are applied with a hammer or the butt of another axe. There is no need to hit it hard, as the wood may become deformed. Then the transverse wedges are driven in. The protruding parts are carefully cut off with a hacksaw and make sure that the ax attachment is secure. The procedure can be considered successful if the handle cannot be removed from the ax and the groove space is completely filled with wedges.
It happens that it is not possible to completely get rid of the gaps. In this case, you can use regular gauze soaked in epoxy. To do this, the upper part of the ax handle is wrapped in soaked gauze before inserting the ax. Epoxy resin allows you to eliminate any gap or crack, thereby forming a reliable fixation of the ax.
Service life of the ax
The durability of a properly made ax is determined by the resistance of the wood to impact and compression. The part of the ax located in the eye experiences very significant loads; over time, it can become wrinkled and the ax head becomes loose. The service life is determined by the type of wood (the harder the better), drying (a poorly dried ax handle will “get wet” very quickly), and the density of the attachment: precise fitting and tight attachment (by blows or pressing) significantly increase durability. Properly made axes can work under heavy loads for years without requiring repairs. If a properly made and mounted ax handle becomes loose, it can be repaired. In the case of a direct attachment (when the ax is placed on top of the tapering end of the ax handle and then wedged), the ax should be set back and an additional wedge made of hardwood should be hammered in. It is also possible to use a flat or round metal wedge. When the ax is mounted in reverse (the ax handle is passed through a cone-shaped eyelet from top to bottom), loosening does not occur, since during operation the loads are directed towards the expanding end of the ax handle and the ax is only fitted more tightly.
READ Making a boat out of plywood with your own hands
Types of axes
There are several types of axes, and each has its own purpose. Professionals distinguish this tool by the width of the butt, which can be wide, medium and narrow. At the same time, some use it for universal work, others for cutting wood, and some varieties are used for neat carpentry work.
Main types of axes:
- cleavers;
- for felling forests;
- construction;
- tourist.
Within each of these groups, there are various tool options designed for narrow-profile or other special work.
https://youtube.com/watch?v=-iIORmEEV-s
Handle differences
An ax handle is the name given to an ax handle. There are many varieties of them, made from different materials. Plastic and metal items are not in widespread demand, and their practicality can be confidently questioned. The most common wooden components of the tool are capable of dampening inertial vibrations during operation.
Classification of axes by handle:
- Lumberjack When using this tool, you need to hold it with both hands. Although this ax can be used quite successfully to chop wood, its main purpose is to cut down trees.
- Woodcutter. The ax is widely used in household farming. It is suitable for some types of carpentry, chopping wood and cutting small trees and branches.
- A carpenter. It is used primarily for processing logs and various wood products. They can be used to chop wood and cut down small bushes. The handle allows you to comfortably use the tool with one or two hands.
- Central Russian This ax is designed to be grasped with both hands, usually equipped with a powerful, sharp blade, and is used for butchering animal carcasses. It is noteworthy that the second name of this instrument is the taiga ax. On long-distance expeditions, it is very convenient to cut clearings with its help.
- Ermak. It is of medium size, and the small handle, held with one hand, implies a stronger load when working with the tool. It is convenient to carry with you. It is used primarily for household needs and chopping wood.
- Sturdy. The small size allows you to take it with you on hiking trips. With its help, you can build a hut, trim small tree trunks, chop firewood, or cut up a hunting trophy.
There are a number of other varieties, but they are classified as professional, intended for special work that requires specific skills.
Photos of do-it-yourself axes
Sources
- https://lesoteka.com/instrument-i-oborudovanie/topor
- https://waysi.ru/stroyka/svoimi-rukami/kak-sdelat-toporise-svoimi-rukami.html
- https://sveklon.ru/kak-sdelat-toporishhe-svoimi-rukami
- https://VashNozh.ru/topory/vidy-toporov
- https://VashNozh.ru/topory/ruchka-dlya-topora
- https://supertopor.ru/vybor_drevesiny_dlya_toporishcha
- https://msmetall.ru/instrument/ruchka-dlya-topora-iz-kakogo-dereva-luchshe.html
- https://BurForum.ru/tehprocessy/toporishche-iz-duba-2.html
- https://WoodShpala.ru/oborudovanie/cherenok-dlya-topora.html
- https://pochini.guru/sovety-mastera/kak-nasadit-topor-na-toporishhe
- https://netigor.ru/kak-sdelat-pravilno-cherenok-dlya-topora/
- https://drevesina.net/izgotovlenie-toporishha-dlja-topora-poshagovyj-process/
[collapse]
Wood chopping
To prepare firewood, an ax is most often required in country houses and rural farmsteads, since even for frying barbecue, wood is the best fuel.
The blade of a wood ax is sharpened at an angle of about 40-60 degrees for better cutting.
The handle is most often made of wood, but can also be metal; the blade is made of hardened carbon steel
When asked which steel to choose, always pay attention to the manufacturer's seal mounted on the handle
The list of advantages of an ax can begin with the ease of working with it, since even a beginner can handle it. The second advantage is accessibility for the buyer in the sense that finding such an ax is as easy as shelling pears in any store.
There is also a wide price range for these axes, from which everyone will choose something for themselves.
The disadvantage of an ax of this format is that it is intended only for one type of work and cannot be used in other areas.
They cannot cut down a tree, and it is quite unsuitable for a butcher, since it is not so sharp. The disadvantages include the easy opportunity to get a low-quality fake, which the market is full of.
Getting to know the chopping product
A chopping tool can be a carpenter's tool, a fighting tool, a camping tool, or a woodcutter's tool. Before placing an ax on an ax handle, you need to decide which type it belongs to. Despite the fact that any ax has a handle and a metal part, each type has its own purpose and design features. Due to the fact that an intense dynamic load is placed on the chopping tool, it is important that the ax is mounted correctly on the shaft. Otherwise, it will fly off the handle and injure a person.
How to properly and permanently place an ax on an ax handle
Many of us are familiar with the situation when a perfectly mounted ax suddenly begins to jump off the ax handle. For few people this phenomenon is inexplicable.
Each of us understands that the drying process of wood is to blame.
But you should know that this can be completely avoided if the planting is carried out technologically correctly and if, after it is completed, you perform a couple of simple but very reliable actions. This is what I will tell you in order.
There are two sequential stages in this process:
- Selection and preparation of an axe.
- Actually planting the ax.
It is this logic that I will follow in my story.
Which side should I put the ax on? Many craftsmen know that the entrance eye of an ax is smaller than the exit eye. Why is this done? Yes, so that the ax handle can be wedged in it and securely fastened. Considering this fact, you should choose the right ax handle for a specific ax.
First you need to take the size of the outlet hole (the larger one) by outlining its internal contour on a piece of paper.
Then a template is cut out of paper along the drawn contour, on the basis of which the search for a suitable ax on the market will be carried out.
The selected ax should be given a couple of days for it to dry completely. To do this, you just need to put it on the heating radiator and occasionally turn it over there.
Do you want to know how to arrange your workshop so that it is very convenient to work in it? Then read this article by my colleague!
Impaling an ax
Mounting the ax begins by placing it on the edge of the ax handle, 5-7 millimeters from its edge, and then marking the boundary of the part that will be processed, i.e. planting boundary.
- Then the outline of the template must be transferred to the end of the ax handle.
- Having completed the markings and armed with a large wood rasp, process the end of the ax up to the boundary mark so that at the end it reaches the outline of the template.
- The end of the workpiece should ultimately coincide with the contour applied to it.
After this, you can begin to try on. Moreover, you need to try it on at the exit (large) hole of the ax. If necessary, you should sharpen it further. Processing should be completed when the ax begins to slightly “bite” the wood of the ax handle.
Having achieved such a “biting”, the very edge of the piece of wood is sharpened so that it fits about 1 cm into the ax.
Do you know how to sharpen an axe? If not, then click here!
After this, you need to take a caliper and measure the size of the entrance hole of the ax.
By further processing, this size should be achieved on the ax handle in the area of the initially applied boundary mark. Moreover, processing is carried out along the entire perimeter of the workpiece so that it completely fits into the exit hole of the ax.
Further processing should result in the end of the piece of wood resembling a champagne cork with a thickening at the bottom.
As in the beginning, the workpiece is processed using a rasp.
Monitoring the dimensions of the workpiece to ensure they correspond to the dimensions of the ax holes should be constantly carried out using a caliper. Having achieved full compliance, a small chamfer is removed at the very edge of the ax to facilitate the process of inserting the workpiece into the ax.
- Having finished processing, make markings for two slots on the processed end.
- The marked cuts are made to a depth not reaching approximately 1 cm from the border of the ax mounting.
- Having inserted the sawn end of the ax into the entrance hole, they begin to tap on its opposite end in order to place the ax on a wooden workpiece.
Then 3 wedges are installed on the glue in the cuts: one large longitudinal and two wedges on the sides. Having inserted the wedges, the end of the ax should be processed to give it perfect evenness.
Now the ax is very securely attached to the ax handle. But if the ax is left in this state, then the wood will inevitably dry out, and the tool may become unusable.
How wedging is performed
Many beginners think that wooden wedges must be made of the same wood as the handle. However, this is a misconception, because the tree must be very durable. It is also necessary to take into account the direction of the wood fibers, which must be parallel to the cut on the ax handle. This will prevent the wooden wedge from breaking when driven into a deep cut.
Epoxy resin is poured into the cuts made and fills all existing cracks and voids. After it hardens, you can hammer in the wedges. First, wooden and then metal wedges are driven in. The minimum distance between the wedges should be about 0.4 centimeters. The metal wedge must be bent so that it covers the wooden one.
According to the prevailing belief among beginners, wooden wedges should be made of the same wood as the ax handle. But that's not true.
First of all, the wood must be durable. The direction of the fibers must also be taken into account. It should be parallel to the narrowing of the wedge. This direction will prevent the latter from breaking when driven into the cut. A broken wedge does not effectively expand the ax handle to the sides. Wedging is considered successful when the wedge has completely filled the entire cutting space and cannot be removed
When making wedges, it is important that the dimensions of the transverse products correspond to the size of the eye. In some cases the eyelet may have gaps
You can fix them with gauze or bandage soaked in epoxy resin. Epoxy material protects wood from getting wet and performs a reinforcing function. To perform reinforcement, it is necessary to wrap several layers of gauze around the upper part of the handle before attaching the ax. The resin is poured into the cuts and fills all existing voids and cracks. After it hardens, the wedges are hammered in. In this case, wooden wedges are driven in first, and then iron wedges. The distance between them should be at least 0.3 cm. The iron wedge at the end is bent at one edge so as to cover the wooden one.
We recommend: Air conditioners from Japan