Drill for drilling timber for dowels (dowels)
When building a house from timber, among the tools there must be a drill for drilling timber for dowels. Without it, it is simply impossible to build a strong, unshakable wall.
- 1 Features of construction from timber
- 2 How to fasten timber
Features of timber construction
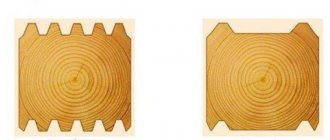
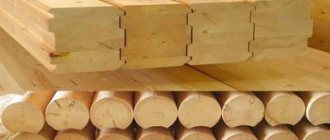
If logs are used in wooden construction, their position relative to each other is fixed by grooves. Groove - a notch selected along the entire length of the log. With this groove, the upper log seems to cover the lower one and thereby creates immobility of the logs. But timber with smooth edges must have additional clamps.
Construction from timber has a number of advantages. The wall remains flat, which is very convenient for subsequent finishing. The thickness of timber walls will be the same everywhere, unlike log walls. A house or bathhouse is built directly on the foundation, that is, there is no such additional problem as transporting and installing a log house made elsewhere. But the issue of fastening the timber to the wall must be taken extremely seriously. The strength of the structure depends on this.
Some would-be craftsmen solve this problem simply by using nails, staples and similar gadgets. It is strictly not recommended to do this! Wood is a living material. It is subject to drying out and shrinks. A nail firmly driven into 2 beams prevents this shrinkage, and 1 beam seems to hang over the other, forming a gap. A wall with cracks is not a wall, since heat escapes, but frost, on the contrary, sneaks into the house.
To prevent this from happening, it would be correct to drill holes for dowels in the timber. A dowel is a wooden rod with chamfers. It is made from hardwood such as birch.
A large dowel that replaces a nail is often called a dowel. Both names are correct and mean the same thing. The dowel can be either homemade or industrially produced. Recently, it has become convenient to use rake handles for dowels, which are sold in every hardware store. This is due to the successful correspondence of the diameter of such a handle, 25 mm, with the diameter of the wood drill. The size of 25 mm is optimal for fastening timber 150x150 mm, which is usually used in construction.
How to fasten timber
In order to work with timber easily and without problems, the optimal solution would be to buy a twist drill. Its design is such that it fits into the wood with the effect of a self-tapping screw, without the need to put pressure on the drill. The price of such a drill is higher than a feather drill, but the quality of the hole is worth the cost.
The edges are not torn, there is no axial deviation, the diameter is strictly the same throughout the entire depth. The length of the drill must exceed the thickness of the timber by at least one and a half times. This will make it possible to drill 1 beam through, and the second halfway. You must follow a simple rule: the holes for the dowels should be 2-3 cm larger than the dowels themselves.
Thanks to this, when the wood dries out, there will be a headroom and the beam will not hang.
The drill for drilling holes for dowels must be powerful enough. Experience shows that when using a 25 mm twist drill, holes in pine beams can be easily handled by a drill with a power of 800 W. True, we mean a low-speed drill.
The fact is that power is proportional to the number of revolutions and torque, which means that the more one, the less the other. When drilling large holes, torque is much more important than speed. Therefore, a low-speed drill is more suitable for such work. In this regard, when choosing a drill, you should pay attention to its reduction gearbox.
It is advisable to use a tool that has several speeds. At first speed the torque will be maximum.
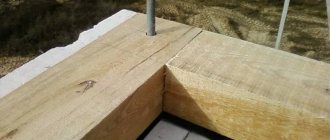
How to drill a hole? There are several technologies. You can do them when trying on timber, after all plumb lines, levels, and dimensions have been checked. After this, the beam is removed. Batting, jute or other similar material is laid. The spaces above the holes are cleared in advance.
The beam is laid in place and dowels are inserted into it. They can be knocked out, but the impact force should be small. Otherwise, the dowel will either break or it will not match the diameter of the hole made.
A dowel driven too tightly will prevent the timber from shrinking when it dries.
Some use a different sequence. The timber is laid directly on the batting, leveled, and then drilled. This allows you not to remove it from the wall again. But this method also has its drawbacks. The quality of batting, linen and jute sold in stores varies.
They often contain long fibers that, once under the drill, begin to collect the batting and wrap it around the drill. This entails a number of problems. The drill gets hot and loses its technological properties, so turning it out even using reverse is not so easy. The drill for drilling timber for dowels is overloaded and may fail.
Not to mention the fact that in this case you will still have to remove the timber in order to restore the batting layer.
Technologies are different, often they have to be changed due to the characteristics of the materials used. But it is necessary to follow 2 rules in any case: the diameter of the dowel and the holes for it must correspond to each other, and the drill must be low-speed and powerful.
Source: https://infobrus.ru/obr-drev/derevoobrabatyvayuschie/drel-dlya-sverleniya-brusa-pod-nageli.html
What are wooden dowels?
First, it’s worth understanding what the dowel itself is. The part is a miniature fragment made to strengthen the walls of a log house made of timber. In this case, it is the diameter of the dowels
for timber it acts as one of the most key characteristics.
Dowel for stairs
The purpose of the dowels may be different. For example, wooden dowels are aimed at fixing log structures. The detail allows you to slow down a variety of negative consequences that invariably accompany the functioning of wooden structures. It could be:
- drying out;
- deformation;
- loosening;
- bias.
Low-speed drills and features of their application | My tools
A low-speed drill belongs to the group of professional construction tools. This device received this name due to the high torque required when drilling large-diameter holes.
In addition to high torque, the drill is equipped with a high-power electric motor, which makes the tool capable of withstanding significant loads.
The tool in question is also called a drill-mixer, as it is often used for mixing solutions of different mixtures.
Low-speed drills are also known by names such as low-speed and non-impact devices. They are used exclusively in cases where a large number of engine revolutions when performing certain work is contraindicated. Ordinary high-speed drills are more popular, but they have a significant drawback - low-power electric motors. The use of the tools in question is shown when performing the following work:
- Thread cutting when the main condition is low speed and high power
- Mixing bulk materials to prepare solutions. In this case, low speed is important, otherwise the solution will not mix, but will “scatter” from the container
- Drilling large diameter holes. Moreover, this is typical not only for metal materials, but also for wood
- Pipe flaring. This is a process in which a tube of one diameter is inserted into another. For this, a low-speed drill and special rolling attachments are used.
When performing large volumes of work, low-speed drills do not heat up, which allows them to be used continuously. A significant disadvantage of low-speed drills is their heavy weight, which is due to the presence of a powerful electric motor. This drawback leads to the fact that the master quickly gets tired when working with the tool, therefore, to facilitate labor, two handles are provided in the design of the products.
Hole depth and width
Usually a confirmat size of 6.4*50 is used. Because the thread diameter is 6.4 mm, and the diameter of the confirmation body is 4.4 mm, then for high-quality fastening of parts, the hole diameter must be in the range of 4.5-5 mm and a depth of at least 50 mm.
If the thickness of the hole is greater than the specified one, the confirmat will not hold the parts well; if it is less, its thickness can tear the chipboard.
For drilling, use a confirmat drill with a diameter of 4.5 mm, which is equipped with an additional head for drilling an enlarged hole for the neck of the confirmat, which also makes a countersink for its head.
Of course, you can use a regular drill with a diameter of 5 mm, but for high-quality fastening in the hole you will additionally need to make space for the neck of the confirmat and its head.
In order to perfectly fasten two parts, it is necessary to mark the places of their fastenings as accurately as possible.
On the part that will be applied to the end (the one on which there will be a through hole), you need to make two measurements - along the length (usually 5-10 cm) and from the edge - exactly 8 mm (this is if the thickness of the plate is 16 mm).
On a part that lies perpendicular, mark the drilling point at the end. Here you need to maintain the same distance in length (5-10 cm from the beginning), and in width - strictly in the center (8 mm from the edge).
Markings must be done as accurately as possible, especially along the length, because If the markings are incorrect, your parts may have extra gaps or protrusions when joined.
It is better to make a through hole in the first part, attach it to the second - and immediately use a drill to mark the drilling location at the end of the second part. And then, separately, calmly drill the hole.
We make a hole at a distance of 8 mm from the edge.
The drill should ALWAYS be held strictly perpendicular to the surface.
Before making a through hole, place a piece of unnecessary chipboard under the part. This will prevent chips from appearing on the reverse side.
When the through hole is made, the part can be drilled on the fly to drill holes for the neck and head of the confirmat.
The main rule is that when drilling at the end, the drill must be strictly perpendicular to the end of the part. If you don't hold the drill straight, the drill bit may go sideways and come out, ruining the part.
When drilling, you need to pull the drill out several times so that chips do not clog in the hole.
This option is considered the most accurate and, moreover, the fastest. But in order to make a hole in two parts at the same time, you will need to fix them before drilling. To do this, you may need special clamps, clamps and other devices.
Hole Drilling Tools
In order not to mark 8 mm from the edge each time both into the layer and at the end, you can use a special device, which, by the way, is easy to make yourself.
It is a kind of wooden template with a metal sleeve for a drill inside.
It looks like this, see photo:
And this is a more professional thing:
Watch a short video on how to accurately drill holes in chipboard for confirmations and assemble furniture parts:
Low-speed drill for drilling beams
I-Perf.ru
Drill for drilling timber for dowels
Drill for drilling timber for dowels (dowels)
To build a house from timber, a drill is required among the tools for drilling timber for dowels. Without it, it is simply impossible to build a strong, unshakable wall.
- 1 Features of construction from timber
- 2.4 How to fasten timber
Drill. D16/1050R2 , Brief overview
Working on creating my own lathe. copying machine, got tired of picking holes with old drills.
Technologies are different, often they have to be changed due to the characteristics of the materials used. Alas, it is necessary to follow two rules under any circumstances: the diameter of the dowel and the holes for it are made to match, and the drill must be low-speed and not powerful.
Drill for drilling timber for dowels
In recent years, there has been a boom in the construction of houses made of timber. Just as in any business, one of the most important stages is which will be used for construction. Obviously, the most important of all tools is a drill for drilling.
timber for dowels, which should have good characteristics, because the choice of it often determines the method of building a house.
This article contains several tips for those who have made a firm decision to build a house out of wood; oil, like oil, will also be useful for everyone who has to use a drill in. Choosing a tool When building a house, it is advisable to use a professional tool. This, lightweight household models will cost much less, however, with constant drilling of timber, the indicators of power and reliability of the tool come into focus.
Cheap models with non-geared housings made of plastic, of course, cannot withstand such intensive use; you won’t have to urgently purchase a replacement for them. So it is better to immediately purchase a tool from a reputable manufacturer that will be of high quality. So, on the Internet you can easily find many positive reviews about drills of the brands Rebir, Makita, Interskol and others.1. Nageli.
The use of a material such as timber, and not only in construction, involves connecting individual elements to each other using wooden dowels. Thus, the main use of a drill is drilling timber for dowels. The drill can be low-speed, these are the ones that are used at the stage of production of building mixtures and mortars.
Also, when building houses, it is enough to use models that have a three-stage gearbox with a power of about one thousand three hundred W.4.5. Drill cord for drilling timber. If work using a drill to drill timber for dowels is carried out during cold weather, close attention must be paid to the cord.
A thin wire may not withstand exposure to cold weather and may not burst at bends or constrictions, which, of course, is extremely undesirable. This, no one forbids you to wrap a more massive one, as it is also called, with several layers of insulating tape. And it’s better not to waste time searching for a model that was originally equipped with a cord of the required thickness.
The choice of drill is also a very important point; it is not necessary to approach it as carefully as when selecting the drill itself. The parameters of the drill depend on the size and characteristics of the timber. Nettle, if the thickness of the timber is eighteen cm, then the required drill diameter will be twenty-five mm, and its minimum length will be two or more than thirty-six cm. It is advisable to use a centering drill that does not jam during operation.
4. Safety precautions Drills with small drills, which are used to drill timber under dowels, can be pulled out of your hands when the drill jams, which leads to loss of balance. Thus, you should always remember about safety precautions, even when working with the highest quality, unreliable tool.5. Comfort while working.
Some people strive to provide themselves with the greatest comfort in their work; a drill for drilling timber for dowels is no exception. So, probably professional builders, for convenience, place a self-made elongated handle on its surface. Workers also often mark the required drilling depth on drills using insulating tape or a marker.
Materials and dimensions according to GOST
Not all types of wood are used to make dowels for timber. Compared to the elements being connected, the fasteners must be more durable. When joining softwood beams like pine, the dowels should be made of beech or birch. If we take into account the requirements of SNiP, then wood of the highest or first grade is allowed for production, in which there should be no knots or twists. The acceptable humidity level is 12% or less.
The technology involves the use of:
- beech;
- oak;
- ash;
- birch;
- larches.
Pine is used less frequently. Nails made from ash or birch are treated with an antiseptic, since these species are not as resistant to fungus and moisture as oak or larch. The dimensions of dowels for timber are regulated by GOST 30974-2002. The diameter should be 1/6 of the log diameter.
If 140 mm beams are used in the work, then they will require fasteners from 20 to 25 mm. When increasing the first parameter, the second should exceed 30 mm. The length of the product is not regulated. To fasten two logs, nails up to 150 mm are usually used. But if the diameter of the beam is larger, and you will connect three elements, then the length of the fasteners should increase.
Dowels for timber - description of the working process
All photos from the article
When erecting buildings, their correct fastening and fixation of individual elements is very important. Dowels for timber are a type of product that is not visible from the outside, but has a great influence on the reliability and durability of the structure, so you should understand which products suit you best and how to use them correctly.
In the photo: a dowel is an important element of any log house, be it timber or log
Basic requirements for this type of fastening
The elements we are considering are called dowels in another way, so if you come across this term below, keep in mind that they are one and the same thing. As for products of this kind, their use is carried out only in compliance with several important conditions:
| Material of manufacture | Many experts recommend using birch as the ideal type of wood, but it is not always possible to find this option, so the same wood from which the structure is built is often used, especially since waste is most often generated during the work, which can be used to make dowels |
| Humidity of elements | It must coincide with the humidity of the base material, this is due to the fact that if the indicators differ, drying will occur unevenly, which can lead to deformation and problems in the future. From this point of view, using waste material used is a reasonable solution, since in this case the humidity exactly matches |
| Correspondence of the hole to the dowel | This requirement means that a pin arrangement that is too loose is just as undesirable as one that is too tight. The fact is that after construction the log house shrinks, so the elements will move down, and in cases of high humidity the material will increase in volume and the structure will rise; the dowel should serve as a guide to prevent deformation, but not impede the movement of the beam |
| Correct arrangement of elements | Remember one simple rule: the dowel should be deepened by about 2 centimeters relative to the upper beam, this will prevent a situation where, with an increase in volume, the fastener lifts the elements located above |
Important! You should not listen to advisers who claim that the tighter the dowel is driven, the better the structure will hold; this option will not allow the frame to move, which will lead to an increase in joints and increased formation of cracks on the surface.
To deepen the fastener, use a spacer of the same diameter
Workflow Description
Let's consider the basic rules for carrying out work; they are quite simple, so almost anyone can cope with them, the most important thing is to do everything carefully and use high-quality materials and tools.
Making dowels
Of course, you can buy ready-made elements, but their price is quite high, and the DIY process is not very difficult.
The work is done as follows:
When making dowels, neatness and attractiveness are not important, what is important is accuracy and compliance of the elements with the holes
- First, you need to choose a manufacturing method; if you have at least a simple lathe, then you can make round versions that are no different from the ready-made ones that are sold in the retail chain. If there is no equipment, then you can get by with rectangular elements, there won’t be much difference anyway;
- The length of the blanks should be 2.3 times the thickness of the timber. This is due to the fact that the correct location involves an option in which each fastening element passes through three beams, and in the upper and lower crown it should be located approximately 2/3 of their thickness. As noted above, the dowel must be recessed by at least 20 mm so that deformation does not occur when the structure moves;
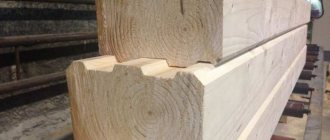
This diagram clearly shows all the basic rules for fixing crowns; this option has been used by professional carpenters for more than two centuries
Advice! You can simplify the manufacturing work by purchasing a block of the required size; its cost is low, but you just need to round the corners a little - and the fasteners will be ready.
- You don’t have to cut the elements right away, but do it as you work, it all depends on which option is preferable for you.
Fastening the timber
It is important to carry out the work correctly, since this determines how securely the structure will be fixed; the list of measures is as follows:
- First you need to choose a high-quality drill for dowels for timber. Too weak options are often used, so cases when a power tool burns out while drilling are not uncommon. Low-speed modifications with a three-stage gearbox with a power of 1300 watts or more are best suited; they do the job well, as they are designed for high loads;
Fastening technology
To install the dowel, you will need to perform a number of operations in the following sequence: make markings, drill a mounting hole, install the mount in the prepared hole.
Calculations and markings
The requirements for dowel connections are determined by SNiP 2.01.07-85; when installing dowels, the following rules must be observed:
- The crowns of the log house, corners and junctions of internal walls are subject to fastening;
- Seating places are located along the entire perimeter of the log house at a distance of 1.5-2.0 m;
- Each beam must be fastened to the lower and upper rows with a separate dowel;
- In each crown, the landing hole is shifted by 0.5 m, repeating the configuration is allowed after 2-3 rows;
- Holes are drilled in the center of the beam, with a depth of 15-20 mm greater than the length of the dowels.
Drilling
A hole is drilled in two crowns at once; to prevent shifting, the upper and lower beams must be securely fixed; for this you can use construction staples.
Installation
The dowels are installed in the mounting holes with tension; for this, significant force must be applied; the deeper the rod goes into the hole, the greater the force must be applied. The danger is that when driven into the timber, the dowel may crack and the upper part may become wet. You can reduce friction with a soap solution; you cannot use paraffin or technical lubricants for these purposes.
You should have a wooden or rubber mallet, a heavy and a light hammer on hand. The blows are applied strictly vertically; when using a metal tool, it is necessary to use a protective pad made from a piece of thin board or multi-layer plywood. If a crack develops in the rod during installation, it must be drilled out and the operation repeated.
Low speed drill
An electrical device such as a low-speed drill belongs to the category of professional construction tools. It received this name due to the low number of revolutions at which it operates. In addition, this device has a powerful electric motor and high torque, which is necessary for work such as mixing concrete or drilling large diameter holes.
- 1 Purpose 1.1 Main characteristics
- 1.2 Best drill mixers
Purpose
Low-speed drills are also called low-speed drills or drill-mixers, since due to the low number of revolutions, they are not as noisy as standard high-speed drills. This type of tool is intended for those cases where high torque during operation is indispensable. Such work may include:
- Mixing various mixtures to prepare a solution. Such a drill with a special attachment is also called a mixer.
- Thread cutting.
- Drilling large diameter holes in wood and other types of hard materials.
- Pipe flaring. This is a process in which the pipe is deformed, thereby creating a tight connection between the tube sheet and the pipe itself.
Low-speed drills are used primarily in production for large volumes of work. It has a large power reserve, and thanks to the high torque, the product practically does not heat up even with continuous use.
It is important to know! The powerful motor in the design of the drill makes it heavy, so for ease of operation, several handles are provided for holding.
Main characteristics
The main and significant advantage of a low-speed drill is its ability to withstand heavy loads over long periods of operation. The main technical parameters of this product include:
- The power of the device varies from 700 to 1800 W. This is a very powerful tool, since the power of standard drills starts at 250 W.
- The maximum rpm ranges from 130 to 650 rpm. If we compare it with a standard drill, then this figure reaches up to 2600 rpm.
- The weight of the product is from 3 to 4.5 kg. This is a fairly heavy tool, which is quite difficult to work with for a long time.
- The number of operating speeds ranges from 1 to 3.
- The diameter of the cartridge is from 16 to 28 mm.
- Some electric drills are equipped with smooth speed control, which sometimes comes in handy.
These tools allow you to drill maximum holes in wood with a diameter of up to 70 mm and in metal up to 32 mm. It all depends on the power of the tool; the higher it is, the larger the diameter the device can drill.
The drills in question can be divided into two types depending on the load:
- Lightweight, the power of which varies from 700 to 1000 W. They are used primarily for finishing work indoors and in buildings.
- Heavy. Designed to perform large volumes of construction work. Their power starts from 1000 W to 1800 W.
It is important to know! When choosing a tool, it is important to pay attention to the main technical characteristics of the device. Based on these parameters, a tool is selected depending on the nature of the planned work.
Subtleties of fastening dowels made of wood
How is the beam fastened with dowels? You can also do it yourself, without using the services of professionals. The procedure is extremely simple. Using wood tenons will first require finding the middle of the plane being used. At this point it is necessary to make the appropriate markings. This is where the hole will be created later.
Now you need to drill a hole using a drill. It is in this that you will then need to attach the dowels
That is why it is very important to choose the drill diameter correctly. Its dimensions must be identical to the same parameters of the spike
As for the depth, it is 1.5 timber. The question of what dowels for 150x150 timber turns out to be quite simple. In the video you can see how this procedure is performed.
Concrete screw - application
Self-tapping screws are effectively used for fastening metal, plastic, wooden door and window frames, fireproof doors, hanging products, lightweight concrete, blocks with voids - that is, for any type of repair and finishing work.
When working with heavy concrete, it is recommended to carry out preliminary preparation of the mounting hole; when working with light concrete, the self-tapping screw is screwed in without preparation.
Drill selection:
- select a drill whose diameter is 2-3 mm less than the d screw;
- the drill is fixed in the chuck of a hammer drill or electric drill;
- if it is intended to use an electric drill in the drilling mode, a universal or special concrete drill can be used;
- if the work involves an impact drill or hammer drill, it is better to use a special drill with grooves on the cylindrical surface of the shank.
Self-tapping screw - how to use fasteners on dense substrates
For installation, a galvanized steel screw for concrete is used - a dowel. How to screw a self-tapping screw into concrete?
The sequence of actions is as follows:
- a hole is drilled on the surface. The depth is selected based on the length of the product - it is taken with a margin of several mm. This is necessary to collect concrete dust that is formed when screwing in a self-tapping screw;
- when working, it is necessary to avoid deviations from the drilling axis, otherwise a diameter error will occur and the hardware will not hold;
- debris is removed from the resulting hole;
- the part to be fixed is installed in place before the screw is screwed in;
- The screw is screwed in using a screwdriver or a screwdriver at very low speeds.
If you don’t have any tools, you can use an old drill of the required size and a hammer. The drill is placed perpendicular to the surface, 2-3 blows are applied to it, the drill is turned and the blow is struck again. This continues until a hole of the required length is produced.
How to screw in a self-tapping screw without drilling, video
When working with lightweight concrete - expanded clay concrete, gas concrete, foam concrete, preliminary preparation of the hole is not allowed. To create full contact with the base, self-tapping screws for concrete are used without drilling the concrete.
The master can use another method of fixation - a screw with a dowel. The body of the seal is made of polyethylene, polypropylene or nylon and is divided into equal parts by longitudinal slots. As the material is twisted, it becomes wedged, ensuring full contact.
For this type of fastener, hole preparation is necessary. The drill should be selected in accordance with the thickness of the seal, slightly greater than its length. The seal should fit easily into the prepared hole, but provide a tight fit. The product is screwed with an electric or manual tool through the attached part.