Many will agree that the best New Year's decorations are those made by hand. Even if they don’t turn out the most perfect, such things always have something that store-bought toys lack - they keep the memory of happy New Year’s moments and are filled with the warmth of the hands that made them.
The best material for making homemade jewelry is, without a doubt, wood. The warmth of its texture, durability and affordability are unrivaled, and various decorative finishing options open up even more opportunities for creativity and experimentation with design.
In this article we will offer a series of original templates for cutting out New Year's decorations. You can make these simple, but very expressive handmade products not only on a jigsaw, but also using a regular hand jigsaw. We will also pay due attention to the questions of how and with what to paint wooden Christmas tree decorations.
If you are new to sawing, our series of materials will help you take your first steps in mastering this exciting activity:
- How to quickly master sawing with a hand jigsaw
- Which files are best for hand sawing?
- Tips for choosing files for jigsaws
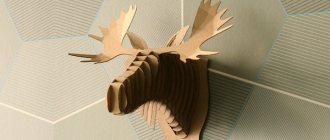
Gingerbread men
The whimsical design of these New Year's wooden figurines in the form of a popular holiday treat will amuse and delight lovers of non-trivial design.
Material: oak cuts, 5 mm thick. Finish: Clear oil finish
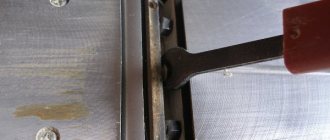
Sawing and processing wooden toys
Print the proposed sketch to the desired scale. Cut the pre-selected piece of wood to the required size. Considering the many curved cuts and small shaped slots, it is better to choose workpieces of small thickness - 3-5 mm. Transfer the template to a wooden base, then use a 1.5 mm drill to make a series of holes through which the blade will pass (don't forget to drill a hole for hanging the figurine).
Start by sawing out the internal elements, and then trim the figures around the perimeter, this will reduce the risk of breaking the fragile toy. Given the amount of fine work involved, it is best to use #3 reverse tooth files for this project, which in addition to a more controlled cut will reduce the likelihood of chipping on the back of the piece. Remove the paper template: If adhesive was used for transfer, sand off any remaining paper using P180 sandpaper. If you plan to apply a clear finish, add a final sanding with P280 grit.
How to choose plywood for sawing A successful project begins with the right choice of material. How to choose high-quality plywood for sawing - read our article.
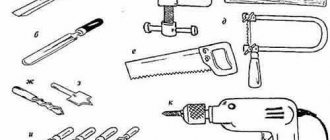
Materials and tools
Working with plywood involves the use of a large number of tools and materials. It is better to take care of purchasing them in advance. During creative work, nothing should distract from what you love.
Even more instructions will be provided by the handicraft portal: https://podelunchik.ru.
We will need:
Note!
Craft letter - TOP 120 photo reviews of craft letter. Simple diagrams + step-by-step DIY instructions- Crafts made from nut shells: the best step-by-step master classes on creating DIY crafts with photo examples of finished works
- Mushroom craft - reviews of ready-made DIY crafts + step-by-step instructions and diagrams for children (180 photos)
- Jigsaw;
- Electric drill;
- Drills of different thicknesses;
- Stationery for drawing up drawings - ruler, pencil;
- Drawings and stencils;
- Scissors;
- Glue;
- Vise;
- Miter box;
- Grinder machine;
- Various files;
- Awl;
- Burnout device;
- Fastening fittings;
- Varnish;
- Dye;
- Decorative elements.
New Year's decor set
The next set of templates is a series of New Year's decorations that can be used as Christmas tree decorations or as independent interior decor. The set includes several types of figurines, which are a kind of designer set: they can be combined in different combinations or used separately as full-fledged New Year's decorations.
The first set of figures are simple stylized Christmas trees in two design solutions: with straight and figured geometry. They can be hung on the Christmas tree or used as regular home decorations.
Stylish Christmas trees for hanging with straight and shaped geometry. Material: birch plywood, 4 mm thick. Finish: acrylic paint + glitter spray paint.
Complete your holiday decor set with figured spirals. These are stylish and truly multifunctional New Year's decorations. By cutting out several figures of different sizes, you can use each spiral separately, make a pendant from several pieces, or combine them into a voluminous decoration, as in the photo. Working with curved cuts will require certain skills. For best results, we recommend using #2 or #3 files and working with not very thick workpieces.
All finished figures can be combined into beautiful rotating pendants. To do this, you will need to additionally cut out decorative crossbars in the form of shooting stars, as well as individual stars. To keep the structure rigid and rotate better, thin wire is used for hanging.
Stencils for cutting
Crafts for a summer cottage
Crafts made can be divided into two categories:
- to improve living conditions;
- for decoration.
No one cares about the appearance of their summer cottage. It's always nice to relax in a beautiful, well-kept place. To create a relaxation zone in the country house, in certain places of the garden and vegetable garden, it is enough to install several sculptural figures or decorative items. This will be pleasing to the eye, however, not everyone can afford it.
It is much easier to create beautiful crafts from plywood yourself. Their production does not require high artistic abilities or practical skills. It is enough to be able to transfer the image you like onto plywood, cut it out and decorate it according to the original. It is necessary to think over the artistic motive and style of execution of crafts.
Options for plywood products:
- cartoon or fairy-tale characters;
- flower pots;
- houses, sandboxes;
- feeders;
- flowers, plants;
- insects or animals, etc...
It all depends on the imagination of the household, desire, perseverance, and creative inspiration. The financial component only complements initiative and diligence.
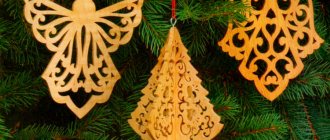
Set of decorations in Christmas style
A set of three ornaments inspired by traditional Christmas motifs. The set includes a pair of stylized angels and an openwork Christmas tree assembled from two halves. The latter can be used as a pendant or as a free-standing decoration.
Such toys look good in their natural form, with an open wooden texture. Therefore, linseed, mineral or any other non-tinted oil is best suited for finishing.
Stencils for cutting
The width of the central slot should correspond to the thickness of the workpiece used. To ensure a good fit between the two halves of the plywood Christmas tree, cut the groove a little smaller, then carefully file it with a file or sandpaper until it fits snugly.
Specifics of the material
Plywood consists of several layers of veneer, which are glued together using a special compound. This is glued natural wood. Some types of plywood are treated with a special impregnation that ensures their moisture resistance.
Plywood has increased strength due to the arrangement of veneer layers perpendicular to each other.
Christmas decorations in stained glass style
You can add a little variety to the standard cutting technology and make one of the proposed options for New Year's decor that imitates stained glass style.
The decorations in the foreground are made using pseudo-stained glass technique.
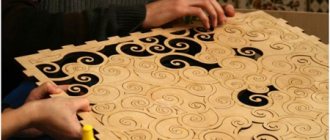
The essence of this technique is quite simple: you need to cut out two stained glass frames and place a sheet of cardboard between them, painted on both sides. In order to avoid the tedious adjustment of two parts, it is better to immediately cut them in series, placing the blanks in a stack one on top of the other. Of course, it is much more convenient to do such work on a jigsaw.
Cutting templates
Making Tips
For the little ones
Wooden educational toys for children are especially useful during early development. They are distinguished by the simplicity of their shapes and designs, but at the same time they effectively develop basic skills in manipulating objects, laying the foundations for understanding shape, color, etc.
General diagram and details of the base
In this section, we will describe the process of making such toys using the example of a sorter - a special stand on which a child will put small parts, dividing them into groups depending on shape and color.
We do the sorter this way:
- For the blanks we will need boards about 20 mm thick and round wooden rods with a cross-section of 10-15 mm.
- From a long piece of board we cut out the base of the sorter, about 15 cm wide and up to 60 cm long.
- We divide the base into five parts. In each part we drill holes for installing vertical supports - one in the first, two in the second, etc.
- We cut the wooden rods into fragments about 20 cm high. We round the upper part of each fragment, and glue the lower part into the hole made in the base.
Drawing of typesetting elements
Then we make typesetting elements - circles, rectangles, triangles, squares and pentagons. We cut each element out of the board, carefully sand it, round the edges to get rid of sharp and traumatic corners, and then make holes in them (see diagram in the article). The number of elements of each type is determined by their thickness and the height of the sorter rods.
- After completing the sawing and drilling, we re-sand all the parts, and then saturate them with stain.
- When the stain dries, paint each series of set elements in a separate color. We also paint the area of the sorter where the parts will be installed in the appropriate shade.
Wood sorter option
After the paint has dried, we open the wood with varnish to protect the pigment layer from damage and abrasion.
Ornamental decorations with geometric patterns
A series of sketches for making simple, but at the same time very expressive New Year's decorations. The through openwork pattern gives these toys a characteristic visual lightness and endows them with grace; at the same time, this feature puts forward a number of requirements for manufacturing. The wooden blank must be thin, but at the same time strong enough so that the fragile pattern does not break.
For a series of these projects, it's best to use hardwood (under a clear finish), or even better, thin plywood if you plan to do an all-over stain that will hide unsightly plywood edges. To make such jewelry, it is most convenient to use spiral saws, which allow cutting in any direction without the need to rotate the workpiece.
Preparing for work
What can be done
So, we have the materials and tools, now let's think about what kind of structure we will cut and assemble? In principle, the possibilities of plywood are practically unlimited, but a novice craftsman should focus on simple forms, for which you can find many diagrams and manufacturing tips on our portal.
Photos of carved parts for metrics
A brief overview is given in the table below:
| Category | Peculiarities |
| Metrics | Baby birth certificates made of plywood are souvenirs dedicated to the birth of a child. Typically, the metric includes the following details:
|
| Toys for little ones | The simplest drawings for cutting out plywood with a jigsaw for children allow you to literally make several simple toys for your baby in just a few hours: sorters, pyramids, mobiles over the crib, etc. All these products are characterized by a small number of parts, their simple shape and fairly large size. At the same time, a mobile or pendant above a crib is usually made of thin plywood, while for sorters and pyramids it is better to take sheets of 10 mm or more. |
| Transport models | All kinds of cars, planes, tanks, etc. represent the lion's share of all products made from this material. Today, detailed drawings of plywood toys for children are widely available, so a product of any complexity can be made. |
| Doll furniture | Miniature pieces of furniture intended for playing with dolls or installing in a dollhouse do not necessarily need to be purchased in specialized stores. If you have, for example, drawings of a children's kitchen on hand, you can make a real masterpiece out of plywood with your own hands, which cannot be compared with any factory crafts. |
| Puzzles | For older children and teenagers, it is worth making several puzzles. As a rule, in addition to plywood parts of various shapes, they include metal rods, laces and various latches that allow the structure to be assembled and disassembled in different ways. |
A do-it-yourself children's kitchen is made from plywood in the same way as ordinary furniture - naturally, adjusted for miniature sizes
Note! Their future owners can also be involved in the production of toys (subject to compliance with safety regulations). Of course, children's works made from plywood are not distinguished by the perfection of their forms, but a child will be much more willing to play with a car or an airplane made independently.
Constructing and transferring a drawing
When we have decided what exactly we will do, we move on to preparation:
Drawing for a dinosaur skeleton
- On graph paper we draw a drawing of all the details of the future structure.
Note! If we use a ready-made diagram, we print it on a printer in compliance with the required scale.
- We place the sheet with the image on the plywood and transfer the drawing through carbon paper.
- As an alternative method, you can prick the key points of the design with an awl, and then connect them with straight lines on the workpiece.
- We cut the plywood with the printed images in such a way that we can cut out one part from one fragment. This is done to make it more convenient for us to work in the future.
Doll chair diagram
Volumetric pendants in an openwork frame
The main feature of these New Year's decorations is a beautiful openwork frame with a slight three-dimensional effect. This simple effect is achieved in a simple way. The oval center of the pendant is carefully cut out according to the template, moved back and fixed with glue. Thus, the openwork frame protruding to the foreground gives additional volume and makes the ornament more interesting.
The rest of the project assumes a standard cutting algorithm. Separately, we note that if you work on a machine, it is better to use #2 or #3 spiral files for this project; they will be easy to cut out not only the openwork frame, but also the main ornament of the decoration. As for the finish, the frame and middle look more beautiful in a contrasting design, painted in different colors. For such decorations, it is best to use alkyd or oil paints, which provide good coverage and color saturation.
Finishing
Naturally, even the most unique figurine needs at least painting in order to be a bright and interesting decorative element.
Before painting plywood elements, they need to be sanded to roughen the surface. This procedure will allow the paint to better adhere to the wooden surface. After processing, it is necessary to remove dust from the wood and degrease the areas intended for painting using a solvent.
Products painted in different colors are covered with masking tape at the paint joints. It is advisable to paint individual areas of such products at intervals to avoid mixing of paints.
You need to paint in several layers, and before applying a layer you need to wait until the previous coating has completely dried.
In this way, the design becomes most durable; the paint will not fade under sunlight and will not come off after atmospheric moisture.
Finally, the prepared surface is opened with varnish; this will make the figure more resistant to natural phenomena. The varnish should also be applied in more than one layer.
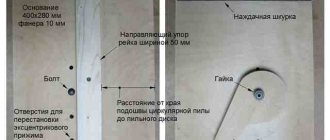
Christmas tree made of plywood with a themed openwork pattern
A voluminous New Year's decoration contains many small details and requires a certain perseverance from the performer, but the beauty of such a craft justifies all the effort expended. You can complete this project as a full tabletop decoration or small pendant by reducing the size of the original drawing.
The project is designed primarily for the use of a jigsaw. The parts are cut out serially, placing two wooden blanks in a stack. This way you will not only spend half as much time cutting, but you will also be less likely to damage fragile openwork parts. For the same reasons, it is more advisable to use thin plywood as the starting material - it is stiffer and easier to work with when cutting detailed patterns.
When both halves are ready, according to the markings on the diagram, two longitudinal slits are made on each part. Through these grooves, the two halves are connected together, forming a free-standing three-dimensional structure. If desired, you can glue both parts together, but practice shows that it is better to leave the decoration disassembled - this way you can more conveniently and safely store the plywood Christmas tree until the next holidays.
Decorative shelves
Plywood shelves are strong and light. Plywood is easy to cut to size. There will be no difficulties with choosing the thickness. No apartment is complete without shelves - reliable keepers of order.
Shelves in the living room usually serve as book stands, in the office they store important documents, in the bedroom a shelf can hold skincare cosmetics, in the nursery - the child’s favorite toys, in the kitchen a shelf is occupied by spices and seasonings.
Sawing snowflakes from wood
What kind of New Year's decor could there be without snowflakes?! Such decorations will always find their place of honor in the New Year's decoration of the house and bring a real holiday atmosphere to it.
Templates for cutting out New Year's snowflakes
Rope horse
The horse used to be the most common wooden toy. Craftsmen made them with their own hands according to drawings to delight children. The horse as a toy was most often made in the form of a rocking chair for younger children. For older children, they made a horse out of plywood, on which they rode, skipping around the room with sabers in their hands. Such a horse allowed boys to play outdoor games.
To make a plywood horse you will need:
- Sheet of plywood.
- Hacksaw or jigsaw.
- Paints.
- Rope.
Before starting work, measure the child’s height; the horse should not touch the floor, so make it from the top of the head to approximately the knee or slightly lower. If the toy is too long, playing with it will be uncomfortable and traumatic.
Manufacturing instructions:
On a sheet of plywood we draw the silhouette of a horse in profile. You need to draw the head to the end of the neck, and then it will just be a long stick
It will be convenient for a child to ride on such a stick and, importantly, hold it with one hand, since it will not be wide. We cut out a horse according to the drawn stencil
The horse needs to be painted so that it is beautiful and colorful; for this we will take a special wood paint. Leave until completely dry. It is recommended to paint only the head of the animal, and not to paint the base on which the child will sit. After the horse blank has dried, we attach a rope to its muzzle - it will serve as a bridle.
That's all. The jumping horse for children is ready, you can sit on it, pick up a bladed weapon and ride into battle with your enemies.
New Year's gnomes
Make a series of these easy Christmas gnome ornaments and use them individually or as a makeshift garland.
DIY New Year's gnomes. Material: plywood. Finish: oil paints
Pattern for the New Year's Gnome project
Garland
Christmas tree beads are an element as important as the toys themselves. This also includes elegant garlands for a tree or room. They can also be made from plywood using the same principle as described above.
Some tips:
- The garland for the Christmas tree should be made in a simple form so that the decoration fits organically into the overall composition. Choose flags, circles and other simple shapes. This will help save time - there will be a lot of elements for cutting and decorating.
- Use satin ribbons and decorative ropes to connect the elements so that the appearance of the product remains solemn.
- To fix the fragments on the rope, tie knots at the location of the element. This way it will maintain its position no matter how inclined the thread is.
- Make loops at the ends of the rope to make it easy to hang the garland.
Sawing out voluminous toys from wood
The aerobatics of sawing wood is mastering the technique of making three-dimensional toys. Outwardly they look complicated, but in reality their creation is not so different from ordinary “flat” sawing. True, here you definitely can’t do without a jigsaw machine, since you will have to work not with sheet materials, but with thick wooden blanks that a manual jigsaw cannot handle.
Let's look at the features of this technique using the example of making a simple three-dimensional icicle.
- First we cut out the blank. In our case, it is a rectangular wooden block. After this, we transfer the pattern template to two faces. In the photo, the front and side projections are the same, but there are projects in which they are different.
- Using a small drill, we drill holes for the blade to pass through, and then carefully cut out the internal waste part. First on one side, then on the other. Carefully remove the waste from the center of the workpiece.
- Now you need to remove all excess material around the perimeter. This operation is done in two stages. First, the waste is cut off on one side (Fig. 3).
- Now the two cut parts need to be taped back together, as shown in Fig. 4. After this, we turn the workpiece 90° and sequentially cut off all the remaining waste parts. Manipulation with tape is necessary for two reasons. Firstly, markings remain on the cut pieces. Secondly, these edges have a flat plane and ensure stability of the workpiece when cutting the second profile.
- As a result of simple manipulations we get an elegant three-dimensional toy.
Now is the time to start putting these skills into practice!
What is a busy board
Busyboard is a developmental board for children with various components. These can be wires, sockets, toggle switches, locks, etc. Translated from English as “a board to keep the baby occupied.”
The toy is designed to keep children occupied and free up time for parents. It turns out that while the child is developing and playing, the mother can do the laundry or cook.
Purpose of the development board
Maria Montessori, a world-famous Italian teacher, suggested using this board for the first time. The essence of the board is the development of a child of any age. Each task in the busy board can be transferred to a more advanced level as the baby grows.
The child can become familiar with the elements of the toy after 6 months: touch the details, feel the difference between textures and develop motor skills. Older children play with sockets and plugs that are inaccessible to them outside the board. Even later, the child understands the purpose of the objects on the busy board. It makes it possible not only to play with them, but also to get a basic understanding of their work.
Recommended age
The Montessori method involves using a similar board from the age of 2-3 years. But almost more than 100 years have passed since they first appeared, and business boards have changed significantly.
From 6 months to 2 years
It is during this period that you can introduce him to the busy board for the first time. It has various materials: textiles, plastic, wood. It is worth adding toys that have sound effects: whistles, bells, rattles and more.
A busy board can distract a child for a long time, but very young children should not be left alone with such a toy for a long time. Manufacturers eliminate dangerous and small parts as much as possible, but it’s impossible to think through everything.
From 2 to 3 years
According to the Montessori method, a child should master everyday skills by the age of 3. Therefore, a modern development board is offered from a younger age. Since these elements are also found in everyday life, and each of them has its own specific function, the child begins to interact with them for the first time through play. He learns to fasten and unfasten buttons and zippers, and open locks.
Busyboard allows him to master these skills earlier, without parental participation and hassle.
From 4 to 7 years
If a child is over 4 years old, this does not mean that he will not be interested in such a board. But in this case, you will have to work hard with the elements, for example, arranging them in the form of different stories, using inserts to create a plot.
This will help the baby look at everything in a new light. Such activities require the participation of mom and dad. You can learn the alphabet on a busy board.
Conventionally, they can be divided into the following types:
| Busy board type | Peculiarities |
| For boy | It differs in color; blue, green, and blue are used. There may be classic masculine elements: wheels, carpentry tools, various equipment, steering wheels. Accessories are often placed: a belt, buttons on the men's side. |
| For girl | It is mainly done in soft pastel colors with a predominance of cream, lilac, pink and others, sometimes there are brighter colors. It is supplied with details typical for girls: cosmetics, mirrors, kitchen utensils. The lacing is done on the shoe, and the buttons are on the women's side. |
| Road busy boards | Designed for use in transport. They are compact, but sufficient for long-term distraction of the baby. Used on the beach, at a party or on vacation. |
| Indoor | They can have different sizes depending on the parameters of the room. Both small ones, from 40 cm in length, and meter-long ones, which attract the attention of guests and can keep the child occupied for a longer period. Attaches to any surface |
| Double sided | They are made in the form of houses with two surfaces. The first one is loaded with various elements; it has many switches and locks. The second is designed for diligent study with a drawing board or magnetic surface to study letters and numbers. |
Puff polar bear
Such homemade toys are made up of several components superimposed on each other. Below is a master class on making a layered polar bear toy craft.
Materials for production:
- Plywood.
- Pencil.
- The paint is white and black.
- Jigsaw or hacksaw.
- PVA glue.
- Paper.
- Scissors.
- Sandpaper.
Step-by-step instruction:
- On a piece of paper, draw a silhouette of a bear with its hind limbs standing on all legs.
- Below, draw another similar silhouette, but in the other direction with the front paws drawn.
- Nearby, draw the head of a bear looking to the side.
- Cut out the stencils with scissors.
- Attach them to the plywood and use a pencil to transfer the image.
- Carefully cut out all parts of the bear.
- The cut areas must be sanded with sandpaper.
- Paint the plywood white on all sides and wait for it to dry completely.
- After this, we glue all the parts, placing one on top of the other. The head will be located on top, the body with the front legs will be in the middle, and the back will be the third part.
- Using black paint, carefully use a thin brush to draw the eye and nose of the animal, and also separate the toes on all paws.
https://youtube.com/watch?v=zN48hHWnHe0
That's all, the beautiful bear toy is ready for playing with children. You can make many more animals and study the fauna of wild animals from them. This style of teaching will look visual and more interesting for toddlers and older children.
https://youtube.com/watch?v=f_07mhrOpXM
https://youtube.com/watch?v=XtNPkQGejY8