Let's say you plan to bring the purchased boards of natural moisture to condition or simply purchased lumber for future use so that you always have it at hand if necessary. There is not always enough space to store lumber in a barn or workshop. Note that wooden boards can also be stored outdoors, in the open air. Only in this case it is important to follow a number of recommendations. Otherwise, due to increased humidity, the wood will quickly become unusable. It can be used exclusively as firewood.
Buying lumber with delivery will not be difficult. Today, in any area you can find a lot of suppliers. Construction markets also have specialized wood sections. Below we list the basic requirements for proper wood storage.
How to save lumber
If wood lies idle for a long time, defects form on it:
- mold and rot;
- insect damage;
- cracks and chips on the sides and ends.
As a result, some boards become unusable, others significantly lose value and service life. To prevent this from happening, you need to immediately think through all the storage nuances after purchasing lumber. The creation of favorable conditions directly depends on the type of wood, the quality of drying and other features.
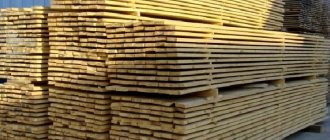
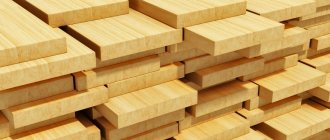
The best storage method is in stacks, where there is the maximum possible number of boards per 1 square meter. This saves a lot of space. It is necessary to lay transverse logs along the edges of each layer in order to shift the force of gravity to the center and ensure good ventilation.
It is impossible to lay lumber on an unprepared surface. To do this, you need to use special stands, which are usually made from non-standard materials. Such measures will prevent debris and soil from getting into the wood, and will also prevent the appearance of mold if the boards are lying on the ground.
Garden cabinet - for tools and more
This idea has been haunting me for a long time. I really want to have a small cabinet for those tools that are constantly in use, so that I don’t have to go to the barn every time to get my favorite shovel, or to the house to get my pruning shears. Moreover, the design of such a structure is extremely simple, it is easy to build, and it does not take up much space. You can even rearrange a miniature storage unit if necessary - it’s no more difficult than moving a closet in your house.
A garden cabinet can be quite small
Although, if desired, the cabinet can be made wider, more spacious and more massive, and on the door you can attach practical containers for all sorts of small things or a folding table, on which it is convenient, for example, to leave a box of seeds or your garden diary, so that you can keep the necessary notes immediately as you work .
A folding table or organizer drawers on the door will add convenience and practicality.
A garden cabinet does not have to be a free-standing structure - you can attach it to the wall of a house or utility room. And good materials and thoughtful design will make this utility facility not only convenient, but also stylish.
A garden cabinet can be not only convenient, but also stylish
The internal space of the storage can also be organized to your taste: make shelves, hang hooks, equip stands if there are a lot of tools in it (for a couple of shovels, I think you can use stands and not bother). Such a structure will not replace a full-fledged shed, of course - it has a different role: it is a place where things that are constantly in use and should always be at hand are conveniently stored.
By the way, now is the time to check your gardening “arsenal” and replenish it with the missing tools. You can select high-quality equipment for any work in the garden in our catalog, which combines offers from large online gardening stores. Choose tools for the garden.
Degrees of wood shrinkage
Its quality and shelf life depend on how well the lumber has dried. Here it should be taken into account that if logging is carried out in the winter-autumn period, it will be of better quality. This is due to the dryness of trees in the cool season.
There are 3 types of wood according to the degree of drying:
- severe drying out - oak, linden, beech, hornbeam, maple, elm, cherry, alder, birch;
- moderate drying - pine, willow, white acacia, pear, elm, poplar;
- weak drying – larch, spruce.
After drying, the material changes its properties and dimensions, so it is better not to perform any manipulations with it until this process is completed.
Protection measures
To preserve lumber outdoors without loss of quality, the following protective measures are provided:
Kiln drying board,
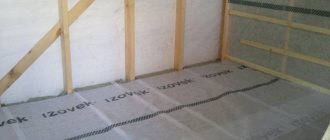
brought to the site in shrink packaging, it is allowed to be kept in an open area.
However, before laying it is necessary to spread a film on the ground to protect the wood from fumes. It is recommended to store such lumber outdoors, especially in winter, for no more than 1 month.
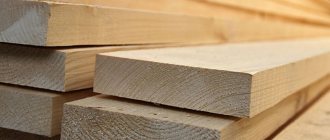
Do you need lumber with natural moisture or well-dried and ready for long-term storage
boards
,
timber
,
joists
? At Veles-Wood you will always find materials of excellent quality. Call and order!
Source
Drying wood indoors
Shrinkage occurs over a long period of time. During this period, it is better to place the materials in a room where the air temperature is slightly lower than in a residential building. You also need to choose a place where the following rules will be observed:
- absence of drafts - otherwise cracks will appear;
- direct sunlight does not fall on the wood - this will allow it to dry evenly and maintain its natural color;
- there are no sudden temperature changes - otherwise defects will appear.
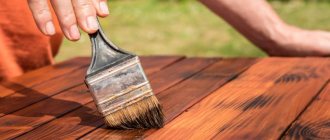
When the workpieces have dried a little, you need to apply garden varnish to the ends. It is a paste made from bee products and natural resin. You can make the var yourself or buy a ready-made one. If you don't have it, PVA glue will do. Such measures prevent further cracking of the wood.
The next step is to position the bars closer to the heat source. For example, a radiator. They need to be turned over from time to time. After complete drying, the boards are ready for use.
About the moisture level of wood
Fresh pine or spruce wood has a moisture content of approximately 60%. After a year and a half of drying, this figure will decrease to 18%. Then the wood can be called only half dry. If the percentage of humidity is even lower, then we can assume that the wood is completely dried.
For construction, materials with a humidity level below 20% are used. Otherwise, the wooden beams will rot. You must take into account that a constant positive air temperature will contribute to even greater drying of the material. For interior work, try to use completely dry wood. This will avoid the formation of cracks and distortions.
How to dry wood outdoors
When it is not possible to dry the workpieces indoors, they can be placed outside. But then it is important to follow the rules:
- A canopy must be installed on top. It will protect the wood from the harmful effects of weather conditions and the sun.
- It is better to cement the ground. If this method is not available, you need to clear all the grass and level the ground, and then cover the surface with roofing felt.
- It is impossible to immediately lay out the beams on the roofing paper. It is necessary to first lay several boards across to ensure ventilation.
All other rules (no drafts, the need to treat with garden varnish, etc.) remain the same.
Shovel hanger
This option, although suitable only for temporary storage, can also be useful.
The dimensions, design features and number of hangers or hooks can be chosen to suit your taste and depending on what is supposed to be placed on them. As a last resort, if the priority is not aesthetics, but cost-effectiveness, it is enough to simply hammer nails onto a wooden rail - such an improvised hanger will serve no worse than a store-bought one.
The idea is extremely simple to implement
You can also use wooden blocks instead of hooks, as in the photo below on the left. And arrange the tools not haphazardly, but in a carefully thought-out order. Such “showcases” are convenient because all the tools are visible, making it easy to find what you need.
On such a “showcase” all inventory is visible
If you approach the matter creatively, such a utilitarian object can even turn into a unique element of garden decor. Some aesthetes create interesting compositions, specially selecting work equipment for them.
By hanging tools, you can create a decorative composition. Not for everybody, of course.
True, I don’t think it’s a good idea to keep tools out in the open; for such compositions it is better to find a place on the veranda or at least under a canopy. A rusty shovel is a dubious decoration, in my opinion, and it will quickly become unsuitable for work.
It is still undesirable to place such decor outdoors.
I use a similar option for storing pruners and hacksaws, but you can hang other tools, the main thing is to choose durable and comfortable hooks of the appropriate size and shape.
In our catalog, which presents products from large online gardening stores, you will find a large selection of different hooks and wall hangers, which are useful not only for storing tools in the country. Choose hangers and hooks.
Basic storage conditions for lumber
To preserve the basic properties of the material, you need to organize storage where all conditions are met:
- Suitable location. Preferably in a closed, dry and sufficiently ventilated area. An alternative option is to select a shady area on a hill and cover it with geotextiles.
- Antiseptic treatment. Treated wood prevents the appearance of mold, rot, fungi and bacteria. Some materials are coated with antiseptic solutions even before sale, but you can apply them yourself.
- Laying. The surest way is stacking. The boards need to be positioned in such a way that there is a distance of 1-2 mm between them in one row. Beams 15-25 mm high are placed transversely between the rows. This placement guarantees adequate ventilation.
- Weather protection. In the absence of a warehouse, you need to organize a shed. In cases where long-term storage is not planned, it is permissible to cover the stack with roofing material (slate, roofing felt, etc.). Under no circumstances should films that create a greenhouse effect be used for these purposes!
- Ventilation. Air circulation protects against moisture and biological damage.
After the lumber has been unloaded, it must be placed in a suitable place within a maximum of 2 days.
Boards can become a habitat for dangerous organisms
Before laying the boards, it is important to carefully check for the presence of quarantine objects. These are pathogenic organisms of a biological species (fungus, plant, insect or animal) that can harm products of plant origin.
We are talking, first of all, about suspicious stains on wood, wood dust (drill flour), which is left by insect larvae and the insects themselves. For example, a seemingly harmless and even cute black beetle - the Great Black Spruce Longhorned Beetle - is capable of not only seriously damaging lumber, but also causing irreparable damage to all nearby coniferous plantings.
It is better to inspect the lumber immediately in the store. But if the product was purchased remotely (by phone or via the Internet), it is important to check it immediately upon delivery to the site.
If a problem is detected, it is important to immediately take measures to eliminate it - contact the local Rosselkhoznadzor Office, whose specialists will carry out disinfection.
Features of lumber storage
A warehouse is considered the best option for storing beams. It should be installed on a hill so that during rain, water does not stagnate on the site, but flows freely beyond its boundaries. According to state standards, the warehouse must be located at a distance:
- at least 50 m from residential buildings;
- at least 100 m from potential sources of wood contamination.
Warehouse space is usually divided into several zones:
- unloading;
- for cutting;
- for placing stacks;
- for storing defective products;
- for disposal.
All areas are fenced off from each other. Loading and unloading should be carried out on trestle-type platforms, where the floor is made of wood treated with an antiseptic.
Preparing a site for timber storage
A properly selected and equipped storage area for profiled timber is half the success. There are several ways to ensure normal conditions for storing lumber. All of them are meticulously described in the relevant GOST. Here we will describe some of them in clear language.
The most ideal platform for storing timber is considered to be a platform made of concrete - monolithic or slab, it makes no difference. As a rule, lumber is stored on such bases by manufacturers whose timber production is on stream. If you just bought a batch of lumber to build a wooden house, it is not practical to build a concrete platform.
A good “substrate” for storing timber is railway sleepers (concrete or wooden). This option is also not available to everyone, but if there is such an opportunity, it is worth taking advantage of. Moreover, to store one house set of such sleepers you will need very little.
Alternatively, the timber can be laid on an area covered with asphalt or paving slabs . In any case, the goal is to avoid laying lumber on bare ground.
If, however, there is nothing described above on the site, and there are no plans in the near future, the timber will have to be stored on the ground . How to do it right? Firstly, it is advisable to choose an area that is located at a higher level. In such a place, the lumber will be better ventilated, and it will not be flooded with water in the event of intense rainfall.
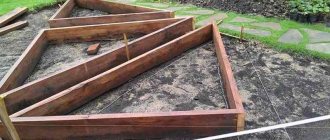
Next, you should build at least a primitive platform from cheap construction lumber. The main task is that the beam should be higher from the soil. At the same time, the site being developed should be as level as possible.
When choosing a place to store a batch of construction timber, you should also ensure that builders have normal access to the material. Accordingly, it is necessary to equip the platform closer to the place where the wooden house is assembled. This will significantly speed up the construction process.
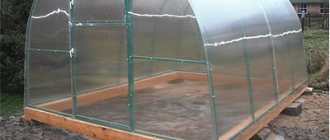
A good step would be to install a temporary canopy over the timber storage area. You can build a primitive cover using sticks and plastic film. Such a canopy will cost almost nothing, but it will help a lot to preserve an expensive batch of timber in proper form.
You can do without a canopy. The alternative is described below.
Stacking is the ideal tree-saving approach
Stacking allows the lumber to be blown with natural air currents. There are several types of stacking:
- Dense - the design does not require gaskets. Suitable for short-term storage in dry rooms when you need to save space.
- Ordinary - boards are laid in parallel rows. Up to 3 layers of gasket are used.
- Dense-row - represents a large number of rows with a spacer between them. This option allows you to simultaneously save space and provide ventilation.
When laying stacks, you must maintain a distance to the nearest wall of at least 1.5 m. Be sure to place bars on the edges of the boards after each layer to distribute the weight. The structure is stable if its height does not exceed its width.
Recommendations for arranging outdoor storage space
To prevent wood from losing its properties for a long time, lumber should be stored in an elevated open area
with good ventilation.
The site must be at least 3.5 m away from the construction site. The surface of the site must be leveled,
preferably further compacted. It will be necessary to make shallow grooves to ensure the drainage of precipitation and melt water.
If there is a lot of lumber, then the area should be sufficient to place stacks at intervals of at least 1.0 m (for pedestrian passage) or 3.5 m (if vehicle passage is necessary). Packs must not be leaned against fences, temporary or permanent structures.
It is prohibited to place materials close to trenches or pits - the distance between the stack and the edge of these objects must be at least a meter.
Antiseptic treatment and stacking
If the lumber has not been treated with an antiseptic before sale, you can perform the procedure yourself. A regular solution of potassium permanganate will do. Don't worry that the dark color will spoil the shade of the board - after drying it completely disappears. However, potassium permanganate is not suitable for processing boards whose shelf life will be longer than 1 month.
The antiseptic is applied with a special sprayer, but you can also use a brush.
When stacking stacks, you should follow the algorithm:
- Place a pad at least 2 cm high on the ground or floor.
- Lay the first layer of boards.
- Place a gasket across the edges. It is necessary to ensure that the width of the beams is the same throughout the entire layer, otherwise the tree will move.
- In this way, layer after layer is laid until the maximum permissible stack height is reached.
If wood is stored outdoors, it must be covered with waterproofing material.
Preparing the stacking area
Wood is capricious. During storage, it can turn blue, rot, deform, or crack, so the issue of storing it must be approached with the utmost seriousness.
The tree can also become unusable:
You should carefully choose a place where the lumber can lie in relative safety from 1 month to 2-3 years. There should be no flammable objects nearby:
The grass under the stacking area should be mowed in advance and the soil should be leveled. It is ideal to cover the soil with black geotextile. It will not allow grass to grow, which will provide additional air circulation. For the same reason, boards should not be laid closer than 0.5-1 meters from the fence and walls of buildings.
Types of antiseptics
Construction supermarkets offer a wide selection of antiseptics. To prepare some, you just need to add water, while others require special substances. The former are preferable, as they are easier to apply and do not emit strong odors.
The most commonly used types of antiseptics are:
- Sodium fluoride. Release form: white powder. It is odorless, preserves the color of the wood and does not reduce its strength. It is used when you need to process a finished product.
- Ammonium silicofluoride. It has the same properties as sodium fluoride, but at the same time it significantly increases the fire resistance of lumber. The downside is that it washes out quickly and is highly toxic.
- Chlorophos. Effective against insects, but emits an unpleasant odor.
- Chlorodan. It is odorless, but requires special organic substances to dissolve.
Separately, oil-based antiseptics are distinguished. They are able to protect against all factors that destroy materials. But at the same time they do not volatilize and are absorbed very deeply, changing the color of the wood, increasing flammability and having a strong unpleasant odor. Used extremely rarely.
Where and how to store garden tools more conveniently: 10 practical ideas
What is the most convenient way for you to store gardening tools?
True, you often don’t immediately understand what exactly will be convenient: everyone has their own habits, their own set of favorite and necessary tools, their own conditions at the dacha, so any idea needs to be adjusted to suit you. And the main thing here is that there is plenty to choose from, so I went looking for ideas again.
I propose to discuss my findings and share my experience: who stores gardening tools and equipment and how, what methods were liked, and which ones may have turned out to be unsuccessful and why.
What is the best way to store boards if there is no warehouse?
Sheds are organized for storing lumber:
- Open. They are located in the direction of the prevailing winds in the area. Suitable for storage in warm seasons.
- Closed. They are erected across the prevailing winds. It is advisable to concrete or asphalt the soil. It is necessary to provide access to the storage area for unloading and loading of about 3 m. The material for the walls is selected so that it protects the boards from the negative effects of ultraviolet rays.
Only healthy wood can be stored outdoors.
Protecting wood from rotting and cracking
All measures aimed at protecting wood materials must be carried out on time and with special care. This will protect the material from a variety of damage. To understand what protection measures you need to take, you need to consider several factors.
- The type and degree of negative impact is humidity, fire, and so on.
- Choosing a wood species that will fully suit the purpose.
- Pre-processing of the material.
- Possible side effects due to chemical treatment.
- The time when protective work will be carried out.
- Need for further wood protection.
- Monitoring the protective measures that are recommended.
To prevent wood materials from deteriorating, it is necessary to use antiseptics. Such substances are usually very toxic. Therefore, before using them, you need to carefully study the properties of the selected drug. Antiseptic substances should not:
- Destroy wood
- Make subsequent processing of the material difficult.
- Contain volatile components.
- Have a pungent odor.
Please note that to treat wood with antiseptics, you need to purchase special protective clothing - a robe, an apron made of rubberized material, rubber gloves, safety glasses and a respirator. The latter can simply be replaced with a bandage made of ordinary gauze, which must first be moistened with water.
The process of processing wood materials must be carried out in a deserted place. It will be ideal to do this outdoors. When the treatment is completed, you will need to wash your face with soap and wash your hands in warm water.
Rules for winter storage of lumber
It is recommended to buy wood in the winter-autumn period. At this time it is denser and drier. In order for the timber to retain its original properties to the maximum, the following conditions must be met:
- Do not install in wet weather. Dry material tolerates sub-zero temperatures well, but if it is wet, it will freeze and deteriorate during the spring thaw.
- Bring the boards to the storage location before the first frost. In autumn, insects look for comfortable “wintering” conditions. If they manage to settle in a tree, by spring there will be nothing left of it.
- Do not store timber in a heated room. It will dry out and become warped.
- Ventilation must be provided. To achieve this, the wood is placed on pallets rather than simply placed on the ground or floor.
- Do not cover stacks with film. It will protect against external moisture, but will not release internal moisture. The result will be mold and rot.
Before laying the boards, be sure to treat them with an antiseptic, paying special attention to the ends. This is where biodefeat begins.
EXAMPLE:
Once I personally had the opportunity to be present during the unloading of 70 m3 of 200x200 timber and 35 m3 of boards, that’s 3 trucks. Those who are involved in deliveries of this volume and size will understand me. For those who are not in the know, I’ll explain that in order to produce 200x200, 3 independent manufacturers had to work and transport round timber from as many as 5 places, plus organizational work to synchronize the arrival of trucks. In general, delivery of such a volume and size at a time to one place is an extraordinary event. I was simply shocked by the attitude towards the material... there are no words at all, only expressions remain. “Bang” a round sum in order to dump the material like potatoes on the “bare” ground... it turns out that the workers will not be paid for unloading!
Think about it: 1 beam 200x200x6m is a “pig” weighing more than 200 kg. It needs to be unloaded and carefully, correctly placed on spacers in a stack (there were about 300 of them there). Is this work really not worth the money? The scale of “stinginess” reaches the point of absurdity!
See prices in Moscow for proper unloading - here!
Naturally, after 3 months, questions arose, because the turn reached the lower rows of timber and boards. Of course they turned green, and the board became moldy in some places.
A good owner lays the foundation in the fall, installs a “well” for the house in the winter and lets it stand for at least six months, i.e., does the final finishing in the fall. But hunting is worse than captivity.
I’ll be honest, building a wooden house at the end of summer is madness, because the degree of shrinkage of the “well” is not even possible to guess. Therefore, be patient and get ready to twist the shrink elements more often in the future.
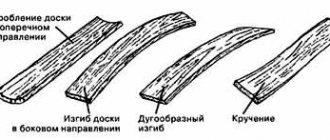
How to deal with deformed material
If it is not possible to purchase new wood, you can use some tips:
- When a small number of boards are deformed, you can try to correct them using a regular plane. To do this, you need to firmly fix the beams and remove irregularities. It is better to use a tool with a long sole. This will avoid "waves".
- For large-scale deformation, you will need an electric plane. The processing principle is the same.
When trying to return lumber to its original properties, you need to understand that it will not be possible to completely fix it. That is why it is recommended to initially organize proper storage of wood.
How to organize the storage of boards at the dacha so that it is neat and the material does not deteriorate
Construction on a summer cottage is a troublesome and unpredictable task. Many summer residents prepare for construction work in advance: they purchase the necessary lumber, tools, dry building mixtures and store it all on their site.
If there are no problems with storing small-sized items - they can be placed in a specially equipped room (a utility room, a shed for garden tools), then it is wrong to simply stack several cubic meters of boards, the length of which reaches three or more meters, near the fence.
In order for the lumber to successfully survive until the start of construction work and then be able to serve for many years, it is important to properly preserve it.