In our country, suburban housing has private plots, which are usually used for gardens and vegetable gardens. A spacious and dry cellar in the house is necessary to preserve the harvest. An office space for this purpose can be arranged in the basement under a residential building, garage or barn. It is also possible to build a separate structure. The final decision on the location of the cellar should be made based on the results of a study of the house and land.
Double floors
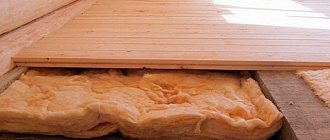
For better insulation in a wooden house, they often resort to a double floor system.
The first layer in this case is the so-called subfloor - untreated boards attached to the floor beams, if we are talking about the second floor, or to the joists. Wood itself has low thermal conductivity. The top layer - the finished floor - is laid on the bottom, sometimes through joists with additional insulation. Next comes the installation of the decorative coating. Double flooring is done as follows:
- timber logs are mounted on the provided mortgages;
- a subfloor is laid on the joists, most often from unedged boards;
- then thinner logs are laid, the space between them is insulated with the selected material;
- This is followed by a finishing floor made from edged boards or floor tongues and a finishing decorative coating.
If necessary, communications can be placed between the two layers - water pipes, electrical cables in corrugated pipes, etc.
It is important to carefully monitor the tight fit of the subfloor boards to each other; if there are gaps, they can be filled with polyurethane foam. If edged boards are used, cracks in the finished coating can be filled with special wood putty compounds.
Conclusion
The underground of a wooden house must be carefully protected from moisture coming from the soil, insulated in order to maintain optimal temperature conditions at any time of the year and provided with high-quality ventilation. Only then can you be confident in the durability of the entire structure (see also the article “How to remove the creaking of a wooden floor or stomp on your health”).
A dry underground is a guarantee of the longevity of a wooden building
The video in this article will introduce you to additional materials that are directly related to the information presented. Monitor the condition of your home's subfloor.
Features of floor construction on the first floor of wooden buildings
When installing a floor on the lower first or basement floor of a wooden house above unheated basements, certain features are present.
Cold floor located directly on the ground (without underground)
A cold floor located directly on the ground (without an underground) is built when there is dry soil under the house and when the ceiling of the first floor of the building is high. The underground of such a floor consists of 4 layers:
- compacted sand cushion;
- dry, clean, calcined sand;
- logs (beams made of coniferous trees with a thickness of more than 15 centimeters), buried in the poured soil base and resting on recesses in the external walls of the room;
- single plank flooring with a thickness of 30-40 mm.
Insulated floor with unheated underground space
Installation of such a floor is recommended when the groundwater level is high. In this case, the logs are placed on pillar supports (made of brick or cast concrete monoliths).
The procedure for constructing an insulated floor with an unheated underground space
- Placement in the underground of a pillow made of compacted sand cleared of organic matter (thickness 10-15 cm).
- Installation of support posts at least half a meter high. A very simple and economical way to install supports is to pour concrete mortar into sections of vertically standing pipes with a metal frame inside.
- Laying a double layer of waterproofing on the surface of the supports.
- Placement of wooden dies 30 mm thick.
- Laying load-bearing joists.
- In order to thermally insulate the floor when using this technology, slats (about 15 mm in cross-section) are nailed to the side ends of the joists, on which a rough floor layer of cut unedged boards is laid.
- A vapor barrier film and an insulation layer are laid on the rough flooring layer (the flooring level is just below the finished floor). A plank floor or wood board covering is laid on top of the beams.
Cold floor with heated underground space
A cold floor with a heated underground space is used in construction on soils with low soil water levels. The technology for its installation is the same as the previous one, up to the stage of installing the subfloor. After installing the logs, a finished floor is mounted on top of them without creating a heat-insulating layer.
Watch the instructional video to learn more about the construction steps.
Setting up a glacier to preserve food
On the site, in addition to stationary basements, you can build a storage facility that is a little simpler, for example, a pit, a pile or a glacier. Let's take a closer look at how to properly build a glacier.
The glacier serves to preserve food and is a room buried in the ground, which has an ice chamber, a compartment for storing food and a vestibule. Glaciers can be divided into three types, which are determined by the method of filling the ice: bottom, side, top filling. The simplest option is a glacier with a top filling of ice, but at the same time, the arrangement of a water drainage system becomes more complicated. The glacier is loaded once a year.
The location of the glacier on the site should be selected taking into account its distance from the garbage pit, yard latrine and other sanitary facilities. A pit for arranging a glacier is dug in a rectangular shape with the most acceptable dimensions: length - from 1.5 m to 2.2 m, width - 2 m, and depth of the pit - from 2.2 m to 2.5 m. Wall cladding should be done with brickwork , logs, which must be treated in advance with an antiseptic or rubble stone. The floor is laid with bricks or cobblestones.
Above the ground, the glacier is erected up to 3 m high and covered with a continuous plank sheathing. On the outside, the covering and walls should be covered with a layer of a mixture of crumpled clay and straw, and then covered with a layer of dry earth at least 30 cm thick. The outer layer of earth should again be coated with clay up to 3 cm thick and the entire surface should be covered with turf.
To increase the shelf life of ice in the glacier, it can be covered with matting, a layer of shavings or sawdust. To enter the glacier, you need to equip a vestibule with good wall insulation.
Proper ventilation
With proper ventilation, moisture from under the house will be removed in a timely manner. In this case, the subfloor will be dry and will not be subject to destruction.
An vent for ventilation of the space under the house.
The basement of the house must have vents to ensure normal ventilation of the underground space. Several vents need to be made during the construction stage of the house.
The subfloor must be constantly ventilated, even if the house is on dry ground. During rains, moisture will inevitably penetrate into the foundation of the building, after which it will begin to settle in the form of condensation on the main structures. And this, in turn, leads to damage to the main communication systems of the house, as well as conservation and supplies that you could put away in the underground.
With high humidity and lack of ventilation, wooden structures will quickly become covered with fungus and begin to collapse.
In this case, you can make the ventilation system yourself. To do this, it is enough to make small holes in the underground, the diameter of which should not be large (10-15 centimeters is enough)
It is important that at sub-zero temperatures the owner can close these holes, and at positive temperatures they can open them
The main thing is that the subfloor must be systematically subjected to preventive inspection for any deviations from the norm. Condensation, mold and mildew, destruction of structures, the presence of insects - all these are signs of improper operation that must be immediately eliminated by any means.
Website editor-in-chief, civil engineer. He graduated from SibSTRIN in 1994, since then he worked for more than 14 years in construction companies, after which he started his own business. Owner of a company engaged in suburban construction.
Types of underground premises
The underground can be warm or cold. For dachas and houses that are not heated in winter, a cold underground with an insulated floor covering is preferable. The temperature of such an underfloor does not depend on the temperature in the room (above the floor) and, to a greater extent, is determined by outdoor climatic conditions. There is no air exchange with the room and underground. Ventilation is carried out through vents in the base.
A floor with a warm underground is installed in heated houses. Its temperature is directly related to the room temperature, thanks to the ventilation holes in the floor. To limit heat loss, the inside of the base is insulated.
It is unwise to create a warm underground in rooms that are not heated in winter. In winter, the ground will begin to freeze, causing the floor to deform. The depth of a warm subfloor is usually 15-25 cm. At a greater depth, heat loss increases, at a shallower depth, ventilation deteriorates.
Let's consider the process of installing a floor with an underground, paying attention to the differences between the cold and warm options.
Active cellar drying
When using the ventilation system described above, the cellar dries naturally. But sometimes - especially in the spring - problems with excessive air humidity in this room still appear. The easiest way to dry is to use ordinary candles. Technologically, this operation will look like this:
- Extend the inlet channel almost to the floor. In this case, it is worth using an extension from a piece of metal pipe.
- Place a lit candle under it.
- Change it as it burns out.
The candle should be installed in some metal container. A fire can occur even in a damp basement. Of course, the candle should be installed in such a way that it does not heat the edge of the pipe. This method can dry the basement in a couple of days.
Ventilation system design
Proper basement ventilation system
To create an optimal microclimate in the basement, good ventilation is needed, the main function of which is to ensure air circulation. If there is no movement of air masses, dampness and humidity will constantly be present in the basement, which, even with high-quality insulation, threatens the appearance of mold and fungal colonies.
To install a ventilation system in the basement, two pipes are installed on different sides, usually on the south and north. One pipe serves to bring in fresh cold air, the other removes warm air from the room.
When installing pipes, you must be guided by the laws of physics, according to which cold air always tends downward, and as it heats up, it rises to the ceiling.
Therefore, the lower part of the supply pipe is located at a distance of 20-30 cm from the basement floor, and the upper part - 40 cm from the ground. The hole in the pipe that goes outside is covered with a fine metal mesh to prevent rodents. The lower part of the exhaust pipe should be 30 cm below the ceiling of the cellar, and its upper part should lead to the roof.
How to deal with dampness under the house?
Having completed the installation of a cellar in the house and begun its operation, many are faced with the problem of dampness. How to prevent condensation from accumulating on the walls of the storage facility, and moisture from penetrating into the living space?
The optimal solution in this case seems to be a do-it-yourself effective ventilation device. The ventilation system for the cellar should consist of two pipes. Through one pipe, fresh air will flow inside, and through the other, on the contrary, it will go outside. You can use any pipes: special ventilation pipes or ordinary ones made of polyvinyl chloride (which are usually used for sewage).
If your house has a small cellar, then you can make ventilation with just one pipe, which will be responsible for both air flow and exhaust. When the size of the cellar is significant, it is recommended to install special devices inside the ventilation pipes that will forcefully pump air out of the storage facility, preventing it from stagnating, leading to the formation of condensation.
The insect can enter the cellar through the ventilation.
The exhaust pipe must be brought to the roof of the house. The lower part of the exhaust pipe must be installed under the ceiling of the cellar (in accordance with the laws of physics). The lower part of the supply pipe is installed at a height of 20-30 from the cellar floor, and the upper part can be discharged through any window. The supply pipe must be equipped with a metal filter, which will protect the cellar from debris and pests. In turn, a deflector can be installed in the exhaust pipe, which will increase draft from the cellar in windy weather.
Website editor-in-chief, civil engineer. He graduated from SibSTRIN in 1994, since then he worked for more than 14 years in construction companies, after which he started his own business. Owner of a company engaged in suburban construction.
We will learn how to arrange a cellar under the house with your own hands for convenient storage of supplies, from root vegetables and potatoes to your own canning.
To store root crops and potatoes in a country house or country house, a cellar under the house is often used. Arranging a cellar in the basement has a number of advantages: you don’t need to go anywhere to buy vegetables, they are always at hand, in addition, there is no need to install insulated walls and ceilings, since the temperature in the basement of a heated house is almost always above zero. Among the disadvantages, it should be noted the increase in humidity in the basement, however, this disadvantage can be easily combated by arranging exhaust and supply ventilation.
How to make a cellar under the house
- Determination of groundwater level and cellar depth
- Cellar technology and construction work
It is possible to build a cellar under a house with your own hands both at the stage of laying the foundation and after building the house. In the first case, the task is greatly facilitated by the fact that full access to the basement is provided for excavation work. In the case of building a cellar in a finished house with ceilings and laid floors, the task is complicated by the fact that you will have to dig a pit by hand and remove the soil from the room.
Determination of groundwater level and cellar depth
One of the requirements for arranging a cellar in the basement of a house is to deepen it by 1.5-1.8 meters, otherwise the temperature in the cellar will rise above +8°C, and vegetables will not be stored well. In order to deepen the cellar, it is necessary to find out the groundwater level in the area. If the construction of the cellar is carried out simultaneously with the construction of the foundation of the house, this task is simplified - before the start of construction, a geodetic study of the site is usually carried out. If you decide to make a cellar in a house that was built a long time ago, you need to determine the maximum groundwater level yourself.
There are several ways to find out:
- Drill a well to a depth of at least 2.5 meters and, leaving it for several days, observe whether water appears in it;
- Find out the water level in the nearest wells.
- It is necessary to check the groundwater level during active snow melting and flooding, or during prolonged autumn rains. It is then that it will be maximum, and when determining it, it is possible to reliably determine whether the water rises to the required height.
If the groundwater level is closer than 1 meter to the floor surface of the house, you will have to abandon the installation of a cellar in the house and build a remote cellar in another place. If it fluctuates at a level of 1-1.5 meters, you can try to reduce it by installing a drainage system around the perimeter of the house deeper than the expected level of the cellar floor. In this case, the walls of the cellar will need to be properly waterproofed, and a clay hydraulic lock will also need to be installed around them.
Walling
The best option would be to make monolithic concrete walls. But if you do the work in the house yourself, you will have to order ready-made concrete, since it will take too much time to create the required volume of solution yourself.
When ordering concrete, you should inform an employee of the manufacturer for what purposes the solution is intended, so that the builders add a special mixture to the solution, which will create penetrating moisture insulation.
Before pouring, you should prepare formwork from boards and bars. It is better to use planed lumber to make the structure easier to disassemble.
Important. When creating walls, you need to provide ventilation ducts, as well as install electrical wiring in advance if it is planned to be hidden.
After pouring concrete, it is recommended to pierce the surfaces of the walls with a steel rod to remove foreign air from the solution.
After about 7-10 days, the formwork can be removed, but the concrete will “stand” completely in another 4-5 weeks.
Start of work - installation of the subfloor
A subfloor when installing plank flooring is necessary for several reasons:
- To increase the operational life of the structure due to the presence of high-quality floor ventilation.
- It serves as a solid base for laying insulation and finishing flooring.
- Makes the frame of the building more rigid.
Before starting work on the installation of the rough structure, check the following:
- The wood chosen as the material for the construction of the subfloor must have an optimal level of humidity - this will eliminate possible deformation of the structure during its subsequent use.
- The boards should not have obvious defects.
- If an inexpensive board can be used for the subfloor, then for the finished floor it is purchased with a reserve, so that later you do not have to look for material of the same shade.
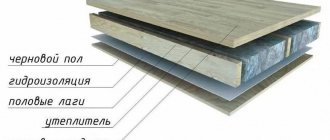
Double floor
Preparation
Installation of the subfloor can be carried out both on the ground and on the floors. In any case, it is necessary to carry out a set of preparatory measures:
The walls of the building must be equipped with ventilation windows, closed from the outside with special grilles. All wooden parts are treated with antiseptic compounds to increase the service life of the structure. Taking into account the size of the room in which the floor will be installed, calculate the required amount of material. Throughout all work, it is important to monitor the horizontal position of the floor structure to prevent the formation of a slope. Timber and logs are subject to processing, in which they are cut to eliminate slopes and bevels.
Treating boards with an antiseptic
Laying the subfloor
To ensure that the floor does not creak, does not vibrate, is smooth and warm, it is necessary to pay special attention to the laying of the subfloor and, first of all, to the joists
Attaching the log
The logs should be suspended on the beam supports in increments of 60 cm - insulation will be laid in the gap formed. It is not worth saving on beams in order to avoid sagging and vibration of the floor during operation.
The step can be reduced if the load on the coating is to increase
Where heavy equipment, such as a stove or fireplace, will subsequently be installed, the floor is reinforced by placing beams in 30 cm increments.
Additional lag fixation
Fastenings in such places are also further reinforced.
The process of attaching slats
At the bottom, beams are nailed across the beams. Between floors, beams are nailed along the beams - this will save the height of the room and, if necessary, use the upper beams as a decorative element in the interior after their additional finishing.
Fastening bars along beams
In the gap, an OSB sheet is laid on the beams.
Laying OSB sheet
After this, mineral wool slabs are laid in a checkerboard pattern, and on top there is a continuous layer of vapor barrier, which covers the logs and is fixed with a construction stapler. The vapor barrier seam is taped.
Laying vapor barrier
The second layer of vapor barrier is laid overlapping, and a ventilation gap is formed on top. To do this, use a 40 x 100 mm block, screwed to the floor joists. The finishing floor will be installed on top of these bars.
Bar for organizing ventilation
Design of a vegetable storage shed
On waterlogged soils, where it is not possible to build a dry cellar, you can build a vegetable shed - an above-ground vegetable storage. A free-standing structure differs from traditional cellars in that there is no need for insulation of the ceiling, therefore this storage requires less physical construction costs and is cheaper.
The storage shed is a frame structure. When planning the construction of a vegetable storage facility, you should know that using wood that has been used is not recommended. For example, old boards from a dismantled house, since the likelihood that such wood is infected with fungus is very high. Dead wood is not suitable for the construction of a storage shed.
The frame of the vegetable storage is made from sanded logs selected in diameter from 0.13 m to 0.22 m. The logs are dug to a depth of about one meter, connected at the top with strapping. The ends of the logs are treated with hot bitumen. The roof slopes are made of continuous plank sheathing, which is covered on top with a sheet of rolled roofing felt in two layers.
This structure involves embanking the structure with earth from bottom to top. From the base, the thickness of the embankment should be at least 60 cm, towards the top - 40 cm. It is better to take peat soil for embankment - it is a poor conductor of heat. It is recommended to cover the top of the soil with turf plates or sow it with grass.
In the middle part, the height of the storage shed should not be more than 2 m, since vegetables may freeze. In general, the storage shed should turn out to be a squat structure - like a hut.
The vegetable storage area must be protected from drafts. This issue can be resolved, for example, by covering one end of the building with a pair of rows of boards, between which a layer of roofing felt should be laid. At the same end you can also install a low insulated door.
A storage shed is usually built up to 3.5 m wide, and a vegetable storage facility can be built up to 5 m long or more. One side of the passage, approximately 70 cm wide, can be equipped with lattice bins, and the other side can be equipped with shelves.
It is recommended to select a site for the construction of a storage shed on dry sandy subsoils, where it is possible to bury the building into the ground. The buried vegetable storage, due to heating by soil heat, maintains normal levels of humidity and temperature inside.
If high groundwater is detected at the construction site, the storage shed should be made into a ground structure. In any case of construction around the cellar, there is a need to dig a not very deep drainage ditch, which will protect the storage shed from rain, surface and melt water.
Near the ridge in the roof there is a need to install an exhaust system, for example, a wooden box with a valve for adjustment. In the case of an extended storage structure, a pair of ventilation pipes should be installed.
There are collapsible storage sheds that can be built in the fall, if necessary, and disassembled in the spring. These warehouses are convenient and practical in that they can be disinfected annually.
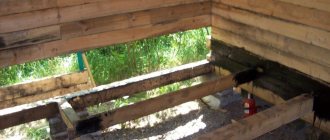
The underground of a private house - operating features
The underground of a house, in most cases, is the place where various communications, water supply, cable ducts, and sewer pipes are laid. It is the subfloor that protects the lower parts of the walls and the ceiling of the basement from the effects of wet soil and cold. For this reason, the subfloor must always be dry.
If condensation begins to form in the underground, then the materials of the walls and ceilings gradually lose their performance characteristics, which causes many problems to arise during the operation of the building. On the contrary, if the underground is always dry, then it can even be used as a small cellar where canned food will be stored.
Temperature control
If you are buying a country house or cottage, then after inspecting all the external structures of the building, be sure to look into the underground, which should not have noticeable defects or signs of freezing of the elements of the house. After purchasing a home, it is best to monitor the temperature in the basement throughout the winter season.
You need to monitor the temperature in summer too. Special electronic devices are excellent for this, which are capable of remembering and displaying limiting positive and negative values. The temperature in the underground should be approximately the same as in the cellar (in the summer, it is usually slightly higher, but there is nothing to worry about).
If water begins to freeze in pipes located underground, this is a clear sign that additional heating of the room is needed. In this case, a special convector can be installed in the underground floor, which will maintain a constant optimal temperature. In summer, appropriate thermal insulation work can be carried out.
If you do everything correctly, the subfloor will have excellent performance characteristics, which will allow you to properly operate all the main structures of the house.
Parquet for renovation
Parquet as a floor covering has been known since the 17th century, when it was first used in the palaces of the kings of France. The main advantage of parquet flooring is its environmental friendliness. Modern manufacturers offer a wide selection of colors, sizes and methods of laying parquet and parquet boards, which allows you to renovate the floors in a room in a style unique to each room.
Before laying such a covering, the floors are leveled with a special screed so that the differences in the heights of uneven surfaces do not exceed half a centimeter. Next, the humidity of the room is determined, for which a small piece of plastic film is laid on the floor for a day, the edges of which are secured with tape. If there is high humidity in the room, the film will become covered with perspiration from the inside. In this case, it is not recommended to lay parquet.
The disadvantages of this coating are the high price and instability to moisture. Also, this material cannot be used when installing “warm floors”.
Moisture protection
Each built house, as a rule, has a special hatch through which you can go underground. When there is no such move, you need to make it yourself. All underground structures in a wooden house must be systematically inspected for their condition.
In old houses, there are hatches in the floor not only for people, but also for cats.
Every year you should inspect the foundation of the house, floors, and lower crowns in a wooden house. Wooden structures must be free of traces of fungus and insect nests.
If the area is low-lying and the soil is wet, then underground the surface of the earth should be covered with some kind of waterproofing material. It is recommended to leave the middle part open to ensure ventilation. When the surface of the earth is covered with waterproofing, the underground will not become waterlogged during rains, so condensation will not appear on structures in a wooden house or cottage. It is necessary to waterproof the soil only if the soil in the dacha near the house is really damp.
Choice of insulation
The first question that arises before starting work is: how to insulate the basement from the inside? Today there are many materials suitable for cellar insulation. Let's list them:
- Styrofoam;
- mineral wool;
- ecowool;
- polyurethane foam;
- expanded polystyrene
- expanded clay
Each insulation has both pros and cons. Polystyrene foam is an inexpensive and durable material, but it is highly flammable and releases toxic substances when ignited.
Ecowool and polyurethane foam are sprayed insulation materials that have excellent thermal insulation characteristics. The materials are able to completely cover the entire surface, right down to the most inaccessible areas and small crevices. But their application requires special equipment, as well as skills to work with it, so insulation is quite difficult to do with your own hands.
Mineral wool has low thermal conductivity, retains heat well, but strongly absorbs moisture and steam. In this regard, it is undesirable to use it for thermal insulation of baths and saunas. When using this material to insulate a log house, it is necessary to install high-quality hydro- and vapor barrier. It is best to finish the top of the heat insulator with water-repellent materials.
Extruded polystyrene foam. It practically does not absorb moisture, has low thermal conductivity and light weight, and is easy to install. But the material breaks easily, so you need to be careful when working, and after installation the insulation must be reinforced with mesh.
Insulating the basement floor with expanded clay also gives good results. This natural insulation consists of porous granules with excellent thermal insulation characteristics. The advantages of the material are also non-flammability, low cost, and low weight. Disadvantages: fragility of granules and high water absorption.
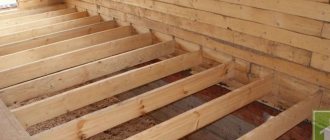
Do-it-yourself wooden floors in a private house on joists
One of the flooring technologies is to build wooden floors in a private house on joists.
- We prepare a high-quality base: remove part of the soil (5 - 10 cm), pour out sand and tamp it.
- We lay crushed stone of the same thickness on top and compact it again.
- We lay a vapor barrier (roofing felt, oilcloth) and begin laying the logs on the racks in approximately half-meter increments.
- We fill the space formed between the joists with a heat-insulating pad.
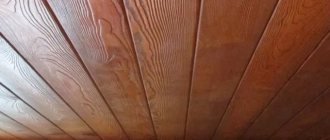
Wooden floors in a private home have a subfloor on which the final covering is laid. This completes the formation. Next, all that remains is to clean it and varnish it.
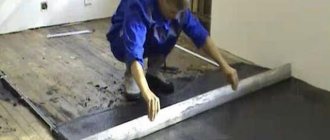
Waterproofing paints
Such paints are mixtures of bitumen and polymer components that impart water-repellent properties. Such compositions should be applied with a brush and in several layers. Thus, the wood will receive a high-quality moisture-proof layer. Also, similar paints can be applied to the screed.
You can start painting with a waterproofing compound only after the following procedures:
- Sanding wooden floors.
- Cleaning floors from dust and dirt.
- Drying wooden parts.
- Careful treatment of hard-to-reach areas (joints between joist frames and walls) with waterproofing varnishes.
- Painting the rough base.
About the basement
What is a basement? In simple terms, a room under the house. Basement construction has its own special technologies, which include waterproofing the basement, waterproofing the outer wall of the basement and the foundation. Waterproofing protects the basement, and therefore the house, from moisture and water getting under the house. However, the technology for building basements does not provide for mandatory insulation of basements and, even more so, does not provide for heating wiring in the basement, and especially in the underground.
But not only the basement, a room in the house for storing separate household belongings, but also the underground is a source of cold air penetrating into the house. The underground of the first floor is formed between the walls of the strip foundation, as well as all other foundations other than the monolithic foundations of USHP and RPP. By definition, a crawl space is a cold, well-ventilated space under the house. Ventilation is provided by special ventilation holes in the foundation (vents). Mandatory backfilling of soil and layers of crushed stone and sand in the underground do not save you from the cold.
All these features impose the main requirement on the floor of the first floor of a private house - its insulation. Floor insulation is standardized by SNiP 02/23/2003 “Thermal protection of buildings”. More about architectural design at the Institute of Territorial Development.
Types of underground premises
There are two types of underground: warm and cold. Cold is used for houses that are not heated during the cold period; for this purpose, the floor is additionally insulated.
In such a subfield, the temperature depends on the temperature outside, and not in the house . Ventilation in the underground of a private house is carried out through vents in the foundation of the house; there is no air exchange with the interior of the house.
Floors with a warm underground are made in houses with permanent residence and heating. The temperature in the underground depends on the temperature in the house, since it is connected to the interior by ventilation vents in the floor.
Most often, the depth of the warm underground is 15-25 cm. With a depth of more than 25 cm, heat loss increases, with less, ventilation will deteriorate.
Organization of the underground
Let's consider several stages, the implementation of which guarantees you a high-quality subfloor:
Stage No. 1: preliminary
The preliminary stage refers to the period of construction of the building itself and includes the completion of certain tasks:
- Before making an underground in a wooden house, the ground level should be raised using imported soil. This way you will protect the building from flooding with high water.
- Wooden buildings quite often use a pile foundation, but in the case of creating a functioning subfloor, it is better to lay a strip foundation, which will simultaneously act as the walls of the basement space. A solution with the following composition is quite suitable for this task:
| Ingredient name | Ratio |
| Cement | 1 |
| Sand | 3 |
| Gravel | 5 |
| Water | 4,5 |
The strip foundation is also the walls of your underground
- Clean soil should not be left under the building during construction. Then a fair question arises: how to fill the underground floor in a wooden house? Sand is best suited for this purpose.
Sand to create a “cushion” under the building
We install a hatch in the floor in order to have free access to underground maintenance in the future.
It is especially important to ensure that fungi and wasp nests do not form on the wood.
Retractable crawlspace hatch in wooden floor
Special passage under the floor for a cat
Next, the building is erected according to generally accepted rules.
Stage No. 2: waterproofing
One of the options for its implementation looks like this:
- Backfilling is not done with clean sand, but mixed with gravel.
- Then we carefully compact the “pillow”.
- Lay sheets of roofing felt overlapping.
Layed roofing felt
- Mix the cement mortar from the following components:
| Ingredient | Ratio |
| Cement | 1 |
| Sand | 2,5 |
| Water | 2 |
- Pour the resulting mixture in a thin layer over the roofing felt layer.
Thus, with your own hands you create a kind of moisture-proof stone bag under your own wooden house, which guarantees its protection from earthen dampness.
Universal antiseptic for wood
Stage No. 3: thermal insulation
Insulation of the subfloor in a wooden house with basalt wool
For the subfloor, it is not so much the insulation itself that is important, but rather the thermal insulation, since maintaining coolness in the summer is no less important for the durability of a wooden building than retaining heat in the winter. How to insulate the underground in a wooden house on your own? To do this, you can use one of several types of suitable materials:
How to insulate the underground in a wooden house on your own? To do this, you can use one of several types of suitable materials:
| Name | Peculiarities | Application |
| Mineral wool |
| We spread the roll and lay it on top of the waterproofing. |
| Expanded polystyrene |
| We lay out the sections in a convenient order, cutting them in the right places. It can be easily mounted on a vertical base surface using dowels and self-tapping screws, which allows for more effective thermal insulation. |
| Expanded clay |
| We fall asleep at the bottom of the underground. In this case, the free space is significantly reduced due to the thickness of the backfill, which can negatively affect ventilation. |
Thermal insulation of the base of a wooden building with polystyrene foam
Before insulating the underground in an old wooden house, carefully check the condition of the crowns and strengthen the waterproofing.
If everything is done correctly and the desired result is achieved, the space under the flooring can be used as a cellar.
Stage No. 4: ventilation
Basic underground ventilation in a wooden house
The fact is that even on dry soil and with high-quality waterproofing, condensation may occur inside the space under the building. This factor can cause damage to communications laid under the floor and products released for storage, not to mention creating optimal conditions for the formation of mold.
Mold under a wooden structure
In order to dry the subfloor, an effective ventilation system is created.
The simplest one is done as follows:
- Along the perimeter of the base we make several holes, depending on the size of the building, no more than fifteen centimeters in size and no less than ten.
- We install grates on them so that pests cannot get inside.
- We close some for the winter to regulate the optimal temperature.
https://youtube.com/watch?v=2sqMYs6ZDRc
General provisions
First, let's highlight the functions that underground space in a wooden building provides:
- Protection of the floor structure from the negative effects of excessive humidity. The earth in our climate zone is always saturated with liquid, be it precipitation or groundwater. Direct contact of wood with such an environment leads to the occurrence of rotting processes, which is where the creation of such an intermediate dry zone as an underground is required.
- Increasing the thermal insulation of the house. A kind of air cushion in combination with insulating materials will make your home warmer, which is especially valuable in winter.
- Convenience of laying all necessary communications. Sewage, water supply and electrical networks located under the floor do not disturb the interior and do not interfere with free movement around the rooms.
An example of laying communications under the surface of a wooden floor
- Possibility of use as a cellar. A properly equipped underground will do an excellent job of storing food.
Underground with products
Cellar disinfection
If rot and mold have settled in the cellar, you will have to disinfect it from time to time. First, remove the mold with a brush and tightly close the exhaust and supply ventilation pipes. A good method of disinfection is treatment with steam generated by slaking lime. In this case, all insects, mold and fungi die.
We suggest you read: How to grow scabiosa from seeds
Collect quicklime, approximately two to three kilograms per 10 cubic meters of cellar. Pour it into a barrel or tank of water and quickly leave the cellar. Close doors and ventilation ducts tightly. After two days, the cellar can be opened and thoroughly ventilated.
Ladder and manhole cover
The simplest solution to the question of how to easily build a staircase in a cellar is to use boards and bars of wood. If desired, you can use concrete or even metal. It all depends on personal preferences and capabilities.
It should be noted that wood will require impregnation with special compounds (to prevent rotting), and metal will require painting with a primer.
There are many types of stairs, for example:
- stationary wooden;
- complex concrete staircase;
- retractable.
Don't forget about the hatch
The hatch cover can be made hinged (hinged) or completely removable, it depends on how large the hole is inside and where it is located.
Measures to prepare the cellar for winter
There are a number of other important measures that will help your basement meet the winter fully armed. Timely implementation of such work will help preserve the harvest for a long time.
Wall treatment
Treat the walls. If the basement has brickwork, then whiten the walls using a lime solution, adding copper sulfate to it. After completing the procedure, ventilate the room well.
Disinfection
There are other methods to prepare a cellar for winter. For disinfection, you can prepare a solution of potassium permanganate or tobacco decoction.
Safe descent
To build a staircase that will lead you to the basement or cellar, you also need to consider:
- it should be simple;
- comfortable;
- have a certain level of inclination;
- width of steps.
Since you will most often be going up and down it empty-handed, such a simple staircase will reduce the risk of falling and injury. The most optimal angle of inclination for stair steps is forty-five degrees, and their width should not be less than twenty centimeters.