1284 0 0
Petr Pirogov June 22, 2018
I have liked boxes since early childhood, and the very first one is still preserved. I keep several old letters in it.
A couple of years ago I made a book that had a secret compartment with a locking mechanism. But it was complicated, and I came up with a new design with a lock on the cover. I'm ready to show you the result.
What can you use to make a simple DIY jewelry box?
The box performs two functions:
- You can store various jewelry, jewelry and hair accessories in it.
- It is a stylish element in the interior.
A beautiful jewelry box always attracts the attention of girls, women and even little girls. It’s hard to argue with the fact that women really love this kind of cute little things. Although you can’t say that the box is a necessary thing in a woman’s room, rather an unusual and beautiful box, in addition to being practical, plays an aesthetic role.
A lot of hairpins, rings, bracelets and other jewelry, without which many girls and women cannot imagine their lives, can be carefully stored in a box. You can buy a ready-made jewelry box, but we suggest making it yourself. A handmade box has many advantages:
- Low cost of materials.
- Unique design.
- Handmade, which is always appreciated.
- You can determine the optimal size and shape of the box yourself.
To make a box with your own hands, you don’t need to buy any materials. You can make a beautiful thing from the materials you have at home. For example:
- Paper
- Cardboard
- Old shoe box
- Tetrapack for milk or juice
- Plastic bucket for mayonnaise or other products
- Egg container
If you have beads, buttons, colored paper, leftover fabric, ribbons and other decorative elements, you can decorate the box beautifully. It is not necessary to do everything as in the photo; you can add something of your own when decorating the box. This will make your box unique.
You can make handmade boxes not only for yourself, but also as a gift. This cute little thing will not leave indifferent the majority of women and girls of different ages. You can create handmade boxes to earn extra income. If you like to fantasize, craft, and create something beautiful and aesthetic, then you will like this activity. We have collected many ideas on how to make and decorate a handmade box.
Handmade box
Step 11: Adding Felt and Paper Inside
This step isn't really necessary, but I wanted to enhance the look a little.
Steps:
- First I took thick paper. I used slightly thicker paper, which really feels more like thin cardboard.
- I then bent it around the wood until I was happy with how it sat there and all the wood was hidden. As I said, this is not necessary, especially if the wood looks good enough.
- I then cut a piece of felt for the bottom of the compartment.
- Finally, I glued everything in place and left it to dry.
How to make and decorate a book box with your own hands: ideas, description, photo
The box from the book is an original idea. A book box can be a good hiding place if you want to hide some little things that are not intended for public viewing. In this case, there is no need to decorate the book cover.
If you decorate the cover of the book, you will get a very unusual box. It's easy to do and the process will take a little time. To make such a box, an old book that you don’t mind cutting is suitable.
What to do:
- Open the book to the first page, draw a square or a circle, depending on your desire. Make indents a few centimeters from the edges of the page.
- Using a utility knife, cut out the shape you drew. You can throw away the part that was cut out; it will no longer be useful.
- Then glue all the pages together. There is no need to glue each page, otherwise they will simply become soggy.
- It is enough to glue the pages together in places. The main thing is that in the end they cannot be flipped through.
- Decorate the cover of the book with fabric, paper, beads, newspaper clippings, and other elements.
- The inside of the box can be left as is. You can also cover it with plain paper to hide the yellowness of the book and give the box a more elegant look.
- The inside and outside of the box can be varnished.
- If desired, you can attach a miniature lock to the box, which is sold in hardware stores and handicrafts.
How to make a book box with your own hands
Important: When decorating a book box, like boxes made from other materials, stick to the same style. If this is a retro style, you can decorate the box with clippings from book pages and black and white photographs. If the style is Provence, add pastel colors and openwork ribbons.
Below are design options for a box made from an old book.
Handmade box from a book
How to make a box from a book
Cute box from a book
Step 10. Hole for the lock and gluing the wood
Now that the lock is attached, you need to make a cut in the board so that the lock has something to cling to.
Steps:
- Close the top cover until it stops. Mark where the lock cuts into the board.
- Take the board out of the book and mark where to make the cut.
- Use a saw to cut out the sides and remove the remaining wood using a chisel. Sand everything with sandpaper or a file.
- Then place the tablet back into the secret compartment, close the front cover and try to close the book. If you can't close it, you'll need to remove some more wood. Remove a little more and repeat until the lock starts to function.
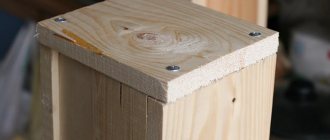
Glue the tree:
- I put a generous amount of white glue on the bottom and sides of each piece of wood and pressed them into place.
- Don't worry if there are gaps etc as these will be covered later with thin cardboard.
- Leave to dry for 12 hours.
- After drying, check that the lock clicks into place and the lid remains closed.
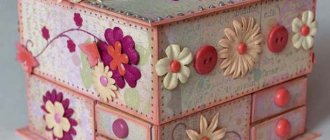
How and with what to decorate a box with your own hands: ideas, description, photos
Decorating a box is one of the most important and interesting stages in creating a product. You don’t have to make the frame of the box from scratch with your own hands. You could already understand this from the example of many of the boxes described. But you can’t do without decor. All its charm lies in the decoration of the box.
You don't have to be a craft guru to decorate a box. There is also no need to have expensive materials for decoration. You can decorate the box using improvised means. For example, egg shells and paper napkins. Ultimately, it is difficult to even guess what materials were used.
decorate the box with eggshells and paper napkins in the following way:
- First you need to boil the eggs, peel them, and chop the shells.
- Apply paint to the box, when it dries, apply a layer of glue.
- Then, while the glue is still wet, spread the shells evenly.
- When the glue dries, apply one or more layers of paint.
- Napkins with a pattern or pattern are suitable for decoration. Divide the napkins into two layers.
- Lubricate the inside of the napkin generously with glue.
- Carefully place the napkin on the box and straighten the edges.
- Apply another layer of glue on top.
This is such an interesting and unusual box.
Decor of the box with eggshells
Painting the box
Decor box with napkins
Another way to decorate a box on a budget is magazine clippings . A glossy magazine will do. You need to make a lot of tubes from magazine pages. You will also need glue. The photo shows that first you need to glue the tubes to the bottom of the box in a vertical position at a distance of 5 cm. Then you should weave the tubes horizontally. The tubes should fit tightly one to the other. To make the tubes stick better, fix them with glue.
How to decorate a box with magazine cutouts: step 1
How to decorate a box with magazine cutouts: step 2
How to decorate a box with magazine cutouts: step 3
Box decorated with magazine cuttings
The emergence and formation of “secret” boxes
The first box appeared two thousand years ago in the Middle East, and a little later the “know-how” spread throughout Egypt, Japan, and China. During excavations carried out within Mesopotamia, archaeologists discovered fragments of wooden caskets. The chests found were decorated with lacquer tree sap, ivory, carvings, and inlay.
In Europe, “amazing boxes” appeared in the Middle Ages and indicated the status and prosperity of the owner. In Ancient Rus', every home already had a chest and was used to store jewelry, love letters, and memorabilia.
Before the advent of industrial production, a wooden box was made by hand directly to the buyer's order.
Russian craftsmen sought to outstrip their colleagues in terms of workmanship. Thus, “cunning” boxes were born that opened only after pressing a secret button.
The first music box appeared in Switzerland, its operation was based on a special mechanism - a carillon, then boxes for self-winding watches were created that emitted a melody when opened.
Today, the chest has evolved from an expensive item to an “everyday” item that is mass-produced by contractors. At the same time, the scope of application of the box has increased beyond recognition: in addition to boxes for storing jewelry, products for banknotes, documents, watches, cigars, and business cards are sold.
How to decorate a box using decoupage technique: ideas, design style, photos
Decoupage is a popular direction in decorative and artistic design. You can master this technique from scratch yourself.
We will tell you what the decoupage technique includes.
Decoupage is a decoration technique that involves gluing a picture and then fixing it with varnish. The varnish helps to fix the picture so that it does not deteriorate over time.
In decoupage, as in other design techniques, there are styles. Let's look at what styles there are in the decoupage technique:
- Shabby Chic . The color scheme is dominated by delicate shades, small or medium-sized flowers, and romantic elements.
- Simplicity . In this style, newspaper clippings, magazines, and elements with printed text are used for design.
- Provence . Picture in the spirit of France, flowers, plants. The style uses pink, beige, pastel shades.
- Victorian style . Products are decorated with gilding; paintings and postcards are also used.
- Ethnic style . Pictures with African, Asian ornaments, exotic animals and birds are used.
- Vintage . Products with an “aging” effect, with scuffs.
The decoupage technique can be used on any materials - leather, metal, cardboard, plastic. But decoupage combines with wood better than all other materials.
You can purchase a set for decoupage, which will contain special napkins with drawings. It is not always possible to buy decoupage napkins. You can print ready-made pictures and successfully use them in this technique.
Plain paper, tracing paper or office paper are suitable for this. Print any design you like on a color printer. Now the paper needs to be thinned. This can be done in the following ways:
- Using tape. Apply varnish to the outside of the picture. You can use regular hairspray. When the varnish is dry, apply tape to the inside of the picture. There should be no folds or cracks. Now carefully tear off the strip of tape. Thus, you need to make the picture very thin so that later it can be used using the decoupage technique.
- With the help of water. Apply several layers of varnish to the picture. Each subsequent layer must be applied when the previous one has dried. Then place the picture in a container of water. After a while, take it out and start rolling the inner layer of paper with your fingers. If the paper is not yet sufficiently wet, leave the picture in the water for a while longer.
The next step is to work with the box. It should be painted, you may have to apply several layers of paint. If you want to get the effect of an old box, you need to apply two layers of paint:
- The first layer is dark.
- The second layer is light.
Then the top layer is rubbed down with sandpaper to dark spots. This creates the effect of scuffs on the box.
Decoupage boxes
At the next stage, paste the picture and open the product with varnish. As you can see, at first glance there is nothing complicated about the decoupage technique. Decorating the product will take time, since the varnish takes a long time to dry. It may take you 1-2 evenings to make a beautiful box. Decoupage is a great idea for those who don’t know how to draw, but want to make a box with a beautiful design. This technique is simple and at the same time looks luxurious if done carefully.
Painting the box
Below are options for beautiful boxes using the decoupage technique.
DIY decoupage box
Beautiful handmade box
Vintage style box
Making a beautiful box with your own hands is not as difficult as you might imagine. Now you know that you can make an original decorative box literally from nothing. If you have a well-developed imagination, if you like to create and do handicrafts, you will like this activity. Try to do the work carefully, then your box will look very presentable. We invite you to watch a detailed master class in which you will learn how to decorate a box with an aging effect using the decoupage technique.
Geometric carving technology
Geometric wood carving of a box is the most complex decoration method. To perform processing without any problems, you need to choose the right material.
Among the popular options it is worth highlighting:
- Linden. The core has a soft and uniform structure. The wood does not crack or warp. The material is also easy to cut, allowing for clean edges.
- Cedar. Wood of this species can be easily cut in any direction.
- Pine or spruce. The material is used extremely rarely. This is due to the fact that the wood has numerous knots. But the advantage of the material is its plasticity, which makes it easy to make geometric carvings.
- Juniper. The wood is easy to saw and sand.
To carve, you need to prepare a certain set of tools and patterns. The main working tool is a chisel, the width of which is 2 cm. It is also necessary to follow safety rules during work. You need to make sure that your fingers are not in the working area.
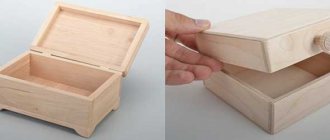
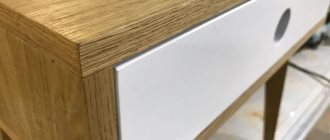
If you need a drawer
In general, a wooden box with a drawer is made in the same way as the classic version, but there are a number of features.
A simple rectangular shape of the lid and bottom will spoil the appearance of the product. It is better to make the long sides of these elements wavy using an electric router. In addition, by choosing this option, the lid and bottom are not placed inside the body, but left outside.
The walls are made of different heights. In particular, the back part and ends are made of the same height and glued together. For the front wall, cut out a die half as wide as the back part. This element is not recessed between the ends, but is installed overlapping and fixed with glue.
The box consists of two parts: the box, which fits freely between the walls, and the front part, which is similar in size to the top die. The elements are also mounted on wood glue.
A partition is installed between the upper and lower parts, which will serve as the bottom of the upper compartment of the box. Inside the retractable and stationary drawers, you can make partitions from thin plywood, delimiting the internal space into several compartments. The lid is installed on decorative hinges, the wood is covered with several layers of furniture varnish.
How to put a lock
An interesting solution is a mortise lock, which will be opened with a small key, but such work is difficult to do even for an experienced specialist. Therefore, it is better to limit yourself to a padlock or a decorative hook.
To install a padlock, loops are placed in the central part of the side wall and lid, which are screwed with small screws. The location of the hinges must be calculated in advance: even a slight displacement will break the symmetry, and the box will lose its attractiveness.
Making a complex-shaped box from solid wood will take much longer. To do this, you must use a power tool, while parts from plywood can even be cut with a hand jigsaw. A large field of work opens up for the artist to design the finished product. You can paint it with paints, attach decorative fittings, decoupage or burn it.
Where to begin
Making any craft begins with a project, a diagram. The master imagines exactly what his masterpiece will be like, and, starting from the drawings, stocks up with the necessary materials and tools.
For many ordinary people, a wooden box appears as a rectangular box with a closing lid. This is true, but not entirely. A box is a real work of art, and even a handicraft made from scrap materials can look like an expensive antique.
Any box has its purpose in the house. Based on this message, the master thinks over the shape of the product. The following options are possible here:
- for jewelry. Such wooden models have a traditionally rectangular shape, but the internal surfaces are lined with velvet, and the lid is complemented by a mirror. As a result, jewelry is not scratched and is convenient to try on;
- for jewelry, trinkets. A characteristic feature of this product are drawers that move freely inside the case. The number of retractable elements is unlimited, and a tight fit does not require special guides;
- A small box for treasured, memorable items. Made in the shape of a heart and great for storing letters, cards, photographs and other things;
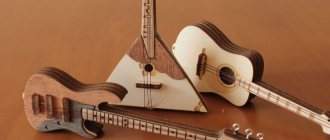
- Puzzle . A rather complex product that simultaneously serves as a decorative decoration and a children's toy. A system of wooden gears, reminiscent of a clock mechanism, is installed here, and the lid opens after rotating the handle or one of the wheels;
- to hide a small amount of money. It is made in the form of a rectangle, but the external decoration is made to resemble a book;
- for needles, threads. Such wooden boxes usually have several compartments where you can store sewing supplies. The case is often complemented by a carrying handle.
In addition, there are boxes with watches, locks and secrets, original boxes and drawers for storing cigars, and products that make melodious sounds when the lid is opened. The shape is not limited to rectangular. In fact, with modern tools for woodworking, it can be anything, including round.
It is noteworthy that all of the above options can be done independently at home. But it’s still better to start learning how to make wooden boxes with your own hands with simple designs, complicating the task as skills develop.
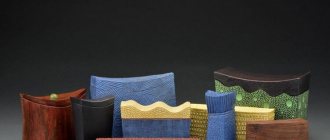
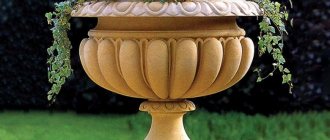
Choosing the shape of the casket
The shape of the chest should be chosen so that it not only fits well into the interior, but also brings benefits.
You can choose between the following forms:
- Simple rectangular
- Square
- Round
- Triangular
- Heart shaped