If you want to make your porch more attractive, simply make some large flower pots with your own hands. Each container like this will decorate your home, and it’s not difficult to make. If you follow the step-by-step instructions, you can do it in just a day, and the result will pleasantly surprise you and your neighbors.
What will you need?
- pine bars 5 x 5 cm;
- bars 3 x 5 cm;
- pine board 2 x 5 cm;
- board 2 x 8 cm;
- plastic pot for insertion into flowerpots with a diameter of 35 cm;
- 6 cm wood screws;
- wood glue;
- 80 grit sandpaper;
- something to use as spacers (a felt furniture cushion will do);
- stain for outdoor use.
Types of boxes
A box is a collective name for a storage structure. The word can mean a small box or a spacious grandma's chest. We suggest distinguishing according to the purpose of the item.
- for things, personal items, dishes, vegetables. The design is a square, rectangular box;
- for mail. Vertical drawer with a hole and a door. The design is protected from moisture by a lid;
- for tools. It is highly durable and has a carrying handle;
- drawers. They have a roller or ball system. Not transferable. The item is inserted into a closet or cabinet.
Plywood allows you to make any of the listed types. We offer step-by-step instructions. It's easy to build a reliable box using them!
How to make a box from plywood with your own hands: wooden with a lid, how to put together from boards
Even a beginner can make this version of a metal box. After all, the most ordinary box and special partitions will be made of metal. Initially, you need to prepare the main material - galvanized steel (0.4 mm thick). Tools you need to prepare:
Expert opinion
Strebizh Viktor Fedorovich, leading construction foreman
After preparing the parts, a plywood box is assembled; for reliability, the seams are first glued with glue for wooden surfaces. If you want to clarify something, please contact me!
Manufacturing technology for a simple street model
In its most primitive form, the work is performed in the following steps:
- Boards, the width of which varies between 15-20 cm, are cut into blanks. Three long pieces will be needed to make the bottom and sides, the ends will be decorated with two short ones (here you need to leave allowances equal to the thickness on three sides).
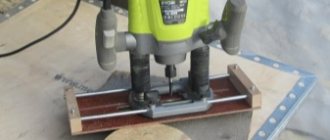
- The boards are planed with a plane, they can be sanded with coarse sandpaper, the cuts must be carefully processed.
- Thin holes are made along the edges of the workpieces: in the side parts - 3, in the end parts - 4.
- Using screws, first fix the sides and bottom, then attach the end blanks.
- The assembled structure is sanded with fine sandpaper.
All surfaces must be thoroughly impregnated with an antiseptic; varnish, stain or enamel can be applied to the outside.
Assemble the box parts using screws
Used cargo pallets are often used as the base material; this is a very cheap raw material that is easy to process. Instructions for assembling an outdoor flower box:
- the pallet must be disassembled using a nail puller; pliers will be needed to remove fasteners;
- Rotten and damaged boards are rejected;
- a rough sketch of the box is drawn up indicating the planned dimensions;
- in accordance with the notes, the wood is sawn and cleaned using sandpaper;
- assembly begins by fixing the lower base and upper frame;
- The side edges are attached to the two parts of the container with nails;
- the joints are masked with narrow decorative strips.
Here, too, the final stage is the application of protective and paint compositions.
If necessary, you can nail legs made of beams to the container; with their help, complete ventilation of the bottom edge is ensured. Flowers can be placed inside in pots or planted directly in the container. In the second case, it is necessary to cover the box with film and equip it with drainage holes.
The end blanks are attached last
How to make a box from plywood with your own hands: with and without a lid
- Take a sheet of plywood, thickness 1.2 cm. Saw into two parts with widths of 6.5 and 22 cm. The smaller board will be the sides of the box. Wide stripe - front and back walls.
- Measure the center on the top side of a wide sheet, go up five centimeters, put a dot and draw to the corners. You will get a triangular roof of the house.
- On the front part, step back 5 cm from each edge, draw two parallel straight lines under the roof, one horizontal.
- Step back 5 cm from the side lines under the triangle, draw a hole for receiving newspapers and letters. Draw as a rectangle with rounded corners.
- Lower from the base of the triangular roof by 25 cm. This is the height of the mailbox.
- Make two 25 cm plates from 6.5 cm plywood. These are the sides. And one plate for the bottom. The rest will go to the roof.
- Use an electric jigsaw to cut out a hole and a door on the front.
- To be neat, sand all edges.
- Glue together the main parts of the house - the bottom, sides, front frame, back wall. For reliability, secure with small nails. Build a roof. It will protect mail from moisture.
- Place the door on decorative canopies. To prevent it from falling inside, we recommend making a stop from a piece of plywood or a screw.
For storing things
A simple box is suitable for storing things, dishes and cutlery, crops, and toys. For heavy, bulky items, we recommend choosing thick plywood. Fastening parts using the tongue-and-groove method.
- Make a drawing on a sheet of Whatman paper. Wallpaper will do. The important point is the actual size. We offer width 150 mm, length 250 mm, height 100 mm.
- You will need two side walls, two front parts, and a bottom. Draw one detail at a time on the drawing. Mark grooves on the sides of the parts.
- Transfer the patterns to plywood. Cut out the drawer elements. Sand the cuts.
- Try it on. Remove flaws in the grooves, if any. The parts must fit tightly into each other.
- Connect the elements into a rectangular box. When using the groove method, we recommend using additional glue. It will ensure the strength of the structure. Apply a thin layer to the joints before assembly.
- Attach the bottom. Check size. Attach with nails, screws, self-tapping screws to the main frame of the structure.
The drawer can easily be turned into an organizer. Just add partitions! They are fixed with glue. Through fastening with screws through the side walls is suitable. An alternative option is metal corners.
The box will become the highlight of the interior if you decorate it and create an unusual design. Stickers, decoupage with napkins, and drawings with permanent paints are suitable.
To make the box you will need the following tools and materials:
Which is better: heated floors or radiators?
Warm floorBatteries
To prevent unpleasant odors from accumulating in the box, it is worth making ventilation holes in the bottom. They are also cut out neatly (can be symmetrical or chaotic). Now, when creating pens, everyone will be able to realize their fantasies, especially if they have all the necessary tools, this will not be difficult.
Before making plywood boxes, you need to think about what function they will contain.
- To think over the design solution for the future product, for this you need to draw a drawing of the box.
- Make measurements and necessary calculations.
- Transfer measurements onto sheets of plywood.
- Having drawn the pattern of the product on the surface of the plywood, we cut out the component parts using a jigsaw or a circular saw.
- We process the edges of the sawn blanks with sandpaper or a grinding machine until there are no roughness or burrs.
- We draw lines of grooves on the walls of the parts (if you use a groove connection), in those places where they will be connected, this method will help keep the future structure in one integrity.
- After preparing the parts, a plywood box is assembled; for reliability, the seams are first glued with glue for wooden surfaces. After the gluing process, the walls are fastened with self-tapping screws or confirmats.
- For fittings, holes are drilled in the places where the handles are attached.
- As an addition, internal partitions can be installed. But a simpler option, the so-called catalog storage, is more in demand. These are small, durable boxes that can be removed and replaced in the usual way.
- Larger plywood boxes may have wheels to make them easier to move. Wheels will also add individuality to this furniture.
If you have experience, such boxes will be made quite quickly.
In cases where plywood boxes are supposed to have a lid, the blank for it is made in such a way that in size it should either cover the assembled sides or be recessed inside. In the second option, you need to provide additional strips to hold the lid.
The piano hinges are attached to the middle of the back wall of the assembled box. Then carefully attach the lid of the product.
An option with a retractable lid is also possible, but it requires at least a little carpentry experience. Then the lid is made smaller than the box itself and grooves are cut for its unhindered movement.
How to make a box from plywood with your own hands: wooden with a lid, how to put together from boards
Metal structures can withstand heavy weight and look original. In addition to pre-treatment, they require regular maintenance to avoid corrosion.
Expert opinion
Strebizh Viktor Fedorovich, leading construction foreman
They make furniture themselves; in three cases, you need additional storage space, you want to save money, or you want to make a practical item with your own hands. If you want to clarify something, please contact me!
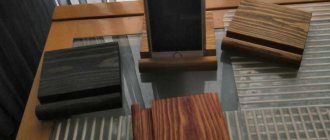
Flowerpots made from block house boards
The creator of these flowerpots, Elena Koley, showed how to easily and simply make flowerpots from block house boards; she made several such models at once: large and small. Let's consider what is needed for this.
You will need:
- block house board;
- planed block;
- self-tapping screws;
- impregnation for wood;
- liquid insulation;
- dye;
- pallets (or any other frame for pots).
Stages of work
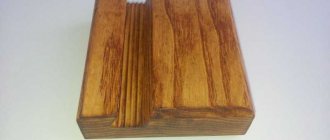
- We cut the boards into equal lengths of 72 cm each, this is exactly the height of our flowerpot; in total, 26 boards will be required for both flowerpots (16 pieces for a large flowerpot and 10 for a small one). Block house boards can make your work easier because you don’t have to sand them. We connect them together using grooves.
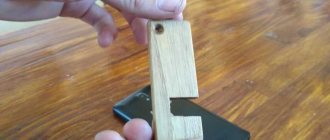
- We secure the boards from the inside with a block and self-tapping screws.
- We make small pieces of timber, they will serve as legs for the flowerpot.
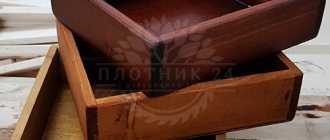
- We paint the workpieces from the inside, you can coat all joints with liquid waterproofing, it will serve as additional protection.
- We connect the resulting blanks and secure them with self-tapping screws, after which we paint the outer side. In addition to paint, you can also use glaze; it has several properties at once: it protects, impregnates and decorates wood.
- Now we install pallets corresponding to the size on the bars: metal or wood, it doesn’t matter. Everything is ready, you can put out the flower pots.
The finished small flowerpot will look like this:
Photo source: www.livemaster.ru
Making a box from plywood: instructions and tips from the masters
- Woodworking Machine. Its price is high and not everyone has it, but when creating batch products it’s worth stocking up on it. Its capabilities are impressive; it is a substitute for a plane, circular saw, and several machines. It is powered from a simple network, so everyone will appreciate the ease of use.
- A drill and a screwdriver, and sometimes just one thing.
- A jigsaw (there is no need for a professional one), but if you have one, the work will go faster.
- Stapler for furniture.
Step 1. Making the body parts
On a pipe ø150 mm, mark 4 rings 1 cm thick and cut them off. These will be the sides of the box.
From the same pipe we cut a piece to the required length for the box body.
The main part of the sidewalls will be made from ø100 mm pipe. To do this, cut a piece of pipe to the required length, cut it lengthwise and place it in an oven preheated to 200 degrees Celsius.
After the pipe has completely softened, remove it and place it between two planes until it cools completely.
To avoid burns, carry out this operation wearing protective gloves.
Using scissors, we cut out two sides for the box from the resulting flat piece of PVC. Their diameter must correspond to the internal diameter of the box body.
We will make the legs of the box from four bolts and nuts. To do this, use a marker to mark the locations of the future legs, drill holes and insert the bolts into place.
Stepping back a little from the center of the body, mark the lid and holes for the hinges.
Cut out the lid according to the intended markings. We drill holes for the hinges and make the recesses necessary for their normal operation in the body.
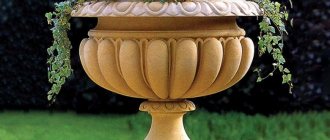
Wooden flower pots
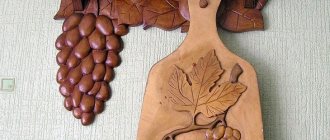
Slats, bars, boards and logs can be used as material for country-style flowerpots. In large wooden blanks, you just need to make recesses for the pot; small parts can be used to build boxes using glue, nails or rope weaving.
You can build a lattice wall with wooden flowerpots from timber and boards. This original varnished flower cabinet, in combination with garden furniture, will add unique sophistication to the relaxation area.
Material and accessories
Plywood for the bottom. The thickness is selected depending on the purpose of use of the product. It should be thicker than the side walls and lid.
- Plywood sheets for side walls
- Material for the lid, if a lid is intended
- Lid handles
- Planks and blocks of wood - for decoration
- Finishing and finishing nails
- Piano hinges
- Decorative overlays
- Wood glue
- Wheels, if you make the box mobile
- Finishing varnish
- Wood putty
Expert opinion
Strebizh Viktor Fedorovich, leading construction foreman
Before starting work on making a flower stand, you need to calculate its size depending on the planned placement of plants. If you want to clarify something, please contact me!
General rules
Creating containers for flower pots, at first glance, is not a difficult task. After all, this is just a kind of container, consisting of a bottom and sides, which should hold and cover the pot. Moreover, it can be hung on a string, nailed to a wall, or simply placed on the ground.
But without complying with basic requirements, a flowerpot can very quickly lose its visual appeal and litter the space intended for decoration.
The first rule is surface treatment that allows it to withstand temperature changes and the influence of precipitation. It is also necessary to exclude the processes of rotting and infection by parasites, using paints and varnishes intended for open air.
For a zonal design, several flower pots are usually used in harmony with other elements of the exterior. The various compositions of flowerpots shown in the photo for decorating facades, walls and garden areas are made with a single solution. Fashionable mixing of styles very rarely works in landscape design.
When decorating with flower containers, the general design concept of the site as a whole is taken into account, or an autonomous solution is possible in limited areas of terraces, gazebos, alpine slides, etc.
In order for the flowers in containers to remain healthy, the location of the flowerpot or composition of them must provide the appropriate light and temperature conditions. The pot must be firmly secured in a decorative vessel, avoiding shaking that is harmful to the plants.
DIY flower stand – 70 photos of ideas for metal and wooden flower stands
- To think over the design solution for the future product, for this you need to draw a drawing of the box.
- Make measurements and necessary calculations.
- Transfer measurements onto sheets of plywood.
- Having drawn the pattern of the product on the surface of the plywood, we cut out the component parts using a jigsaw or a circular saw.
For storing things
Plywood allows you to make any of the listed types. We offer step-by-step instructions. It's easy to build a reliable box using them!
Expert opinion
Strebizh Viktor Fedorovich, leading construction foreman
Now, when creating pens, everyone will be able to realize their fantasies, especially if they have all the necessary tools, this will not be difficult. If you want to clarify something, please contact me!
Vessels made from building materials
Using various metal frames in the shape of a bucket or other container, you can make blanks for flowerpots from polymer gypsum or cement. The selected vessel must be surrounded with metal wire, then the resulting mesh must be removed and covered in several layers with strips of fabric soaked in the solution.
Then make a thickening by lubricating the resulting frame with plaster or cement. After drying, the surfaces need to be sanded, preparing the product for painting and decoration.
For lovers of garden sculptures, polyurethane foam may be their favorite material. From it, using various templates, you can sculpt figures that are resistant to external influences.
Classic wall flower stand
- shelf or board made of wood or chipboard,
- a decorative element for connecting the structure (in this case, a strong tree branch of a suitable configuration),
- drill,
- saw or jigsaw,
- screws,
- paint,
- varnish,
- pencil,
- brush,
- roulette
How to treat the surface → Room decoration → How to choose the right paint → Surface treatment technologies → Leveling and finishing the walls → Selecting and applying a primer → Removal from the surface → Stretch ceilings and technologies → Reviews and testimonials
Flowerpots from barrels
Old wooden barrels can also be turned into flowerpots. There are several options here:
- barrels are used as solid structures, then the containers required in volume and size are simply installed in them;
- or sawed both lengthwise and crosswise. In the first case, you will need to connect the boards to each other, in the second, two flowerpots can be made from cut barrels.
Photo source: www.stroychik.ru
Whatever option you choose for yourself, remember that the surface of the wood should be sanded and coated with protective varnish or paint.