A turning tool is necessary for working on a lathe. A high-quality tool is very expensive, so one chisel costs from 3 thousand rubles, and the cost of some can reach 20 thousand rubles. Not everyone is ready to shell out that kind of money for turning chisels , given the fact that for work you need to have 3 or 4 cutters of different configurations.
In this article I will talk about the types of turning cutters , their purpose and methods of making them yourself from blade to handle.
I won’t drag it out and start talking about what kind of incisors there are and what they are needed for.
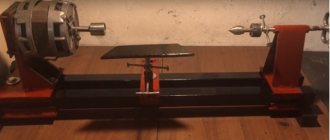
Components of a mini metal lathe
The composition of any turning device is traditional; all of the following elements are present regardless of how it is made - manually at home or industrially.
The devices consist of the following components:
bed
The main load-bearing element of the entire structure, giving it rigidity and strength. The bed of a homemade metal lathe is made from wooden beams or metal blanks in the form of ready-made corners.
The main requirement for the bed is the necessary strength, since the structure of the machine is exposed to strong vibration during the processing process.
Drive unit
The main element of the part responsible for the power of work. The drive must be selected very correctly based on the power required. This is not an easy task and one that needs to be thought through carefully.
A used drive from a washing machine, a construction mixer, or something else will suffice if you are making a lightweight machine for metal work.
The number of revolutions with such drives is about 1500 rpm, and the power is 200 W or slightly higher.
- Tailstock. This is a special steel plate to which a steel corner is also welded. It is needed for tight fixation of the workpiece to the bed for high-quality processing.
- Headstock. This is the same part as the tailstock, but unlike the front one, it is fixed on the movable frame of the device.
- Front and back centers.
- Caliper.
This is one of the key factors for the working elements of the device, information about which you can read below.
State standards
The technical regulations adopted in the USSR for metal-cutting tools remain relevant today. For groove cutters with carbide brazed inserts, the parameters and geometry are determined by GOST 2209-82 or its later version GOST 2209-90. They provide comprehensive information on geometry, wear resistance and methods for checking the quality of the material.
Lathe cutters must comply with GOST 18874-73.
It describes the design features, dimensions and geometry of high-speed steel tools, and their markings. The regulation is almost half a century old, and it is actively exploited, which indicates the active use of obsolete and worn-out machine tools in most industries. The latest changes were made to GOST 18874-73 in 1985, during which time technologies and materials for cutters have changed dramatically. Tools for external grooves comply with GOST 18885-73, the situation is similar to that described above, modern groove cutters can differ radically from the standard, providing better quality and speed of cutting.
In general, standards that are half a century old cannot be effective. During this time, technology has changed significantly, but updating the machine fleet is extremely expensive, so cutters according to old GOST standards will be in demand and needed for a long time. Modern production with high-tech equipment relies on other criteria for selecting tools for metal turning.
Overview of species
The cutters differ in functionality, design nuances and other parameters.
By purpose
Here we are talking about the materials with which the cutter works.
- On wood. In markets they can be found in sets with rings, combs, reiers, hooks, and meisels. The cutters and rotation mechanisms are fastened together.
- For metal. When you need to weld or solder a plate, that’s when they talk about the optimal choice for cutters. Hard alloys and high-speed alloys are used more often in this case. Installation of such cutters is possible not only on lathes, but also on slotting, planing, special-purpose and others.
This classification is small, the choice here will not be difficult.
By design
These are solid cutters in which the shaft and head are articulated by one system. Or is it a tool with welded plates, they are very firmly connected to the head. If the soldering of the plates was carried out without technical precision, cracks may subsequently form on the working surface. Such cutters are widely used because they are suitable for a wide variety of machines.
By type of processing
Here the cutters are divided into fine and semi-finish. For finishing machines, the feed rate is low; material with a small thickness is removed from the blank. Most often, such tools are represented by a through cutter. Semi-finish ones are very similar to the previous version, but they are weaker in characteristics than finishing ones. But they can be used for the same tasks.
By type of installation
Tangential cutters are a tool that is installed at a certain angle, any angle except the straight one. This is measured relative to the axis of the surface that is undergoing the operation. And the tool is distinguished by a complex fastening scheme for internal turning.
The radial cutter is distinguished by fixing an exclusively right angle on the surface that is being processed. A popular option for industrial purposes. And the radial version has a big advantage - it is a simplified fastening system.
By feed type
Here everything is even simpler: left-handed cutters are tools with the right-hand side of the cut, and it is towards it that the metal being processed is turned. The right incisors have a cutting part on the left; the metal surface for processing is turned onto it.
By fastening the cutting part relative to the rod
And this characteristic presents 4 types of incisors. The bent ones are distinguished by a special curved line, a characteristic feature of the projection axis of the upper position. And lateral localization ensures the straightness of the lines. Straight incisors are those whose axis of projection maintains an even line, both from above and from the side.
In retracted incisors, the head and shaft are different in size, the head will be smaller. It is attached to the incisal axis. The part is characterized by some displacement relative to the axis of the cutters, in any direction. Well, curved incisors in the upper localization are connected to the projection axis by a straight line, while the lateral projection is connected to a curved line.
By processing method
And there are many varieties here.
- Trimming. If it is a machine with cross-feed workpieces, the tool is easily connected to the equipment. These are either the edges of different surfaces, or stepped elements.
- Walkthroughs. Functional for metalworking with cross and longitudinal feed equipment. This is relevant if trimming concerns the ends, cylindrical and cone-shaped workpieces.
- Boring. Needed for through and blind holes, for recesses and recesses.
- Round. Here the shape determined the name.
- Threaded. External and internal threads are formed, with a trapezoidal cross-section, as well as round and rectangular. The products themselves can be smooth, round, or convex.
Rules for sharpening metal cutters for a lathe
Sharpening turning tools is a responsible procedure. When carrying it out, you need to take into account the features of the equipment and material. Sharpening of a working tool is carried out in three stages:
- The rear part is cut at an angle that is identical to the rear angle of the holding element of the device.
- Next they work with the back of the working head.
- The final stage is adjusting the angle to the desired position.
You can sharpen in three ways:
- Using an abrasive wheel.
- By coating the surface to be sharpened with chemicals.
- Using specialized equipment.
In order not to spoil the cutting element of the device, to make it more durable, you need to take into account a number of rules:
- Do not attempt to sharpen the edge using a sharpening stone. It is extremely difficult to make the desired angle with hand tools. The heat that occurs during friction degrades the performance of the tool's working head.
- It is preferable to sharpen the cutting edge using a cooling system.
- Before you start sharpening with an abrasive wheel, you need to check it. It should be smooth, without chips or cracks. During torsion, the disk should not deviate to the sides. This can cause equipment breakdown and damage to the cutting edge.
- It is forbidden to hold the cutter suspended. To do this, you need to use a special emphasis. It is installed at a distance of 5 mm from the abrasive wheel.
- To avoid overheating of the material during rotation of the wheel, do not press the equipment against the abrasive. Effort should be minimal.
- When working, you need to wear safety glasses to protect your eyes from metal shavings.
- You cannot sharpen disposable models made in the form of plates.
- The best option when choosing the type of abrasive to coat the grinding wheel is carborundum. It is a green abrasive crumb. This material is suitable for sharpening carbide inserts. Carbon steels need to be sharpened with corundum wheels.
- Do not quickly cool the cutter after sharpening. This will lead to damage to the integrity of the metal.
- Change sharpening stones periodically.
We must not forget about fine-tuning the equipment. This technological operation allows you to get rid of chips, microcracks, and unevenness on the blade. To carry out finishing, special equipment is used on which diamond-coated wheels are fixed. The cutter is clamped in a vice, which is moved to the grinding wheel using a handle. Using a flywheel, bring the cutting edge to the finishing state.
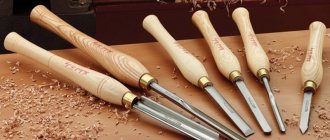
Wood turning cutters
- Wood turning tools are intended for manual processing of a part rotating in a machine.
- They consist of two main parts: a working part (metal) and a handle (usually wooden).
- In turn, the working part can be divided into:
- cutting (blade) - this is the part that is sharpened and interacts with the workpiece;
- body - the main part by which the turner holds the cutter with his “non-working” hand on the armrest of the machine;
- shank - a narrowed part into which the body smoothly passes. The shank is designed for attaching a handle to it.
The handle can be divided into two parts:
- the base is the large part that the turner holds in his “working” hand;
- neck - a small cylindrical part with a metal fastening ring that prevents the handle from cracking when it is pressed onto the shank of the working part.
Types of turning tools
Depending on the type of work performed, wood turning tools have different configurations; the more complex the product, the more sophisticated their design will be, which will determine the specific sharpening of the blade.
Each master can have his own special, exclusive, highly specialized turning tools designed to perform some special work.
Therefore, there is no need to study the design of each individual cutter.
For the successful work of a novice turner, two types will be enough: reyer and meisel.
Reyer - designed for rough, roughing, initial processing of the workpiece. A design feature of this type is a blade shaped like a semicircle. It is made from a thick plate or from a semicircular groove. With the help of a reyer, the wooden blank is given the approximate outline of the future product.
Reyer
Meisel - for finishing the workpiece, giving it its final shape. Also, it can be used to cut off the product from the remains of the workpiece. The shape of a meisel resembles a jamb knife (a plate with an oblique blade, sharpened on both sides at the same angle).
Meysel
With the help of a reyer and a meisel, you can easily perform turning work of medium complexity. Processing the workpiece on the outer surface. In some cases, it is possible to work with the internal surfaces of a part.
All other wood turning tools can be classified as shaped tools. Among them, the most popular types are:
- chisel-scraper - for leveling the cylindrical surface of the workpiece. The shape resembles a straight chisel with one-sided sharpening;
- comb - designed for carving and applying decorative grooves and marks;
- hook – for turning cavities in the workpiece;
- ring - has the same purpose as the hook;
- for rough processing - has a blade shape in the form of a triangle. Designed to give the workpiece a cylindrical shape. This type is the safest of all others due to the small contact area between the tool and the workpiece.
Chisel-hook Chisel-scraper Shaped cutters
Homemade wood turning tools are something of a talisman for craftsmen. Therefore, they prefer to make working tools with their own hands rather than purchase them in a regular store. Although the purchased ones fully meet their requirements, technical characteristics and safe work practices.
Homemade cutters
Making reyer and meisel yourself is not difficult. To make them with your own hands, the most suitable material would be files and rasps that have already “outlived” their usefulness.
This decommissioned tool has the required dimensions, strength, material quality, and steel grade. Using a sharpening machine, the file is given the required shape in terms of the blade and shank.
Then a machined handle with a fastening ring is stuffed. And that’s it, the tool for making wood turning products is ready.
To make wood turning tools, you can use, in addition to files and rasps, car springs or reinforcement bars as materials. They have the necessary hardness. But after making the tool with your own hands, you need to be extremely careful.
Its tests must be carried out on soft wood (linden, poplar), after which the blade must be inspected for chips and cracks.
And only after such a check can turning tools made by yourself be used when working with harder wood (birch, oak, beech).
- Video about homemade cutters
- When making cutting tools yourself, you need to remember:
- The shorter the working part, the more difficult and inconvenient it is to hold it while turning. The length of the body should provide full grip with the hand, plus support on the armrest, plus the distance from the armrest to the workpiece, plus margin for wear and sharpening. Therefore, the initial length of the working part should be at least 20 cm, but a size exceeding 40 cm will cause inconvenience in work. The optimal length should be 20 – 30 cm;
- The shorter the shank, the greater the possibility that it can be torn out of the handle. Therefore, when a cutting tool is made from files or rasps, the shanks are lengthened by 1.5 - 2 times;
- The thinner and narrower the working part of the tool, the greater the likelihood of it being damaged by the workpiece during the turning process. Therefore, at the initial stages of processing, when the workpiece does not yet have an absolute cylindrical shape and runout on the blade occurs, as well as at large diameters, when the cutting force is of great importance, it is necessary to use cutters with sufficient thickness.
- wood turning tools must have a handle no shorter than 25 cm. If it is much smaller, then during the turning process it will be difficult to hold the tool in your hands, not to mention the quality of the work performed.
Do-it-yourself sharpening of cutters
- The quality of the treated surface largely depends on the correct sharpening of the working tool.
- To do this, you will need an electric sharpening machine with a set of wheels of different grain sizes and a velvet bar for manually editing the blade.
- Video of sharpening cutters
- Each craftsman chooses the sharpening angle independently, focusing on his skill as a turner, the hardness of the wood, the quality of the working tool and the final desired appearance of the surface being processed.
- For a novice turner, the optimal sharpening angle options will be:
- for meisel - the bevel itself should be 40° relative to the axis of the working surface and 40° for each side of the blade;
- for reyer – 50° – 60°.
Over time, as the turner's skill level increases, sharpening angles can be reduced to 20° - 35°.
Ideally, in addition to a set of different styles, it is desirable to have cutters of the same type, the same size, but with different sharpening angles. This will make the turner’s work much faster and easier, and will also extend their service life, because there will be no need to constantly resharpen the blades depending on the type of wood being processed.
Blunt sharpening angles are intended for: hard wood, initial (rough) processing.
Tool used
Turning chisels
Chisels are the most common and at the same time the most diverse working tools that are necessary when working on a wood lathe. Depending on their purpose, they are divided into several groups.
Reyer
This is a semicircular chisel, which is used for working with non-standard products. Used for rough turning of wood. The blade has a groove shape that allows you to remove large amounts of wood. Reyer blade length up to 30 cm.
Meysel
This is a chisel knife that is sharpened at a certain angle. Used for finishing wood turning. Using an acute angle, meisel is used for finishing the profile surface, and an obtuse angle is used for turning a blank with the formation of roundings.
Shaped tools
With the help of these tools you can give the final look to the product and also decorate it with patterns. Such tools are successfully used for boring internal surfaces.
Chisel-comb
The comb is used to apply artificial marks and grooves to the product. The comb also helps to apply threads to the finished product and make markings on it if necessary.
Chisel-ring
This is another version of the chisel, which is used to create internal cavities in a wooden product. The cavities can be of various configurations, at the request of the master.
How to make cutters for a wood lathe with your own hands, their prices
The production of original wooden products on machines requires the availability of a variety of high-quality auxiliary tools. In most cases, wood lathe cutters are used for this. Thanks to them, it is possible to bring the workpiece to the required geometric parameters.
Manufacturers offer all kinds of sets, including products with cutting edges of various configurations. You can also make your own wood cutting tools with your own hands.
Wide selection of shapes and models
When processing wood blanks professionally, it is important to correctly select the appropriate tool for wood turning. A wide selection and large sets with diverse tips will allow you to cover a significant part of the work.
Varieties
Based on functionality, wood chisels are usually divided into the following groups:
- Rough peeling . The tool has a pair of working edges that meet at an acute angle. It is believed that this design is significantly safer than radius analogues.
Raiser for rough roughing
- Finish turning . Similar types of cutters for a wood lathe remove a small layer of chips and are not intended to give the workpiece a shape, but their purpose is to give external smoothness to the outer surface. Metal tips are available with left or right sharpening.
Finishing tool
- wood cutter They are used to work with non-standard surfaces.
Shaped can have almost any configuration
- Cut-off cutter . It is currently relevant for one operation in which it is necessary to separate some part from the workpiece.
Cutting width 10 mm
- Boring . With the help of such products, excess material that appears during the processing process is removed. A special ledge located in the cutting area helps in such an operation.
Boring tool to remove excess wood
- Round wood turning tools They are used for processing radius workpieces. The working part can be either radius or with small technological teeth.
Reyer for turning bowls
- Wood turning at the end is carried out using a conventional cutting file.
- As auxiliary equipment, special stops are used on cutters that limit the depth of cut.
In addition to the standard set, professionals use homemade wood lathe cutters in their work. This approach increases productivity and helps expand the range of finished products.
If you plan to engage in wood processing for a long time, then you cannot do without high-quality tools, which are made from tool-grade steel. It is able to withstand high production intensity, which homemade products are not always capable of.
Homemade wood turning tools
The greatest difficulty in the production of each type of chisel for a lathe is the selection of blanks for the cutting part. In addition to ensuring appropriate hardness, you have to think about the possibility of installing the metal part in the holder. It will allow you to fix the cutter in the desired position for comfortable processing.
Types of machines (for wood and metal)
Universal
The universal lathe is designed for initial roughing, as well as sharpening, cutting and drilling. Also, using this equipment, carvings are applied to a wooden object.
Lathe-screw
This type of lathe is designed for processing cone-shaped workpieces and for applying threads.
Turning and milling
Most often, this equipment is used for boring grooves. If such a machine additionally contains a copying device, this will allow the work to be completed faster and more accurately. Also, such machines help to obtain objects of completely unusual shapes, real works of art.
Desktop
This equipment is suitable for domestic use only. Such machines can be located in an apartment, in a garage, in a private house and perform the most standard operations for processing wood products. It is on such machines that folk craftsmen make the most necessary and beautiful items for their interior.
Self-made cutter
To make a high-quality wood cutter at home, you need to follow these steps:
- Making blanks for a knife for a cutter. It is best to use an old circular wheel to create blanks. The metal must be cut using a regular grinder into small rectangular strips measuring 20x80 mm. It is worth noting that each strip can be turned into a good tool cutter in the future.
- Giving the correct shape to the main incisor. In order for the part to acquire the desired shape, it must be carefully ground. The procedure can be carried out in two ways: by forging or by sharpening on a machine. Forging is necessary to create the correct bend, and turning is necessary to obtain a good shape for the cutter knife.
- Correct sharpening of cutters for hand tools. To properly sharpen a knife, you will need a regular grinding machine with a fine-grit working wheel. The part itself must be held at an angle of 45 degrees. Depending on the total length of the cutter, the sharp part of the tool should be 20 or 35 mm. The knife itself can be sharpened not only manually, but also using specialized equipment.
- Making a handle for comfortable operation. To prevent wood carving from causing discomfort, it is necessary to make a high-quality wooden handle. Depending on personal preferences, the handle can be made manually or on a special machine. If you chose the first option, then after planing the product must be sanded with sandpaper.
- Connections between the knife and the handle. The metal cutter must be carefully inserted into the handle. To do this, you will need to drill a hole 20 or 30 mm deep in the center of the wooden handle. The blade of the cutter should be located outside, but the base itself is carefully driven into the handle. Separately, it is worth noting that for reliable fixation at the end of the metal workpiece, it is necessary to provide a special point in the form of a thin needle. At the moment of forgetting, it is advisable to use a guard made of thick fabric, so as not to dull the working blade of the knife by the end of the procedure.
- Installation of a crown for quality carving. In order to secure the manufactured knife, it is necessary to install a special metal retaining ring. A hole is cut out on a wooden handle, the contour of which corresponds to the size of the ring. Then the thread is made and the crown itself is secured. At the end of this procedure, the wooden handle should be crimped and the cutter should be securely fixed inside the product itself.
- Grinding the knife. In order for the process of wood processing to bring pleasure and good results, you need to bring the blade to readiness. For these purposes, it is best to use a small sharpening stone or simple ceramics. A little lubricant should be poured onto the surface of the sharpening product (motor oil can be used), after which the cutter can be safely sharpened perpendicularly.
After this, you are guaranteed to get a sharp tool, and if you sharpen the cutter correctly, then the wood carving will be of better quality and faster. If necessary, the cutter can always be upgraded and slightly modified.
Modern tools and wood processing technologies are directly dependent on each other
That is why, when purchasing specialized cutters, it is important to take into account not only the manufacturer’s brand and declared performance characteristics, but also the scope of their use. Standard and inexpensive kits are most suitable for minor household repairs and the creation of simple products.
Professionals will require more advanced and versatile tools that will make the process of processing wood workpieces faster and more comfortable.
And those who have already gained the necessary experience can make their own wood cutters, filling their collection with the most diverse and unexpected elements.
Knives for wood carving are a must-have accessory in the arsenal of a craftsman who makes decorative objects from natural wood.
Such tools can have different types and shapes, which directly affects the specific processing of individual parts. The most famous cutter, which is very popular among our craftsmen, is the Bogorodsk knife.
We build it ourselves
A turning tool is necessary for working on a lathe. A high-quality tool is very expensive, so one chisel costs from 3 thousand rubles, and the cost of some can reach 20 thousand rubles. Not everyone is ready to shell out that kind of money for turning chisels , given the fact that for work you need to have 3 or 4 cutters of different configurations.
In this article I will talk about the types of turning cutters , their purpose and methods of making them yourself from blade to handle.
I won’t drag it out and start talking about what kind of incisors there are and what they are needed for.
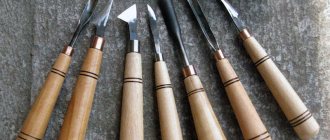
Meisel (oblique incisor)
A turning tool with a flat blade and a sharpened blade at an angle of 45-55 degrees. Meisel is necessary for almost all types of work: turning, trimming, finishing parts. The width of the lathe chisel can vary from 10 to 40 mm, the thickness within 4 – 6 mm, despite the fact that the wider the blade, the thicker it should be.
Reyer (semicircular chisel)
Semicircular turning tools are needed for rough roughing of the workpiece. A very useful cutter if you need to remove a large thickness. This type of chisel is very difficult to make on your own, because it is not easy to find a semicircular blank made of high-quality steel.
Flat cutter
The cutter is designed for turning smooth areas. The chisel blade is flat and comes in different widths depending on your needs. The thickness of the canvas is 4 – 6 mm.
Rounded cutter
It also has a flat blade of the same thickness of 4 – 6 mm and the width you need. Rounded turning tools are used for both rough roughing and finishing of concave areas of the product.
Parting lathe cutter
A cutting turning chisel (cutter) is needed for cutting products and processing cone-shaped recesses.
A significant advantage of purchased turning tools is that they are made of high-quality high-speed steel. It is the lack of high-quality material and tools for its processing that makes it difficult to make chisels at home.
I'll give you an example of how I made chisels myself. A turning chisel consists of a blade and a handle, which are naturally made separately. Let's start with making the canvas.
The main and probably the only tool I used when making a turning chisel was a grinder (angle grinder). But for work, I needed the following consumables:
- cutting wheel
- grinding wheel
- Velcro plate
- sandpaper of different grits (from 80 to 600)
As a blank, I took an old file. Why a file? It's simple: fairly strong steel, blade thickness 6 mm and width about 40 mm, the file has a shank, which will make attaching the handle much easier. I will make a reservation: if the length of the file allows you to make 2 blades, then by cutting the source on the second half you can use a grinder to cut out the shank. By the way, the length of the blade without a shank should be 150-180 mm.
I’ll tell you using the example of making a meisel - an oblique turning tool . The procedure is as follows:
Take a file and use a grinder to cut it at an angle of 40 degrees. Then, using a grinding wheel, we roughly sharpen the blade. Before you start, make sure you have a container of cold water to cool the blade you are sharpening. In order not to overheat the steel, cool the workpiece more often and do not sharpen for too long. After the rough grinding is completed, we begin sharpening the blade using sandpaper. In order to work using this method, you need to fix the grinder on the workbench. As you sharpen the blade, change the abrasive wheels to smaller ones, not forgetting to cool the workpiece.
When sharpening is finished, you need to round the bottom edge of the turning chisel and the face - the wide sides. For this job, I preferred using sandpaper. Oddly enough, sandpaper did a much better job than a sanding wheel. The rounded bottom edge is needed so that the chisel can move more easily along the tool rest. Do not forget that we used a file as the starting material, which without smoothing will be very difficult to move along the tool rest.
The next step will be making a handle for a turning chisel .
It turns out to be a small vicious circle: we need turning tools to make turning tools . I had a couple of similar chisels of simply terrible quality. One is rounded from an old chisel, the other is a meisel from a piece of raw metal, which became dull almost from one blow on a branch. It's just a sad sight, but, nevertheless, with their help I managed to turn out several handles. The materials I used were: larch, apple, cherry, pine, cedar. Based on my experience, I will say that it is better not to use pine and cedar, because they make the handle very light, which makes the turning chisel very inconvenient.
The design of the handle was partially looked at on the Internet, and partially made for myself. The length turned out to be 280 mm. You can download the drawing of a handle for a turning chisel from the link and use it both for clarity and as a template. Do not forget that you will need a copper or brass ring approximately 20 mm wide so that the handle does not burst when inserting the blade.
So. When both the handle and the blade of the turning chisel are ready, all that remains is to connect them. We stuff the prepared ring onto the neck of the handle. We take a drill and a drill with a diameter slightly smaller than the diameter of the shank. Drill a hole exactly in the center with a depth equal to the length of the shank. If the hole is not made exactly in the center, then the handle and the blade will connect at an angle.
Then we clamp the blade in a vice and hammer the handle onto the shank using a mallet. To avoid damaging the handle, it is necessary to place a cloth under the blows of the mallet. to coat the handle of a turning chisel with varnish after all the work is completed, so as not to spoil the coating.
Well, that's all. Our turning tool is ready.
Now it would be nice to make a storage box for chisels. For these purposes, you need a box with decent dimensions, since the total length of the chisels is approximately 45-50 cm. I found my father's old tool box. It was a little shabby and dirty, but it was just the right size. Using a grinder with Velcro sandpaper, I cleaned the surface of the box from the outside; I had to work on the inside with my hands. Then it was necessary to do something so that the incisors would not hang around the box and hit each other, becoming dull against each other.
I decided to make three stands, one for the neck on which the ring was put, the second for the narrowest part of the handle, and the third for the blade of the turning chisel . To do this, I took a piece of plywood and cut out two blanks with a width equal to the width of the box. Then, using a forstner drill, we make semicircular recesses in the workpieces at equal distances. The diameter of the drill should be 1 mm larger than the diameter of the handle at the points where the chisel comes into contact with the stands. We cut the stand in the places where the canvas supports with a hacksaw according to the profile of the canvas. The last thing we need is to secure the stands in the box and we can lay out the turning tools.
We made turning cutters - the main tool for performing turning work. In order to improve your work, make a tool according to your needs. After some time, you will get used to sharpening chisels and select the optimal blade sharpening angle for the job.
If you have any questions, write to me via feedback.
Author of the article: Samorodov Vadim 2015-11-12
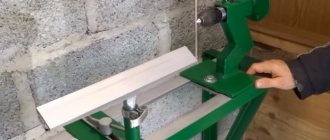
DIY making
When making these tools, you cannot do without an electric sharpening machine (electric sharpener) with a set of abrasive wheels of different grain sizes. In most operations, it can be successfully replaced by a grinder with cutting and grinding discs.
Wood cutter blade
To make a tool blade, any used high-quality steel products are suitable - springs, drills, scalpels, rasps and even bearing rings.
For knives, the easiest choice is a hacksaw blade. Manufacturing consists of cutting it into pieces of the required length, forming the desired blade shape and sharpening.
The best option for chisels is a circular saw blade, the thickness of which is very suitable for this purpose. The carbon steel from which it is made holds an edge for a long time, even when processing hard wood. Cutting strips of the required size and grinding them to obtain the required blade shape is done using a grinder or an abrasive disc of an electric sharpener.
An old punch is perfect for a semicircular chisel - it already has the desired shape. It is enough just to cut off the excess metal from it and sharpen it.
During intensive grinding, the metal heats up, which causes a tempering, making it softer and unable to maintain an edge for a long time. Therefore, after giving the blade the desired shape and sharpening, hardening is required. To do this, you need to heat the cutting part using a gas or kerosene burner until it turns crimson and lower it into a container with machine oil.
Lever
Oak is considered the most suitable wood for the handle. Well, where it does not grow, it can be quite successfully replaced by birch, which, being burnt black with a gas burner and sanded, does not require any coating and is very comfortable to work with.
For wood knives, the handle can be made in the following way:
- cut two bars about 12 centimeters long and 12x22 millimeters in cross-section;
- attaching the shank of the blade to the block, circle it with a pencil;
- Use a chisel to select wood to the depth of the blade thickness;
- apply wood glue (PVA or EDF can be used) on the surface of the bars, connect the structure and tighten it with clamps or clamp it in a vice;
- After the glue has dried, plan the handle or grind it on an electric grinder and sand it.
For chisels, the handle can be turned on a lathe or cut from a whole block. Then drill a hole to the size of the shank and, having first put a crimp ring on the handle, which protects the wood from splitting, carefully place it on the blade.
Sharpening wood cutters
The final stage in the manufacture of wood cutters is the formation of the cutting part and sharpening. The main part of the metal from the cutting edge can be removed on the abrasive wheel of an electric sharpener or with the sharpening disc of an angle grinder.
The sharpening angles of the chamfers of all types of cutters are approximately the same and lie in the range of 18-25°, and the length of the sharp part is about 20-35 mm, depending on the total length of the cutter. During the processing process, it is necessary to constantly cool the blade in a container with water.
Further work is performed manually in the following sequence:
- sharpening on an emery block, which is recommended to be periodically moistened with water;
- sharpening on a thinner block or on sandpaper placed on a hard, even substrate;
- final editing and polishing of the cutting edge on a leather belt rubbed with GOI paste.
During the operation of a cutting tool, its blade inevitably loses its sharpness. Regular thorough sharpening of wood cutters is a necessary condition for comfortable work of the carver and high quality of the carved product.
Description of turning tools
The wood cutter is made of high strength steel.
Although wood is a soft material, the cutting part is subjected to significant loads, and even heats up from constant friction. Therefore, factory cutters are made from alloy and carbon steels, which hold an edge for a long time and at the same time are not too fragile, that is, they do not crumble as a result of a sharp increase in load (for example, when they hit an internal knot in hard wood).
Each cutter consists of the following parts:
- blade – comes into contact with the workpiece and, due to its sharpness, removes a layer of wood;
- working part (body) - one end of it is sharpened to a blade, and the other ends with a shank, the turner holds it with his hand;
- shank - the narrowed end of the working part, onto which a wooden handle is mounted.
The handle is usually made of wood and consists, in turn, of a thick cylindrical base and a narrow neck, on which a metal ring is usually put on, which protects it from cracking when placed on the shank.
Varieties
All devices used for the manufacture, finishing and decoration of turning workpieces can be divided into several general types:
Cut off . The shape resembles a knife, but unlike a regular knife, a turning knife uses only the tip. Parting tools are worked by turning their plane vertically, unlike chisels, which are held horizontally. Using a turning knife, a part of the workpiece is cut off and deep grooves are made.- Chisels . Flat or semicircular objects with a sharpened blade. They select a part of the material, pressing it against the workpiece parallel to the floor or at a slight angle. Thanks to chisels, a beam or log, sandwiched between the headstocks, takes the shape of a curly bed leg or an evenly tapering baseball bat.
- Scrapers . They are used after the product has been given a rough shape. Unlike a chisel, a scraper does not have a sharpened blade - the cut is made using the hard edge of the end. Thanks to scrapers, both decorative and functional complex ring cuts can be made in wood. The most common scrapers are shaped like the letter R.
Various options and their purpose
The variety of cutting tools for wood when rotating on a lathe is very large. Experienced craftsmen create cutters of the shape they consider convenient for the implementation of individual tasks. Therefore, one personal cutter is not similar to another. However, there are standards for factory tools, some of which are basic, others highly specialized.
Reyer
This is one of the basic incisors. It can be recognized by its characteristic shape - the working part of the rail is not flat, but curved, forming a groove. Sharpening is done from the inside of the curve. They work with a rake, bringing it to the workpiece with the groove up.
Thanks to the shape of the blade, this cutter selects wood in a semicircle. Its longitudinally curved shape makes it very durable, making it well suited for rough turning of workpieces. With the help of a reyer you can also make smooth transitions and grooves with a semicircular profile.
The width of the rib ranges from 4 to 30 mm, and the sharpening angle is about 30 degrees.
Meysel
If a reyer is a relatively simple tool, which is intended primarily for rough, rough work, then a meisel is already much more difficult to use.
It is unlikely that you will be able to master it in a couple of days of practice. This cutter is used already when the outlines of the wooden product are formed.
However, for an experienced turner, the use of a meisel gives an even, smooth surface of wood of a given geometry.
The Meisel is a bit like a regular flat hammer chisel, but its blade is angled. Accordingly, the master must have at his disposal at least two meisels - left- and right-handed - in order to process mirrored areas.
Sharpening the meisel can be done either by beveling one side until it comes out flat, or by equally removing the metal layer from both sides. In this case, the width of the blade can reach up to 40 mm, and the bevel angle ranges from 60 to 75 degrees. When sharpening a cutting edge on both sides, the angle should be 20 – 25° on each side.
Shaped
After the main processing of the part in the headstocks has been completed, it is the turn of the figured cut. For this purpose, shaped cutters are used. They can have different shapes for turning grooves, grooves, and select grooves of complex shapes.
Klukarza.
The most common “styles” are:
- Klukarza . The shape of the cutter is similar to the reyer, but has a bend in the working part near the blade. Thanks to this shape, the cranberry can be used for small and complex work; it can reach places where tools with a straight working part cannot reach.
- Comb . It makes parallel grooves and grooves. With the proper level of skill, a thread is cut using a comb.
- Hook . Allows you to make an internal recess with a protruding edge, as well as various curved grooves.
- Crescent or dovetail . Used for turning round and faceted beads.
The process of turning a workpiece on a lathe significantly depends on the sharpening angle of the tool. Small angles (20 – 30°) are intended for fine work.
They remove wood well, but if moved carelessly they can damage the workpiece or break themselves. Large angles (60 – 75°) are intended for rough work with hard rocks.
They can remove less in one pass, but they are not afraid of knots and pressure created by the turner.
About creating with your own hands
Experienced turners make their own cutters for work, not being satisfied with the assortment that is on sale. Plus, it's significantly cheaper. The material used is old tools that have served their purpose: files, needle files, rasps and other flat objects with sufficient hardness.
In order to make a cutting edge, sharpening machines with diamond wheels are used. The easiest way is to make a straight blade - to do this, just sharpen the end of the tool.
When removing metal on a wheel at high speed, you must avoid overheating the steel. Otherwise, the metal will be tempered, and the future cutter will quickly lose its sharpness. Supplying water to the wheel while sharpening is one of the best cooling options. However, if you overheat the cutter during the process, it doesn’t matter. It can be hardened again by heating it red-hot with a propane torch and then running in water or oil.
What wood lathe cutters do you use?
Blades with complex configurations will have to be adjusted manually using thin files and diamond needle files. If the farm has an engraver, it can also be used with conical, cylindrical and spherical burrs (cutters). This way you can get a cutter of any configuration.
After the body is ready, they begin to handle the handle. On turning tools, the shank is increased to accommodate a longer handle for convenience. It is advisable to burn the drilled hole in the handle by heating the shank and inserting it “hot” so that the wood will crack less.
Best sets
DEXX 1834-H11_z01
- type : chisel;
- profile : flat, oblique, curved;
- handle material : wood;
- blade material : alloy steel.
One of the most affordable sets. There are 11 chisel-type cutters, there are both semicircular and oblique blades. Suitable for most small carpentry work.
Factory sharpening is only indicated, so upon purchase you will need to bring the tool into working condition.
STAYER 1831-H33
- type : cutter;
- profile : V-shaped, semicircular, flat, oblique, curved, square;
- reinforced handle;
- handle material : rubber, plastic;
- blade material : hardened steel.
Set with an impressive set of cutters. Some of them almost duplicate each other, so in case of breakdown there will be no problems. The cutters are put on the handle. There are two types: for rough shaping of the workpiece and for fine work.