The operation of lathes is impossible without the use of cutting equipment. Most often, the equipment is equipped with cutters, which allow most processing operations to be performed. Among them are boring, cutting grooves and threads, trimming, etc. A separate group of cutting tools is used for preliminary preparation of wood. The operator eliminates excess workpiece mass, allowing it to be integrated into the work area for more precise, targeted operations. But in any case, the cutter for a wood lathe must have optimal sharpening. Special equipment helps to bring the characteristics of the equipment into the proper form, but first you should understand the design of the cutter itself.
How is the cutter constructed?
The base is a metal rod, which can be divided into two parts: the working head and the shank. The cutting part has the shape of a triangle with rear and front auxiliary surfaces along which chips flow during the cutting process. Processing is performed with the main cutting edge, which craftsmen call the apex. This is the intersection of the secondary and main edges.
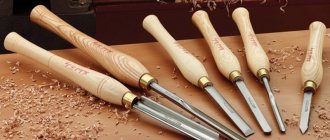
As for sharpening, the condition of this particular part matters. The top may be rounded or sharp. The tool also has different formats. Usually the size of the holder is taken into account - on average from 8 to 25 mm. For universal work, it is better to purchase a set of wood cutters for a lathe, which includes more than 10 pieces. The standard set includes cutters with different shapes, which allows you to make grooves, grooves, chamfer and perform shaped processing.
Finishing the chisel by hand
In the next video, the author clearly demonstrates how to fine-tune a chisel manually using an emery block.
The bar must be constantly moistened, otherwise it will quickly become greasy and cease to perform its functions. The grain of the abrasive stone should be significantly smaller than that of the stone on the grindstone.
The whole point of manual finishing comes down to grinding the chamfer specified on the sharpener with abrasives of different grain sizes, gradually reducing the grain size to zero.
Attention! The most important secret of razor sharpening! If you did everything on the sharpener as described in the theoretical video, place the bevel of the chisel on the flat surface of the abrasive stone. It will touch the surface only at two points: the very tip and the butt, i.e. there will be no need to grind the entire length of the chamfer specified on the sharpener. When finishing the surface of the block, only the nose and butt of the chamfer will rub!
Carefully, with wave-like movements that repeat the radius of the chisel, Valery begins finishing work. As we remember, at the sharpener we already received a “sharpening”. Now, by sharpening the chisel by hand on a finer-grained block, the main task is to gradually get rid of the oversharpening. Important: burrs should never be broken off! They themselves will gradually disappear during the finishing process.
After manipulations on the block, the roughness of the chamfer will decrease significantly. Next, you can switch to fine-grained sandpaper (or a block with a finer grain) and continue sharpening and polishing with it. Please note that Valery corrects not only the chamfer that he set on the sharpener. To make the “sharpening” completely disappear, he also processes the upper semicircular surface of the chisel. Only after the complete visual disappearance of burrs can the tool be considered ready for use. But if you watched the video carefully, Valery Alekseevich, after abrasive processing, made the final sharpening touches on a “rag” with Goya paste applied. The paste polishes the surface and further reduces the roughness of the chisel surfaces. Instead of a “rag”, you can use leather with Goya paste.
Visual result after manual finishing:
- 1. “Resharpening” should disappear;
- 2. The surface of the chamfer should be as polished as the top surface of the chisel;
- 3. The cutting edge should not shine.
Don't try to achieve results as quickly as possible. This work requires care and patience. It usually takes 15-20 minutes to fine-tune one chisel.
Types of turning tools
The general segment of turning tools in the main classification involves the division of equipment by purpose - for wood and metal. In this case, the first type is considered. Such models differ from metal cutters in the material of manufacture. Technologists use tool grades of steel, while metal processing is carried out with cutters made of carbon hard alloys.
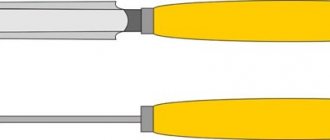
Also, different types of cutters for a wood lathe differ in design. The working part can be straight, bent, drawn or curved. The choice of one or another type of cutter is determined by the wood processing method, cutting characteristics and equipment. By the way, the parameters for integrating the equipment into the fastening zone also determine differences in the design of the shank. Modern machines focus on versatility, that is, the ability to work with rectangular, round or square holders. Moreover, in this aspect, differences between cutters for metal and wood are most often not made.
Features and Specifications
Comparing solutions presented in stores from various manufacturers, for example, products from Bosch and the Skil 7720 model, you can find that they all have a similar design, in which the following components can be distinguished:
- Frame. Made of durable plastic and has a comfortable handle.
- Tool start button and speed control.
- An informative indicator that helps you find out about the tool blocking and the operating speed set at any given moment.
- A special socket allows you to quickly change and install the working tool.
It’s not hard to guess why an electric wood chisel is often called a multi-cutter. After all, this device has the capabilities of various types of working tools. For example, the equipment of one of the most popular multifunctional models among domestic consumers, Skil 7720, includes:
- steel violin blades for universal use, 35 mm wide - 5 pieces;
- steel flat cutters with a blade width of 15 mm - 2 pieces;
- steel spatulas 60 mm wide - 3 pieces;
- steel knives 60 mm wide - 5 pieces.
Having such a large set of working tools at hand, any home craftsman will be able to solve a wide variety of tasks using an electric chisel.
To get a more complete picture of the device’s capabilities, let’s return to the aforementioned multifunctional electric chisel Skil 7720 and get acquainted with its technical characteristics:
- vibration level - 12.7 m/s2;
- acoustic power level - 92 dB;
- acoustic pressure level - 81 dB;
- three operating speeds with an oscillation frequency of 6500/8500/i9500 rpm;
- platform working stroke - 2.2 mm;
- operating power indicator - 250 W;
- weight - 1.2 kg.
However, not only the above operating parameters make the Skil 7720 model a convenient and effective tool in the hands of a home craftsman. This is also facilitated by the presence of a special device in the design, with which you can quickly and without the help of additional solutions change the working tool. In this electric chisel, the manufacturer provides the possibility of additional feed of the tool forward, which also has a positive effect on the convenience and efficiency of its use.
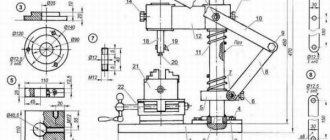
How do you make cutters with your own hands?
As you can see, the cutter is designed quite simply, and an ordinary lathe can easily be equipped with a homemade analogue. Typically, such products are created on the basis of files and rasps. Home craftsmen only remake them to fit the format of specific turning equipment. You can also use car springs or sections of reinforcing bar as a basis. But in such cases, more effort will be required when finalizing the shape of the element.
Next, homemade cutters for a wood lathe are carefully mechanically adjusted to the required size. This is the first sharpening during which the working edge will be formed. The disadvantage of a homemade cutter is that the workpiece may have internal defects resulting from previous use. The same file, after long-term use for its original purpose, due to stress in the structure, is often endowed with voids, which reduces its working life.
Self-made cutter
To make a high-quality wood cutter at home, you need to follow these steps:
- Making blanks for a knife for a cutter. It is best to use an old circular wheel to create blanks. The metal must be cut using a regular grinder into small rectangular strips measuring 20x80 mm. It is worth noting that each strip can be turned into a good tool cutter in the future.
- Giving the correct shape to the main incisor. In order for the part to acquire the desired shape, it must be carefully ground. The procedure can be carried out in two ways: by forging or by sharpening on a machine. Forging is necessary to create the correct bend, and turning is necessary to obtain a good shape for the cutter knife.
- Correct sharpening of cutters for hand tools. To properly sharpen a knife, you will need a regular grinding machine with a fine-grit working wheel. The part itself must be held at an angle of 45 degrees. Depending on the total length of the cutter, the sharp part of the tool should be 20 or 35 mm. The knife itself can be sharpened not only manually, but also using specialized equipment.
- Making a handle for comfortable operation. To prevent wood carving from causing discomfort, it is necessary to make a high-quality wooden handle. Depending on personal preferences, the handle can be made manually or on a special machine. If you chose the first option, then after planing the product must be sanded with sandpaper.
- Connections between the knife and the handle. The metal cutter must be carefully inserted into the handle. To do this, you will need to drill a hole 20 or 30 mm deep in the center of the wooden handle. The blade of the cutter should be located outside, but the base itself is carefully driven into the handle. Separately, it is worth noting that for reliable fixation at the end of the metal workpiece, it is necessary to provide a special point in the form of a thin needle. At the moment of forgetting, it is advisable to use a guard made of thick fabric, so as not to dull the working blade of the knife by the end of the procedure.
- Installation of a crown for quality carving. In order to secure the manufactured knife, it is necessary to install a special metal retaining ring. A hole is cut out on a wooden handle, the contour of which corresponds to the size of the ring. Then the thread is made and the crown itself is secured. At the end of this procedure, the wooden handle should be crimped and the cutter should be securely fixed inside the product itself.
- Grinding the knife. In order for the process of wood processing to bring pleasure and good results, you need to bring the blade to readiness. For these purposes, it is best to use a small sharpening stone or simple ceramics. A little lubricant should be poured onto the surface of the sharpening product (motor oil can be used), after which the cutter can be safely sharpened perpendicularly.
After this, you are guaranteed to get a sharp tool, and if you sharpen the cutter correctly, then the wood carving will be of better quality and faster. If necessary, the cutter can always be upgraded and slightly modified.
Modern tools and wood processing technologies are directly dependent on each other
That is why, when purchasing specialized cutters, it is important to take into account not only the manufacturer’s brand and declared performance characteristics, but also the scope of their use. Standard and inexpensive kits are most suitable for minor household repairs and the creation of simple products.
Professionals will require more advanced and versatile tools that will make the process of processing wood workpieces faster and more comfortable.
And those who have already gained the necessary experience can make their own wood cutters, filling their collection with the most diverse and unexpected elements.
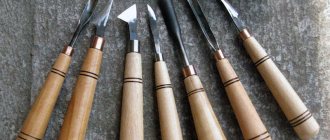
Knives for wood carving are a must-have accessory in the arsenal of a craftsman who makes decorative objects from natural wood.
Such tools can have different types and shapes, which directly affects the specific processing of individual parts. The most famous cutter, which is very popular among our craftsmen, is the Bogorodsk knife.
Why is cutter sharpening important?
The need to perform this operation, at first glance, is similar to sharpening kitchen knives. A sharp blade handles cutting tasks more efficiently, requiring less effort and time. But in the case of machine tool correction, there are other technological nuances. High-quality sharpening is a preventive measure that eliminates the risk of the working head falling off during operation.
In addition, negative deformation phenomena in the form of chipping and scuffing are prevented. Obviously, the quality of the work itself on a wood lathe also improves. Correctly sharpened cutters form even grooves and grooves, not to mention shaped operations. Other factors affect the quality of work, but the sharpness of the tool tip is key to achieving optimal results.
Overview of species
The cutters differ in functionality, design nuances and other parameters.
By purpose
Here we are talking about the materials with which the cutter works.
- On wood. In markets they can be found in sets with rings, combs, reiers, hooks, and meisels. The cutters and rotation mechanisms are fastened together.
- For metal. When you need to weld or solder a plate, that’s when they talk about the optimal choice for cutters. Hard alloys and high-speed alloys are used more often in this case. Installation of such cutters is possible not only on lathes, but also on slotting, planing, special-purpose and others.
This classification is small, the choice here will not be difficult.
By design
These are solid cutters in which the shaft and head are articulated by one system. Or is it a tool with welded plates, they are very firmly connected to the head. If the soldering of the plates was carried out without technical precision, cracks may subsequently form on the working surface. Such cutters are widely used because they are suitable for a wide variety of machines.
By type of processing
Here the cutters are divided into fine and semi-finish. For finishing machines, the feed rate is low; material with a small thickness is removed from the blank. Most often, such tools are represented by a through cutter. Semi-finish ones are very similar to the previous version, but they are weaker in characteristics than finishing ones. But they can be used for the same tasks.
By type of installation
Tangential cutters are a tool that is installed at a certain angle, any angle except the straight one. This is measured relative to the axis of the surface that is undergoing the operation. And the tool is distinguished by a complex fastening scheme for internal turning.
The radial cutter is distinguished by fixing an exclusively right angle on the surface that is being processed. A popular option for industrial purposes. And the radial version has a big advantage - it is a simplified fastening system.
By feed type
Here everything is even simpler: left-handed cutters are tools with the right-hand side of the cut, and it is towards it that the metal being processed is turned. The right incisors have a cutting part on the left; the metal surface for processing is turned onto it.
By fastening the cutting part relative to the rod
And this characteristic presents 4 types of incisors. The bent ones are distinguished by a special curved line, a characteristic feature of the projection axis of the upper position. And lateral localization ensures the straightness of the lines. Straight incisors are those whose axis of projection maintains an even line, both from above and from the side.
In retracted incisors, the head and shaft are different in size, the head will be smaller. It is attached to the incisal axis. The part is characterized by some displacement relative to the axis of the cutters, in any direction. Well, curved incisors in the upper localization are connected to the projection axis by a straight line, while the lateral projection is connected to a curved line.
By processing method
And there are many varieties here.
- Trimming. If it is a machine with cross-feed workpieces, the tool is easily connected to the equipment. These are either the edges of different surfaces, or stepped elements.
- Walkthroughs. Functional for metalworking with cross and longitudinal feed equipment. This is relevant if trimming concerns the ends, cylindrical and cone-shaped workpieces.
- Boring. Needed for through and blind holes, for recesses and recesses.
- Round. Here the shape determined the name.
- Threaded. External and internal threads are formed, with a trapezoidal cross-section, as well as round and rectangular. The products themselves can be smooth, round, or convex.
Sharpening equipment
Since the cutter is made on the basis of tool steel, its sharpening must be carried out on high-power equipment. For such needs, boring machines are used in different configurations. The basic structure of the design includes two base clamps and a retractable hand rest with a V-shaped stop. As an addition, adjustable hand rests can be used to expand the possibilities for securing the workpiece.
For example, if it is necessary to modify a bevel cutter for a wood lathe, then an appropriately shaped attachment may be required. In this case, an adjustable hand rest will help. But most often, universal holder models are used, designed for a wide range of standard cutters. The fixing base is usually attached under the elements that perform sharpening. The relative position of the functional sides in this part is determined by the sharpening parameters. Modern models of sharpening machines also allow you to service scraper blades, planer and chisel equipment.
Types of machines (for wood and metal)
Universal
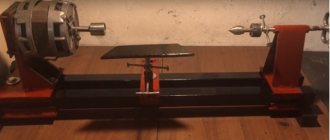
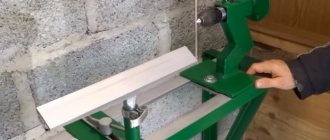
The universal lathe is designed for initial roughing, as well as sharpening, cutting and drilling. Also, using this equipment, carvings are applied to a wooden object.
Lathe-screw
This type of lathe is designed for processing cone-shaped workpieces and for applying threads.
Turning and milling
Most often, this equipment is used for boring grooves. If such a machine additionally contains a copying device, this will allow the work to be completed faster and more accurately. Also, such machines help to obtain objects of completely unusual shapes, real works of art.
Desktop
This equipment is suitable for domestic use only. Such machines can be located in an apartment, in a garage, in a private house and perform the most standard operations for processing wood products. It is on such machines that folk craftsmen make the most necessary and beautiful items for their interior.
Sharpening with abrasive wheels
A sharpening machine is only a technical basis for organizing the mechanical interaction between the tool being processed and the abrasive. Sharpening is carried out with discs made of electrocorundum when they rotate at a frequency of about 3000 rpm. The abrasive can be made from other materials of varying degrees of hardness, but in any case it must prevent overheating of the cutting edge.
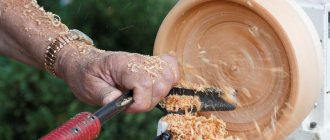
For example, in some cases, low-frequency sharpening at 2000 rpm using a 20 cm aluminum oxide wheel is recommended. This results in a kind of “soft” sharpening effect, which is beneficial if you are using a medium-format or low-power wood lathe. How to sharpen a cutter with an abrasive disc? Experienced craftsmen recommend sharpening with slight pressure of the tool against the rotating disk. At the same time, uniformity must be ensured, which is achieved by moving the blade from side to side. If you use a machine with a retractable tool rest, then it is important to ensure that the contact patch between the abrasive and the cutter is located higher than the axis of rotation of the wheel.
Processing on a grindstone
Sharpening a semicircular chisel is performed in several stages. For initial processing, you will need a regular sharpener, which you can buy or make yourself, as the author of the video did. The master clearly demonstrates the sharpening process on video. First he straightens the cutting edge. After this, the chisel will become completely dull, but will have a smooth end, which needs to be sharpened in the future.
Don't forget to use safety glasses, because scale getting into your eyes can cause you a lot of unnecessary problems!
Then we watch the movie, everything is very clear there. The only thing I could add to the master is the advice to apply the chisel to the stone without any pressure to avoid overheating the metal! The fact is that for the manufacture of tools, hardened steel is used, which has high cutting properties. However, during processing on a sharpener, the metal of the chisel can become very hot and lose its performance characteristics. This will become noticeable by the tarnished colors that appear on its surface. To prevent such a result, during processing on a sharpener, the chisel must be periodically dipped in water. Don’t forget to place a container of water next to the sharpener in advance!
How to determine the end of sharpening on a sharpener?! It's very simple. Burrs should appear on the entire cutting edge, called “regrinding” in professional slang. If the edge shines somewhere and there is no sharpening, continue sharpening.
So, visual criteria for correct sharpening on a sharpener:
- 1. There should be no tarnish on the tip;
- 2. Uniform “grinding” along the entire edge.
- 3. The chamfer must be uniform, i.e. ideally repeat the radius of the stone
Finishing the characteristics of the cutter
This is a more precise operation performed on machines with diamond wheels. This sharpening method is most often used when it is necessary to remove obvious defects. For example, if a wood lathe cutter has burrs, cracks or nicks. In this case, the working process is carried out under mechanical control. That is, the tool being processed is fixed in a vice and controlled by a hydraulic or electric drive. The operator adjusts the cutter displacement parameters in accordance with the requirements for its correction parameters.
What do you need to make a homemade cutter?
To sharpen the cutting area, you will need an electric sharpener or sharpening machine. The production of some types of cutters involves sharpening using abrasive discs of different configurations.
You also need to prepare steel blanks according to the number of tools being made. The best wood cutters (chisels) for a lathe are made from R6M5 steel. Parts from old bearings, files, and taps are also suitable. You can use any suitable size product made from hard grade steel.
The tool is equipped with a wooden handle. You can buy it ready-made or make it yourself. In order to save time, it is better to buy, especially since there are handles of different sizes on sale, and they are inexpensive.
Before making wood cutters, you need to decide on the configuration and purpose: whether they will be used for finishing or rough processing, turning bowls or other purposes.
General recommendations for sharpening
Even before starting sharpening, the condition of the machine and the grinding wheel should be carefully checked. When working manually, the cutter must be supported on a handy support part, and not supported by weight. As a rule, the tool rest itself is installed 3-5 mm from the abrasive disc. To eliminate the risk of critical overheating, sharpening of cutters for a wood lathe is carried out with periodic cooling with water. This also avoids the formation of small cracks that occur under extremely high thermal loads.
Comparison of sharpening a chisel and a flat knife
| Chisel processing | Planing knives |
| A fine grit grinding wheel is used first and lapping is done using a coarse abrasive. | Primary processing is carried out with a coarse abrasive, correction of defects is carried out with a fine one, and finishing and finishing polishing is carried out with a leather belt or strip of leather. |
| The procedure can be carried out either manually or using an automated circle. | Sharpening is carried out only on automatic wheels with different abrasive grain sizes. Otherwise, the procedure will take a long time. |
| The sharpening angle usually varies from 25° to 35°. | The angle for a flat knife when sharpening can be 25° – 45°. |
| The inclination of the chamfer is determined based on the thickness of the metal of the chisel. | The inclination of the knife blade when sharpening is selected based on the thickness of the wood with which you will have to work. |
After such comparisons, it immediately becomes clear how sharpening a chisel differs from a flat knife. The difference is quite noticeable and should be taken into account in the process of preparing a particular tool for woodworking.