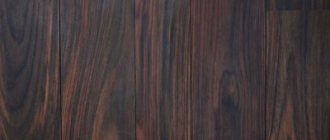
In order not to lose the quality characteristics of wood, it is recommended to treat it only with natural compounds. Various natural oils have been used for treating wood since the 12th century. In terms of its characteristics, linseed oil takes first place, as it not only protects wood, but also gives it a soft, velvety shade. How to properly use linseed oil for wood processing, the main stages and subtleties of the work in one short article.
How to tint correctly
In a nutshell, the instructions for tinting are that the dye is slowly added to the stain, paint, etc., after which it is simply mixed thoroughly. The dye is added gradually and when the liquid reaches the desired shade, you can proceed to processing the wood. However, there are a number of nuances, depending on what needs to be prepared -.
Preparation of tinted varnish
The main purpose of the treatment is to create a durable film on the surface of the wood; after the varnish has dried, it will protect the wood from moisture penetration into it, and the texture will also appear. Tinted wood varnish differs from regular varnish in that after processing the wood texture not only appears, but is also painted in the appropriate shade.
Sometimes even famous manufacturers can make mistakes in the color chart, so it makes sense to take care of preparing the varnish of the desired shade with your own hands. Dyes are usually sold in the same stores as the wood treatment products themselves. You can even try to negotiate with the operator of the coloring machine and the color can be cast into your container. This is just an ideal option, but it all depends on the mood of the employees.
Use of natural raw materials
White matte wood paint.
Odorless paint for wooden furniture Since ancient times, the question of how to create a brown color was solved with the help of plant ingredients: beet juice, onion peels, sorrel, blackberries or blueberries. Nowadays, hardly anyone would want to dye their sweater or other clothes by squeezing out natural juices. It is easier to buy a ready-made chemical dye. However, such information may be useful.
One of the well-known methods is dyeing with natural coffee. How to do this for a blouse is explained below:
- First you need to brew coffee (for 100 g of ground coffee you need 2 liters of water).
- Cool the coffee broth and strain through 3-4 layers of gauze.
- Place the resulting solution in a bowl and heat it over a fire to 80ºC.
- Place the blouse to be dyed in the hot solution and bring to a boil.
- Boil for 15 minutes, constantly stirring the contents, which is necessary for uniform coloring.
- The fabric or item is removed from the basin and the water should be allowed to drain.
- It is better to dry the blouse flat on hangers.
When deciding how to get original shades of brown, it is better to learn how to find the correct and balanced ratios of the main colors to be mixed. There are a large number of options for light or dark brown, and the required shade can only be obtained by experimenting with primary and additional colors. Now you know the nuances of getting brown from what colors, what colors are used for this.
Decorative properties of oils
When choosing an oil, the visual effect of its application is of paramount importance. From this point of view, oils are divided into conditionally colorless and tinting. Why are oils called colorless only conditionally? Because in any case they change the color of the wood surface, but at the same time maintain transparency. Coloring oils include a colloidal suspension of coloring pigment - from white to soot, which somewhat muffles the contrast of the texture pattern.
Transparent oils always reveal the wood's texture differently. This is due, first of all, to the viscosity index. The lower it is, the smaller the pores of the wood can be impregnated. Thick oils show only the general pattern of the fibers, while rarer oils show fine details of texture. Thus, for treating oak surfaces, the oil should have a viscosity slightly below average, while rich, thick formulations are recommended for alder.
The use of tinting oils is in many ways similar to staining. Tinting wood with oil is quite rarely used as an independent processing technique. Much more often, such compositions are used to emphasize the soft veins between hard wood fibers or to cover individual furniture elements. After drying, tinting oil has less gloss than colorless oil.
It is not known whether such a property of oils as smell can be attributed to decorative qualities. In reality, all oils smell completely different, from haymaking to roasted seeds. After drying, the smell from the oil treatment turns into a very persistent, but subtle aroma, which can become a valuable part of the interior color.
How to tint correctly
In a nutshell, the instructions for tinting are that the dye is slowly added to the stain, paint, etc., after which it is simply mixed thoroughly. The dye is added gradually and when the liquid reaches the desired shade, you can proceed to processing the wood. However, there are a number of nuances, depending on what needs to be prepared -.
Preparation of tinted varnish
The main purpose of the treatment is to create a durable film on the surface of the wood; after the varnish has dried, it will protect the wood from moisture penetration into it, and the texture will also appear. Tinted wood varnish differs from regular varnish in that after processing the wood texture not only appears, but is also painted in the appropriate shade.
Sometimes even famous manufacturers can make mistakes in the color chart, so it makes sense to take care of preparing the varnish of the desired shade with your own hands. Dyes are usually sold in the same stores as the wood treatment products themselves. You can even try to negotiate with the operator of the coloring machine and the color can be cast into your container. This is just an ideal option, but it all depends on the mood of the employees.
Flaxseed oil is a natural substance obtained by cold or hot pressing of flaxseeds. Pure oil can be used as a stand-alone finishing coating, but in its untreated state it is ineffective due to its low polymerization (drying) ability.
When talking about impregnating wood with linseed oil, they usually mean using drying oil. This is a composition modified by heat treatment and the addition of chemical additives that accelerate the polymerization process. Drying oil is also called “boiled” or “boiled” linseed oil.
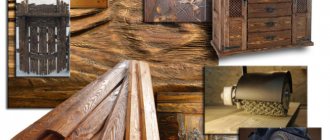
Two recipes for homemade oil-wax for impregnating wood
Hello, dear readers and DIYers! Surely many of you make various products from natural wood, and you know very well that the key to their long service is not only competent pre-drying of the material, but also high-quality finishing of the surface with various oils, impregnations, or varnishes.
In this article, the author of the YouTube channel “Rag 'n' Bone Brown” will tell you about a fairly simple method of making oil wax at home for finishing impregnation of wood and products made from it.
The fact is that this is a truly wonderful finishing coating that not only protects the wood from moisture, but also smoothes out all the unevenness and roughness of the surface and gives the wood a unique, barely noticeable gloss.
Materials. - Natural beeswax - Linseed oil - Mineral oil - White spirit - Screw-top jars - Rags.
The author’s innovation lies in the fact that he decides to combine oil and wax and thereby speed up the process of finishing wood. In addition, the author intends to prepare a mixture of two types: one for cutting boards and wooden food utensils, and the other for other wooden products. The first mixture will be composed of safe components that, upon contact with food, will be harmless to humans. Whereas the requirements for the ingredients of the second type of mixture will not be as high.
So, the master will need the following ingredients: The first is beeswax. Its function is to thicken and harden the composition. When applied to a wooden surface, wax will give the latter durability, smoothness and a pleasant shine.
It is important to mix all the ingredients thoroughly and quickly, because as soon as the hot wax comes into contact with the cold ingredients and the walls of the jar, it will immediately begin to thicken.
To stir, you can use a wooden stick like this, long enough to reach the bottom. Now you can screw on the lids.
I thank the author for two simple wood impregnation recipes! Also, a similar recipe was proposed by Vladimir Natynchik in one of his articles. However, it has slight differences in composition and method of preparation. Instead of flaxseed oil, Vladimir used rosehip oil, since it has virtually no odor.
After applying thick oil-wax impregnations to the surface of the wood, it is recommended to warm it up with a regular household hairdryer. This will facilitate deeper penetration of the product into the thickness of the material.
Good mood, good luck, and interesting ideas to everyone!
The author's video can be found here.
Source: usamodelkina.ru
How to avoid spontaneous combustion
The process of oil oxidation upon contact with air is accompanied by an increase in temperature, which can lead to spontaneous combustion of oil-vapor rags, tampons, sponges, etc. Before disposal, all consumables that were used for wiping off linseed oil should be thoroughly dried in a straightened state outside the room, or better yet, soaked in water or immediately burned. To store the dispenser and other tools in contact with oil, use airtight containers.
In order not to lose the quality characteristics of wood, it is recommended to treat it only with natural compounds. Various natural oils have been used for treating wood since the 12th century. In terms of its characteristics, linseed oil takes first place, as it not only protects wood, but also gives it a soft, velvety shade. How to properly use linseed oil for wood processing, the main stages and subtleties of the work in one short article.
When choosing how to treat a wooden floor or staircase, the environmental friendliness and protective properties of the impregnation are first taken into account. Impregnating wood with natural linseed oil has a number of advantages:
- The old product acquires an aesthetic appearance, as small cracks, abrasions and unevenness are masked.
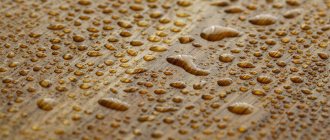
- Absorbing into the porous surface, the composition gives it water-repellent properties.
- After drying, dust and dirt adhere less to the surface.
- Emphasizes the natural texture of wood.
- The oil has antiseptic properties and protects the surface from fungi, mold and blue stains.
- It is deeply absorbed into the wood and will last at least 50 years.
- Protects wood from cracking and drying out.
- Wood never stops “breathing”.
- Hypoallergenic and suitable as finishing in children's rooms and kitchens.
Linen is used to coat any wood products: in the processing of houses, when finishing furniture and decorative elements made of oak, teak, pine, spruce, fir. Due to its composition, the oil is easily combined with various tinting emulsions. Apply independently as finishing and protection or under further varnish coating.
The only downside is the price, which depends on the manufacturer and the volume of impregnation purchased. The table below presents the most popular manufacturers of linseed oil for finishing work:
Which wood oil to choose depends on your financial capabilities. An unrefined product from any manufacturer is suitable for wood processing. Imported flax compositions are more expensive, but have additives in the form of beeswax or artificial polymers. They reduce drying time and simplify work. Each manufacturer has its own consumption and depends on the thickness of the product.
To tint the surface, impregnation with colors is purchased. This can be found in the catalogs of the manufacturer Tikkuril, price from 750 rubles/liter. Translucent tinting with various natural shades. Using colored oil, you can tint an inexpensive type of wood, such as pine, or give the appearance of oak or mahogany. After processing, it will be difficult at first glance to distinguish inexpensive material from a similar premium class one.
We make oil stain for tinting wood products
Now I will show you what kind of oil stain I make. I use different stains and paints for tinting: watercolor paint, construction water stain, alcohol stain, thinly diluted acrylic, tempera and artist's oil paint. And so I needed to tint the doors. They are not very new, they were painted with white paint. My task was to remove this layer of paint and make just tinted wood. I started thinking about tinting oils. I watched all the videos I found, read a bunch of forums. I found tinted oils in the store and read the ingredients. In general, creativity began. I realized that I could do something similar myself.
Small disclaimer. This master class is suitable for those who are not allergic to turpentine, white spirit, and who do not feel sick from the smell of linseed oil and alkyd-urethane varnish. Who does not have bronchial asthma. No, it's not ADHD, don't panic. Artists work with these substances all their lives. You just need to ventilate the room. With large volumes, do not get carried away for several hours in a row, but take breaks and go outside. You can also wear a gas mask in the form of a mask with boxes. Now there are modern ones, very comfortable. In addition, I have selected here the best materials that I found. There is no strong smell from them.
This is what I came up with in the finished products.
This is an old oak door from the 50s. It was painted over with white paint. I removed the paint. This is already my tint.
I'm tinting the other door. Either pine or Christmas tree.
This is also a homemade stain.
What I like about homemade stain is that you can adjust absolutely everything. We know the components, we know their behavior, and we can add them as we please.
So what we need:
1. Flaxseed oil (any kind: artistic is better, but you can also buy it from the supermarket). The oil is drying out.
2. Artistic oil paint Umber natural. I have Ladoga. (For 5 doors it took me one and a half large tubes)
3. Wooden blank. Let's tint it. Lightly sanded, on purpose.
4. Tikkurila white spirit. It smells like pine. No technical terrible smell. You can take Pinene, pharmaceutical turpentine, gasoline, or even essential oils. This is a thinner.
5. Yacht varnish “Unika super” semi-matte, “Tikkurila”. Because at the end I will cover it with this varnish. So that there is no conflict between varnishes. You can take any, even PF. But imported ones are better, they smell less, dry faster and are more transparent.
Selection according to wood type
Wood oil is always selected for a specific species. It is recommended to have with you a test piece of wood of the same type and quality of processing that is typical for wood trim. Test application even on small areas will help to quickly evaluate the behavior of the composition in contact with wood, as well as the decorative effect.
To begin with, all coniferous woods practically do not need to be impregnated with oil. If absolutely necessary, thick formulations applied in one layer should be used. This is due to the presence of a large amount of resins in the pores, due to which the wood loses its ability to absorb even fluid oils. Therefore, it is necessary to achieve rapid drying of the oil on the surface and in the surface layer.
Thick, saturated oils are also used when processing low-density wood (linden, alder), especially fruit species that have the most developed vascular system. There are no obstacles to impregnation with thick oil, while excessively fluid compositions will penetrate too deeply and will forever remain in a liquid state, deprived of oxygen.
A completely opposite approach is used when processing beech, birch or sycamore. Due to the high density of such wood, they are impregnated either with unmelted oil or with solvent-containing compounds. Often, when working with dense hardwoods, they are treated in a combination way: first with oils that penetrate well into the wood, and then with thick compounds with a high proportion of solids and wax.
Required Tools
To prepare the surface of an item for painting with your own hands, you need the following set of tools:
- screwdrivers (you will need these to unscrew removable parts that do not need to be painted, such as door handles or a car dashboard);
- “skins” of various grain sizes;
- sponges and brushes for cleaning the surface.
List of basic tools for painting
To create “wooden decor” with your own hands you will need:
- any painting tool (brush, roller or spray gun), you can also use decorative paints in cans;
- primer;
- a special rubber grater for decorative work (some of the decoration methods listed below allow you to do without this tool);
- enamel of two colors;
- colorless varnish for additional fixation of the pattern.
When all the tools, as well as the enamels and varnish necessary for decoration, have been purchased, you can begin the preparatory work.
What is oil wax and how to make it yourself
Linseed oil with wax is an effective decorative and protective coating that gives wood high moisture-proof properties and increases its wear resistance. Impregnation adds a silky shine to surfaces and emphasizes the natural qualities of wood. Suitable for processing light and dark wood. A completely natural impregnation is optimal for finishing wooden floors, stairs, doors, furniture and other items subject to intense wear.
It is not difficult to prepare linseed oil and wood wax yourself. The easiest way: add grated beeswax to oil heated in a water bath and bring to a homogeneous consistency. The classic proportion by weight is 1:1. The ratio of wax and linseed oil can be varied, creating compositions of varying degrees of viscosity: from thick mastics to liquid impregnations that penetrate deep into the wood structure.
Beneficial properties of flaxseed oil
Flax seed is a very popular product in home cosmetology. Flaxseed oil is used for cosmetic purposes to care for the skin of the face and body, maintaining the beauty of hands, nails and hair. This product has a rich chemical composition, which allows it to provide complex beneficial effects on the skin:
- unsaturated fatty acids omega-6 and omega-3 (in terms of their content, flaxseed oil is comparable only to fish oil) help cells regenerate, activate collagen production, promote tissue restoration, and eliminate fine wrinkles;
- niacin (vitamin PP) increases cell tone, eliminates flaking, and prevents the development of skin cancer;
- thiamine (vitamin B1) moisturizes and smoothes the skin, it is indispensable for excessive dry skin;
- choline (vitamin B4) relieves skin irritation and softens it, prevents the appearance of pimples and acne;
- phylloquine (vitamin K) improves complexion and general skin condition;
- folic acid (vitamin B9) relieves inflammation, protects the skin from harmful influences, fights acne and acne.
The benefits of flaxseed oil for skin have been proven for a long time. Regular use of flaxseed oil or flax seed decoctions allows you to solve a number of problems of both cosmetic and medical nature:
- cure skin prone to inflammation and get rid of acne;
- get rid of dryness, redness, peeling or itching of the skin;
- relieve dermatitis, eczema or psoriasis;
- prevent sagging skin, “tighten” the oval of the face;
- smooth out early wrinkles, increase elasticity and tone of the skin;
- reduce the sensitivity of overly delicate skin;
- improve the appearance of flabby, lacking tone or aging skin.
Features of applying and maintaining oil finishes
The process of applying the oil is extremely simple; just follow the instructions for using the specific composition. But there are also general rules:
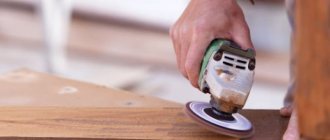
- Before applying oil, wood must undergo chamber drying (humidity no more than 12-14%) and surface grinding until tactile roughness is eliminated.
- Application is carried out strictly in layers over the entire surface of the product, each layer must be completely dry.
- After a specified period of time after application, rub the excess oil with a dry rag, distributing it between areas with uneven absorption.
- Oil is applied to all sides of the part in equal quantities, and surfaces with open fiber cuts are no exception, despite the increased absorption rate.
- If, after the oil has dried, lint has risen on the surface, before applying the next layer, it is necessary to carry out preliminary sanding, otherwise, when the oil film is rubbed, fibers from the rag will also settle on the surface.
Oil impregnation maintains performance for 4-5 years indoors and 2-3 years outdoors. After these periods, the coating is renewed by simply thoroughly cleaning the surfaces and applying another layer of oil. The thickness of the oil is chosen depending on the degree of damage to the previous finish; usually these are fairly thick restoration compounds.
Color for wood: preparation of tinted varnish, oil and impregnation
The beauty of wood is that it looks great on its own, you just need to show its texture. Color can be used to obtain the desired shade. Sometimes, for example, light wood needs to be slightly darkened, and it is in such a situation that color comes in handy.
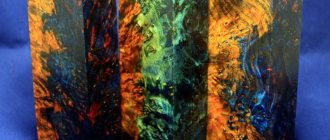
Wood treated with tinted oil
Computer operation
There is color selection using a special computer program. In this case, you can use tinting machines (varnishes and enamels are most often used) or a special catalog from the manufacturer of the pigment liquid.
Computer color tinting has become widespread due to a number of advantages:
- obtaining the desired color in the shortest possible period of time;
- the desired shades can be re-created if you save the desired tone in the computer;
- There is a huge palette of colors and shades.
The main disadvantage of carrying out such work is the impossibility of creating the desired color at the work site.
What to consider
Painting a wall using a color scheme uses a special device that can be purchased at a special hardware store. Tinting with acrylic paint must comply with certain requirements:
- Color paint is created directly inside the room that will be painted. This is necessary to evaluate the resulting tone in both artificial and daylight;
- color shades for water-based paint should be added in small parts or drops so that the dye does not damage the main tones;
- You should also take into account that the paint on a large area looks a little different than on a small section of the wall.
It is quite difficult to obtain a black color, since even one drop of it can completely change the color, and it will be much more difficult to lighten it. Very often the result is a dull gray color. That is why you should stock up on small jars and do everything carefully and consistently, using the product drop by drop.
It is also important to remember that on a wall using water-based paints, the resulting color will look much brighter than in a container
To obtain a good result for mixing, you should choose white paint of the desired base and without any yellowish admixture. Color for acrylic paint will give the desired color only when using a snow-white base. If you plan to paint the walls, then the colors should be chosen specifically for them, and not for the ceiling, which plays an important role. These types of compositions for acrylic paints have some differences in terms of wear resistance, elasticity and soiling.
If you need to re-tint water-based paint, it is very important to purchase the compositions from the same manufacturer, since one tone can vary greatly between different brands. When buying latex paint, you need to remember that it has a rather thick consistency, so it requires high-quality and long-term mixing
The solvent in this case will be water, which is carefully poured in until the desired mixture is formed. After adding water, the main dyes are carefully added dropwise to the composition.
When purchasing latex paint, you need to remember that it has a rather thick consistency, so it requires high-quality and long-term mixing. The solvent in this case will be water, which is carefully poured in until the desired mixture is formed. After adding water, the main dyes are carefully added dropwise to the composition.
Application technology
Each manufacturer's use is indicated on the label. But there are standard methods:
- Immersion - when a wooden element is immersed in a hot composition and left to soak for several days. Then it is taken out and dried on a warm surface.
- Vacuum impregnation - the product is placed in a special device, where, under the influence of a vacuum, the oil penetrates deep into the wood.
- Two-layer application - performed using a brush or a piece of foam rubber when finishing the premises.
Let's take a closer look at two-layer application, which is suitable for treating wooden floors, stairs and walls.
Two-layer application
To complete the finishing you will need tools and materials:
- Oil.
- Wax.
- Wide tassel - flute.
- Sanding paper of the finest fraction.
- Cotton rags.
- A piece of clean suede.
The product is first cleaned of the old coating, and the surface is sanded using sandpaper. Use a soft brush to sweep away dust. Prepared wood absorbs oil better, and the protective properties of the coating will be higher.
Before work, the oil is brought to a boil twice. Thermal preparation will reduce the drying time of the impregnation. You need to cook the flaxseed product in a water bath, in small portions. As soon as the oil boils for the first time, remove it from the heat and allow to cool. Then the procedure is repeated. Before application, the hot product is stirred so that the color is more uniform. Modern wax compositions do not need to be preheated, but they will take longer to dry.
Use hot impregnation with caution and wear protective gloves.
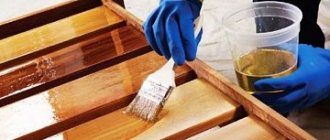
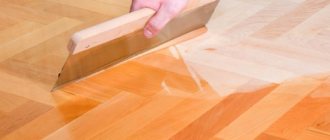
- A brush or sponge is soaked in linseed oil, which is applied liberally to the wood using a blotting motion. Movements are performed along the fibers.
- Within two hours, the surface of the wood is impregnated.
- A second layer of hot impregnation is applied. The surfaces are allowed to dry for 2-3 hours.
- Take a soft rag and use it to remove excess impregnation from the tree.
- The surface is polished with wax or varnished.
Beeswax is heated in a water bath and rubbed hot into the wood until the surface acquires an even shine. But it is not necessary to cover the impregnation with wax; you can use the old method of polishing - using a thick suede cloth. Rub the surface with suede until it shines, using circular movements. But adding shine to wood is a long and painstaking process. It may take several weeks to treat a large area.
When using linseed oil to protect wood in your home, the application technology is followed. You will have to work with a heated product, so take care to protect your hands and eyes. By impregnating the wood, the oil will protect it from moisture, sun, fungi and mold. Small cracks will disappear on the surface, and the pattern will become clearer. To decorate inexpensive wood like oak or mahogany, impregnations with tinting effects are used, which can be purchased at any specialized store. For simple processing, the most inexpensive unrefined oil is suitable. It is advisable to wipe the top surface with wax or sand it until shiny with a suede cloth.
All photos from the article
The beauty of wood is that it looks great on its own, you just need to show its texture. Color can be used to obtain the desired shade. Sometimes, for example, light wood needs to be slightly darkened, and it is in such a situation that color comes in handy.
Purpose of tinting
Tinting is the process of mixing coloring compounds and paintwork materials to obtain specified colors.
Construction companies often order this service from professional companies. However, if this is not possible or if you do the finishing work yourself, you can do the tinting yourself. The process of selecting and mixing colors is indispensable in the following cases:
- obtaining a color to match the furniture or decoration of the room;
- repairing a small area of a wall or ceiling when it is necessary to obtain an exact shade for spot restoration of the damaged area;
- If there is a shortage of a rare type of paint, it is difficult to purchase a few more jars of the material; it will be easier to do the tinting yourself or order the paint from a special company;
- selection of an individual palette for the interior.
Tinting is indispensable for cosmetic repairs. It allows you to reduce the scope of work many times over. When selecting the desired shade, it is enough to restore minor scuffs and defects.
Features of finishing with raw oil and drying oil
When treating wooden products with pure linseed oil, you should be prepared not only for long drying, which can take up to 3 days (for each layer), but also know a number of important features. The raw product is actively absorbed into the structure of the wood, so coating the wood with linseed oil has to be done in 5-7 or more layers. When it dries on the outside, it does not polymerize well on the inside, which is why a seemingly dry product can leave oil stains for a long time. Exposure to ultraviolet light significantly speeds up the drying process. In the sun, treated wood can dry out in 6-8 hours, but the tone of the coating will change: it will become yellowish or even slightly brown.
Drying oil, thanks to its high polymerization rate, has completely different properties: it dries quickly, is not absorbed so actively, and does not change its color. This makes it more practical to use. Regardless of the conditions, the answer to the question of how long drying oil dries is clear - no more than a day (at 20°C). This distinguishes it favorably from raw flaxseed oil. In the future, when talking about this type of finishing, we will mean linseed oil.
Color Mixing Methods
To achieve brown color, there are several methods. You can mix either construction paints (acrylic, oil), or those intended for painting and drawing (watercolor, oil, gouache, etc.)
It is important to take pure and classic tones
Let's see how to get brown color when mixing paint:
- The classic method is to mix green and red paint together.
- The use of three colors is to combine yellow and blue with red in equal proportions (as you know, yellow and blue together give a green color).
- An intermediate option is to combine blue with orange or gray with orange.
- A complex combination is yellow and purple; instead of purple, you can use purple, i.e. yellow and orange with purple - this option is less popular; it is difficult to control the resulting paint and its nuances.
- An additional method is to mix green and purple with the orange tone of gouache.
In the video: obtaining brown of different saturations.
Viscosity differences
In carpentry, there are about two dozen common types of wood, differing in density, porosity and vessel sizes. In each individual case, the oil must be selected individually, also taking into account the size, shape and specific features of the product being processed.
Please note that viscosity can only be adjusted with solvents when working with tung oil; other compositions absolutely do not tolerate this
The thicker and more viscous the oil used, the more difficult it is to apply an even layer before polymerization begins. Working with thick oils requires greater care; the resulting drips are subsequently very problematic to remove. The advantages of thick oils are their high drying speed, comparable to some types of varnishes. Also, due to the high content of solid particles, such oils form a more durable film, providing protection from both mechanical damage and contamination.
Thinner oils are used to process products that either have a significant surface area or are full of small parts with many hard-to-reach places. Low viscosity oils can be applied for quite a long time without worrying about uneven drying. However, to obtain high-quality protection, the product must dry for quite a long time; moreover, such oils are usually applied in 3 or more layers.
Methods for cleaning, bleaching and thickening oils
Prevention of peeling of the painting layer
The painting layer is strengthened with a 5-6 percent solution of fish glue, into which honey mixed with xylene or pinene is added as a plasticizer (one part of honey with pinene or xylene is taken for twenty parts of glue).
Drying oils
Light plays a very important role in the drying process of oils, and in the absence of light, drying almost stops. So, oil that dried in the light for 6 days dried in the dark in 66 days. In this case, direct sunlight acts especially energetically, since their warmth is of great importance here. Indeed, for oil paint to dry in sunlight, it takes from half to one third of the time that it takes to dry in the shade. The most active rays of the sun are ultraviolet rays, which have no less effect on accelerating the drying of oils than the effect of the so-called “sicatives”.
How high the air temperature is for drying oils can be judged from the following data. Flaxseed oil at 25-28 gr. C; It dries out sooner than at 15-18 degrees. C; With a significant increase in temperature, the drying process is especially accelerated. Thus, according to Weger, oil that dried at room temperature in winter in 5-7 days and in summer in 3-4 days dried at 50 degrees. C in a dark oven for 12 hours at a temperature of 95 degrees. C - for approximately 1 hour, and at 120 gr. C - in 30 minutes. Oil containing manganese sicatif and dried at room temperature for 14 hours, at 95 degrees. C dried in 30-40 minutes, and at 120 gr. C - in 15-20 minutes.
Cold delays the drying of oils, as does the high percentage of moisture contained in the air (in rainy times and in damp rooms); normal air humidity responds favorably to the process, since the oil, at the same time as oxygen, absorbs from the air a certain amount of water necessary for the normal course of drying, the action of which during the drying process goes hand in hand with the action of oxygen. From the above it follows that the drying of oil in too dry air, although it occurs quickly, is abnormal, since in this case there is a large loss in the oil substance due to the formation of a large number of gaseous products of oil breakdown. When the oil dries in air saturated with water vapor, a swollen film with a high water content is obtained, which, when completely dry, becomes covered with cracks.
Substances that accelerate the drying of oils include paints of a known composition, as well as special preparations called sicatives, which promote the absorption of oxygen by the oil.
The drying process is delayed and slowed down mainly by water and mucus contained in oils, and some essential oils added to fatty oils, since these latter themselves need oxygen for their drying and thus prevent it from being absorbed by the fatty oil.
In addition, certain paint compositions also tend to slow down the drying process.
The acceleration and deceleration of the drying process is also affected by the material that is coated with oil or oil paint. Thus, oil and oil paint dry faster on the surface of lead than on other metals; They dry more slowly on wood than on metals.
Later studies of vegetable fatty oils revealed that oils classified as non-drying oils also harden when placed in special conditions. Olive oil, for example, when applied to a lead plate, gains the ability to dry, which, however, requires several months.
The hardened oil, which is a flexible, elastic substance called linoxin, gradually (as it decreases in weight and volume) loses its elasticity, as a result of which old oil paintings become brittle and brittle.
Dried oil, when completely hardened, is insoluble in water and is only slightly soluble in ether, gasoline and other essential oils. Freshly dried oil is not a dry substance, but a liquid-solid one. Due to its composition and structure, it can be partially washed away by water if the paint from which the oil has been erased does not help fix it.
This is how oil paints get lost in the open air. This occurs not only due to the waste of volatile products from drying out the oil, but also due to the removal of soluble products by water. Hardened films of oil sometimes become soft again and become sticky. Such softening of the layer after the oil dries is observed mainly in poppy, nut, and sunflower oils and very rarely in linseed oil. In the light and in dry air, the films become hard again and lose their stickiness.
Understanding the terms
Tinting wood varnish (as well as stain, impregnation and other means) means gradually adding dye until it acquires the desired shade. That is, color is a dye that is gradually added to the solution.
As for which color to choose, it is recommended to adhere to the color chart when purchasing it. It is also useful to know that colors that use organic pigments are not particularly resistant to light. Therefore, for outdoor work it is better to use a color scheme that uses inorganic pigments.
There can be several hundred shades of color; the common types of tinting wooden stairs alone include about 50-100 shades. But if suddenly the color palette is not enough, then you can always mix 2 different colors and get your own shade.
In this case, it is recommended to first experiment with a small amount of color and test the resulting tinted varnish or stain on an unnecessary piece of wood. A sign that everything went well can be considered a smooth surface after drying, the absence of drips and uniform coloring.
Shades of yellow
Making a shelving unit in the garage with your own hands
Manufacturers of large sets of gouaches or watercolors call yellow shades with their own “trademark” names - for example, “Inca gold”, “golden palm”. They achieve interesting combinations by combining colors. In production there are tables and standards with precise indications of proportions. At home, you will have to select the necessary combinations experimentally. Here are the characteristics of the main shades of yellow:
- golden - widely used in painting icons, used for picture frames, it is a yellow tone with a pearlescent sheen;
- straw – rich tone with an “apricot” glow;
- light bronze – yellow with a brown tint;
- waxy - a pale shade of yellow;
- lemon – this tone contains a drop of green.
Before mixing paints on a large scale, it is necessary to conduct a number of trial experiments. To do this, combine a little yellow and a tiny amount of other tones on the palette and achieve the desired result by thoroughly mixing the material. Usually, for 50 ml of the main color, 1-3 ml of another paint is enough, no more.
Acid
Experts call this tone lemon. It is “caustic”, acidic, well suited for signal designs. The procedure for creating lemon color is as follows:
- take yellow dye, dilute it a little with white to make the tone lighter;
- Using a thin brush, drip a drop of green paint into the base;
- mix the material thoroughly so that there are no streaks;
- if necessary, add a little more greens.
Golden
It is much easier to achieve a golden hue if the base paint has a slight pearlescent sheen. You just need to add a drop of red pigment to it; if you don’t have it, brown will do. If there is too much additive, the material will look dirty. You can try to correct the situation by introducing whitewash, although this is not always possible.
Dark yellow and other shades
Dark yellow is created in an interesting way. You should mix approximately equal parts of orange and green. Then a small amount of this color is introduced into the finished yellow paint. The result will be the desired dark shade. It can be made even easier by mixing yellow and brown pigment, but the finished color will be different than in the first option. To add brightness to the shade, a little red paint is dripped into it.
To obtain yellow-green, these two colors are combined equally. The finished paint will be incredibly rich and cheerful, which is why it is often used in interior design. The finished color is also called light green; it fits perfectly into the avant-garde style and a number of other style solutions. The tone contrasts well with blue-green, resulting in a pleasing effect to the eye of a combination of cold and warm shades.
You can also make other interesting yellow tones yourself:
- yellow-orange – main tone + red;
- beige – basic tone + white + brown;
- olive – the main tone is a little dirty green;
- terracotta – main tone + orange + brown.
The gentle yellowish color looks interesting in the interior. It is obtained by mixing the base with pink and diluting it with white to the desired softness of the pigment. This color goes well with wood, especially oak, as well as purple and brass.
Saturated color
You can also make the richest shades of sunny colors yourself. First, the main yellow is diluted with white, but in a small volume - this will add lightness. Next, red or orange is introduced little by little to provide depth and intensity to the tone. Usually, only ½ drop of red is enough for 50 ml of paint. Having received the desired color scheme, you can start creating masterpieces on paper with your own hands!
Protective properties of oils
Unlike most wood preservatives, oil does not form a thick film, maintaining the vapor permeability of the material. At the same time, the hydrophobicity of the surface increases significantly - upon contact with liquid water, the absorption of wood is practically zero. However, a wooden product remains susceptible to shrinkage and swelling; coating with oil does not eliminate these phenomena.
The protective effect of the oil is to compact the outer layers of the tree, thereby preventing the penetration of insect pests into the mass. Due to the absence of paths for moisture penetration, the tree becomes least susceptible to organic damage by mold, mildew or blue staining.
Oil also preserves the color of wood well, which is especially important for exterior decoration of a house. The oil crust that forms on the surface effectively scatters sunlight and limits the flow of oxygen.
Due to this, the rate of cellulose oxidation and the associated appearance of a grayish coating are reduced significantly.
All these properties are more pronounced the thicker the oil used for coating and the more layers are applied. Oils are characterized by the division of protection into two barriers: an internal one, achieved by impregnation of the pores, and an external one, formed when a thin oil film dries on the surface. It should be remembered that oil-impregnated wood has a higher thermal conductivity than dry wood.