Wooden floors can most often be seen in private homes or country houses. If the floor in the toilet of your home is made of wood, this is not a reason to give up basic amenities such as a toilet. Installation will be a little more difficult, but there shouldn't be any problems.
We will tell you what features are involved in installing a toilet on a wooden floor, how to prepare for the work and carry out the installation yourself. The given instructions will help novice craftsmen in choosing, placing and connecting a plumbing fixture.
Basics of the wastewater system
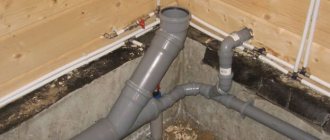
If you are interested in installing a toilet with your own hands in a private home, you need to have a good understanding of the sewerage system. Drain pipes in country houses are usually cast iron. The internal and external surfaces of such products are covered with petroleum bitumen. This helps protect the pipeline from corrosion, as it reduces the negative effects of water. Thus, the installation of a toilet must be preceded by reliable sealing of the components of the sewer system.
When installing the structure into the socket, the gap that appears is covered with tow. In addition, at the final stage, treatment with a cement-sand composition is necessary. In the areas of connection to the sewerage outlet, siphons are fixed, performing the function of a water seal. They prevent the penetration of unpleasant odors into living spaces.
To work, you need not only detailed and understandable instructions explaining how to properly install a toilet in a private home, but also a certain set of devices and materials. During the installation process you will need:
- rags;
- coarse fiber;
- wrench;
- tank for mixing the solution;
- cement-sand mixture;
- corrugated adapter;
- silicone;
- drill;
- corundum stone.
First, you need to determine the method of attaching the plumbing fixture to the floor. If the room has a cement screed on the floor, the toilet can be connected using screws that are secured into dowels. Another method involves fixing plumbing fixtures to a board that is mounted into the floor. The wood must be strong enough - it is advisable to choose oak for this purpose. Anchors are attached under the board for secure fixation.
A simple way is to use nails. They are hammered in diagonally. The nails should protrude two centimeters above the plank support. During the work process, a depression is formed on the floor surface, which is filled with cement mortar, and a board is laid on top. When the part is firmly fixed in the cement, you need to secure the toilet with screws. In this case, the screws should be treated with solid oil so that they do not turn. Then you need to hide rubber washers under the fastener heads. This way you can avoid deformation of the toilet frames.
Another installation technology involves the use of epoxy glue. To do this, the surface is thoroughly cleaned and degreased.
Then it is roughened by treating it with corundum stone and degreased again. A layer of resin five millimeters thick is applied to the area where the product is attached. Then the plumbing fixture is installed and securely pressed to the floor surface. It is not recommended to use the toilet within 12 hours after installation. You need to let the glue harden. Epoxy glue has a rather pungent odor, so it is better to leave the room for a while after completing the work.
One of the important requirements is reliable connection of the product to the sewerage system. One part of the plumbing point is completely connected to the drainage system. This is the so-called water release. There are direct and oblique releases, depending on the installed system.
The release grooves are covered with a special mixture of red lead and drying oil, then tow is wound around this area. Remember that it is unacceptable for parts of tow to penetrate inside the pipes, as this can cause blockage.
The sewer socket should be cleaned of the remnants of the previous sealant, after which an outlet is installed into it. The annular hole must be covered with flagella from linen yarn. At the next stage, this gap is covered with cement mortar. All seams are also processed.
Features of connecting to the sewer
After this, the installed toilet requires connection to the waste disposal system. In fact, there are two types of entrance to the sewer outlet - horizontal (relevant for new buildings) and vertical (typical for old buildings). For them, plumbing fixtures with the appropriate outlet are selected - horizontal or vertical. Devices with oblique outlets are considered universal and can be connected to any type of sewer system.
Typically, the type of toilet is selected to match the existing drainage system in the building. In the case of laying sewerage “from scratch”, they are guided by their own preferences.
It is important to maintain the required distances and differences between the plumbing fixtures and the riser. The use of an eccentric helps with this, and the simplest and most universal method is the use of corrugation.
When making connections, it is important to apply plumbing sealant along the edges of the cuff to enhance the sealing effect and at the same time lubricate it in order to facilitate installation, but not much, because its excess will lead to a decrease in the reliability of the connection.
Installation of a toilet with vertical outlet Source teplo.guru
Vertical outlet bathroom
The most common drainage option in European countries due to the versatility of the design, which allows the installation of the bathroom to the wall at the desired angle. The device consists of a siphon in a bowl and an outlet pipe directed downwards.
Installation is quite simple:
- floor markings are carried out and a conventional screw flange with a lock is installed;
- a sewer hole is installed in the center of the flange;
- The toilet is mounted on a flange with reliable fixation of the outlet pipe.
Horizontal outlet toilet
Received maximum distribution in Russia. Another name for this option is “direct outlet into the wall.” The drainage of the device is directed backwards. The connection of the branch pipe to the sewer pipe is made using a specific cuff.
This type of toilet is fixed directly to the floor through special holes in the base of the device.
Recommendation! It is better to begin work on connecting direct outlet plumbing during installation. Fastening is done using dowels and standard screws.
Required Tools
Before you begin installation, you need to carry out all the preliminary work and select tools and materials in advance.
For installation you will need:
- toilet of the chosen design;
- hammer drill;
- screwdriver;
- set of wrenches;
- hammer;
- screws;
- rubber gaskets;
- dowels;
- pipes for connecting to the sewer: plastic, fan or corrugated;
- plumbing silicone grease.
In addition to these tools, you may need:
- pencil for marking the place;
- a special board for fastening - taffeta, especially for installation on an old wooden floor;
- if the toilet is going to sit on glue, then epoxy glue is needed;
- emery for polishing the surface;
- For final processing you need red lead and tow.
Ventilation
Ventilation in a private residential space is mainly taken into account during the design: in the bathroom, toilet and dining area there are hidden ventilation shafts with decorative grilles. If the toilet is located on the lower floor, there is no need for artificial ventilation. Often there are several bathrooms, in which case it is necessary to install forced ventilation with air ducts.
Ventilation in the bathroom
A hood in a bathroom in a wooden private house has additional loads, so the requirements placed on it are serious. This material is greatly affected by increased humidity levels, so you need to install a hood and additional ventilation ducts. You should not use air conditioners because they make the air dry, causing cracks to form on the wood.
You may be interested in: Important points when planning a children's room for two children
Development Council
Today, it has become easier to equip bathrooms, since the market is represented by a huge selection of furniture and plumbing fixtures. Modern wooden houses can be equipped with sinks, showers and cabinets of any configuration - it all depends on the material resources and imagination of their owner.
Plumbing
If the layout of the house provides for the placement of a bathroom on the second floor, then it is recommended to abandon the installation of heavy cast-iron plumbing fixtures, replacing them with acrylic ones. Installing a shower cabin will also help reduce the overall level of humidity in the room. In this case, it is advisable to use a hydrobox, which will ensure complete isolation of the surrounding space from the structure. A built-in cubicle model equipped with closing doors would also look good in a bathroom interior. The washbasin, shower and toilet (in a combined bathroom) should be in harmony with the finishing of the surfaces in the room.
Furniture
In spacious bathrooms, it is recommended to have a cabinet for storing towels and linen, a chest of drawers for various toiletries and shelves. In small rooms, it is enough to install built-in or wall cabinets. The main item in the interior will be a full-length mirror. An additional installation of a heated towel rail would not hurt; hooks for bathrobes must be attached. In addition, we must not forget about the laundry basket: in a small room it can be hidden in a closet, and in a large room it can stand separately, acting as an interior detail.
Furniture should be harmoniously combined with surface finishes and plumbing fixtures. You should not choose large-sized models; it is advisable to give preference to compact and multifunctional modules.
Lighting
To effectively highlight the beauty of wood in the bathroom, you need to install good lighting, with halogen spotlights being the best option. With their help, you can not only zone the space in an interesting way, but also perfectly illuminate the surface finish. In order for the spotlights to look harmonious in the room, all wiring must be hidden behind the suspended ceiling structure. Additionally, it wouldn’t hurt to install a sconce (near the toilet or washbasin) as the main light source.
How to attach a country toilet
Now we are not talking about standard ceramic products, but about those that are made specifically for wooden toilets. They do not provide for connection to the sewer, but are installed above the hole in the cesspool. They also do not flush. They simply represent a ceramic seat of the usual shape. They differ from the standard ones by having a larger hole/outlet downwards. This is done to minimize the possibility of contamination of the walls.
What is the problem
The difficulty is not how to fix the country toilet, but how to make sure that waste does not fall on the floor. The whole difficulty of installing a country toilet is that there remains a gap between the outlet and the wall of the toilet. And if you simply place it on top of the hole, some of the waste will fall onto the area of the floor under the toilet and then flow out from under it.
Even if you seal the joint with sealant, this will not solve the problem. The waste will remain on the floor area and will “smell” accordingly. That is, when installing a country toilet, you need to build an “adapter” that will prevent the leakage of sewage.
What can be done
There are several ways to make the transition - the outlet of the country toilet / the hole above the cesspool - airtight. They are of varying degrees of difficulty, so you choose for yourself what is best for you to do. The first idea is to make a funnel with the bell facing upward. This will allow you to close that same free area. This transition can be made from different materials:
- Choose a plastic bowl, plastic flower pot, baby bucket, etc. Cut out the bottom of a vessel selected to size. Install the resulting socket with the flared part up. This is if the septic tank pipe is smaller in diameter than the toilet hole. When installed, the outlet will rest against the walls of the plastic funnel. After checking the size match, coat the joints with silicone and leave the entire structure motionless until the sealant polymerizes.
- Cut a strip of tin and make an “adapter” out of it according to the required size and shape. Secure to the boards with self-tapping screws or nails, and to the porcelain/earthware with sealant.
- Make a “cuff” along the edge of the cutout in the floor. To do this, you can nail a strip of tin, a PVC window strip, a strip of plastic, etc. around the perimeter. The strip is stuffed so that the bottom edge is approximately 1 cm below the edge of the board. The top one should protrude so much that the bottom edge of the toilet outlet is at least a centimeter lower. Based on this, choose the width of the strip.
Actually, other materials can be used. The main thing is to make sure that waste does not fall on the floor
How this can be achieved is not so important
It’s a little more difficult if the toilet inlet is not round. In this case, either use a tin adapter that can be riveted, or use a hair dryer to heat the plastic of the vessel and give it the desired shape.
Types of toilet seats
Also, modern stores offer toilet seats in various other forms: for example, in the form of a guitar or a flower, and here we are talking not only about the contours, but also about the design. It is clear that such products are much more expensive. But they look very original.
For families with a baby, it is best to purchase a double toilet seat. It consists of two seats: a large standard one and a small one built into it. The insert allows a small child to sit comfortably, making the transition from potty to toilet much easier.
There are also special seats for disabled people and very elderly people whose physical capabilities are limited. Firstly, such designs have armrests, which is very convenient. Secondly, their seat is soft, which also provides additional comfort.
In addition, now you can often find toilet seats with various bells and whistles. Manufacturers are coming up with more and more additional functions designed to make our lives even more comfortable. Here is a partial list of what you can find in a modern toilet seat:
- heating system;
- microlift;
- radio;
- audio system;
- bidet;
- intestinal gas composition analyzer.
The materials from which the seats are made are also varied. It could be:
- plastic. The most popular material: low cost and a wide variety of colors. A plastic toilet seat can be with drawings or patterns, or plain. Easy to clean and generally unpretentious to handle. The only negative is low strength. This leads to situations similar to the one I wrote about in the introduction to the article;
- duroplast. In general, this is also plastic, but with high strength. It is difficult to scratch or break. Outwardly it resembles a ceramic product, but differs from ordinary plastic in greater mass. It is easy to care for and tolerates various chemical cleaning agents. A bonus is the content of antibacterial components in the structure of the material. Considering the operating conditions of the product, this is a rather important indicator. The only downside of Duroplast is, perhaps, the cost. It is, of course, higher than that of simple plastic;
- plywood. Most often, such chairs were used in the last century. The characteristics of the material are quite good; it is highly resistant to mechanical and physical damage. At the same time, its cost is low, and its use is quite comfortable, since special rubber elements are attached to the bottom of the seat, which prevent the toilet seat from sliding along the rim of the toilet. But the appearance of such products is far from modern trends. Plywood covers are quite rough and unattractive. Perhaps this is not a bad option for an old village house. But for use in modern bathrooms this looks inappropriate;
- tree. The characteristics of products made from this material are very high, and the appearance is quite attractive and aesthetic. But even here there are some drawbacks. Firstly, wood is more sensitive to high humidity conditions that are typical in a bathroom, as well as to cleaning products. Secondly, the weight of wooden products should be taken into account. If you accidentally release the lid so that its entire mass falls onto the toilet, then there is a high risk of breaking the bowl. Sometimes such covers are covered with fabric covers with a thin foam lining. This helps to avoid rattling noise when closing. But they wear out quickly, so with this choice, be prepared for regular expenses. On the other hand, when using such covers, the lid is protected from contamination, so you will save both cleaning agent and cleaning time.
I also recommend taking a photo of it with your smartphone so that you can check the shape of the toilet seat and the toilet in the store.
Removing the old toilet
Dismantling the toilet
First step. Turn off the water supply and drain all the liquid from the tank.
Shut off the water
Second step. We unscrew the hose through which the tank is connected to the water supply.
Disconnect the hose
Third step. Unscrew the tank fasteners. If they are rusty, we arm ourselves with a screwdriver or open-end wrench. We press the bolt head with the selected tool and unscrew the nut using an adjustable wrench. If that doesn’t work, pre-soak the nut with kerosene. We remove the tank.
Fourth step. We dismantle the toilet mountings.
Fifth step. Disconnect the toilet flush from the sewer.
Corrugation is easy to remove
In older buildings, drains are usually secured using cement coating. To destroy it we use a hammer and chisel
We need to crack the cement and carefully rock the toilet to the sides. The drain should turn and become loose
We tilt the product, allowing the remaining water to drain into the sewer.
Dismantling the toilet We loosen the seal, if there was one. If the toilet had an outlet to the floor, you need to clean off the wax ring
Sixth step. We close the sewer hole with a wooden or other suitable plug.
While work is in progress, plug the hole with a rag. Dismantling the toilet.
Mounting options
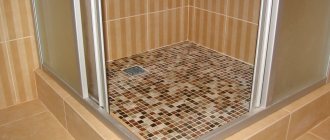
When considering the question of how to install a toilet on tiles with your own hands, you should understand that it is possible to perform open and closed fastening. In the first fixation option, the fastening bolts are placed on the protruding part of the toilet base; in a closed system, they are placed inside the base of the toilet.
We fix the toilet using an open method
The simplest and most affordable option for securely mounting a toilet is an open one, since it reduces the cost of time and effort, but is inferior in aesthetics to the second mounting method. The toilet is mounted in the selected permanent location, then using a pencil, marks are drawn on the tile for holes intended to fix the structure.
In addition to the marked points for fastening, you should draw the outline of the base of the structure on the tile and make holes at the marks. First, use a core to scratch the glaze onto the tile. This is done so that the subsequently used drill does not slip on the surface of the tile. First, take a glass drill to go through the tile. Next, using a hammer drill, a hole of the required size is drilled using a concrete drill.
The hole needs to be cleaned of dust and then filled with silicone sealant. This material acts as a reliable waterproofing material. The dowels are inserted into the holes filled with sealant. Before installing a toilet on the tile, a strip of sealant must be applied along the outlined contour of the structure to prevent water from penetrating into the base of the toilet.
At the last stage, bushings, bolts or screws are inserted into the mounting holes and tightened. This must be done very carefully so as not to overdo it. Otherwise, a crack will appear in the toilet. Also, before the final effort, you can check how firmly and correctly the toilet is attached. Don't worry that the screw will spoil the overall appearance of the toilet. The mounting points can be covered with plugs to give an aesthetic appearance. Usually such parts are included in the kit. If they deteriorate over time, you can easily replace them with new ones purchased at the construction market or at a plumbing store. Remove excess silicone using a rubber spatula. The whole process of work can be made more understandable if you watch a video on how to properly install a toilet on tiles.
Installing an internally mounted toilet
When choosing a closed toilet mounting system, it is worth finding out whether it is possible to install the toilet on tiles in this way. It turns out it is possible. First of all, it is necessary to make outlet openings to connect the equipment to the water supply and sewerage system. These holes must be located as close as possible to the toilet being mounted. Similar to the open installation of a structure on floor tiles, you need to outline the outline of the base and then transfer the marks for the holes.
Hidden installation of a toilet on a tiled floor involves first rigidly attaching the connecting structure to the floor. After this, the toilet is installed on it and through the existing side holes it is bolted to the base.
A video of installing a toilet on a tiled floor tells more about this option.
However, there are situations when the floor cannot be drilled due to the installed heating system. Then, to solve the problem, you have to glue the toilet to the tiles. For this work you need to use special glue, epoxy resin with a special hardener or liquid nails. In all cases, preparation of the tiles and the bottom plane of the toilet structure is necessary.
These elements are processed with sandpaper to roughen the surfaces in order to improve the adhesion of the adhesive to the toilet and floor. To understand the installation logic, we recommend watching the video of installing a toilet on tiles.
Read also:
— Installing a washing machine with your own hands — You can rearrange the wall-hung toilet after installation or not — Sink faucets in the bathroom - design options — Private house — heating installation and pipe laying options — Installing an expansion tank for closed-type heating — Video tutorial: how to install a toilet with your own hands with a description
Selection and installation of plumbing fixtures
Often in the bathroom there is not only a bathtub with a toilet, but also a shower stall and a bidet. This is easy to do if the room space is at least six to eight square meters. A bathtub installed in the center looks good, which is only possible in very spacious rooms with a reinforced floor structure. In the case of a regular floor, all plumbing fixtures are installed along the walls.
If space allows, a large sink is preferable. For a family of more than three or four people, two washbasins are made. The bathtub itself is sometimes made of cedar or larch wood with special impregnation. In larger rooms a Jacuzzi is installed, and in smaller rooms a shower stall with or without a tray is installed. For very small rooms, a shortened bathtub, corner sink, or wall-hung toilet are suitable. When arranging a shower stall, care should be taken to ensure that the water does not stagnate on the floor or spread throughout the room.
The need to replace the toilet
It is not always necessary to change a plumbing fixture if there are malfunctions in the sewer system. If water is constantly leaking from the tank in the bathroom, this is a serious reason to think about it.
When it drips onto the floor, and all the pipe connections are in order, then the cause of the problem is usually a chip or crack. In this situation, it is possible to eliminate the leak only temporarily; the toilet should be replaced as quickly as possible.
If water from the drain tank flows into the sewer along the wall of the bowl, then, most likely, the installation of new plumbing fixtures will not be necessary, since the cause of such a malfunction is most likely a leaky valve. Since all internal elements for flush tanks are sold separately, they only need to be replaced with new products.
Plumbing faience and porcelain are rather fragile materials that are characterized by instability to sudden temperature changes. The enamel can become covered with a network of cracks, spoiling the external aesthetic component of the device and threatening complete destruction of the bowl. If this product develops chips or other problems, the toilet should be replaced as soon as possible.
None of the toilet users can know for sure when the ceramic coating on it will not withstand and will burst under the influence of water currents, the weight of a person or as a result of internal stress. It’s good if the residents are nearby at this moment and one of them can quickly eliminate the emergency situation, otherwise the toilet of the neighbors living on the floor below will need to be repaired.
Another sign of a plumbing problem is the presence of an unpleasant odor. Most often, it is caused by improper installation of the sewer system, as a result of which the drainage stagnates in the pipes. When everything turned out to be in order with the pipeline, and the earthenware is clean, the cause of the smell should be sought in the fact that the glossy coating has begun to deteriorate.
If the integrity of the enamel is damaged and the porous structure of the sanitaryware begins to come into contact with impurities, it begins to absorb unpleasant “odors.” It will not be possible to cope with these odors, since the destruction process is irreversible. In this case, it is impossible to do without replacing the old toilet with a new one.
Another important reason for dismantling old and installing new plumbing is the planned renovation of the bathroom. Few property owners decide to keep the same fixture when changing the design of their bathroom. Since new, more modern products appear on sale regularly, updating a bathroom with replacing plumbing fixtures can transform its interior beyond recognition
Regardless of whether you choose a classic option or an unusual model from the catalog, the process of how to properly change a toilet occurs in the same sequence
Since new, more modern products appear on sale regularly, updating a bathroom with replacing plumbing fixtures can transform its interior beyond recognition. Regardless of whether you choose a classic option or an unusual model from the catalog, the process of how to properly change a toilet occurs in the same sequence.
Layout
Top tips when developing a bathroom renovation plan:
- It is better to arrange a room for water procedures on the first or basement floor. Plumbing fixtures are heavy; additional reinforcements are used to position them on the floor: wooden beams and screed.
- If the house consists of several floors and there is a need for a second bathroom, it is located symmetrically with the bathroom on the floor below.
- It is better to place the plumbing along the wall, this will reduce the load.
- We choose only plastic pipes for water supply that do not come into contact with the walls. This will help reduce condensation accumulation and avoid rotting processes, mold and mildew on the wood.
- We construct the floor a few centimeters lower (1-3 cm) than in the other rooms. Add a drain hole to the room plan. If the plumbing is faulty, water will not flood other rooms in the house.
- Don’t forget about ventilation: grilles at the bottom of the door, a gap between the door and the floor, a lattice air duct system on the wall (you can choose a model with an additional function - a humidity sensor).
- If the bathtub is on the ground floor, we bury the sewer pipes in the ground to prevent them from freezing in the winter.
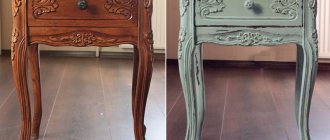
The dark color of the wood can be obtained by staining or by covering the wood with stain. Source izba.spb.ru
Make an accurate plan for the placement of plumbing fixtures and sockets in the bathroom. Then move on to planning the arrangement of furniture and additional decor: mirrors, laundry baskets, shower curtains, vases of flowers. Assess the space of the room. Consider how best to arrange your furnishings to leave enough free space to move around in the bathroom.
Zoning space in “wet zones” with tiles helps combat humidity in a wooden house. Source izba.spb.ru
How to make a toilet in a private house
When planning the location of the bathroom, the ideal choice would be a ready-made room, for example, a small pantry. Especially if it is located close to the drain well. If there is free space only on the opposite side, the task becomes more difficult. It is possible to install a toilet in it, but the amount of work and cost will increase. You can make a combined toilet in a small room with a regular bath or shower and a washing machine.
If there is no suitable place, a bathroom in a wooden house is even placed in the dining area, fencing it off with a solid partition and making the entrance in the adjacent wall. The building materials are chipboard, lining, plasterboard, etc. Soundproofing material is needed between the layers of sheathing.
Before installing a toilet in a private house, it is necessary to level and strengthen the floors, and then lay linoleum. In the case where the neck of the pipe is higher than the toilet outlet, it is worth raising it a little. A wide board or pieces of timber act as a podium. If the floor is concrete, cement and brick. The wood should be carefully painted and covered with drying oil.
Usually a direct connection to the sewer is possible without problems. A cuff with a sealing ring is inserted into the pipe, and the toilet outlet is inserted into the cuff. In case of difficulties, you need to use a plastic eccentric or a corrugated cuff
It is much easier to connect to the fecal pump, since the outlet is located at a standard height and everything important for docking is already there
When the toilet is placed in the chosen place and fits well with the sewer, you need to mark the holes. Then you should remove it and start drilling the floor. A mounting kit is often included. It includes screws, washers, dowels, caps.
Afterwards you need to put the toilet back in place and check it with a building level. If it is not level, you should correct the situation by placing something solid under it. Finally, you need to fill the gap with cement. If the toilet is installed on a podium, it should be leveled at the creation stage.
How to make a cesspool in a private house?
Let's consider the basic principles of arranging a sealed cesspool in a private house. Its mechanism of action is the flow of wastewater through pipes into a special sealed container. They remain there until they are pumped out by a sewer truck. For five family members you need to allocate 8 cubic meters of pit. If water procedures occur frequently, the washing machine and dishwasher are constantly running, you need to pump out the contents of the drainage hole three times a month.
You may be interested in: Possibilities and options for redevelopment of a two-room apartment
Features of a sealed cesspool device:
- The design of the storage tank can be of various types: a sealed well made of concrete, a factory-made container made of plastic;
- Plastic containers are considered more airtight than wells. An excellent choice would be a Eurocube, a 1000 liter tank with a tray made of wood or plastic. They are lightweight and low cost;
- The ventilation outlet should be installed at a height of 10 cm and placed 70 cm above the surface level;
- Then you need to lay the sewer pipes. You should look to see if there are trees along the way - they will prevent access to the pipes if repair work is necessary. Pipes should be placed below the depth at which the soil can freeze. If this is not possible, the pipeline should be insulated to prevent freezing.
Concreting the toilet floor
First of all, wooden floors (if any) are dismantled. Then a depression of 40-50 cm is created, followed by careful leveling and compaction. After this, a 30 cm layer of sand is poured, compacted and watered. Cover everything on top with fine crushed stone (fraction up to 10 mm), level it and compact it again.
The next stage involves leading the sewer pipe out through the foundation. This will require the use of diamond drilling equipment to prevent cracking or partial destruction of the building’s load-bearing structures.
Diamond drilling of holes for drainage Source specteh-smol.speczakaz.info
The hole inside the building should be 15-20 cm above the floor, and the outlet of the pipe to the outside should be located below the calculated level of soil freezing.
Then the recess is waterproofed, reinforcement mesh is laid and concrete is poured.
Before the solution hardens, future toilet fasteners (threaded steel rods) are inserted into it.
After this, you can install electric heated floors, which will add comfort to the room.
What will you need?
As mentioned above, it is necessary to prepare in advance for installation. Below are the basic elements needed to get started.
1. Plumbing fixture. Naturally, you won’t be able to start without a device. Connection components must also be present.
2. Taffeta. A distinctive element in the process of installing a toilet on a wooden floor. This is the base located under the plumbing. A board or plywood measuring 0.5 x 0.5 m is suitable. The main requirement will be strength and moisture resistance. Protects the floor from the harmful effects of the toilet, i.e. rotting.
3. Hardware. It is enough to stock up on self-tapping screws of suitable size. There is no need to drill into the concrete base, which greatly simplifies the work. Additionally, you can use liquid nails.
Luxury country toilet
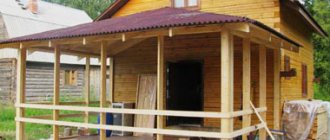
I built an outdoor toilet for my wife and daughter. Well, I didn’t forget myself. I didn’t waste time on trifles. If you build, then build it right!
The user divided the construction of an outdoor toilet into stages:
- I dug a hole and lowered two barrels with a volume of 200 liters into it. The barrels were stacked on top of each other. There is no bottom or lid. I cut slits in the bottom barrel in a checkerboard pattern. Gravel 10-15 cm thick was poured from below.
- Marked out the foundation for the country toilet. Base size – 2500x1500 mm.
- The strip foundation was poured. I laid a beam with a cross section of 10x10 cm on the concrete. For waterproofing, I laid roofing felt.
- Installed the frame of an outdoor toilet made of timber. The height of the main posts is 2000 mm. A 5x5 cm block was used for the jib.
- For the rafters of the country toilet, the user took a 50x50 mm block. The pitch of the rafters is 400 mm. The lathing is a board 15x2 cm. The floor is covered with a board 3 cm thick.
- Mrreanimatolog insulated the country toilet with stone wool. The inside was lined with clapboard. Outside is a block house. I installed a washbasin, a sink and a “faience friend” like a country toilet.
The ventilation pipe goes behind the toilet. Then it passes under the floor and comes out directly above the barrel. A vent pipe is mounted on the wall. I made ventilation holes around the perimeter of the foundation from a pipe with a diameter of 5 cm. This provides additional ventilation. Therefore, there are no unpleasant odors in the toilet.
At the end of the work, the user completed a porch 700 mm long. Covered the roof with corrugated sheets. I cut in windows measuring 50x50 cm and installed a homemade door.
The operation of the country toilet proved the functionality of the design. Among the modifications, the user installed the toilet with silicone sealant. This eliminated leaks where the toilet was installed on the floor.
How to choose a toilet
Installing a toilet in a private house with your own hands is associated with certain costs and you want them to pay off in terms of convenience.
- Economy class;
- middle class;
- luxury plumbing.
Luxury plumbing parts are designed to last a long time and will not simply break. When buying an expensive item, you can be sure that it will last a long time.
Another parameter is the color scheme. In large supermarkets you can choose any shade and implement the most daring design solutions.
Models available for sale:
- made of natural stone - durable and reliable, service life is unlimited;
- glass - completely transparent or with a pattern;
- earthenware;
- ceramic;
- metal;
- porcelain, which can last up to 50 years;
- plastic.
When purchasing, you need to carefully look at what is included in the equipment package. It may happen that the bowl and tank are sold separately.
In addition to external characteristics, you need to pay attention to:
- to the height of the equipment;
- type of construction – suspended, floor-mounted, wall-mounted floor;
- what type of flush - reverse or direct;
- The method of draining the tank is one or two button.
Wall-hung plumbing will cost more, but the structural elements will be hidden in the wall, which will save some space in the room. Backwash is of better quality because it washes the bowl completely. Two-button flush allows you to save water.
What should a master expect: the main stages of construction
When thinking about building a bathroom in a wooden house, you should immediately decide that the plumbing must have access to the sewer or at least to a cesspool. Water must also be connected for the bathroom to function fully.
The arrangement of this zone in a wooden structure has its own characteristics and even some difficulties. But they are easy to overcome if you do everything according to the established sequence.
The construction of the bathroom should take place in the following order:
- Sewerage installation. This is an initial and very responsible activity. If problems arise with the sewerage system, construction may be delayed. In a house that does not have access to a sewer, cesspool or sewage treatment plant, it will be impossible to create a bathroom. The only solution in this case is to carry out sewerage or dig a hole yourself.
- Ventilation. Without it, it is also impossible to carry out hygiene procedures fully. This requirement is easier to fulfill; the main thing is to think about how to arrange everything correctly.
- Waterproofing installation and plumbing installation. This is also an important stage. If you ignore the installation of waterproofing, then over time the wood will deteriorate due to high humidity. It is also better to purchase high-quality plumbing fixtures. It will last much longer and you won’t have to injure the wooden base to carry out installation and dismantling.
- Selection of design and finishing work. In order not to become hostage to one image of a wooden house, you can use the services of an interior designer or come up with everything yourself, inspired by ideas from the Internet or an architecture and design magazine.
Work must be carried out strictly according to plan. You can’t do ventilation without understanding the sewage system, etc.
Also, before starting, you need to consider a few truths about wooden houses:
- Over time, the house shrinks. Therefore, it is better to purchase metal-plastic or plastic pipes so that in case of deformation they can withstand the pressure.
- To secure the pipeline, use special clips.
- A sliding frame is a special technology that will allow you to build a bathroom in a wooden house without complications.
Interior decoration
Toilet in Provence style
The walls and ceiling in the toilet are made from materials that are resistant to constant exposure to moisture. It could be:
- clapboard;
- moisture-resistant wallpaper;
- dye;
- tiles - tiled and/or ceramic;
- mosaic.
The most popular decoration and furnishing of the toilet in the Provence style has recently become popular. The main design line in this option promotes relaxation, calmness, leisurely and measured actions. This is especially important if the warm toilet is combined with a bathroom.
It is better to design a bathroom in soothing colors with small elements of bright color. Flashy shades and bright designs irritate the nervous system and prevent you from completely relaxing.
Construction of a toilet for a summer house: drawing with dimensions for a “birdhouse” type structure
The design of the Birdhouse consists of wood, which can be covered with any other type of material. Construction of a single or gable roof is allowed. This type of closet is mounted as an above-ground building above the cesspool.
Typical design of a “Birdhouse” with dimensional parameters:
| Design element | Size, m |
| Rear wall (height) | 2 |
| Width | 1 |
| Front wall (height) | 2,3 |
| Base area | 1x1 |
When installing a wooden toilet structure, mandatory control of the placement of surfaces vertically and horizontally is necessary. For these purposes, it is recommended to use a building level.
Drawing of the Birdhouse toilet: 1 - frame, 2 - stand, 3 - door, 4 - handle, 5 - door crossbar, 6 - front wall, 7 - roof rafters, 8 - roof, 9 - ventilation riser, 10 - deflector, 11 — side wall, 12 — cesspool cover, 13 — brick supports, 14 — rear wall
Materials for the construction of the Birdhouse
To carry out the work, make sure you have:
- roofing felt - in the amount of 2 m?;
- concrete curb (2 pcs., length - 2 m) or sand-cement block (4 pcs.);
- door block (2000x900 mm);
- sand;
- linings (40 pcs., 87x3000 mm);
- edged boards (4 pcs., 50x100x6000 mm; 3 pcs., 32x90x6000 mm);
- profile sheet made of galvanized steel (2000x1520x0.4 mm);
- wooden beam (1 pc., 50x50x600);
- components for the door (latch, hinges, handles);
- fasteners (screws, nails);
- material for the finishing coating (varnish or coloring composition).
Toilet “Skvorechnik”, photo 1: preparation of materials and installation of the frame
In order to insulate the structure, you should purchase polystyrene foam. After construction is completed, the frame is sheathed from the inside. You can decorate the interior with beautiful materials (optional).
How to build a toilet in a country house with your own hands: step-by-step construction of a “Birdhouse”
Instructions for building the “Birdhouse” (step-by-step guide):
organization of a cesspool. The minimum size of the tank is 1x1x2 m. At the bottom there is a cushion of crushed stone or broken brick;
Toilet “Skvorechnik”, photo 2: installation of a technological hole in the floor
- construction of the foundation part. To do this, a concrete curb is installed so that the edges of the pit are located at a distance of no more than 0.2 m from it. The curb will act as a ceiling. The process of installing a curb involves digging in such a way that the concrete base rises above the soil level by no more than 0.1-0.15 m. If sand-cement blocks are used, they should be dug in the corners. The entire frame will be installed on them in the future;
- installation of roofing felt. The material is laid on top of the base in 3-4 layers as an insulator from moisture;
- construction of the above-ground part (wooden frame), its finishing. A wooden board or lining can be used as a cladding material for the frame. The flooring is made from thick boards. The minimum thickness for flooring is 4 cm. It is recommended to use wood species with increased strength characteristics. These species include larch, beech, oak, etc.
Toilet “Birdhouse”, photo 3: cladding of the external walls of the structure
Final work on the creation of the “Birdhouse”
The final work includes the following stages:
- creating a hole in the floor. The shape of the slot in this case can be arbitrary (round, diamond-shaped, oval, heart-shaped), the main thing is that its diameter is at least 30 cm;
- installation of door structure. For convenience, you can make a small slot in the door leaf in the form of a window so that sunlight can penetrate inside the frame. This window can be left free or glazed;
- roofing arrangement. The roof of the Birdhouse can be covered with various types of materials. Asbestos-cement sheets, roofing felt, and profile sheets made of steel are best suited for these purposes;
- applying the finishing layer. The surface of the product should be treated with varnish or paint. It is recommended to use oil dye.
Toilet “Skvorechnik”, photo 4: installation of a ventilation pipe and arrangement of the roof
When arranging toilets, do not forget about organizing ventilation. Even the simplest option will be enough. This system is designed to remove air from the waste pit to the outside. A pipe can be used as a material for making ventilation. The minimum diameter of the product is 10 cm.
To install the pipe in the podium part of the toilet, as well as in its roof, slots of the appropriate diameter are made. The pipe must rise above the roof by at least 0.2 m.
Toilet “Birdhouse”, photo 5: country toilet, built with your own hands
Varieties
There are several types of garden toilets.
With cesspool
This is the simplest and most common type of outdoor summer toilet. A depression of about 1.5–2 m is made in the ground, over which a small wooden structure is installed. Waste accumulates in this pit, and over time, fermenting, decomposes. If the pit fills up too quickly and the contents do not have time to decompose, you can resort to using a sewer machine. A wooden house can be made in an original design to decorate the site, for example, it can look like a “Teremok” or “Mill”.
Backlash closet
This is one of the variations of the previous option. Such a toilet is most often built adjacent to a house or to other heated structures on the site, for example, with a utility block. Its design includes a receiving funnel, a waste pipe, a cesspool and ventilation - a backlash channel for extracting air. To allow air to pass through the channel, it is placed near the chimney. Moving along the drain pipe, the air enters the heated part of the chimney, and then upward to a special hole for ventilation. An undoubted advantage is that such a toilet is warm and can be used in the winter season.
Powder closet
Its design does not provide for a cesspool. The recess under the toilet is presented in the form of a barrel. This option is suitable for areas with high inland waters, where it is not possible to dig a hole. To neutralize odors, ash, sawdust, and peat are used; sewage is sprinkled with it, if necessary, and “powdered.” As the barrel fills, it needs to be emptied. By mixing sewage with peat, it can later be used as fertilizer.
Peat toilet
Its structure resembles a powder closet, since it involves the use of peat to neutralize odors. The design is a regular toilet filled with peat. Instead of pipes, a special container is used that accumulates waste. This option can be installed both on the territory of the house and in a specially equipped house on the site
To neutralize odors, it is important to provide the building with a ventilation hole.
Dry toilet
The simplest type of arrangement of a country toilet. This is a portable cabin that has a container with a special means for recycling waste.
Chemical toilet
It is similar to the previous mobile version, but in this case, not a bio-filler, but a chemical substance is used for waste disposal. It cannot subsequently be used to fertilize the soil.
The main factor by which a choice is made from existing options is the depth of groundwater passage. If their level is at a depth of more than 2.5 m, even when it rains or floods, any type can be installed. If the water level is higher than this mark, it is better not to choose options with a cesspool.