Installation of a door in a frame house is carried out immediately after the construction of the building itself. This is the main advantage of such residential buildings, since they do not shrink.
If you have a little experience in installation and basic knowledge of installation, you can install the door yourself.
Door made of MDF and glass in the bedroom of a frame house
Door types
Doors can be internal or external. Here you should make a choice based on their placement in a frame house. External doors can be wooden or metal.
The wooden type is favored for its environmental properties, soundproofing characteristics and beautiful appearance.
Metal doors improve heat-insulating properties, and they are durable, long-lasting and reliable.
Among the internal type there is a choice between:
- PVC doors. Installing a door in a PVC frame house can provide good sound insulation, and they are also highly reliable, durable, strong and easy to care for;
- interior from MDF. MDF doors are usually veneered or laminated. It does not tolerate moisture, and is also less environmentally friendly than the wooden version, but is well resistant to fungus and insects;
- frame type, which is the cheapest option for such a building.
Crooked walls
If you are installing a frame in a doorway with curved walls, it will be difficult to install the door in a plane relative to the frame, and you will even think that you bought a defective door, although this is not the case at all. There are two ways to check the curvature of walls. Drive a nail or screw into each corner of the doorway, and then stretch the string in a crisscross pattern between them to create an X in the center of the opening.
The two threads should touch each other in the center, if this does not happen, try to move the wall at the bottom of the doorway a little.
Using a small sledgehammer and a suitable block of wood, lightly tap the bottom of each wall. Before knocking on the wall, make sure there are no plumbing fixtures or electrical outlets. And there should be no tiles on the other side of the wall, otherwise they will fall off!
Tap the wall until the threads touch each other. Don't worry if you can't completely eliminate the curvature, you can still improve the result while installing the box.
You can also check the curvature of the door frame walls by eye. The main thing is to know where to look. Unless your door frame is at the very end of a narrow hallway, look across one edge of the frame closest to you to the opposite edge further away from you.
Your head should be positioned so that your line of sight runs along both edges. The far edge should be parallel to yours. If this is not the case, the walls are installed crookedly and in this position you can see exactly how much the wall needs to be moved.
This is interesting: Do-it-yourself insulation of windows with thermal film: Review
Required tools and materials
To perform installation, you must obtain mounting hardware.
These can be anchor bolts, nails, metal studs, backing bars, as well as polyurethane foam.
Before installing doors, you should have the following tools ready:
- hammer;
- hacksaw;
- chisel;
- corner;
- roulette;
- screwdriver or screwdriver;
- sledgehammer;
- construction level.
Door installation tool kit
Installation of an interior partition
At the first stage of the work, it is necessary to determine the location of the future partition. To mark, use a plumb line and a cord; parallel lines are drawn on the floor and ceiling .
When marking, the width of the partition is also taken into account ; if it is sheathed in one sheet, then 2.5 cm is added to the thickness of the frame, and if the plasterboard is laid in two layers, then 5 cm is added.
To perform the above work, you will need the following tools:
- building level;
- measuring instruments;
- cord and plumb line, or as their replacement - a laser level;
- corner;
- electric drill;
- metal scissors or jigsaw;
- pencil;
- stationery knife;
- putty knife;
- container for plaster.
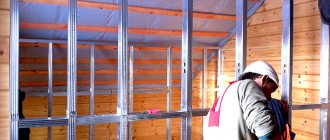
Installation of profiles
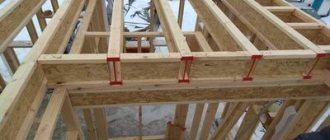
At the next stage, the remaining rack profiles are mounted ; if you have gypsum boards of standard width, then the distance between them is 60 cm.
To increase the strength of the future partition , it is necessary to secure horizontal jumpers between the vertical posts, which are cut from the same profile.
A wooden block is also installed and secured into the transverse profile located above the doorway; it should easily fit into it so as not to disturb the shape; using a square, check that the angles are 90 degrees .
The remaining transverse profiles are attached to the racks; special short screws are used for this.
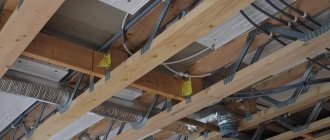
After the frame is created, you will see that its structure is quite rigid and durable, begin laying the electrical wiring . The rack profiles have holes through which it will be convenient to thread wires.
The wiring is placed in a special corrugated non-combustible insulation.
Fastening drywall
At home, you can use a utility knife and a long ruler or straight edge to cut drywall . To do this, apply a ruler to the sheet, make a cut along the line several times, the deeper it is, the better, and then carefully break the gypsum board and get the required size.
Here additional profiles reinforced with wooden blocks must be installed, it all depends on the weight of the suspended structures.
Carrying out finishing work
Installation of the frame and gypsum board is only the beginning of creating a plasterboard partition. At the next stage, all seams are sealed. To do this, use sickle tape and putty. The entire surface of the wall is also puttyed.
After the base has dried, begin leveling the surface. The wall is covered with a primer , which will allow the plaster to adhere better and provide additional protection for the gypsum board. Leveling is carried out with a wide spatula and finishing plaster.
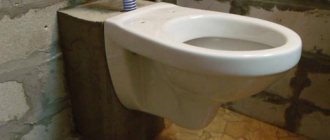
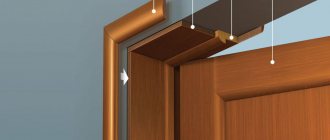
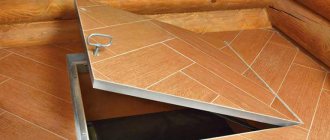
Door block installation
is installed into the prepared opening ; this is done using wedges, self-tapping screws and polyurethane foam . First, the frame is aligned using wedges and fixed with self-tapping screws, after which they proceed to installing the door leaf.
The work is checked to ensure that the work is carried out correctly , and the door should open and close easily. If everything is normal, then the remaining gaps are filled with polyurethane foam.
The foam is cut off after it has completely hardened; if the canvas was removed, then it is hung only a day later, after installing the box.
Finishing
At the last stage of creating a plasterboard wall, its finishing is carried out; for this, paint or wallpaper is usually used. The frame is covered with platbands, which help hide the door attachment points.
Standard door opening sizes
Openings are designed at the stage of construction of a frame house. There are standard sizes that are needed for installation.
They are determined by the type of room the frame house has.
- entrance opening – 2100 by 900 or 1200 mm;
- for living rooms – 2100 by 1600 mm;
- for living quarters and kitchens - 2100 by 900 mm;
- for the pantry and other utility rooms - 2100 by 700 mm.
Entrance door in a frame house
First five mounts
Install the first five fasteners in the correct locations and in the correct order. Otherwise, you will not be able to adjust the door correctly.
In this tutorial, I insert screws into pre-drilled holes in the front of the box. In your case, instead, drive 15-gauge nails or staples into each of your designated locations, or drive self-tapping screws close to the quarter so that the jamb covers the fasteners.
Fastener Location #1: The first fastener is near the top hinge of the box - as high as it will go. Do not insert shims behind fastener #1. The shims are already installed at the top of the jamb.
Fastener Location 2: The second fastener is level with the top of the door frame as high as it will go.
Fastening location 3: The third fastening is located at the bottom of the door frame as low as possible to the floor. However, before this it is necessary to correct the remaining unevenness of the wall. Slide the bottom of the door frame in or out against the wall until the door is flush with the frame. If the frame is very curved, do not try to completely eliminate the curvature; you can still do this before attaching fasteners number 4 (this is especially important with paired doors). You may need additional spacer to secure the box before installing the third fastener.
Fastener Location 4: Fastener #4 should be at the very bottom of the door frame, as low to the floor as possible. However, before doing this, correct the remaining unevenness of the wall. Slide the bottom of the door frame in or out against the wall until the door is perfectly flush with the frame. If you are installing a double door, make sure they are both on the same plane.
To maintain the 3-4mm clearance, you may need to insert another shim before attaching fastener number 4.
Mounting location 5:
The latest fastening corrects serious problems with doors, especially heavy ones. The weight of the door will put pressure on the upper frame of the door, and at the same time the upper hinge will be under pressure. This pressure will increase the hinge gap above the top hinge. If the hinge gap above the top hinge is not removed at this stage, the gap may not be adjusted and the door will rub against the door frame. To reduce pressure on the top hinge and frame, replace one of the top hinge screws with a screw long enough to penetrate not only the frame itself, but also the wall stud. Applying enough pressure to this screw will help adjust the top gap, but do not tighten it too much.
In the future, this screw can be loosened or tightened to adjust the fit of the door if it settles.
Preparing the doorway
A frame house is made with places for doors, which are formed with small tolerances of 10-20 mm. There are cases when such tolerances are greater due to subfloors that were installed out of level.
Therefore, you should first carry out preparatory work that will allow you to identify shortcomings of the installation site, avoid complications and improve the quality of the work performed.
Initially, the evenness of the walls of the frame building is assessed. To do this, use 2 methods. The first test option is to use a nylon thread. A nail is driven into the corners, onto which a thread is wound.
It is necessary to make the letter X. If the wall is level, then the threads will touch in the center. Otherwise, use a block and a sledgehammer to tap a little on both sides of the wall until the threads touch each other.
Another way is to check with a building level. This is much simpler, since you just need to attach the device to the wall and determine whether the wall of the frame house has any deviations.
Checking the doorway
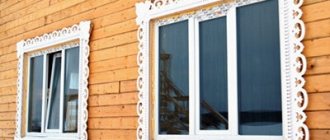
Casing: prices, cost
Manufacturing costs can vary greatly: prices and costs depend on many factors; in every wooden building, the part is not just necessary, but simply irreplaceable!
What determine the prices and cost of casing?
It depends on the quality of the wood, the type of casing, the shape of the casing, the presence of decorative elements, the size of the opening, and also on where the part will be installed - in timber, logs or a log house.
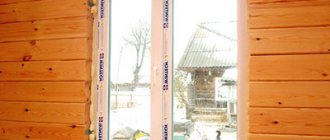
The window frame is made of dry material with a humidity of 8-12%. It consists of a top, risers, an adhesive window sill or a window sill board in cases of installing a plastic window sill.
Several types of work:
Solid: all parts are made by processing solid wood while maintaining the correct wood texture.
Adhesive: parts of such casing are made from glued boards. It is glued into a microspike on all four sides. Knots and resin pockets in this case are completely cut out.
Combined is the most common type of casing. The top and risers are made of solid pine. And the window sill is made of glued boards. All of it has a clean appearance and after installation needs to be treated with paint and varnish.
It is important!
Window frames are made to fit each window or door individually. When placing an order, the customer must know which windows and doors will be installed in the future casing. It can be made either with a sample for a window - this option is used in cases where the house will not have exterior and interior decoration, the walls of timber or rounded logs remain untouched
It can be made as a sample for a window - this option is used in cases where the house will not have exterior or interior decoration; the walls of timber or rounded logs remain intact.
And without sampling - this option is used in cases where the house is planned for interior and exterior decoration in the future. This version of the frame can be finished or rough (if it is completely closed during future finishing).
The pigtail can be either a standard shape - a rectangle, or non-standard shapes. Trapezes, polygons, balcony blocks.
Helpful advice!
Non-standard forms have their disadvantages, but there are ways to avoid them. Such information is discussed with the surveyor at the site.
More about the process
After window openings are cut in a wooden house, the structure of the log house no longer has the same rigidity as if the log house were solid. First, let's answer the question, what is a window frame, or, as it is also called, casing (wooden frame).
After window openings are cut in a wooden house, the structure of the log house no longer has the same rigidity as if the log house were solid. This is especially true for the window opening itself. During the shrinkage process, the logs can move significantly horizontally, which will also lead to deformation of the windows.
All these unpleasant moments are prevented by the frame (casing, wooden frame), which looks like a wooden box. From all of the above, it is clear that installing a socket in a wooden house is a dire necessity. This is true not only for a log house, but also for a timber house.
The process of installing the pigtail is quite simple. Having the necessary tools and materials at hand, you can install the pigtail yourself.
It is assumed that the window opening has already been cut. Now you need to use a chainsaw to select a spike (ridge) on the sides of the opening. This is done so that the pigtail does not move perpendicular to the axis of the walls.
Then the pigtail is made according to the obtained dimensions. Accordingly, in its side racks you need to select grooves for the ridge.
All elements of the pigtail are attached using dowels. Installation of the frame starts from the bottom beam. A layer of linen or jute is first laid under it.
Then vertical bars are installed, into the grooves of which flax or jute is also placed. And lastly, the upper beam of the frame is installed. The shrinkage gap, which must be left above the jamb, is covered with linen fabric.
It is important!
The window frame is a monolithic structure and is absolutely independent of any movements of the frame. Framed with frames, windows and doors will please the eye and will last you indefinitely.
Checking horizontal piping
Make sure that the harness is in a horizontal position. A level is used to check.
If there are deviations, it is necessary to place scraps of slabs or other materials under the harness.
Everything must be done so that the bubble in the level shows a horizontal position.
- you need to check in the doorway;
- the floor should be washed first;
- if it turns out to be uneven, then place a gasket under the canvas of the required thickness.
Make gaskets
Most door openings are made to large tolerances and must be reduced before installing the door, otherwise you will have to insert a spacer between the frame and the wall. Use plywood squares, screwing them around the entire perimeter of the opening so that in the end the doorway is only 3-4 mm larger than the external dimensions of the door and frame. If the door is located in a hallway or other inconvenient location, it is necessary to center the opening so that the frame and door slopes are the same on both sides of the finished door.
Installing gaskets behind the hinges should be avoided. Spacers behind the hinges will not allow you to subsequently adjust the position of the door in order to level and correct the necessary gaps. Please note that my level even has blue markings on the hinge locations so you don't accidentally install the spacer in those areas.
Checking and adjusting the size of the gaps
A frame house may have significant gaps in the opening where the door is installed. It is necessary to reduce them. To do this, you can use plywood or boards.
They must be installed on the sides and at the top of the door opening itself. This produces a gap with the required thickness, which should not exceed 2 cm.
The installation should not be carried out in the place of the frame building where the hinges are attached, as it will be difficult to change the position of the box and the canvas.
Correct clearances will avoid the following problems:
- malfunction;
- eliminating cracks through which drafts pass;
- creaking;
- damage to appearance.
Installing a door in a frame house
Level the threshold
Don't wait until the box is installed to start leveling the threshold. Place the level on the threshold and find a position where the bubble of your level stops in the center.
If you are installing the door on a finished floor - laminate, tile, or wood plank, you can measure the thickness of the leveling pad and cut the same number of millimeters from the opposite part of the trim. If the finished floor has not yet been installed, leave the pad in place and install the box on top of it.
Installation of the box
The first step is to install the box. We make holes in the vertical butts. If the box has a threshold, then the same actions must be performed with the threshold.
It is important to consider that self-tapping screws are the least suitable for this. They are susceptible to destruction from corrosion, and can also affect the destruction of the frame under heavy load.
In some situations, it is best to use regular nails, as it is faster and cheaper. The only place where they can be used is when installing materials to the floor frame.
Now we put the box into the holes and fix it with two gaskets at the top of the jamb, which should be located on opposite sides.
All that remains is to place the bars between the opening and the frame, and also identify 5 fasteners:
- the first fastener should be located near the loop on top and as high as possible;
- a second fastening is placed on the opposite side;
- the position of the box is checked and the third fastening is located near the floor;
- a fourth mount is installed on the opposite side of the third one;
- with the help of the fifth fastening, the load from the mass of the door is eliminated, which should penetrate not only into the frame, but also into the end. It will help adjust the position of the door.
Types of sliding mechanism
The assortment includes a huge selection of models, among which the buyer will be able to choose the design they need, based on a number of factors:
- Room layout;
- Stylistic design;
- Doorway width.
Below you will find sliding interior doors, their installation options and a visual photo.
Harmonic
This type of door design fits perfectly into a classic interior and is very popular among buyers. In the open and half-open positions, the door looks very original and stylish, and in the fully closed position it creates a solid structure.
The door consists of slats, the width of which is no more than 15 cm. They are connected to each other by special hinges, thanks to which the structure opens freely to the left and right.
Coupe
We can safely say that this type of sliding system is the most popular, because it is simple and easy to use, and also has durability. Due to this, such doors are often installed in children's rooms.
The structure may consist of one or several canvases. If sliding doors have sufficient width in the opening, they make the room more spacious and brighter. They can open either moving away from each other or in parallel. The entire structure is mounted on one rail mounted on top, so there is no threshold at the bottom, which is very convenient, especially in children's rooms.
Pencil case
It works on the principle of a compartment door, but the difference is that it goes into a special niche. This option is difficult to install, but practical and looks quite beautiful.
It is recommended to hire a specialist to install the pencil case, because it will be difficult to cope with the task yourself. The pseudo-wall consists of plasterboard and metal profiles. During its installation, many nuances must be taken into account in order for the design to work properly.
Portal
This version of the door has exactly the same parameters in height, width and filling. If all previous designs are similar in execution style, then this type is completely different in both installation and external design. Once installed, it creates the impression of an ordinary wall with large display windows. It is usually installed on a balcony, loggia, veranda in private houses.
Double doors
An equally popular type of sliding door system. It consists of two doors, one of which can be static, and the second is in constant use. But if it is necessary, for example, to remove furniture from the room, then you can open the second door, making the passage wider. Moreover, models with constantly used two doors are found everywhere.
This option is perfect for wide openings and fits perfectly into the overall interior of the room.
Tricuspid
Unlike double-leaf doors, they have an additional one leaf and are installed mainly in large rooms, for example, in the living room, dining room and other rooms. Often this type of sliding system is installed in the foyer of a private house, thanks to which it is possible to place a special emphasis on the interior of the room. When closing the door leaf, a solid structure is created, which allows you to zone one large room into two small ones.
Radius semicircular doors
This type of sliding system appeared relatively recently and every day the demand for it is growing more and more. This option is attractive with its unusual semicircular shape. Like the previous model, this type of door is installed mainly in large rooms and has considerable dimensions. With their help, you can turn your wildest fantasies into reality and create a spectacular entrance to the room.
This design is especially convenient if the house has rounded walls and a conventional sliding system cannot be installed in this case.
Intra-opening
With the right approach to installing this design, you can perfectly complement the style of the room. The system consists of two canvases that are installed on rails. The door can open either to the right or to the left.
HS portal (lift and slide)
The most expensive option, because it has an expensive profile from which the door is made. This option can be found in fashionable design projects, in offices, spa salons, hotels, cottages and catering establishments.
But the undoubted advantages include:
- High level of security;
- Strength;
- Ease of use.
What considerations should you follow?
A frame house, with all the typical technology of its construction, after facing and finishing work always acquires a unique appearance that is unique to it. This is primarily influenced by the tastes and, of course, the capabilities of the owners. Despite the importance of these purely subjective factors, it can be useful to distract yourself from them for a while and look around. You will see that local conditions have no less influence:
- climate and microclimatic features - for example, the house will be built on a southern steep slope, also protected from cooling winds, or on an open field in a windy area;
- the house will be suburban or in a private sector urban area;
- criminality of the area - despite the general increase in crime, we still have many places with a patriarchal peaceful way of life;
- the presence of noisy industries and railways nearby.
Window openings
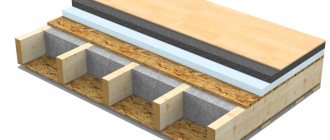
In frame buildings, the walls are multi-layered and this is where the complexity of the openings lies. The walls of frame houses on the outside have nine layers (standard equipment).
With the installation of openings inside the house, the situation is much simpler, since the walls inside the frame house are four layers thick.
It is not necessary to trim the openings, but it is better to do so.
When building a frame house out of ignorance, some builders may make mistakes, for example, making uneven openings. These mistakes can be corrected with cement.
Finishing and installing doors is no different from installing and finishing windows.
Once you understand the technology for installing windows, you will definitely be able to handle installing doors.
Video description
The video shows all the stages of making a room partition
The partition is made in a different way. To do this, two frames are erected, where the guides are installed independently of each other. The vertical elements will be inserted in such a way that they alternate in a checkerboard pattern at a standard distance. The stand is attached to only one sheet. This method will help remove the acoustics that form between the internal surfaces of the partition. The thickness of this structure increases by 10 centimeters.
Advantages of plasterboard partitions
Drywall is a universal building material that is used both for finishing a room and for creating new structures in it, including interior partitions, and for creating partitions for zoning in an office or apartment. The only things that can compete with it in terms of characteristics are: partitions made of tongue-and-groove slabs or polystyrene concrete blocks.
- this is a lightweight material , so the load on the structure of the house will be insignificant;
- all work with it is done with your own hands , without the help of assistants, since the material is light;
- the cost of drywall is low , as well as the materials needed to create the frame and surface finishing ;
- the material is easy to cut , it bends easily, so even arched structures can be created with its help;
- installation of the frame and sheets is simple and quick;
- finishing of such structures is carried out with various materials;
- plasterboard sheets consist of natural materials, so they are safe for human health.
- ordinary , most often gray, used in rooms where the humidity is no more than 70%;
- moisture resistant , has a green or blue color and is used in rooms where there is constantly high humidity;
- fireproof , usually used in the kitchen, where there is a possibility of strong heating of the wall, it contains fiberglass and other additives, it is red or gray in color;
- fire-resistant, moisture-resistant , it is rarely used in rooms with difficult conditions.
The thickness of a regular sheet is 12.5 mm , but to create arches, sheets 6.5 mm thick are used; to give them flexibility, they are pre-moistened.
Product repair
How to protect products:
- do not place blocks of wood, bricks, stones between the frame or canvas;
- when the door sag, it is necessary to adjust the hinges or geometry;
- Mounting closers with a protective function on aluminum doors will prevent damage from gusts of wind.
Timely adjustment of hinges will help save you from many problems and inconveniences, and often from major repairs. To determine adjustment options, you need to:
- open the door;
- Unscrew the fastenings of the decorative trims and remove them.
The method helps to identify manufacturing defects. If the sash geometry is distorted, the glazing beads are removed. Using straightening plates the problem is corrected.
The smoothness of the move can be corrected using the adjusting screws of the closer.
It is better to entrust the repair of aluminum systems to specialists. Often companies that manufacture or sell doors offer repairs. By contacting them, you can get the best solution. The company's employees know the features of the products. They are able to quickly fix the problem.