The first roofing materials for the roofs of people's homes were reeds and flat stones; as soon as technologies and tools appeared that made it possible to process wood, chips and then shingles began to be used as roofing materials. Later, with the development of technology, more modern materials began to be used. People of the older generation still remember how happy the inhabitants of the Russian outback were at the appearance of ordinary roofing felt; they began to replace shingles everywhere with this roofing material, modern at that time. Slate made a real revolution in construction; this covering made it possible to significantly increase the comfort of living in buildings. Today, this material is hopelessly outdated; it is being replaced by new, more practical coatings.
Roof shingles
How to cover a roof
The slope of the shingled roof cannot be less than 15⁰. The lathing underneath is laid either solid or with a maximum distance between the slats of 100 mm. Considering the low weight of wooden plates, poles ø 60–70 or bars with a square cross-section with a side of 50 mm are more often used for lathing. Roofing material is laid, as a rule, in 2–5 layers, with each of the plates overlapped by the next one:
- for two layers – half;
- three - two thirds;
- four - three-quarters,
- five - four-fifths.
On a note
For non-residential buildings, only two-layer coatings are used, for residential buildings, respectively, all the rest.
The issue of waterproofing such a roof raises a lot of controversy. Opinions, by the way, are mutually exclusive:
- one at a time - a layer of waterproofing is spread on the sheathing,
- on the other hand, such insulation is not required at all.
Old masters in Rus' preferred not to use continuous lathing and insulation, since for the normal functioning of a natural building material it is necessary for it to “breathe”. Under these conditions, the roof not only does not allow this to be done, but over time it begins to rot.
The weakest point is the slopes of the roof, so in these areas additional boards are laid, the width of which is about 350–400 mm. Note also that here the number of layers of material increases by one.
To fix the boards, special nails 40–60 mm long are used. They are thinner than regular ones, and when used, the wooden plates do not split. Before work, they must be boiled in drying oil. Fasteners are made in the upper corners of the boards, departing from the edge by at least 2 cm.
When using the technology of making shingles by splitting, the plate is formed in such a way that when slightly bent, the fibers - “pins” - rise. When laying the first row of planks from the bottom, the “pins” should look up; as for the rest, in this case the “pins” should look down. If you do not follow these recommendations, once moisture gets into the fibers of the boards, it begins to oxidize them, and eventually the entire coating may collapse.
The most difficult is considered to be laying in the valley. In these areas it is necessary to lay additional layers of material with the installation of auxiliary sheathing strips. The valley and convex corners are covered in a fan pattern.
In the past, it was quite difficult to find a more modern roofing material than aspen roofing shingles. In the southern regions of the country, houses were covered with straw and reeds, but in the northern and central regions aspen shingles were common. Aspen grows, and previously grew, everywhere, and competently prepared and installed shingles on the roof for many decades reliably protected the roofs of peasant houses and wooden churches. At this time, shingle roofing is elite, as well as reed, straw and slate, and natural tiles. There are not many craftsmen who know about installing shingle roofs and who have been able to preserve long-standing traditions, and their work is quite expensive.
Lathing requirements
Finished wooden roofing is a multi-layer waterproofing coating consisting of individual elements that overlap each other. Although shingle flooring is very lightweight, its installation requires a strong and secure base. There are two types of lathing for decking a wooden roof:
- Solid. Continuous sheathing consists of individual slats or square-section wooden blocks laid without gaps.
- Sparse. Sparse lathing is also made from slats, boards or wooden blocks, however, they are fixed in increments of 5-10 cm, which makes the structure lighter and saves materials.
Experienced craftsmen argue that it is necessary to lay vapor-permeable waterproofing on top of the rafters to protect the roof frame from water penetration, but at the same time not to make it impossible for the structure to “breathe.”
The technology of laying a roof from aspen or coniferous shingles is a monotonous and long process, which, nevertheless, can be done with your own hands. A wooden roof can consist of 2-5 layers of chocks. To cover non-residential or commercial structures, a two-layer coating is sufficient, while for residential buildings a multi-layer roof and a third, quarter or fifth of the chock are required. The sequence of construction of a shingle roof is as follows:
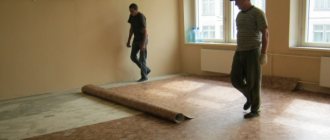
- First, lumps are prepared. To do this, you need to remove the bark from the logs, cut out the core, and then divide the remaining logs into thin plates of the same size.
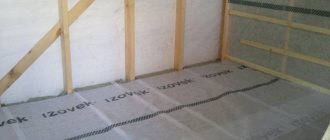
- Waterproofing material is laid out on the rafter legs with sagging, and then attached to the frame with a construction stapler.
- On top of the waterproofing, perpendicular to the rafters, a continuous or sparse sheathing made of edged boards or bars is attached.
- Laying the chocks begins from the bottom row of the roof. The boards are fixed using special nails 60-80 mm long, boiled in drying oil to prevent the material from splitting.
- The second row is laid overlapping the first so as to protect the seams between the planks from moisture penetration.
Please note that if a wooden roof breaks or leaks, it can be easily repaired. To do this, you need to carefully dismantle the damaged block and replace it with a new one.
Characteristics of roofing shingles
The quality and durability of the roof depend on the wood used, installation method and manufacturing technology. To calculate the load on the battens and rafters, the weight of one meter of square shingles is taken to be within the range of 14-15 kg. In fact, the weight of the roof can vary greatly, since different types of wood and different humidity levels are used.
The best material for shingles is considered to be:
- Canadian cedar;
- Larch or Siberian pine;
- Aspen and oak over 15 years old.
Cedar shingles are the most durable and beautiful, but the price per square meter exceeds all existing types of roofing. Cedar wood is not afraid of anything, neither putrefactive bacteria nor woodworms, and can stand on a roof for up to 80 years without care or maintenance. The weight of a cedar shingle roof is 15-20% less than that of its closest competitors.
For ordinary buildings, you can use pine, spruce and aspen; they last on the roof for 20-30 years, after which the roof is replaced due to the texture drying out in the sun. Oak and larch are considered the heaviest and most expensive to manufacture due to their high density and severe deformation of the fibers.
Current manufacturers
See also
Cement-sand mixture for plastering walls: how to plaster, composition
There are not many companies that produce these panels.
I will highlight a few well-known ones:
- TZK Tekhosnastka
. Russian company. There is only one line. This is oak chips. Sold since 2009; - Nailite
. American company. One of the first in its market. The panels are also suitable for the plinth. The only downside is the high price. But the quality is exemplary; - Foundry
. Another company from the USA. Not as popular as the previous one, but their siding sells well all over the world. Has a wide range to suit every taste; - Novik
. Manufacturer from Canada. The panels are durable, reliable and also durable. Externally they perfectly copy the bark of a tree; - Certainteed
. Again a company from the USA. A young company, but with ambitions. The line includes about 20 bark imitation options.
If you know any other famous and good companies, then write in the comments.
By the way, siding shingles are also often used for roofing.
Operating rules
Shingles are a roofing material that does not require special care:
- during the first year of operation, conduct an audit every month to ensure timely elimination of installation errors;
- carry out repair work on time, which in most cases consists of replacing damaged plates.
Life time
The shingles are characterized by long-term operation. The value of this parameter can reach 50–60 years or more. The service life in most cases depends on the correctness of the workpiece:
- Preparations for shingles need to be made only from spring to autumn;
- Before splitting wood, be sure to remove the bark and core (the bark is susceptible to rotting, and the core is susceptible to cracking).
Shingled roof repair
One of the problems that owners of houses with shingles face is the darkening of the roofing material. Solving this problem is very easy. It is enough to wash the roof surface with water and bleach.
The shingle plate to be replaced should be slightly smaller than the space for it
After 8–10 years of using shingles as a roofing material, the plates may need to be replaced. This need is associated with periodic waterlogging of the material and its drying. The plates are replaced in the following order:
- Remove the damaged area. To do this, you need to drive a wedge under the plate that is located above the damaged one and lift it slightly.
- Chop the damaged plate with a chisel and remove.
- Cut off the nail heads with a hacksaw.
- Now you can mount the new plate. If the board does not fit into the existing space as it should, then it is recommended to trim it from the thin end. The element to be replaced must be placed in place by tapping. It is necessary to nail the shingles to the sheathing with nails scalded in drying oil.
- Roofing adhesive should be applied to the nail heads.
1. 2. 3.
Since time immemorial, people have covered the roofs of their houses with wood. Natural tiles, reeds, reeds (more details: “ “) and straw (see: “ “) were also often used. And in those regions where forest was rare, roofing shingles were used. This material is called differently, in some regions it is shingles, in others it is spindle, ploughshare or shingles. But regardless of this, the essence of the technology is the same - the roof is covered with wooden roofing boards, sawn or split in a certain way. Such a roof is as original as, for example.
Modern imitation
On the modern construction market you can find an amazing variety of roofing materials designed to imitate shingles. Thanks to advancing technologies, they produce, for example, copper shingles. It is worth noting that such material is not very similar to its ancestor. Copper plates are made of diamonds, squares or “fish scales” of different sizes with a thickness of less than 1 mm. They have “ears” designed for fastening to the sheathing. They are similar in cost to handcrafted wood plates. Although among the advantages we should note fire resistance, ease of installation, and a variety of colors. But the disadvantages can be noise and low environmental friendliness.
American manufacturers have a special collection of bitumen shingles made to look like shingles. Along with this, you can find polymer imitations made from PVC, resins, and mineral additives. They are most similar to their historical counterpart in color, size and shape.
Installation features
Placing shingles on sheathing
The first row of shingles is placed so that the shutter is located 4 cm from the sheathing on the leeward side. If you install the first row differently, the eaves will begin to dry out prematurely and turn black from environmental influences.
The bars for the sheathing are hewn into two edges. The sheathing is installed from the eaves overhang to the ridge. A board is attached along the overhang, after the sheathing strip. Each plank is fixed at the intersection with the rafter beam.
Laying diagram with guide
Roofing shingles are laid using boards, one of which serves as a guide for laying the base material, and the purpose of the others is to hold the guide.
There must be at least two auxiliary boards. A guide moves along them during the process of laying shingles.
In places where roofs slope down, it is recommended that instead of bars, the shingles be fastened to a board having a width of 350 mm for installing a three-layer covering, 400 mm for laying a four-layer covering.
For the outer row, a board with a width of 100-250 mm is used.
Boards for roofing are treated with oil paint in 2 layers and covered with hot bitumen. Thanks to the treatment, the board will not absorb water if it flows through the shingles.
In places where the roof slopes, the roof covering wears out faster, so the coating layer on the slopes increases by one time, compared to the thickness of the main coating. For example, when laying shingles on the roof surface in three layers, four must be laid at the descent site.
Laying the boards on the slope is carried out so that when arranging a three-layer covering, the shingles are located at the same level in relation to the sheathing strip, which is laid above the boards. The second row of shingles is attached to this plan. This promotes tight abutment of the rows of shingles to the previously laid layers.
It is highly undesirable to use valleys on a natural roof. They are longer than the slopes, so when installing them it is necessary to lay auxiliary sheathing strips every two rows of shingles.
Row laying scheme
To make the roof waterproof, the ridge and eaves of the roof are laid with shortened plates, and full-length shingles are used for the main covering. In the first row at the eaves, the shingles are laid in the direction of the pile on the surface downwards, in the remaining rows the fleecy side is directed upwards.
Shingled roofing requires maintenance.
It is as follows:
- snow from the roof is removed with a broom from the ridge of the roof to the overhang;
- The coating is checked for defects.
Working with shingles is quite easy, so it is not surprising that they began to use it not only on roofs, but also as a finishing material for facades and interiors.
Common mistakes
Common mistakes include:
- Using excessively thick or long nails. The first ones split the wood, the second ones break through the wind protection film.
- Replacing nails with self-tapping screws that press the shingles too tightly, without the possibility of displacement and compensation for temperature or humidity expansion.
- Ignoring the need for pre-treatment of walls. The natural antiseptic properties of larch will not appear if there are no vapor barriers or if the stage of priming the walls is skipped. The same applies to sheathing: installation and closing of beams that have not been treated with fungicides is considered a serious violation.
- Refusal of lathing. On construction forums, ideas of direct fastening of shingles to wood concrete or similar porous material are discussed, but such actions contradict the requirements of the technology; a wooden façade must have ventilation gaps.
- No 2-3 cm gap for air access in the lower and upper parts of the cladding.
How to lay shingles on a roof
The minimum level of roof slope under shingles should be 15 degrees. The material must be laid with an overlap, and it can be either horizontal or vertical. The amount of overlap is selected in accordance with the number of layers of shingles:
- 2 layers - the amount of overlap is equal to half the length of the plate;
- 3 layers - ⅔ plate length;
- 4 layers - ¾ of the plate length;
- 5 layers - ⅘ length of the plate.
These values are relevant for each subsequent layer.
The roofing installation process is as follows:
- You need to start work from the overhangs, gradually moving upward.
The first row is laid with the pins forward, since when you make the plates yourself by hand, they take on a slightly curved appearance. All others are mounted with the pins facing down. The first row should be laid from left to right, each subsequent row in the opposite direction. The plates must be laid in a checkerboard pattern - Fastening the material to the sheathing can be done using special shingles screws.
Before use, they must be boiled in drying oil, which will significantly increase their service life. Holes for nails on shingle plates can be made in advance - On slopes, it is recommended to lay one more layer of shingles, since at these points the roof will experience greater loads than in other areas.
- It is also recommended to lay out an additional layer of shingles in the valley areas.
Installation errors
When covering a roof with shingles yourself, some mistakes are possible, especially if you have not had such experience before:
- large pitch of the sheathing - for shingles it is better to equip a continuous sheathing or with a small pitch, no more than 10 cm;
- insufficient overlap - because of this, moisture will penetrate into the under-roof space;
- improper processing of the plates, in particular, the bark and core were not cut off before splitting;
- absence of additional layers on eaves overhangs and in valleys, which can cause leakage.
Production methods
The name of the boards indicates the method of its production. Tearing, that is, stabbing, pinching by hand, has always been considered a special skill that requires certain skills and a trained eye.
- To make shingles or shingles, choose logs that are smooth, without knots or curls. They are cleared of bark and cut into logs of the required length: about 40–45 cm.
- To produce thin shingles, logs are sometimes soaked overnight in water, then worked on wet wood. Swellable fibers are more easily affected.
- Holding the log in a stable position, determine the required thickness of the die, and then drive the ax into the mass.
- With one hand, guide the blade along the block of wood, with the other, tear off a layer of fibers from the massif.
Handmade shingles are smooth on the top side – the side that is separated by the blade. Where the fibers are torn off, it is rough and embossed.
This work requires special precision and takes quite a lot of time and effort. But linden or aspen logs are very difficult to pluck by hand. To facilitate the process and increase productivity, mahalas were made - special mechanical machines. Their system consists of two logs held together by a pin. One serves as a support for the logs, the other holds the blade. The wood is driven through the mahal, obtaining even boards of a given thickness.
Machine-made and hand-made shingles from the same raw materials have different technical characteristics . Even with the same thickness. The first one looks smoother, but is more fragile, since its fibers are cut with a blade. Moisture penetrates into cut areas more easily and rotting occurs faster. The plucked one is unsightly in appearance, but is somewhat more flexible and stronger, since it has intact fibers.
Roofing shingles: manufacturing, processing, laying scheme, installation
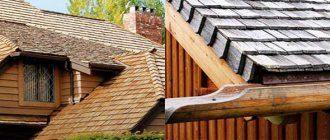
Finishing the roof with shingles
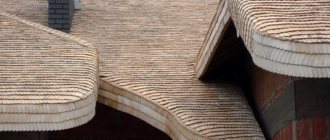
Shingled roofs are not only strong and durable, but also unique. Shingle roofs will always attract interested glances and, thanks to their unusual designs, always serve as a decorative element that will adorn any building.
Using gontines
Gontines - planks of certain sizes are made using wood from coniferous trees, as well as oak and beech. A wooden roof weighs very little, so there is no need to build heavy sheathing for it.
The use of any waterproofing materials is also not required, since their use can cause rotting of the shingles, since the air supply will be limited, which is simply unacceptable in cases with wooden roofs.
Shingle roof slope
The slope of the shingle roof should be 30-50°. For sheathing under a shingle roof, you need to prepare long poles and bars, the cross-section of which is 5x5 cm. Next, they need to be nailed at a distance equal to 1/3 of the length of the covering. In production conditions, the production of shingles occurs in one of two ways, namely by splitting or sawing.
Manual chopping guarantees higher quality material and a smooth surface. Those shingles that have been sawed will be rough to the touch. This worsens the properties of such wooden shingles, since sawn shingles absorb moisture well, as a result of which they can quickly rot.
Shredded shingles
Roofers prefer split shingles made from straight-trunked pitch pine. It can also be made at home. To do this, it is necessary to saw a log, the diameter of which is 30-40 cm, into several parts so that pieces 40 cm long are obtained. After which, these pieces are cut with an ax into blocks 8-10 cm thick. Next, using special using devices - a blade and a mallet, the workpieces are split into shingles with a thickness of 0.8 to 1 cm.
The shingle is clamped in a vice and the blade mounted on the shingle is struck with jerky blows with a mallet. In general, shingle roofs typically consist of three layers.
Shingle processing
The shingles are pre-treated with fire retardants and antiseptic solutions. The shingles are laid in such a way that the sharp edges fit tightly into the grooves of the adjacent ones. In addition, the parts that make up the upper rows must overlap the joints of the underlying shingles that were connected earlier. The shingles are secured by nailing them to the sheathing at the top.
It is necessary to comply with the condition that the nails enter the bar no less than 2-2.5 cm. The eaves overhang is finished using a board, the thickness of which must correspond to the thickness of the shingle covering. It's not just the manufacturing method, but also the way wood roofing looks that makes shingled roofs unique. No other roofing material can imitate this roofing either in appearance or in its properties.
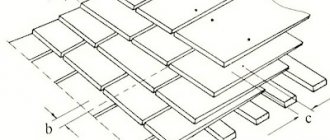
Scheme for laying shingles in three layers.
Price of shingles for roofing and facades
Since various types of wood can be used in the production of shingles, the price of this material, which is used for roofing and facade finishing, depends primarily on this factor.
Pine shingles are the most affordable, larch and cedar shingles are elite and prestigious. Larch and cedar shingles are roofing and facade materials that belong to the category of the best, and are often used in the construction of country houses, cottages, and estates.
Shingle roof repair
High quality material
Professional roof installation
Which facade finishing options are outdated, and which, on the contrary, are undervalued
Which tree is better
There are quite a lot of materials that can be used to cover the outside of a wooden house. But most homeowners understandably prefer wood: after all, they didn’t build a house from natural materials to cover it with vinyl siding.
Another question is which wood is best for facade cladding. Let's figure out what options there are.
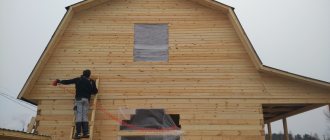
In the photo: facing the facade with wooden shingles. Details in the article about the project “Wooden ball house near Zelenograd”
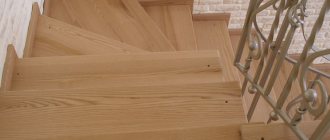
1. Lining
A classic of the genre for Russian home and dacha owners is lining (pictured below): a thin cladding board, usually coniferous, with a tongue-and-groove joint. The connection was designed to compensate for the appearance of cracks when the wooden planks dry out. In the last century, dachas and sheds were lined with clapboard, and sometimes even city loggias and kitchens.
Fact:
The transparent varnish that was used to cover the paneling gave it a “bathhouse”, “country” look. Today, to make the lining look more modern, designers advise using paint in complex shades - after all, it can be used not only for interiors, but also for facades.
In the photo: clapboard cladding of a country house. Details in the article about the project “Dacha on the banks of the Volga for large companies and family evenings”
But there is another side to this coin: in the open air, under the influence of sunlight and precipitation, the wood changes color (to Russians it traditionally resembles the color of a picket fence).
Sometimes the geometric dimensions of the board change (it dries out, it moves). The material also requires protection from biological damage: impregnation, which must be renewed with some regularity.
All these are not the disadvantages of naturally dried wood, but its physical properties that have to be taken into account. Although not everyone is happy with this option.
What is a wooden roof
We know many architectural monuments of antiquity, and most of them are covered with wood. In forest-rich Russia, this was the best and most affordable roofing material. However, today's fashion for wooden roofs comes not from Russian antiquity, but from modern Europe. They did not stop using wood for these purposes, since modernizing old houses in Holland, Switzerland, and France is prohibited by law.
Shingled house in the Swiss Alps is protected by the state
A wooden roof in the most general sense is a roof made entirely of wood, with the exception of fastening materials - nails or screws. Although in ancient Rus' the fastening spikes were also made of wood. Let us at least remember the famous churches that have survived: in Spas-Vezhi (1628), Yuryev (1718), Yanidor in the Perm region (1702), Varzuga in the Murmansk region (1674), Kizhi on Onega Island (1714).
The Church of the Transfiguration of the Lord in Kizhi was built without a single metal fastening element
Advantages and disadvantages of wooden roofing
Fashion is fashion, but we need to understand what we are up to in our quest to make our home beautiful.
The advantages of such a roof are very significant:
- Aesthetics. Of course, your house will stand out from everyone, as Baratynsky said, “with a unique expression.”
- Economic factor. Such a roof does not require the installation of noise, thermal, hydro and vapor barriers, nor ventilation in the under-roof space. The “shards” work like a fir cone: when dry, they “breathe” and do not allow condensation to form under the roof, and when wet, they swell and close tightly.
- Excellent performance characteristics. The roof can withstand heavy snow loads, strong winds, high humidity, precipitation, large temperature changes, and protects residents from the noise of rain and wind.
- Eco-friendly and hypoallergenic. It does not emit harmful fumes either inside the house or into the environment.
- Fairly high durability. However, this directly depends on the type of “shards”, the type of wood and the thoroughness of installation. An oak or larch shingle will last up to 80 years.
Of course, there are also disadvantages:
- Fragility in case of improper installation or use of unstable wood. A roof made of aspen shingles is designed to last only 8 years, and a roof made of pine planks - up to 20 years.
- High cost of material and labor.
- In the case of independent execution, there is a large labor cost for installation, which implies scrupulous fixation of each, often very small, element.
- Low fire resistance. Some danger remains even with careful impregnation of each element with modern fire retardants, proper design of fire-fighting materials around the pipe areas and installation of anti-spark deflectors on pipes and lightning rods.
- Strict requirements for the slope of the slope. A wooden roof does not rot or leak even with a fairly large roof slope - from 18 to 70°, ideally 40-45°.
Basic principles of plastering work
The quality of plaster application depends on the preparation of the base and the prepared mixture. It is necessary to follow the manufacturer’s recommendations and be guided by SNIP. The human factor is also important: the qualifications of the master.
As a result of treating walls with plaster, the surface should be smooth and free of cracks. The mixture recipe largely depends on the base material: brick, wood, concrete. An important factor is the operating conditions of the structures: the exterior decoration or the interior of the room. Plastering various surfaces involves applying the mixture in several ways:
- By throwing method.
- Spreading method.
Types of wooden roofing
In general, the concept of wooden roofing means tiles or their analogues made of wood. There are several types of material in question:
- shingles - small boards that are laid on the roof in a checkerboard pattern;
- shindel - planks of irregular shape and small size, which can be laid either in a checkerboard pattern or overlapping;
- shingles - figured sawn planks;
- ploughshare - a tile made of wood, spade-shaped, but now practically not used;
- tes are boards made of pine wood.
Most often, when equipping a roof, shingles and shingles are used - these two types of wooden roofing can not only perform protective functions at a high level, but also support the overall style of the building and fit perfectly into any landscape design.
Shingles
Manufacturers claim a service life of shingles of 50 years - this is already a long time, but look at ancient buildings that stand for more than 100 years - their roofs were made of shingles, and their appearance still remains attractive.
The shingles cope well with their “responsibilities” - they reliably protect the house from rain and wind. This happens due to the natural properties of wood - during rain, the “petals” of the shingles swell and close together, and in the warm season, on the contrary, they dry out a little and free space appears between them. In the first case, the shingles closed together do not give even a small chance of moisture penetrating into the house, and in the second, space appears for ventilation.
The main advantage of shingles is that such a wooden roof is lightweight, which does not require the installation of a powerful rafter system. Due to its light weight, shingles can also be used for houses with low foundations.
It is quite possible to make roofing shingles with your own hands - you will need wooden blocks from 40 to 100 cm long, pre-soaked in water. They are planed into chips, and the size is not important, but the thickness should be about 5 mm. As a rule, for a wooden roof of a house, shingles are laid in 4-5 layers - this will provide the necessary protection from adverse weather conditions. But for gazebos, bathhouses and utility rooms, 2-3 layers of shingles will be enough.
Here is a diagram of laying shingles over waterproof plywood and a built-up bitumen-polymer coating:
Please note: despite the fact that shingles perform the functions of heat and moisture protection very well, it is still advisable to lay layers of appropriate insulation under it
Shingle
Gontines are planks of certain sizes, which are made of oak or beech; coniferous wood can also be used. The most expensive, but also the highest quality, are larch and cedar shingles.
Wooden shingle roofing is light in weight, so there is no need to install any heavy sheathing before laying the material in question. And it is strictly forbidden to lay a layer of moisture insulation directly under the roof shingles - this will lead to rotting of the wood and will prevent ventilation of the under-roof space.
Of course, you can make roofing shingles with your own hands, but it is more practical to purchase ready-made material
When choosing gontines, pay attention to the following points:
- The wood should not be too dry - it will quickly crack, lose its attractive appearance and lose its ability to perform protective functions.
- Ideally, there should be a small depression in the middle of each shingle - not a hole/depression, but simply a bevel from the edges of the board towards the center. This will provide greater protection for your home during rain and snow.
- The optimal shingle in terms of cost would be material made from spruce, but some manufacturers make wooden roofing from pine and aspen - this is acceptable, but undesirable. But oak, beech and larch are expensive materials; wooden shingle roofing made from them will require large financial investments.
Since shingles differ from shingles in their larger width and thickness, for houses you will need to lay the planks in only 2 layers, for utility/utility rooms - in one.
Please note: if you plan to make a wooden roof that is not a natural color, but painted, then painting work with the shingles must be done before the installation process
Construction, material and characteristics of a wooden roof
In order to correctly understand what a wooden roof is, to understand the intricacies of choosing and laying its different types, you need to have a good knowledge of the structure of the roof in principle and the materials suitable for such a roof.
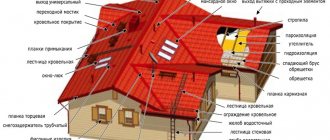
Structural terminology of the roof in general
When designing and constructing roofing structures, it is customary to use the following terms.
- The roof is the top covering of any building. A typical pitched roof rests on external walls and consists of a rafter system and a roofing pie. It protects walls and interiors from all external climatic influences.
- Roof slopes are inclined planes. The roof can be gable or multi-slope. The lower edge of the slope above the wall is called the overhang (eaves).
- Ridge - a horizontal connection of slopes with a gable roof structure. A rib is any other convex joint. Endova is a concave connection.
- The rafter system is a load-bearing roof structure consisting of vertical posts, inclined rafter legs and auxiliary struts. Its support is the mauerlat - a log, board or timber lying on the perimeter of the walls.
- The roofing pie is attached to the rafters and consists of noise, heat, hydro and vapor barriers (in the case of a warm roof), counter battens, sheathing and roofing material. For a cold roof (non-residential attic), insulation and vapor barrier are not used. The counter grille is placed on top of the hydraulic barrier to create a ventilation gap.
- Lathing is a lattice or solid flooring mounted on a counter-lattice (if insulation is not used, directly on the rafters) and additionally strengthens the rafter system. The roofing material is attached to the sheathing.
Choosing wood for roofing
Wooden roofing is made from any wood, but in most cases coniferous is preferable: spruce, cedar, larch (only soft linden or aspen are needed for the ploughshare). Coniferous varieties contain resins and essential substances, natural antiseptics against bacteria and fungi.
A roof made of coniferous wood, even without treatment with a synthetic antiseptic, will last twice as long as a deciduous one.
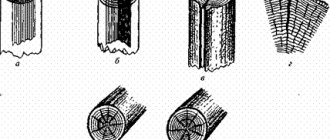
Working with raw lumber
Ideally, all types of roofing material are made from large diameter trunks - 40-80 centimeters, but smaller ones can be used for wood chips and shingles. Of course, the log should not have knots or through cracks, wane, blue stains, or damage by insects. The wetter the logs, the easier they are to process, but the longer the plates are after drying. A sawn log dries for three years, so it is advisable to saw it for faster drying into churaki (logs) 40-70 centimeters long and remove the bark. Then the drying time is reduced to six months. It is not recommended to use the middle of the log (sapwood), as well as the outer side (sapwood), for roofing elements; they are not strong enough. Finished plates of any type must be dried in packs to a moisture content of 25% - it is quite difficult to determine the finished state of the wood by eye, but it will take three to four months.
Roofing plates dry in packs for three to four months
It is also necessary to take into account the location of the annual rings of wood - the more frequent they are, the stronger the elements of the wooden roof.