When manufacturing staircase elements, you should pay special ATTENTION to the direction of the wood grain . Drawings must be transferred to the source material, taking this feature into account, along the greatest direction of the template.
Installing a wooden staircase with your own hands is a labor-intensive and quite complicated process for a beginner, as it requires certain training, skills and abilities.
It is obvious that securely fastened and perfectly adjusted staircase elements make the structure as stable and reliable as possible, eliminating creaks, swaying and deformation. However, novice craftsmen often neglect simple rules, which leads to distortions, premature destruction and other extremely unpleasant consequences.
In this article we will try to talk about the key points of assembling and installing rotary flight stairs so that you do not make mistakes in practice.
If you don't have a finished project, we recommend that you use our online staircase calculator . It allows you to receive a ready-made estimate, a set of drawings, a 3D model and recommendations for manufacturing the most convenient design.
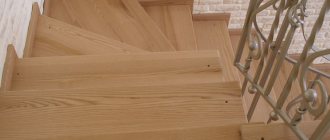
To make the base, prepared wooden beams are cut to the size of the finished staircase, and an additional section equal to the thickness of the tread is removed. Then markings are applied to the parts according to the parameters of the steps and the recesses are cut out with a chisel or milling machine. The finished first element will be a template for making the rest.
Calculation of stairs
Height
The overall height of a wood structure is determined by measuring the total distance from the finished flooring on the bottom floor of the house to the finished floor on the top floor. If the building is not completed or there is no finishing, which sometimes takes up a lot of centimeters, presumptive marks are used. To accurately measure horizontal and vertical lines, use a building level. When making calculations, an allowance must be made for the height of the interfloor ceiling and the final finishing “pie”.
Riser height
This parameter is calculated to find out how many steps are needed. For a “average” person in terms of height and physical characteristics, the anatomically convenient riser height is from 15 to 19 cm. If you take a smaller value, the step will be lost; if you take a larger value, the staircase will become dangerous for movement. The standard value is 17 cm - this is the optimal value.
Number and width of steps
According to current standards, the number of steps should not exceed 17 pieces in one flight. To calculate their sufficient number, divide the measured height of the stairs by the height of the riser. If the number turns out to be a fraction, you can:
- leave “as is”, provided that the highest precision is observed during manufacturing;
- round the parameter up to a whole number - in this case it will be necessary to make an adjustment for the height of the lower step, reducing it.
The optimal height of the steps is from 15 to 20 cm. The width of the tread, according to standards, should be at least 50 cm in total with the height of the riser, so that the foot rests comfortably and safely on it. The average value is from 22 to 40 cm, optimally 30 cm. The depth of the treads should be at least 25 cm.
Stair width
The minimum width of platforms, openings and flights allowed by standards and sufficient for convenient passage is 80 cm. The exact number is selected based on the available free space. To make walking and turning convenient, it is advisable to leave at least a meter - up to 110 cm. For a harmonious and proportionate appearance of the staircase, it is worth making the parameters of its width and the width of the tread multiples of each other.
The size of the opening in the ceiling, the angle of inclination of the stairs and other parameters
The opening in the interfloor ceiling is calculated according to the internal width of the stairs. The height of the tallest owner of the house is also taken into account so that he does not have to bend over when climbing due to lack of free space. The height of the clearance should be at least 2 meters, the width of the opening - from 1 meter.
According to current standards, the maximum angle of inclination for in-house systems is 45 degrees. If it is exceeded, the ladder will be classified as an extension. At an angle of less than 30 degrees, walking will be uncomfortable due to excessive flatness. The optimal “fork” is 35-40 degrees. The angle of inclination of the march is determined, among other things, by the number of steps - the table below shows the approximate ratio:
There is also a safety limitation for fences - at least 90 cm in height. The gap between the balusters should be more than 20 cm, and if the family has small children or animals - 15 cm.
A visit to our website will help you decide on the type of wood cladding for your home, outside and inside.
and others, as well as order the assembly of stairs, in compliance with all rules and requirements.
We offer the widest range of lumber from the Vologda region and profile planed kiln-dried products from Arkhangelsk:
Opening hours: Monday - Friday 9.00 - 16.00 Saturday 9.00 - 14.00 Sunday closed
Phones: 8(831) 4155587 8(902) 3051662
- In a wooden beam, at equal distances, you need to make recesses of a precisely specified shape, as shown in the video;
- If the grooves are inaccurately distributed or there are the slightest errors in size and depth, the steps will wobble and the staircase structure will turn out to be inconvenient and unsafe;
Simple DIY staircase, variety of models
If you plan to make a lifting structure, you need to ensure some nuances during the construction process:
- Initially, it should be sufficient, thoughtful and reliable. To do this, you need to correctly draw up a drawing and project. You should not leave this for later, since all the next steps depend on the preparation of the project. If you try to assemble a ladder on the go, you may end up with a weak structure that falls apart during use and is not suitable for regular ascents.
- It is necessary to ensure convenience for residents. It is ensured mainly through the correct selection of dimensions of treads, risers and fences. These dimensions are selected for each resident, and even children should be taken into account.
Assembly steps
- First, a trial assembly is carried out with your own hands to eliminate possible defects in the stairs;
- After final fitting, the wooden parts are treated with a special antiseptic solution to protect the wood from damage by fungus and mold;
- The ends of the steps and the inner surface of the grooves are coated with glue and tightly fastened, as shown in the photo;
- To increase the level of reliability, the steps are additionally fixed with screws on the outside. In order not to spoil the aesthetic appearance of the stairs, it is better to recess the heads of the screws into the beam by 5-8 mm, and fill the resulting recesses with putty;
- Then the staircase undergoes finishing treatment - varnish or paint.
Let's sum it up
There are many design options for lifting products and materials used to equip them. The steps of the stairs, which are installed on a bowstring, look especially beautiful. And thanks to modern technologies, this design has become much stronger and stronger, which makes it possible to extend the service life of such a structure.
The width of stairs recommended by professionals in individual houses is 1300±200 mm.
Installation of steps and risers
The risers are placed in the sawed-off niches of the stringer, leveled and sanded. Fixation is carried out using self-tapping screws, which upon completion of installation are puttied or covered with finishing.
After fixing the risers, pre-milled steps are installed, the length of which should exceed the distance between the pair of outer stringers by 1-2 cm. The width of the elements should be 2-3 cm larger than the comb protrusion. The steps are fastened to the risers and stringers using self-tapping screws, the heads of which must be recessed into the wood.
Installation of fences
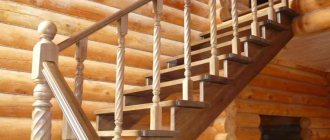
The finished look of the staircase is given by auxiliary elements. Fences can be used both carved and smooth, steel or wooden figured.
Installing supports with wooden balusters is a rather difficult task, requiring precise marking and adjustment.
The hole in the step for the dowel is assigned at a distance from the edge, taken to be 1/2 of the width of the baluster base. Next, holes are made and dowels are glued inside. They rise above the surface by 10-15 mm.
All elements are mounted on dowels with vertical level adjustment. Next, prepare the handrails by cutting the edges at the desired angle and milling them from the bottom. To connect to the supports, holes are drilled at the edge of the element. The handrail is installed on a dowel glued into the support post.
When preparing handrails, their edges are cut at the required angle and milled from the bottom. To connect the railings to the posts, holes are drilled on the edge. The wooden railings are installed on a dowel inserted into the support post.
The balusters are coated with high-quality glue, and railings are placed on top of them in the existing groove. Despite the high reliability of the resulting connection, it is recommended to additionally strengthen the joint with small self-tapping screws.
After the glue has dried, the stairs must be coated with an antiseptic primer, then the surface is treated with transparent varnish or paint. You can install a decorative plinth. In a spiral staircase, you can design it with an axial support in the form of a log or beam, or install a bent string to support the steps. The price of such a design will be high, since viscous flexible wood is used in production, but the final effect is worth it.
When choosing a staircase with a complex configuration, be prepared for some difficulties in everyday life: for example, it will be difficult to move bulky furniture up the stairs. You should not skimp on fencing by sparingly placing balusters: the safest distance is considered to be no more than 15 cm.
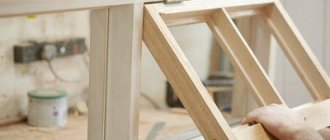
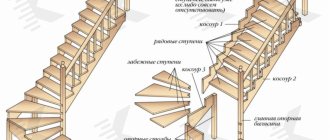
Assembling bowstrings or stringers
On the prepared boards you need to mark the length and saw off the excess. On the block, using a square, mark the height of the riser and the width of the tread with a decrease of 2-4 cm.
The notches for the steps are cut out with a jigsaw or saw. Next, place the workpiece at the installation site so that the lower edge rests against the floor, and the upper edge against the ceiling. The cuts under the steps should be horizontal, without “blockages”. After this, it is recommended to sand the surface of the block and perform milling, rounding the outer edges.
For optimal rigidity, sometimes 2, 3 or 4 stringers may be required, the number of which is selected depending on the width of the stairs. Sometimes it’s easier to order a ready-made supporting frame, which will include all the elements with cutouts, designated by numbers for joining in accordance with the diagram.
Classification of stairs according to construction method
- marching;
- console;
- spinal;
- screw;
- combined.
Marching stairs
Marching stairs made of wood are distinguished by the simplest design, consisting of individual flights. Such stairs can be straight or rotary. A monolithic staircase with straight flights cannot be called “wooden” in the literal sense of the word: the railings, balusters and steps for stairs are made of wood, and the base is concrete.
Cantilever stairs
The design of a cantilever staircase is more complex; its location along the wall and the absence of massive handrails and visible supports creates the imaginary impression of a structure “hanging in the air.” In fact, reliable fastening of wooden steps with anchors to the load-bearing wall provides the necessary stability and strength. Replacing the flooring in a room with such a staircase does not require dismantling it, which can be called an indisputable advantage.
Spiral staircases
Spiral staircases cannot be called the most convenient to use, but this option is most suitable for rooms with limited space. A combined staircase usually includes elements of curved, straight and spiral flights.
Spinal stairs
Spinal stairs are so named for some similarity with a ridge: indeed, it is difficult to call a structure consisting of individual elements, connected by means of a sequential insertion, anything other than a spinal staircase.
The use of this design allows the alternation of planning solutions (straight, spiral, turning staircases with winder steps), which makes it possible to obtain a staircase of almost any geometry. The shape of the fence naturally follows the shape of the wooden staircase structure, hence the need to use flexible handrails. The production and installation of a wooden spine-type staircase will cost one and a half to two times more than the classic version.
- Turning stairs - in this case we mean straight structures with one or more turns. At first glance, they seem complicated, but in reality, if you figure out how to make a wooden staircase with one flight, then connecting several flights across the landings will not be difficult.
Types of structures
To build a staircase structure, you must be able to use the tool and know the rules for constructing sketches and drawings. This will allow:
- design all the constituent elements of the structure;
- take into account potential weaknesses and correct shortcomings at the project stage;
- calculate the size of the steps so that it is convenient to go up and down.
It is best to use wood to make stairs. This building material is environmentally friendly, practical, and easy to work with, which is especially important for novice craftsmen. Using a special tool, you can make a staircase of a shape that would ideally suit your interior:
- straight or rounded;
- simple or decorative;
- heavy or light.
The following popular types of wooden staircase designs are distinguished:
- on stringers - the most common option. The main beam is a ridge on which the steps rest on top. The most commonly used scheme is with 2 stringers, but there are also options with 1 and 3 load-bearing elements.
- on a bowstring - the beams are located on the sides of the steps. This scheme visually makes the whole composition a little heavier, which is quite pleasant to the eye, but is no more difficult to manufacture than the previous version.
- on rails - here a metal fence acts as a load-bearing element. Such designs fit perfectly into modern interiors.
- on the central pillar - this system is used for spiral staircases.
Why a wooden staircase?
Indeed, metal and concrete are much stronger and more durable than wood. Installation of such stairs is carried out according to the “set it and forget it” principle, while natural wood needs to be constantly looked after, impregnated with an antiseptic, varnished, and potholes repaired.
As practice shows, it takes an amateur no more than 1 week to arrange a simple wooden march
Wood is installed much faster and costs much less, plus, according to statistics, half of the metal and concrete stairs in residential buildings are sheathed with wood in order to reduce the risk of injury to the structure. There is no need to sheathe the wooden span; it is already safe.
For more detailed step-by-step instructions for making a wooden staircase with your own hands, watch the video:
Construction documents, norms and rules
To take into account safe and convenient standard sizes of flights of stairs and their railings at the design stage, first read the problem-oriented information in the construction documentation that regulates these characteristics:
- NPB 245 - 2001 and GOST R53254 - 2009 “Fire fighting equipment. External stationary fire ladders. Roof fencing. General technical requirements".
- SNiP 2.08.01 - 89 “Residential buildings”.
- SNiP 31 – 01 – 2003 “Residential multi-apartment buildings”.
- SNiP 31 - 02 - 2001 “Single-apartment residential houses.”
- SNiP II – 25 – 80 “Wooden structures”.
Making a wooden staircase with your own hands from bent-glued veneer, wood using clamps and jigs is very difficult and time-consuming, but in the end it turns out very beautiful and exclusive.
If you are going to build labor-intensive, but advantageous for the interior, bent-laminated stairs or its elements, then read GOST 20850-84 “Glulam-laminated wooden structures.”
How to make a wooden staircase to the second floor?
The whole process consists of planning, assembly and installation.
Selection of equipment
A single-flight wooden staircase is assembled with your own hands from parts and components:
- Steps. Their width is selected individually, but most often it is 1 m.
- The bowstring (2 pcs) is the heaviest part of the structure.
- Angle with galvanized coating for fixing steps, self-tapping screws (40 mm).
- Additional parts (posts, balusters, handrails).
- Finishing materials: stain, varnish.
Perform calculations and drawing
How to make a wooden staircase durable and aesthetically pleasing? The key points in planning the product are to correctly measure the dimensions of the opening, determine the number and size of steps. Next, you need to calculate the main dimensions of the future product and draw up a drawing. You can get the necessary calculations and advice from professionals on how to make a wooden staircase with your own hands.
Manufacturing process
To solve all the questions about how to make a wooden staircase yourself, carefully follow the recommendations:
For more detailed step-by-step instructions for making a wooden staircase with your own hands, watch the video:
The first thing any builder faces is the design of future work. In the case of building a staircase, you will need to create an actual drawing to scale.
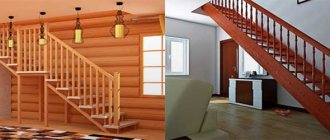
Wooden stairs in the house are a very attractive element that can decorate or, conversely, spoil the appearance of any room. Beautiful carved stairs, like the one shown in the title photo, are the prerogative of professional assemblers and carvers, but this does not mean that simple structures assembled with your own hands cannot look impressive.
In today's article we will look at the installation of wooden stairs step by step. This material will allow you to assemble a high-quality structure with your own hands, without spending a lot of money on hiring specialists and materials.
The first thing any builder faces is the design of future work. In the case of building a staircase, you will need to create an actual drawing to scale.
It is a drawing, not sketches on a piece of cardboard or a pack of cigarettes. This approach will allow you to avoid common errors in the manufacture and assembly of parts.
Ideally, processing should be done on the structure in disassembled form.
Material selection
After all the basic calculations have been completed, you will need to purchase boards of different lengths and densities:
- The thickness of the boards for steps should be 30-40 mm;
- for risers – 20-25 mm;
- the thickness for a bowstring or stringer is 50 mm, and the height is 150-250 mm.
It is better to buy ready-made handrails and balusters, since their production will require a lathe and timber measuring 10x10, 15x15 cm. To fix the components, you will need screws and nails, as well as metal corners for reinforcement.
Processing of the finished product
After the entire structure has been assembled, it is necessary to treat the wood with special means to protect it from insects, rot, etc.
Ideally, processing should be done on the structure in disassembled form.
In order to harmoniously fit the staircase into the interior of the room, it is necessary to use a varnish coating. It is also possible to tint the desired shade. To do this, you can use stain or colored varnish.
The painting process includes three stages: sanding, priming and varnishing.
Brief instructions on the material
Whatever kind of staircase you decide to make, you must choose the best raw materials, since the durability of the final structure depends on it.
To make a staircase to the second floor, both concrete and stones (brick) are suitable. Wood is often used. It is better to choose from hard and durable wood species - oak board, spruce, ash.
For railings, structures made of metal, stainless steel and aluminum are chosen. You can also combine wood, concrete, plastic and metal.
If you are making a staircase from stone, it is better to use blocks made by industrial methods, so the finished structure is protected from cracks.
Wood is easy to work with if you are making stairs from this material.
Manufacturing standards
There are several rules for making stairs in private homes. Some of which are determined by convenience, others by fire safety standards. In fact, they can be listed in the following recommendations:
Components
- The lifting angle should not exceed 45 degrees. The only exception can be the “Duck Walk” design. If the climb is too sudden, the stress on the heart increases and the risk of falling from the stairs increases.
- According to fire safety standards, the width of the march part must be at least 800 millimeters.
- The width of the tread is not less than 250 millimeters, the height is not more than 200.
- The total length of the march must be 200 centimeters or more.
- According to building codes and regulations, the distance between the march can be 75 mm or more.
- Railings must exceed 900 millimeters. Moreover, you should focus on the growth of the residents in the building.
Ease of lifting at different angles