When you start immersing yourself in making furniture with your own hands, there is a need to simplify your work with the same type of operations associated with the preliminary marking of parts for fasteners. Furniture drilling jigs are an excellent tool for the home craftsman. Many people prefer to make templates from blanks themselves. However, there are quite a few budget devices on sale on Aliexpress that are easier to buy than to reproduce. And they will last much longer, maintaining the original accurate calibration.
You can read about how to properly prepare sawn parts for further assembly in the article about adding and drilling chipboard with your own hands.
Do-it-yourself tenon joints
These strong joints can be made quickly and accurately using a plunge router and a simple homemade jig. See also how to make tenon joints.
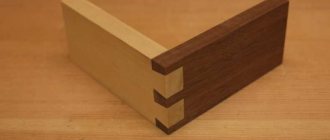
In these joints, a single small length of tenon is inserted into the sockets of adjacent parts, as shown in the left picture, and these joints are as strong as with the classic solid tenons shown in the right picture. Tenon joints are preferred over traditional joints for several reasons.
- A plunge router allows you to make pockets in long, wide or thick workpieces that are difficult to machine with slotting and drilling machines. (That's why we chose this method to connect the pieces in the project "Traditional Bed, Simple and Elegant," published in this issue.)
- Using only one cutter, you get identical sockets with even and smooth walls, ensuring bond strength. And you won't have to adjust the thickness of each tenon, as is the case with sockets that are made on a drill press or hollowed out by hand.
- You can make extra tenon blanks in the most common sizes and save them for future projects to save time. And these spikes can be made from scraps that would otherwise be thrown away.
- You don't have to add the length of the tenons to the length of the piece, as in classic joints, so you can use valuable wood more efficiently.
What you need to get started
- A plunge router with a sufficiently powerful electric motor (at least 1.2 kW) for making nests in hard wood.
- A cutter with an ascending spiral with a diameter of no more than 1/3 of the thickness of the workpieces in which the nests will be made.
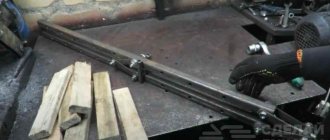
- A device that guides the router along the workpiece. Although you can use your router's standard side fence, ours works better because it prevents the router from accidentally moving off to the side.
- A copy sleeve, the outer diameter of which is equal to the width of the slot in the fixture template and into which the cutter fits freely. It is rare to make sockets wider than 12 mm, so sleeves with a diameter of 16 and 19 mm will be used most often.
How to make a device
Two options for homemade devices are excellent for selecting nests: centering and fixed. First, let's look at a centering fixture, which, as the name suggests, has a slotted template that is automatically positioned in the middle of the thickness or width of the workpiece. With the fixture shown in the picture below, you can mill sockets on workpieces up to 83 mm wide.
When making such a device, cut a slot in the template, the length of which is equal to the sum of the length of the socket and the difference in the diameters of the cutter and the copy sleeve.
For example, if you need to rout a 12x50mm socket using a 16mm sleeve, make a slot 16mm wide by 54mm long, positioned exactly at the crosshairs of the center lines of the template. Cut the slot carefully so that the copy sleeve moves easily along it without the slightest side play. To work with the device, place it on the workpiece, as shown in the photo below. Insert a router bit into the collet that matches the required thickness of the tenon, adjust the depth, and mill out the socket in several shallow passes.
A simpler fixture with a fixed template allows you to make nests at the same distance from the edge of the workpiece, as shown in the photo below. Like the centering jig, it has a slot for the copy sleeve, but there is only one guide block, screwed parallel to the long side of the slot and at a right angle to the surface of the template.
Mark the center of the socket on the workpiece, then align the crosshairs of the template lines with this mark. Turn the clamping bars so that they cover the workpiece on both sides and secure the device with a clamp.
A fixture with a fixed template allows you to mill sockets not only in the middle of the edges of the workpiece. To change the indentation, secure the guide bar at a different distance from the slot.
Making tenon joints
To make them, use only hard hardwood, as softwood is too soft and lacks strength. It is better to choose straight-layer material without knots and other defects.
Quick tip! You can make insert tenons from cherry or walnut sapwood. Although it differs in color, it has the same strength as heartwood.
First, cut the material to a thickness equal to the width of the sockets. The tenon should not fall out of the socket if the workpiece is turned over, but it can be removed by hand. If you do not have a thickness planer, cut the workpieces to the required thickness on a saw.
Now saw the blanks to a width corresponding to the length of the nests. Then use a router table to make fillets on all the edges. Finally, cut the workpiece into individual tenons of the required length and make small chamfers around the ends to make the tenon easier to insert into the socket.
Using a fillet bit with a radius slightly larger than half the thickness of the tenon (6mm for a 10mm piece), rout the edges until they are slightly tapered. The “pointed” edges of the tenons rest against the rounded ends of the sockets, leaving room for excess glue.
How to simplify assembly
Compared to classic tenons, these joints have twice as many sockets, so their assembly requires twice as much glue. To avoid haste and fuss, we recommend dividing the assembly into two stages. First glue the tenons into the sockets of the pieces that form one part of each joint. 11In this case, it is not necessary to use clamps to press tightly inserted tenons. Wait for the glue to set, glue the joints as usual and secure with clamps.
Using a plane or sandpaper, make small chamfers on the ends of the tenon so that it can be easily inserted and does not remove all the glue from the walls of the socket.
Having coated the walls of the socket and the bottom of the tenon with glue, insert the tenon into the socket until it stops, hitting it lightly with a mallet if necessary.
The best cutters for tenon joints
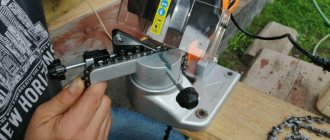
We recommend using carbide cutters with an ascending spiral - they easily enter the material, do not lead to the formation of chips (if they are not dull) and remove chips well, and this reduces the temperature in the cutting zone, avoiding the formation of burns and maintaining the sharpness of the cutting edges. Downward spiral cutters push chips deeper into the pocket, resulting in higher temperatures and faster wear on the cutting edges.
Plunge straight cutter, ascending helix cutter, downward spiral cutter, regular straight cutter
A straight cutter is also suitable for this task if it has so-called undercutters at the end, allowing the tool to enter the material being processed with its end. These cutters are designed for plunge milling. Conventional straight cutters, which do not have scoring tools, leave the wood between the carbide blades, preventing vertical immersion.
You might be interested in:
stroyboks.ru
DIY carpentry templates video YouTube video
10 months ago
Milling templates Festool MFS and Assistent system. How to make them yourself? We will talk about all this today)…
2 years ago
A homemade dowel jig that is accurate and easy to use. Done in an hour.
3 years ago
DIY furniture jig without turning.
3 years ago
Continuation of the topic of templates for drilling. Showing how easy it is to make not only the device itself...
2 years ago
A very easy to make device for installing dowels.
1 years ago
I show how you can easily make a homemade device for connecting an “oblique screw”. I take it as a basis...
4 years ago
Get Money Back for Purchases https://goo.gl/Qu6nYR Buy in more than 700 online stores around the world and return...
1 years ago
Review of a Chinese device for making detachable furniture joints using a jig...
1 years ago
Hand routers for any budget https://bit.ly/2xEwmtZ This is my first device for a hand router made...
2 years ago
Detailed instructions on how to make your own device for milling grooves in the edge of a part (board...
2 years ago
Column for the kitchen. We have finished making this column, it will be installed in the kitchen. I…
3 years ago
Tenon and groove using a manual wood router. Do-it-yourself device for a tongue-and-groove or domino type connection….
…
2 years ago
Making a tenon cutter for box joints. Everything is simple, cheap, and very fast. Need a hand router...
2 years ago
Cashback service with a huge number of stores - https://letyshops.com/soc/sh-1?r=3164001 In this series of videos, I will show how I make…
2 years ago
Decorate your products using one or more of the presented templates. Milling cutter - https://www.kalpa-vriksa.ru/catalog/…
2 years ago
A homemade self-centering jig for installing dowels that is accurate and easy to use….
2 years ago
Cashback service with a huge number of stores - https://letyshops.com/soc/sh-1?r=3164001 In this series of videos, I will show how I make…
2 years ago
Manufacturing of conductors for furniture joints “Minifix”! The jig allows you to mark and drill…
9 months ago
In this video you will see one of the ways to join plywood in width. In this video I will show one of the ways of splicing the plywood…
3 years ago
I share various techniques for marking and making carpentry templates. In this video I will share a few useful tricks on how…
5 years ago
Download my book about carpentry: https://jurprime.ru/offers/book/ § Subscribe to the channel: https://www.youtube.com/user/jurprime?sub_con…
youtuberu.ru
Universal furniture jig for drilling
In terms of functionality, it combines the two previous devices, since it can adapt to marking with drills of different diameters, and the ruler allows you to set any desired distance from the edge and pitch. It is used both for drilling the front surface of parts and the end.
Well-known manufacturers of furniture jigs include Cheron, Kreg and Wolfcraft. Before choosing any model, we recommend comparing prices, quality and functionality with smaller manufacturers and suppliers of furniture components Blum, Hettich and others. Often the optimal price-quality ratio, and even with a guarantee, can be found where it seems that “everything is expensive.” Do not exclude this possibility for yourself and consider all possible options. After all, a furniture jig can serve faithfully for many years, helping to speed up production processes without losing the quality and accuracy of making furniture with your own hands.
DIY carpentry templates Video
10 months back
Milling templates Festool MFS and Assistent system. How to make them yourself? We will talk about all this today)…
2 years ago
A homemade dowel jig that is accurate and easy to use. Done in an hour.
3 years ago
DIY furniture jig without turning.
3 years ago
Continuation of the topic of templates for drilling. Showing how easy it is to make not only the device itself...
2 years ago
A very easy to make device for installing dowels.
1 year ago
I show how you can easily make a homemade device for connecting an “oblique screw”. I take it as a basis...
4 years ago
Get Money Back for Purchases https://goo.gl/Qu6nYR Buy in more than 700 online stores around the world and return...
1 year ago
Review of a Chinese device for making detachable furniture joints using a jig...
2 years ago
Detailed instructions on how to make your own device for milling grooves in the edge of a part (board...
2 years ago
Column for the kitchen. We have finished making this column, it will be installed in the kitchen. I…
3 years ago
Tenon and groove using a manual wood router. Do-it-yourself device for a tongue-and-groove or domino type connection….
1 year ago
Hand routers for any budget https://bit.ly/2xEwmtZ This is my first device for a hand router made...
2 years ago
Making a tenon cutter for box joints. Everything is simple, cheap, and very fast. Need a hand router...
2 years ago
Cashback service with a huge number of stores - https://letyshops.com/soc/sh-1?r=3164001 In this series of videos, I will show how I make…
2 years ago
A homemade self-centering jig for installing dowels that is accurate and easy to use….
2 years ago
Decorate your products using one or more of the presented templates. Milling cutter - https://www.kalpa-vriksa.ru/catalog/…
2 years ago
Cashback service with a huge number of stores - https://letyshops.com/soc/sh-1?r=3164001 In this series of videos, I will show how I make…
2 years ago
Manufacturing of conductors for furniture joints “Minifix”! The jig allows you to mark and drill…
3 years ago
I share various techniques for marking and making carpentry templates. In this video I will share a few useful tricks on how…
9 months back
In this video you will see one of the ways to join plywood in width. In this video I will show one of the ways of splicing the plywood…
videohot.ru
Furniture jigs for marking fasteners for guides for drawers
The fastening of any guides and pull-out systems also obeys the furniture “law”: the distance from the edge for fastening the first screw is 37 mm, and then the installation holes are located in increments of 32 mm at distances of 64, 128, etc.
Most manufacturers of components for drawers offer their own furniture jigs to facilitate marking for fasteners. However, you can also choose universal templates. Most often they consist of a set - left and right conductors.
DIY carpentry templates video Video watch
10 months ago
Milling templates Festool MFS and Assistent system. How to make them yourself? We will talk about all this today)…
2 years ago
A homemade dowel jig that is accurate and easy to use. Done in an hour.
3 years ago
DIY furniture jig without turning.
3 years ago
Continuation of the topic of templates for drilling. Showing how easy it is to make not only the device itself...
2 years ago
A very easy to make device for installing dowels.
1 years ago
I show how you can easily make a homemade device for connecting an “oblique screw”. I take it as a basis...
4 years ago
Get Money Back for Purchases https://goo.gl/Qu6nYR Buy in more than 700 online stores around the world and return...
1 years ago
Review of a Chinese device for making detachable furniture joints using a jig...
1 years ago
Hand routers for any budget https://bit.ly/2xEwmtZ This is my first device for a hand router made...
2 years ago
Detailed instructions on how to make your own device for milling grooves in the edge of a part (board...
2 years ago
Column for the kitchen. We have finished making this column, it will be installed in the kitchen. I…
3 years ago
Tenon and groove using a manual wood router. Do-it-yourself device for a tongue-and-groove or domino type connection….
2 years ago
Making a tenon cutter for box joints. Everything is simple, cheap, and very fast. Need a hand router...
2 years ago
Cashback service with a huge number of stores - https://letyshops.com/soc/sh-1?r=3164001 In this series of videos, I will show how I make…
2 years ago
Decorate your products using one or more of the presented templates. Milling cutter - https://www.kalpa-vriksa.ru/catalog/…
2 years ago
A homemade self-centering jig for installing dowels that is accurate and easy to use….
2 years ago
Cashback service with a huge number of stores - https://letyshops.com/soc/sh-1?r=3164001 In this series of videos, I will show how I make…
2 years ago
Manufacturing of conductors for furniture joints “Minifix”! The jig allows you to mark and drill…
9 months ago
In this video you will see one of the ways to join plywood in width. In this video I will show one of the ways of splicing the plywood…
3 years ago
I share various techniques for marking and making carpentry templates. In this video I will share a few useful tricks on how…
5 years ago
Download my book about carpentry: https://jurprime.ru/offers/book/ § Subscribe to the channel: https://www.youtube.com/user/jurprime?sub_con…
stab.su
DIY clamps and stops
Processing workpieces on a carpentry workbench will be convenient when using various devices that fix the parts on the table surface. With your own hands, you can make both the simplest stops and clamps, and universal systems that allow you to secure workpieces of any configuration.
Simple wooden stops for a carpentry workbench - drawing, example
Homemade bench stops made of wood do not dull the tool and do not damage the ends of the parts. The devices are divided according to the type of rod and inserted into holes of the appropriate shape.
Rectangular wedges do not rotate and ensure absolute immobility of the workpiece. The stops themselves are easy to make, but hollowing out the square sockets will take a lot of time and effort. It is advisable to install these holes in tabletops made of solid boards at the stage of manufacturing a carpentry workbench.
On working surfaces made of sheet material, it is more correct to use stops with a cylindrical rod. Such devices are convenient for fastening curved parts, and holes for them can always be drilled in the right place. Rigid fixation of rectangular workpieces is achieved by installing an additional bar with two rods.
How to make a stop with a round rod
Birch, cherry, maple or walnut are suitable for the bench stop rod. The top strip is made of the same hardwood or plywood. A low-profile stop can be made from high-density laminated board left over from the flooring installation.
Decide on the diameter of the rod. If you plan to purchase ready-made retainers later, choose the standard size of 19 mm. If you are confident in further independent production of accessories for a carpentry workbench, use a diameter of 21 mm. This is the outer size of half-inch water pipes from which homemade clamping clamps are made. Approximately the same value corresponds to the nominal diameter of three quarter pipes suitable for the manufacture of round wooden rods.
Take a piece of pipe with a diameter of 3/4 inch, a length of 60–80 mm and a thread of at least 20 mm. Sharpen the edges on one end and screw the nut onto the other.
Insert the device into the inch pipe and drive a birch stick through it, hitting it from above with a heavy hammer.
Trim the wood when the wood chips hit the nut. It may seem easier to take a longer tube, but it will be much more difficult to penetrate.
After running the stick, remove the burrs with sandpaper. Wooden rods made in this way may have minor imperfections that do not affect the overall shape of the cylinder. At the beginning of setting up a home workshop, when there are no special machines yet, you will not find an easier way to make a round stick with your own hands.
Draw the top parts of the stops on the workpieces in the required quantity and mark the centers for drilling holes.
Drawing of bench stops made of wood.
Using a feather drill, make indentations half the thickness of the material. Start drilling at low speeds, pressing lightly on the drill. At the moment of contact, marks will appear on the surface, which will show where the tool should be deflected for perpendicular drilling.
Saw the workpieces, sand the ends and countersink the holes for the screws.
Apply wood glue to the stud and into the recess.
Connect the parts, press them with your hands and wipe off excess glue. Insert the rod into the hole in the table top and tighten the screw.
After ten minutes, carefully remove the stop, pushing from below and without moving the parts. Leave the device until the glue dries completely.
Drill holes for bench stops where you consider necessary. Most often they are needed on the left side of the table for planing workpieces and next to the vice for joint use. The distance between the centers of the holes should be the same everywhere and correspond to the size of the long stops. Before drilling, attach an unnecessary board to the bottom so that there are no chips when the drill comes out.
How to make a stop for cutting boards
The stop located on the side of the tabletop is convenient for cross-cutting boards. When it is not needed, its rotating part is lowered and is out of the way. Use the tool in conjunction with a long bench stop, holding the board firmly with one hand while using the hacksaw with the other.
Cut the wooden stop pieces from leftover hardwood. Make two countersink holes in the fixed part and one in the turning strip, exactly matching the diameter of the screw being used.
Side support diagram.
Mark on the end of the table the location of the moving part in line with the bench stop.
Secure the turntable first, adding a block if necessary to increase the thickness of the tabletop. Next, install a stationary part perpendicular to it.
Universal bench clamps
Movable fasteners allow you to fix various workpieces and removable work panels on the carpentry workbench. The clamps move in metal guides with a T-shaped groove (T-slots) embedded flush with the table surface, which can be aluminum or steel.
Scheme of clamping devices.
How to make guides with your own hands
An analogue of factory rails with a T-shaped slot can be easily made from a metal pipe of rectangular or square cross-section. A profile with a height of no more than half the thickness of the tabletop is suitable. Immediately select the bolts and mark the cutout on one side of the pipe in proportion to the diameter of the bolt.
Cut out the groove with a grinder, trim the edges with a file and round the edges with sandpaper.
Select suitable profile trims for making sliders if the hex head is smaller than the groove and rotates in it.
Drill holes for the bolts and cut the brackets, calculating their height to be 1-2 mm less than the internal passage of the profile.
How to embed guides into a tabletop
Use a hand router to make a recess in the countertop. If the profile being cut is wider than the cutter, make the groove in two approaches.
Draw a marking on the surface and install a flat panel parallel to it. To prevent chipping when the cutter comes out, attach a wooden strip close to the end.
Adjust the routing depth stop and select the groove in several passes.
Rearrange the panel, cut out the remaining material and sand the recess with abrasive paper.
Secure the guides with screws, making recesses in the metal for the caps.
How to make a simple clamp bar
Customizable clamping systems provide a variety of options for securing parts to your woodwork. The simplest design is a clamping bar, fixed with bolts sliding in T-shaped tracks.
Saw strips of plywood, adding 20 mm to the width of the parts indicated on the drawing, in order to later trim the glued workpiece and get perfectly straight ends. For the middle part, plywood scraps of the same thickness will do.
Drawing of the clamping strip blanks.
Glue the parts together, drill holes with a countersink 25 mm from the edges and tighten the screws on both sides. After the glue has dried, saw the workpiece to final size using a circular saw.
Cut plywood washers with a diameter slightly larger than the width of the clamping strip.
Carefully drill holes for the bolts.
Place the tool on the surface of a woodworking bench, put on washers and tighten with wing nuts.
The clamping bar is excellent for holding large workpieces and also as a side stop along which to guide the tool, for example when routing a longitudinal groove.
How to make clamps from plywood
Simple and convenient clamps in the form of brackets are fixed on the workbench in the same T-slots, are easy to move and allow you to fix a variety of parts in any position.
The device consists of a plywood part with a groove, a bolt with a slider, washers, a wing nut and a metal sleeve.
To make wooden elements you will need a template; it can be easily drawn on paper following our instructions.
The procedure for making a template
Trace the template onto the plywood and use an awl to mark the center of the drill.
Make a hole with a 22mm diameter drill bit.
Prepare the remaining pieces and attach them together using wood glue and screws. Sand the ends, paying particular attention to the top semi-circle and the bottom rounded parts.
Take a half-inch tube and measure a length on it the length of the plywood staple. Drill a hole in the center for the bolt and cut the bushing to size. File off the metal burrs and sand the surfaces.
Assemble the clamp by placing washers under the nut.
The clamp in the photo below is simpler and is made in a similar way. When using this design, you have to place a pad of approximately the same thickness under the second arm of the lever, otherwise there will be a misalignment of the bolt, leading to deformation of the guide rail.
Increase the capabilities of the clamping system by making another T-shaped track from a profile pipe. By placing the guide between the rails embedded in the table, you can fasten parts anywhere on the carpentry workbench.
This additional strip is fixed at the edges with short bolts, and inside the profile there are small plywood inserts with holes.
The considered devices for a carpentry workbench are easy to manufacture and are suitable for securing most workpieces. Further work in carpentry will require new stops or clamps, which ingenuity will help you come up with, and experience that comes gradually will allow you to do them.
buildip.ru
Furniture templates for installing handles
Any furniture handle has an installation base - the distance between the screws is subject to system 32. That is, it is a multiple of pitch 32, corresponds to the values 32, 64, 96, 128 mm, etc. When installing handles, it is important to maintain the same distance from the edges of the facade. Templates for drilling holes for handles can make marking easier. They can have different looks and shapes. The package may include drills.
DIY carpentry templates Video
10 months ago
Milling templates Festool MFS and Assistent system. How to make them yourself? We will talk about all this today)…
2 years ago
A homemade dowel jig that is accurate and easy to use. Done in an hour.
3 years ago
DIY furniture jig without turning.
3 years ago
Continuation of the topic of templates for drilling. Showing how easy it is to make not only the device itself...
2 years ago
A very easy to make device for installing dowels.
1 years ago
I show how you can easily make a homemade device for connecting an “oblique screw”. I take it as a basis...
4 years ago
Get Money Back for Purchases https://goo.gl/Qu6nYR Buy in more than 700 online stores around the world and return...
1 years ago
Review of a Chinese device for making detachable furniture joints using a jig...
1 years ago
Hand routers for any budget https://bit.ly/2xEwmtZ This is my first device for a hand router made...
2 years ago
Detailed instructions on how to make your own device for milling grooves in the edge of a part (board...
2 years ago
Column for the kitchen. We have finished making this column, it will be installed in the kitchen. I…
3 years ago
Tenon and groove using a manual wood router. Do-it-yourself device for a tongue-and-groove or domino type connection….
2 years ago
Making a tenon cutter for box joints. Everything is simple, cheap, and very fast. Need a hand router...
2 years ago
Cashback service with a huge number of stores - https://letyshops.com/soc/sh-1?r=3164001 In this series of videos, I will show how I make…
2 years ago
Decorate your products using one or more of the presented templates. Milling cutter - https://www.kalpa-vriksa.ru/catalog/…
2 years ago
A homemade self-centering jig for installing dowels that is accurate and easy to use….
2 years ago
Cashback service with a huge number of stores - https://letyshops.com/soc/sh-1?r=3164001 In this series of videos, I will show how I make…
2 years ago
Manufacturing of conductors for furniture joints “Minifix”! The jig allows you to mark and drill…
9 months ago
In this video you will see one of the ways to join plywood in width. In this video I will show one of the ways of splicing the plywood…
3 years ago
I share various techniques for marking and making carpentry templates. In this video I will share a few useful tricks on how…
5 years ago
Download my book about carpentry: https://jurprime.ru/offers/book/ § Subscribe to the channel: https://www.youtube.com/user/jurprime?sub_con…
inlove.kz
Carpentry tricks and devices (video)
Carpentry tricks, which experienced craftsmen generously share, are especially useful for enjoyable work. These are usually homemade devices. In this video tutorial we will talk about templates. How to first draw them and then cut them out. This is a simple method. We take the rail and clamp it. Depending on how strongly it is pulled, the arc will be flat or steeper.
This Chinese store is a haven for woodworkers.
Products for inventors Link to the store.
Using a similar method, we make a bow from a thin strip.
What's so good about this carpentry trick? We can adjust the bend by thinning one side. You can use an exotic carpentry method. Hammer two nails. This is a simple device to make. And then the various curves are drawn very accurately. This method is good for large curves. Branded items are also available. Templates. The blue bendy thing is a particularly handy tool. You bend it, for example, around some kind of barrel.
And then you can bend it a little. The results are interesting shapes. There is another interesting thing. The screws are screwed in there. It turns out immediately as a separate template. You can also draw an arc using 2 hammered nails. This is good for rocking chairs, large ovals.
DIY electronics in a Chinese store.
Geometric carpentry technique
How to make the right oval or egg. Let's make a device. A triangle is drawn. Two side walls of the egg are drawn. And then a small radius on top. We need an oval, we can do the same from below. You will get a perfect oval. It can be made even simpler. This method is especially good when there is no large compass. Again the nails are hammered. By adjusting their spread and the length of the rope, you can make different ovals. The longer the rope, the closer the figure will be to the circle.
The video shows how a carpenter makes fixtures - templates. They are necessary when you need to make 2 or more identical parts.
We glue the first side in a simple way. And then you need to use a little trick. There are tricks here on how to make a template of the same width. You can put a piece of plastic or wood. And just leaning on it on a band saw works very quickly and accurately. I set it to 4.7 millimeters, and that’s what happened. As you can see, the cut surface is absolutely flat. Of course, it needs to be processed with a grinder. But it will take very little work. The width will be the same with an accuracy of 0.5-1 millimeter.
The following shows some of the works that the master made in a carpentry workshop using templates that are sometimes found around us and do not even need to be created. For example, a table is made using a propeller blade. On his side, using a template, sawn. On a cape stand, both legs should be perfectly equal. If there were slight distortions, the result would not be a beautiful thing. First, 1 part was made on the table, and then the second was added along it.
Device - clamp clamp for gluing panels
This video from the Alexander Stolyar channel discusses options for clamps, the basic operating principle of which is based on the idea of using fragments of this tool as a clamp. They will be done in haste. After some time, working options will be presented.
The main part of the device is made from a blank pine board. Beginners who do not have a woodworking machine can buy ready-made timber 50 x 50 or 50 x 40. You will need beech round timber for the 25th, you can take a polypropylene pipe of the same diameter.
In the second case, to ensure the strength of the carpentry, we’ll use a trick - we’ll hammer some sticks inside. It is advisable to have a piece of hardwood board. You will also need a small clamp, a rasp, and a screwdriver with a drill. 3/4" steel pipe scrap. Grinder or hacksaw for metal.
We cut the workpiece 70 centimeters long. The working part of the clamp is 60 centimeters. We measure the length of the working stroke. We make markings with a slightly smaller step, stepping back 5 centimeters from the edge for future drilling.
We mark the end where the clamping mechanism will be located. We tilt it a little towards it, that is, not at 90 degrees, but with a slight tilt of 3-4 degrees. Let's drill a hole. Drilling depth so that the nose appears slightly. The pipe has a diameter of 26.5 millimeters. Therefore, it does not fit into the holes. It needs to be expanded with a rasp.
Continuation in the video from 3 minutes about carpentry tricks and useful devices.
Making a carpentry workbench with your own hands
Master class on making a carpentry workbench with your own hands
As they say: - Our hands, not for boredom.
To make a workbench, we have to go through several manufacturing stages; at a minimum, we need to draw or find a drawing of a carpentry workbench. Decide and find wood, and actually make our workbench.
Beech board
So let's get started. First, we purchase the material. Edged board - beech 50mm thick. We let the material rest in the workshop for some time and make a rough trim to size with an allowance of 100 mm. Next, we joint our workpieces on both sides, check the angle and thickness the third side. And we check again.
We unroll the blanks for the bench board onto the timber and lay them out on the table for subsequent gluing. In our work we use carpentry adhesives from the Titebond family. We lay out the timber with the jointed side facing each other, selecting the ends of the timber according to the fibers so that the direction of the fibers of the next one does not repeat the direction of the fibers of the previous one.
We saw the timber using a stop and a ruler We sawed the timber Sawed timber Getting ready for gluing with Titebond
Then, unfolding the beam, coat one side with glue and place it in the press. In our workshop, we use a Plano 1100 press to glue together panels that will be used to make a workbench.
Timber laid out on the table Plano Press Add clamps
In our case, the bench board is made of two halves, since the thicknesser available in the workshop does not allow processing workpieces more than 240-250 mm wide. If necessary, you can increase the pressure of the press with clamps.
Before jointing the shield halves, it is better to grind or grind off the dried glue. For this purpose, they chose an old, battered plane from “grandfather’s chest.” Next, we joint two sides of the blanks, thickness the third and get two halves of a workbench board 40mm thick made of solid beech.
Grandfather's plane Plane the shield Plane the edge Planing machine
We join the two halves of our future workbench using Domino DF-500. Place the halves in a press and tighten them.
While the shield is being glued, we return to our preparations. So, we have the blanks for the legs, cast-offs, or more precisely, the binding of the table top and drawers. All remaining blanks are thicknessed at 40mm, calibrated to the required size with an allowance of approximately 1mm, and this millimeter is removed on a thicknesser.
We plan our blanks again and calibrate them
Then all the blanks are cut to size on both sides, but the blanks for cutting out the table top are made with an allowance of 2-4mm.
Beech blanks Cut to size Check the size with a tape measure Parts with allowance
Next, we cut a tenon on the binding of the bench board. We select the cutter of the required size - we chose a 19 mm CMT straight slot cutter. To cut tenons, we use a homemade tenon-cutting template. Using a hand router using a 30mm copy ring, we cut a tenon with a depth of 40-42mm (depending on what allowance was left when trimming the cast-off of the table top). For this operation we used a Festool OF-1400 EBQ router.
Before further gluing the shield and tying the bench board, it is necessary to perform several more operations. We file and trim the shield to size, taking into account the size obtained after cutting the tenons. For this purpose, a TS-55 EBQ Plus circular saw and a guide rail were used. Mark and drill holes for the front and rear vices. We set the cutter to a depth equal to the thickness of the plywood used for the bottom of the tray (we are making a workbench with a tray, but didn’t you know? =)), in our case - 6 mm. We mill a groove for the bottom of the tray in the shield. In the shield trim (rear), we also mill the groove with a 6mm cutter to a depth of 15mm. For this we use a Veritas milling table.
Next, we mark the joints for Domino and mill according to the markings. Glue the front board together first. Bessey TPN80S14BE Clamps are not bad for this purpose,
A tightening belt with a ratcheting mechanism is also suitable for gluing. then we glue the sides and, while it dries, we go to make the bottom of the tray.
We cut a strip of plywood 6 mm thick, a little narrower than the grooves milled in the cast-off tabletop allow, and cut it a little shorter, 5 mm, approximately, from the expected final size. We insert the bottom of the tray into the milled grooves and glue the back board. It is better to use waterless adhesives for gluing tenon joints.
Sawing the plywood with a plunge-cut saw Sawing the plywood with a plunge-cut saw Insert the plywood into the groove and quarter The finished result
After drying, fix the workbench tray with screws from below and make a riser for the tray. Festool C 12 LI 1.5 screwdrivers were used in the work.
Now let's start making a bench for our undoubtedly carpentry workbench. We mark the blanks according to the template, and for connection we use a Domino DF_700 dowel router. Where necessary, we round the workpieces on a band saw and make a chamfer, well, as is clear, again on our favorite Veritas milling table. Then we glue the legs in a press or tighten them with clamps.
Next we drill out the drawers. We mill a chamfer. We mark and drill out the counter holes on the legs of the underframe. When working on a drilling machine, the KLI16 quick-release clamps make life a lot easier.
Manufacturing of bench vise jaws. The sawn jointed timber is glued in a press. The plywood is jointed, thicknessed, then the holes are marked and drilled.
After marking, the jaws of the vice are rounded on a band saw and installed on the workbench.
Marking bench jaws Rounding the jaws on a band saw Installing a bench vise Installed vice
For side vices we use a screw for a vise HV-516, for the front ones, as a rule, a screw for a vise HV-515. Much depends on the dimensions of the workbench. The handles for the vice were made using a Veritas tabletop cork punch, and the washers were made on a simple drilling machine. The washers are attached to the handle with dowels.
Cork maker Veritas Dowel Maker Making washer handles Making washer handles Making washer handles
Next, the workbench is polished; in our work we actively use Mirka abrasives. Rows of holes are drilled, in our case with a 19mm Forsner drill D19 Fisch 031701900. All sharp edges are rounded with a chamfer. The workbench is finished using Rustin's putty and Pinotex antiseptic. Some customers ask to make a workbench without coating and putty, in order to later cover it with a more wear-resistant chemical themselves.
Well, we have almost finished making the carpentry workbench, all that remains is to pack our workbench and send it to the future owner.
Workbench disassembled Workbench 1200mm assembled