Intarsia – knitting as an art. Using yarn and large blocks of color, we get a product that is very similar to a drawing - a landscape or a painting. Knitting that exactly matches the picture can also be called intarsia.
Intarsia is a multi-colored knitting technique in which, unlike jacquard, broaches are not formed on the inside of the product.
A product knitted using this technique has the same thickness over its entire area, regardless of the number of color blocks used in the work. This technique was invented in the 90s, but for some reason did not become widespread, most likely due to its complexity. Most things knitted using the intarsia technique are very impressive and cost-effective.
When knitting with intarsia knitting needles, you will have to take each new color from a separate ball, while making sure that the balls do not get tangled. You can find several ways to solve this problem on the Internet:
- place each ball in a separate bag with a hole;
- place the balls in different plastic containers;
- secure the thread of each ball with clothespins, and thread the yarn into the hole;
- come up with your own interesting way of attaching glomeruli;
- Each time, cut the thread and leave the ends on the wrong side.
The last method of knitting has the risk that at the end of the work you will have to thread more than one hundred ends if the color of the yarn is constantly changing and you are knitting a large product. It is also impossible to knit raglan with intarsia, but you can knit simple colored patterns in the round. Although, many articles write that knitting with intarsia in the round is impossible.
Intarsia patterns:
how to change the color of the thread vertically, horizontally, how to introduce a new color when knitting with intarsia.
- interesting selection on knitka.ru!!!
- Knitting a sweater from thick yarn
Entering a new color when knitting intarsia:
Intarsia, thread color change along the edge:
Knitting using intarsia technique
Using the intarsia technique, you can knit various complex patterns, change the color of the thread not only horizontally and vertically, but also diagonally at different angles.
The result is a product consisting of blocks of different colors and shapes.
The quality of the product is usually impeccable, because both the front side and the back side produce the same pattern, there are no thread broaches.
In each row, when changing one color of thread to another, they cross each other on the wrong side.
What you need to know when knitting using the intarsia technique:
Scheme
I recently knitted a pillow with knitting needles using this technique, which I already talked about. It has a very simple transition from color to color, always vertically. This type of knitting does not require special patterns.
But quite often complex intricate patterns are used, which are almost impossible to knit without a diagram.
You can look for a diagram on the Internet, in old magazines, and I made a separate publication with a selection of diagrams of several beautiful models, in which I also tell you how to read the diagrams, where to start and how you can make the diagrams yourself.
What yarn to use
Multiple glomeruli can be used in one row. It is, of course, better to start knitting in a new technique for you with patterns with a small amount of color in one row. And experienced knitters can use up to 20 balls or more in one row.
The yarn should be of the same thickness and be sure that it does not fade!
You should not knit from large balls, it is very inconvenient. Make small balls, enough to knit one block of color. In any case, when finishing knitting a block of one color, the thread will have to be broken.
How to connect threads correctly
At the junction of two colors, the threads need to be crossed from the wrong side so that the parts are tight to each other, no holes are formed, but without tightening the product.
We shift the “old” ball to the right side of us so that it does not interfere.
We knit the next loop of the product with yarn from the “new” ball, tighten both threads at the junction and then knit as usual until the next color.
Having knitted the row completely, I turn the product over and shift the balls from the right side back to the left, preferably in the same order, one color after another. But this rarely happens, which is not scary at all. You can unravel the desired tangle without much difficulty. But of course, the whole knitting process takes a long time.
When knitting diagonal lines, you should take into account the following nuance:
When tilting the line to the right, you should change and twist the threads only in the front row, and when tilting to the left, vice versa, only in the purl row. Otherwise, you may end up with an unsightly crossbar above the loop.
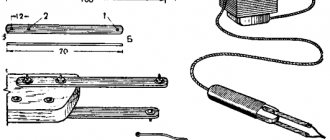
Wood tauching
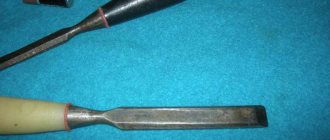
Inlaying wood with metal (copper, silver, aluminum, brass, etc.) is a fairly common type of technique. Recesses are made in the wood according to the diagram, and wire or liquid metal is placed in them. The main condition is that the wood must be strong and dry so that it can withstand the effects of molten metals. The grooves are made using a knife or chisel. Before placing the wire, the grooves are lubricated with glue, and then it can be carefully hammered in with a hammer.
This type of inlay is the most complex, so you need to carefully adhere to safety precautions. When working with wire straightening, you must use safety glasses to protect your eyes from possible damage. Basic means of protection should be at hand, because the work is complex, and any thoughtless movement can lead to injuries or burns.
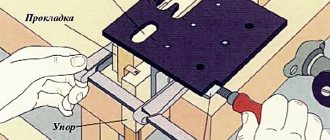
Mosaic looks very impressive on wood products. By working on it, you can reveal yourself creatively and give free rein to your imagination. The process of creating even the smallest thing (for example, a souvenir) is very interesting and exciting. You can start small, and then expand your horizons and move on to planning large projects.
For example, you can create a wooden mosaic for the walls with your own hands. This undertaking certainly requires good preparation, but there is nothing impossible about it. With a lot of desire and experience, everything will work out.
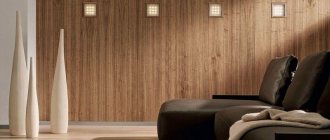
The interior of the room will change dramatically if at least one wall is decorated, or if there is a decorative element in the room.
What patterns are used when knitting using the intarsia technique?
There is an opinion that intarsia is knitted with knitting needles only with a stocking pattern, i.e. stockinette stitch from face and purl from backside.
Yes, in most drawings this kind of pattern is appropriate; the pattern on it is more distinct.
But designers do not stand still and modern models use not only different patterns, but also yarn of different textures.
One day I bought a magazine with knitted patterns from famous German and French designers, in which I discovered such interesting knitting. True, I didn’t know then that this technique was called that.
The peculiarity of the models presented in this album is the combination in one product of yarn not only of different shades, but also of different quality (wool, cotton, angora, boucle), as well as the use of different patterns in one product: both hosiery and scarf knitting, and boucle.
Each color is represented by yarn of a different quality, which creates an additional effect, and the combination of fluffy thread with smooth or boucle thread makes it possible to create an unusual texture of the product, which is only possible with hand knitting.
I was so carried away by this knitting that I knitted several models from the magazine for myself and my sister. My latest works can be viewed here>>.
I managed to knit pullovers with a pattern only on the front and part of the sleeves quite quickly, but I knitted a jacket with a colored pattern both on the back and along the entire length of the sleeves for half a year
Several conditions that are required to obtain a quality product:
- The color scheme must be impeccable. Poorly chosen colors can make the product look tacky and unattractive.
How to choose well-combined colors
- Follow the pattern diagram strictly. This is especially important when knitting sleeves, since the main effect of models with patterns lies in the unity of the sleeves and all the details.
- If you are using used yarn rather than new yarn, you should avoid stockinette knitting, since all the defects in the yarn are visible in the smooth fabric.
Features of the use of circuits
Since absolute precision is required when making patterns, the knitter must knit the fabric with the required density.
If there is a need to continue the drawing along the width of the canvas, then you need to calculate each additional loop and draw a diagram.
A large-scale increase in the entire pattern must be done equally in proportion to the length and width: we consider 1 cell of the original pattern equal to 2 stitches of a row and 2 rows in height. Be sure to calculate, or better yet, draw a new diagram. It may turn out that magnification disrupts the drawing. In this case, it is better to take another scheme for work.
It is better to knit the missing width or height of the fabric behind the pattern with a single-color light thread, leaving the pattern as the main one for the product.
You need to read the diagrams for front rows from left to right, for purl rows - from right to left.
What can be knitted using the intarsia technique?
Intarsia is first and foremost a work of art. You can knit pullovers, jackets, and even coats! You walk down the street in such a coat and all the men fall in piles, and women are jealous too
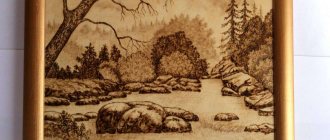
I also dream of knitting paintings using the intarsia technique. I just don’t know when I’ll get to them.
Have I interested you in intarsia knitting?
I myself love everything where you have to count and put puzzles together, so I really liked the diamond mosaic too.
See what a beautiful autumn blanket you can knit using this technique by following the link, here is a diagram with autumn leaves. And also a blanket with New York houses.
Jumper "Lemon branches"
Size: 38-40.
We need to prepare:
- yarn, 51% cotton, 49% polyamide, 50g per 130m, banana color (No1) – 500g;
- the same yarn, yellow (No2) – 150g;
- the same yarn, kiwi color (No3) – 100g;
- the same yarn, melange (No4) – 50g;
- straight knitting needles No. 2.5 and No. 3.5;
- circular knitting needles No. 2.5;
- hook No.3;
- buttons Ø1cm.
Patterns:
- elastic band 2l/2i;
- persons Ch.: in k/r – l/p, in p/r – i/p;
- purl Ch.: in k/r – i/p, in p/r – l/p;
- small pearls: 1 p.: alternate 1 l/p with 1 i/p; 2p.: above i/p we knit l/p, over l/p we knit i/p. Next we repeat these two steps;
- “lemon branches”: we knit according to the pattern, using the intarsia technique.
Density: 26 p. by 36 p. equal to 10 cm by 10 cm.
Description
Before
We dial sp. No. 2.5 yarn No. 1 130 p. and knit an elastic band of 2 l./2 i. to a height of 5 cm, adding in the last p. 7 p. In total we have 137 p. Go to sp. No3.5 and carry out according to cx. pattern of lemon branches. At the level of 21cm (76 rubles) on both sides we make an increase of 10 rubles. 1 time for 1 p., then in every 8th p. 7 times 1 p. In total we have 153 p. At the level of 39 cm from the cutting under the armholes we close 6 sts on both sides, then in every 2nd p. twice 2 stitches, 5 times 1 stitch. Continue straight for another 17cm. At the level of 56 cm from the cut (204 r.), we close it under the cutout in every 2nd r. once 5 pets, twice 3 pets, once 2 pets, three times 1 pet. Then every 4th row twice 1 st. At 65cm from the cut, bind off the remaining 38 stitches. under the shoulder.
We perform the second shoulder in the same way.
Back
We knit according to the description of the front. At a level of 47cm from the cut (row 172), we close 1 loop in the middle of the part for rolling out and finish each side separately to a height of 15cm. At a level of 62 cm from the cutting edge, cast off 14 stitches on the inside, then in every 2nd row, 4 stitches once, 3 stitches once, 1 stitch twice. At 65cm from the elastic band bind off the remaining 38 stitches. under the shoulder.
We perform the second shoulder in the same way.
Sleeves
We dial sp. No.2.5 yarn No.1 50 p. and knit an elastic band of 2 l./2 i. to a height of 5 cm, adding in the last p. 24 p. In total we have 74 p. Go to sp. No3.5 and carry out according to cx. pattern of lemon branches. To expand the sleeves on both sides, we increase in the 2nd row. 1 time for 1 pet., then in every 4th r. 33 times 1 st.
We have 142 pets in operation. At the level of 39 cm from the cutting edge, close 4 stitches on both sides, then in every 2nd p. 1 time for 2 pets, 7 times for 1 pet., 5 times for 3 pets, 3 times for 4 pets. At 52 cm from the cut, bind off the remaining 34 stitches.
We knit the second sleeve in the same way.
Assembly
We slightly moisten the parts and dry them. We sew the shoulders. By persons side along the edge of the rollout we raise in circular sp. No2.5 124 pet. for the plank. Having knitted 8 cm of elastic band 2 l./2 i., close the stitch. We perform a binding on the back along the edge of the cut. We make 1 row of sc – see photo of the model. At the same time we make buttonholes.
Sew the sides and sleeves. We sew in the sleeves.