COLORING WITH OIL PAINTS
Oil paints are sold in tubes in a semi-liquid state.
The paint is released from the tubes onto a metal saucer and diluted to a liquid state with siccatives - quickly evaporating solvents. It is applied in the same way as watercolor, transparently, taking into account that the initially matte and dense paint will become transparent after drying. The painting procedure is the same as when working with watercolor paints. Watercolor brushes can be washed in warm water; after using oil paint, they must be washed with soap. Clean brushes should be wiped with a dry cloth, and saucers and jars should be treated with kerosene or turpentine, and then washed in warm water.
Labor protection at woodworking enterprises
Rules for labor protection in logging and woodworking production are established by a special commission. These standards are then distributed in the form of leaflets and conveyed during workplace briefings. Also, the scope of activity of occupational safety and health workers includes testing the knowledge of safety regulations relating to a specific position held by all employees. For this purpose, workers are periodically certified.
Important! Based on the results of certification, sanctions may be imposed, including dismissal.
COATING WITH VARNISHES AND OILS
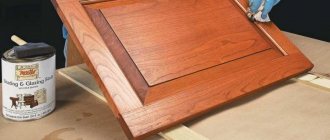
The burned work, after cleaning and painting, can be coated with varnishes or oils. For varnishing, nitro varnish, amber, shellac and copal varnishes are used.
Shellac varnish is used if the board is painted with watercolors. To prepare it, 1 part of purified and crushed shellac is dissolved in 4 parts of alcohol, heated slightly and mixed well. If you want to get a brown color, add a little more shellac. This method is quite complicated. In addition, shellac is afraid of water and can become covered with cracks and stains.
Amber, copal and nitro varnish are used after painting the board with oil paints. To obtain amber varnish, a piece of molten amber is mixed with turpentine. Copal varnish is obtained from a transparent white resin - copal, which is crushed and dissolved in alcohol with a small amount of turpentine.
Nitrovarnish is most convenient for use at home. They cover the product in several layers, working with a soft brush or cotton swab. After applying each coat of varnish, you must wait at least 5 minutes. If you apply more than 5 layers of varnish, then after each 5th layer you must wait at least 24 hours.
To remove bubbles, various deposits, dust and unevenness, the surface of the product must be treated with fine glass sandpaper. The last layer of varnish can be sanded with a special paste or fine sandpaper. However, this can be easily avoided if you apply the varnish in a neat, even layer. At the end, you should carefully polish the surface with polish and cloth, waiting at least 1 - 2 days so that the varnish dries well. The first polishing should be done with polish using a swab, the second polishing can be done with a cloth.
If your product is made of light wood and you do not want the wood to darken, you can apply nitro varnish in 2–3 steps, waiting at least 2 hours between the first and second applications, and 1–3 days between the second and third.
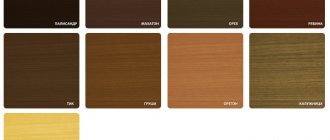
A wooden product can be coated with oil varnishes or vegetable oils, such as linseed, hemp, etc. Oil varnishes are usually used by specialists to achieve a special decorative effect. At home, it is better to use vegetable oils.
Vegetable oil gives the wood a fresher and richer tone. For example, it has been noticed that products made from red wood become a deep dark red or cherry color.
To do this, apply vegetable oil in one even layer and after 30 minutes, after it has been absorbed into the wood, wipe off the excess with a dry cloth. After another day, you need to coat some places, such as the ends, with vegetable oil again and leave the product in the light until completely dry, making sure that it does not overheat on one side. Typically, vegetable oil dries within 1 - 2 weeks, but this process can be accelerated by adding 20% natural drying oil to it. After 1 – 2 weeks, the product should be polished with a clean linen brush.
If you want to apply nitro varnish to an oil-based coating, it must be applied only after complete impregnation with vegetable oil, otherwise gray spots may appear on the wooden surface. In winter conditions, it is better to impregnate with a mixture of sunflower oil and drying oil in a ratio of 1: 2, respectively.
LiveInternetLiveInternet
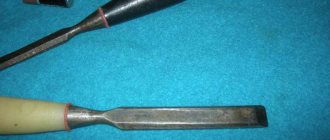
Burnout device and rules for working with it
Today, sawing masters not only create wonderful crafts, but also, if desired, give them ornaments using a burner.
In this article I will tell you how you can decorate your craft by giving it a beautiful ornament. For burning you need:
To work, you will first need a burning device. You can buy it at the store, or you can make it yourself.
All burners have approximately the same design:
1. Metal screen;
2. Plastic cap;
3. Needle;
4. A needle holder consisting of a plastic base and two brass tubes pressed into it;
5. Power electrical wire;
6. Pen body.
The burning device operates from a network with a voltage of 220 Volts.
If you have an electric burning device, then it is better to modify it a little for convenient operation. Replace the electrical wire with a wire with a larger cross-section (from 4 to 6 mm2), this will increase the heat of the needle.
When buying straight needles for a burning device, some bend them, some make them sharp, depending on what patterns you want to make. It is best if your needle is bent at an angle of 45°. This can be done using pliers. If you bend the needle, then when working you will get a wide ornament. You can also make a flat needle in order to burn delicate work, such as a painting. To do this, the tip of the needle must be carefully ground off using straight files, then the ground surface must be cleaned with fine-grained sandpaper.
In order for the ornament to turn out beautiful, you do not need to press hard on the needle, but apply light pressure and make repeating movements. It also happens that by pressing hard on the needle, it breaks or, at best, becomes bent.
If the file is broken, you need to replace it with another one. Replacing the needle must be done carefully. Do not under any circumstances change the needle while the burning device is plugged in. To replace the needle, you need to clear the remains of the broken needle from the needle holder by unscrewing the screws using a small screwdriver. Then cut a piece of chrome wire with a diameter of 1 mm and a length of no more than 2.5 mm, then bend it in half. The ends of the wire must be tinned using soldering acid, also called zinc acid.
If the file is bent, you need to unscrew the needle clamps, then pull out the needle and place it on a flat metal surface to straighten it using a small hammer.
Preparation of material
The surface you have prepared must be treated. Before transferring the drawing onto plywood, it is necessary to clean it. After stripping the plywood, choose a simple design that you won't be working on for a long time. Check if the drawing fits the dimensions.
Required surface
Species of deciduous finely vascular trees suitable for burning are: aspen, maple, alder and partly birch. It is best if the surface for the burner is pre-sanded with sandpaper. The surface must be free of defects and irregularities. After treatment, the surface should be smooth and matte. If the workpiece material is light wood without shine, then this is a huge plus.
I tried burning and I can say with confidence that it turned out very well! Using a burner, you can give the craft a special contour. For example, you can cut a board for a scorched picture. It will turn out very beautiful.
Burnout
In the manufacture, design and finishing of teaching aids, instruments, models, gaming equipment and various household items, burning (pyrography) has become widespread in recent years. Burning is also often used in Skillful Hands circles. It consists of applying various designs, ornaments and inscriptions to the surface of wood, plywood or cardboard products using strong heating with hot metal pins or wires. Upon contact with hot metal, the surface layer of the material becomes charred. Depending on the temperature of the metal tip and the duration of contact, traces of greater or less depth, painted in various shades of brown, remain on the surface of the product.
In Skillful Hands circles, burning is carried out in the vast majority of cases using electric burners operating at a voltage of 2-3-4 volts. To obtain a current of this voltage, school educational step-down transformers, transformers from children's Electrical Constructor sets, and others suitable for voltage and power are usually used. Depending on the latter, several electric burners can be connected to one transformer at once
Figure 1 shows the design of a homemade electric burner, proposed by the author and which has become widespread in children's amateur technical circles. On a handle made of 5-6 mm plywood or plank (A) two metal strips (B) are fixed. To the free ends of these strips, using small screws and nuts, attach a loop (B) made of nichrome wire 0.4-0.5 mm thick (usually wire from spirals to electric stoves is used for this purpose). The ends of an electrical cord connected to the terminals of the transformer are attached to the opposite ends of the strips. When the transformer is connected to the network, wire B becomes heated, and its pointed middle part burns out. The heat of the electric burner wire should not be too strong so that there are no flashes when touching the surface of the wood.
Rice. 1. Electric burner
A
- pen;
B
- metal strips;
B
- loop made of nichrome wire (all dimensions in millimeters). On the right is an electric burner connected to a step-down transformer
Rice. 2. Burning along contours
When burning wood and plywood, the best results are obtained when using soft wood: linden, poplar and alder. On harder wood, such as birch or maple, the burnt pattern has a reddish tint. It is difficult to achieve the required uniformity of depth and color of individual strokes on planks or plywood made of hard, large-porous wood, as well as wood in which soft layers alternate with hard ones (oak, ash, pine, spruce, larch).
The most common are contour burning (Fig. 2), burning with the transfer of shades of chiaroscuro (Fig. 4) and silhouette burning - with continuous shading of silhouettes or background (Fig. 3). The so-called decorative burning is very often used - with sharply defined contours and the same sharp and rich shadows.
Rice. 3. Silhouette burning
Rice. 4. Burning with shades of chiaroscuro
Rice. 5. Stencils and templates for burning
For burning, drawings from special albums are used, but most often graphic compositions are created according to the instructions of the circle leader. When decorating the burning of various household items - frames, shelves, boxes, etc. - folk ornaments and motifs are used.
Designs for burning are transferred to carefully cleaned and sanded parts in the same way as for sawing.
To ensure that the lines of the drawings do not turn out too bold, use carbon paper that has already been used.
When burning ornaments, many board games, puzzles and other crafts, when the same elements of the design have to be transferred to plywood many times, stencils and templates are widely used (Fig. 5).
The surfaces of products decorated with burnt patterns or contours are usually varnished with a light alcohol varnish or covered with wax paste. After burning, some homemade items are first painted and then varnished. For coloring, transparent watercolor paints, aqueous solutions of aniline dyes and colored ink are used.
Operating rules
with a burning device:
1. Before work, straighten the wires of the burning device and constantly make sure that they do not twist.
2. Do not operate the electric burning device for more than two hours at a time. Take breaks every 30-40 minutes and ventilate the room.
3. Choose the brightest time of day to work. In the evening, make sure there is good lighting. The light should hit the material from the left.
4. If you make a small mistake, use a safety razor blade. You can only work with a razor along the grain. Try to use it as little as possible.
5. When working, take care of the surface of the material. To avoid getting your work dirty, place a clean sheet of paper under your hand.
source
WAX FINISH
Waxing is considered the best option for finishing scorched works, since wax gives the product a silky matte shine, while the color of the wood does not change and retains its tone and richness. However, this very old method has a number of disadvantages: the wax coating is quite fragile, deteriorates from dampness and moisture, and dust sticks to it. It is usually used in the manufacture of products made from porous wood, such as oak.
The product is coated with a mixture of 1 part melted wax and 2 parts turpentine using a clean clothing or shoe brush. This mixture is applied into the recesses using a brush. After a day, when the turpentine has evaporated, the surface of the work must be polished with a dry brush until it shines.
To increase the strength of the wax coating, melted rosin is added to the mixture. You can also cover the product with two layers of wax every day or apply a finishing layer of nitro varnish.
Labor safety instructions for students in manual wood processing
When working in workshops during technology lessons, the student must follow certain rules:
- get special clothes from the teacher and put them on;
- take the necessary tools from him and take your workplace. Check their condition before starting work;
- receive a task and technical map to complete the project;
- listen to the teacher’s instructions and start working, observing all the rules;
- in the process of completing a task, the student should not be distracted by any extraneous actions;
- if in the process of making a product it is necessary to use glue, then the student should do this only under the supervision of a teacher and only in a workshop where there is a good ventilation system;
- In the event of any industrial emergency, the student must stop all work and immediately notify his teacher. If a friend is injured, he must be accompanied to a medical center for assistance;
- after finishing the work, you need to restore order in the workplace and in the entire workshop as a whole;
- shavings and sawdust are swept away only with a brush, and not blown away;
- the remaining material is returned to the teacher;
- After checking for safety and integrity, the instruments are also handed over. If you have any comments about the work, you must inform the teacher about it;
- You can leave the room with the class after permission from the teacher.
Important! Thus, despite the dangers of the woodworking industry, if you know TB, you can avoid injuries. The most important ones are SNIP for the construction of wooden houses, logging work, mechanical and manual processing of wood.
Safety precautions when burning wood
When working with an electric burner, do not place containers of water or wet objects near it, or handle the device with wet hands.
When burning, acrid smoke is formed, which is why you should not lean too far towards the board. In addition, all work should be carried out in a ventilated area or regularly open windows to allow fresh air to enter.
Do not touch hot pins with your hands or clothing.
Bubbles on a varnished surface form more often when the varnish is diluted with acetone or other volatile substances.
When coating a product with varnishes, you should remember that some of them are toxic and dangerous and can cause an allergic reaction. If varnish or wax mixture gets on your skin, the area should be washed immediately with warm water.
Varnishes should be applied in a ventilated area. Moreover, in any case, it is advisable to give preference to vegetable oils.
Wood for burning
The wooden base for burning should have a uniform structure, fine porosity, and should not have chips, scratches or cracks.
It is also necessary to make sure that there are no mechanical defects so that there is no resin.
- The wooden base must be light, otherwise the image will not be visible.
- Tree species that are suitable for the base: linden, poplar, alder, aspen and birch.
- A properly selected foundation guarantees a successful result.
For a beginning craftsman, it is recommended to use ready-made wood burning kits. Sheets of plywood are also the best option for starting out.
Image selection
The only condition when choosing an image is that the drawing must have a clearly defined outline.
- Drawings can be found on the Internet and printed. Or you can come up with it yourself.
- But the first time, it is recommended to use simple images in order to understand the principle of operation and get the hang of it.
- Each time you will hone your skills and your work will look better and better.
The image is applied to the base using carbon paper or manually.
Tips for Beginners
To ensure that the first point does not stand out and the lines are smooth, blow lightly on the tip.
- Follow the outline with one line. Work slowly. You can help yourself by moving the base with your other hand.
- Fill with medium heating temperature of the device. Perform slow circular movements.
- Using a metal scouring pad, clean the tip several times as you work.
- It is impossible to erase an already scorched line, so work carefully and focused.
- Thick lines can be obtained by moving the tool very slowly across the surface. And thin ones are the opposite - draw lines quickly.
- The higher the temperature of the device, the darker your lines will be.
To get smooth tonal transitions in one line, use a small table fan. It will cool the tip and the lines will be smooth. But be careful and attentive!