There is a wide variety of accessories that increase the functionality of a milling machine. Among them are:
The design of the rip fence for a router table is the simplest of all types of holding systems. Making it yourself will not be difficult if you first understand the principle of its operation.
For normal movement of the cutter using the workpiece guide, a control groove is first made in it and the distance from the edge to the zero mark is measured. As a result, it is easy to move the stop along the bar, setting any acceptable distance, but it is important to remember that when working with two bars, they need to be fixed at the same time.
Expert opinion
Strebizh Viktor Fedorovich, leading construction foreman
Now you can, without rushing, mill just such a miracle jolana with an implanted stool in the center of the body and a edging made of marijuana mixed in epoxy. If you want to clarify something, please contact me!
How to make a jig for a dovetail box joint with your own hands
Copy sleeve
Having learned how to use a copying sleeve for a router, craftsmen receive a good assistant in processing various wooden parts.
Many craftsmen use templates, especially when it comes to creating a series of wooden parts. It rarely happens that a template is used to cut out one part, but such cases do occur, for example, during restoration.
In most cases, such a device is used in production:
- figured platbands;
- identical parts for further assembly of furniture;
- tenons necessary for joining wooden products;
- recesses for hinges or door locks;
- paneled surfaces on the door.
When making a template, it is important to initially select high-quality and durable material. Even taking into account the minimal contact of the machine router and the edge of the template, it is erased over time, and the drawings lose their original accuracy. Such problems can be easily avoided if you initially use durable materials:
Naturally, it will be difficult to prepare a metal template, but it will last for many years without deforming and maintaining the original dimensions and strokes of the design. It is better not to experiment with such a device and make a template specifically for the required part of the wooden product. There are no high-quality universal devices.
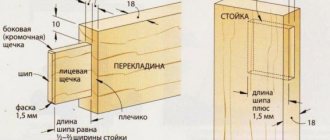
The tongue-and-groove box corner joint is neat and reliable. But it can also be made more powerful if you prepare the grooves with a dovetail router. To do this, you will need to assemble a special conductor.
From thin plywood or laminate we cut out the sole of the conductor measuring 15x25 cm. We screw slats to it along the edges.
Mark a transverse line in the center of the workpiece. Then we glue V-shaped stops on it from thick plywood or MDF. They consist of 2 segments with ends sawn at 45 degrees. On the reverse side, the workpieces are additionally strengthened with self-tapping screws.
Which is better: heated floors or radiators?
Warm floorBatteries
To ensure rigidity, the supports need to be strengthened by installing gussets made of the same material. The connections are similarly tightened with self-tapping screws, the heads of which must be recessed.
The conductor will additionally need 2 bar attachments, equal in length to its sole. A quarter is chosen from them. Then we mill a wide groove in the sole of the jig.
To make a corner box joint, you need to saw the workpieces at 45 degrees.
After the glue has set, we apply a jig with a dovetail cutter to them, and mill the groove.
If you use attachments from a block, then it can be made narrower.
Next, we open the rail on the circular saw to get a tenon for the selected width of the groove on the box.
Expert opinion
Strebizh Viktor Fedorovich, leading construction foreman
Now you can, without rushing, mill just such a miracle jolana with an implanted stool in the center of the body and a edging made of marijuana mixed in epoxy. If you want to clarify something, please contact me!
Other devices
Circular
Among other devices for a wood router, circular ones occupy a special place. All round and oval cuts are made with their help. The compass is a rod with a pin. Simply moving the bar changes the size of the circle. For small radius holes, for example, for inserting hinges, the compass structure is attached directly to the base of the milling machine.
A router for cutting circles can be improved for cutting out ovals. You can do it yourself. You will need a base in which screws or suction cups are used to secure the workpieces; shoes, mounting rods and a bracket for fixing the structure with the tool. Round openings are cut when one shoe is used; inserting a second shoe into the jig makes it possible to cut oval holes.
For making grooves on narrow surfaces
To make this option, of course, you can have some fun with a drill and chisel, and you can even cut out a fairly accurate hole. But how much time will be wasted. The milling cutter will cope with this task faster and more accurately. But this requires certain accessories.
They can consist of a round or rectangular plate attached to the base of the instrument. Two pins on the plate will ensure smooth running of the tool
The axes of the pins are located on the line of the cutter, under this condition the groove will be made in the center of the part, regardless of the thickness. When making cuts, it is important to control that the pins are tightly pressed to the workpiece on both sides. A similar result can be achieved using two parallel stops
Even a task with one rip fence is feasible, but the workpiece must be secured between two surfaces. If the craftsman constantly deals with cuts on narrow surfaces, you can make a table of two parts, which will make it possible to clamp the material between them. The universal use of the copy ring makes it possible to protect the template from the cutting edge. A hand cutter with a copy ring will help replace, for example, carpentry tools used when installing door hinges, and reduce the time that will inevitably be wasted if the worker does not have the necessary skills to work with them.
For work on installing door hinges, for example, a template is made from a piece of wood. This is an additional time investment, which then more than pays off - the grooves will be ready in a few seconds. You can often come across advice to buy ready-made templates for a router. And this is reasonable, since they are on sale and are intended for the same type of common activity - for example, installing door hinges or in the manufacture of furniture, where several of the same type of parts are required.
Fastening and clamping devices can be used both universally and designed for the use of a specific type of equipment. Their types are variable - in the form of a block, a shoe with a spring or steel plates.
Clamping machines are distinguished by the fact that they remain motionless during the processing of the workpiece, however, they are also varied and quite complex to manufacture. Therefore, despite the abundance of drawings for craftsmen, they prefer to buy them ready-made, factory-made. There is good balancing of self-braking, the drive can be manual, hydraulic or pneumatic, high-quality metal. It’s easier to purchase a ready-made device and upgrade it to suit your own needs.
For processing bodies of revolution
There are also special, ready-made devices. However, manufacturers of professional instruments are not always able to predict what needs craftsmen may have.
For milling tenons
Special devices are used to cut tenons. Expert advice always refers to industrial devices. They can have several functions at once - for example, making a profile for a blind and through dovetail and a through connection with a straight tenon. Here, the exact trajectory of the cutter, a high-quality template and a copy ring are of great importance.
Boring template making for a router: mux22 – LJ
Actually acrylic (I don’t remember the thickness, in my opinion it’s something like 4-5 mm):
I apply the heel of the neck, trace it with a marker without much precision, because at this stage there is no need for it, and moreover, there is a danger of cutting off something unnecessary with a rough tool. So I make a small margin in all measurements.
By the way, the groove in the template will be significantly longer than the heel of the neck
- at least a couple of centimeters. This is necessary in order to work calmly with the router and have support for it even when processing the edge of the body.
I fix the template on the workbench and start sawing the acrylic with my Japanese wood hacksaw. This does not spoil the canvas, but I still add a little oil, primarily to reduce the heat.
Yes, before sawing, you should outline the marker lines with a sharp awl, drawing a deep groove along them
. This will make your work much easier, because the marker can be accidentally erased, and most importantly, it is highly reflective and difficult to see from some angles. Scratches are always clearly visible.
When the reach of the saw ends (or it reaches the corner, it all depends on the design of the saw), you need to switch to a jigsaw with a larger reach.
The cutting line of the jigsaw MUST be moistened with oil.
, because it heats up the acrylic very much: while the file is moving, everything is fine and without lubrication, but if the jigsaw stops even for a moment, the melted plastic will immediately harden around the file and bite it. The first time I sawed a pattern like this, I broke five files in a row before I realized I needed to add oil.
When the cutting is finished, a magical oscillating spindle-grinding machine comes into play, reminiscent of some kind of creepy device for torturing witches.
Since even the smallest sanding drum does not fit into the corners of the template, I remove the machine and level them with a regular round file:
Expert opinion
Strebizh Viktor Fedorovich, leading construction foreman
To carve wood with your own hands, you will need quite a lot of tools, and each master has his own special ones that are more convenient and practical for work. If you want to clarify something, please contact me!
USING A TEMPLATE.
To use the template, attach it to the workpiece. There are several options: double-sided tape or screws (photo above right).
Double sided tape. This is a quick way to attach the jig and provides a secure grip without leaving marks on the workpiece. The only drawback is the high consumption of adhesive tape if you have a large number of workpieces to work with.
Screws. Your other choice is to secure the template with screws. There is no doubt that they will provide reliable fastening. This method is good when the holes will not be visible on the product, they will be hidden from view.
Accessories for a wood router: DIY production, instructions and assembly
Copy rings are a round plate with a protruding edge that slides along the base surface along the template. This device provides an accurate path for the cutter to move. Basically, this element is installed on the base of the workbench. There are several methods for attaching it:
Using a template also allows you to achieve more efficient and accurate work. It is attached directly to the workpiece with double-sided tape, and then both parts of the device are pressed to the machine with clamps. Moreover, experienced milling operators advise checking how tightly the ring is pressed to the edge of the template.
In addition, with such a device you can not process the entire edge, but only the corners. Therefore, the procedure for processing material using a template is an excellent option for cutting grooves for a product.
Device for a wood milling machine: list of auxiliary devices, how to assemble it yourself
When the reach of the saw ends (or it reaches the corner, it all depends on the design of the saw), you need to switch to a jigsaw with a larger reach.
Expert opinion
Strebizh Viktor Fedorovich, leading construction foreman
Step-by-step master classes with photos and descriptions, technologies, life hacks - everything a real master or just a craftsman needs for needlework. If you want to clarify something, please contact me!
Special kits
There are also special devices for hand routers designed to perform certain tasks. On sale you can find entire sets of such equipment, the use of which is especially important for professional craftsmen.
Basically, the kits perform a narrow-profile task
Hinge cutters
At home, you can do without using special templates to insert loops. It is necessary to install a second parallel stop on the rods, which will allow the tool to be securely fixed to the end of the door. This equipment is perfect for doing one-time work.
Binding cutter set
There are universal sets of nozzles that can only be used together, as they complement each other. These include a binding kit. In this case, you need to connect the nozzles without gaps. And in order to increase the versatility of the set, it is necessary to provide for the possibility of using typesetting cutters. In this case, several attachments should be fixed on one axis, the arrangement of which can be combined.
Attention! Only experienced craftsmen can make a homemade binding kit. Such work will require a lot of effort and time, which is not always justified.
Working with a hand router on wood: photos, videos
- Profile - to create a shaped configuration of the edges of the product.
- Conical - used to remove chamfers from poses at an angle of 45 degrees Celsius.
- A disc or rebate cutter is designed to create a groove in an edge.
- Galtein - designed for cutting round grooves on the edge of a figured product.
- Edge - used to form spikes and grooves.
Obtaining a figured and curved edge
If you need not a straight edge, but a rounded one or any other shape of the edge, you need to look at the condition of the existing edge. If the workpiece is more or less flat, take the required edge cutter, install it and process the surface as described above. If the surface is too curved, it is first brought to normal condition and then milled.
This is necessary because the bearing roller rolls over the surface and if there are flaws, they will be copied. Therefore, act sequentially - first level it, then add curvature.
If a curved surface is at all boring, a template is cut out. The design is applied to plywood 8-12 mm thick; first it can be cut out with a jigsaw, so the edge can be brought to perfection with a router.
In this case, you will also have to work with a router, but without a template for now. When the surface is perfect, the template is fixed to the workpiece and then the work already described above with a manual wood router. Just one thing: if you need to remove a large amount of material in some places, it is better to do it with a jigsaw, for example. Otherwise, the cutter will quickly become dull.
Expert opinion
Strebizh Viktor Fedorovich, leading construction foreman
There are many different types of milling machines, but for the home craftsman or semi-professional use, universal ones are more suitable. If you want to clarify something, please contact me!
Expanding the functionality of the router
Additions for a router should solve one problem - to hold the tool in the desired position when processing material. When purchasing an expensive machine, frequently used milling accessories are included in the kit. But for cheaper or highly specialized options, you have to buy them separately. The design of such additions is quite simple and does not require a drawing for self-production.
Rip fence
This addition allows for straight cuts and is often used when working with wood. It allows you to work on any surface, not just your desktop. The grooves are cut with its help.
The design of the add-on consists of:
- Rods that are attached to the body of the instrument.
- A fine adjustment screw is used to adjust the gap between the cutter and the surface.
- A locking screw, with its help, the rods are secured in the desired position.
- Overlays, on which the tool is placed.
The design of the base is quite simple and you can make it yourself.
To prepare an addition to the work you need:
- Install the rods into the holes of the tool body and secure them with a screw.
- Set the required distance between the surface and the cutter.
Additionally, by placing a specially treated block (with one rounded edge), you can significantly increase functionality and make cuts along a curve. This part is installed between the tool and the surface. Due to its unstable position, it must be handled very carefully.
Guide rail
The addition is used to move the tool over the working surface at any angle, which is different from the rip fence. The design makes it easier to mill holes located at a distance from each other. Special clamps hold the device on the surface being treated. If they were not included in the delivery set, then clamps are used. Some options are equipped with an adapter to adjust the direction of movement of the tool.
The design is best used together with a power tool whose support platform is adjustable. This will help eliminate the problem when the tire and the cutter are located in different planes, which happens when the tool and the workpiece are close.
The design is quite simple, but very effective. If you have minimal skills in working with the tool, it can be easily done at home. To do this, just take a block, which is attached to the surface to be treated using a clamp. If you fix the structure on two or more bars at the same time, you can make a groove in one go. The main disadvantage is the difficulty of accurately fixing the structure in relation to the future cut. But the following additions lack this.
The first fixture consists of a sheet of plywood and a guide connected together. It is used to work with blades of the same size.
When you need to use cutters of different diameters, a different device is suitable. Its main advantage is that the tool is in contact with the entire lower part of the material. The guide has a board (folding) that holds the power tool in the desired position to the material.
What is a router and why is it needed?
- Edges. Serve for processing the side surfaces of workpieces. With their help, you can make smooth or shaped edges, you can form recesses and spikes for joining parts. It is this type of cutter that comes with a bearing at the end - it rests on the part, setting the distance from the edge of the workpiece to the cutter.
How to treat the surface → Room decoration → How to choose the right paint → Surface treatment technologies → Leveling and finishing the walls → Selecting and applying a primer → Removal from the surface → Stretch ceilings and technologies → Reviews and testimonials
What can be made from plywood
A hand saw is used to create decorative elements of plywood products. And as a result of this processing of wood, plywood or plastic, a variety of crafts are created that have aesthetic significance and practical application.
The process of figure sawing itself is a fascinating hobby, which brings both material and moral benefits to those who practice it.
Drawings, drawings, pictures and ideas of what can be made from plywood using a jigsaw:
Source pinimg.com
Source pinimg.com
Source pinimg.com
Source opilah.com
Source pussikbouquet.rf
Source miracle-lobzik.ru
As you can see, from ordinary plywood or a wooden blank you can independently make a large number of products, which include a vase for sweets, a lamp, a basket, a photo frame, a stand for cards, a hanger in the corridor, a pincushion, a panel, a bread bin, a stand for eggs or hot dishes, a box, a candlestick and much more.
If you are just starting to carve, then first take simple drawings, diagrams, drawings or sketches for carving. Choose ideas for making wooden products using a hand jigsaw that will please you with their appearance.
Once you have mastered the cutting techniques, you can raise the bar and start cutting out jewelry models with openwork fragments.
You can also make platbands for home design using a jigsaw.
Using stencils for cutting, you can make homemade products much easier and faster from wooden blanks or plywood.
At the same time, handmade products will emphasize the style and complement the design of the room.
EDGE TRIM.
Using a template and a stop, cutting a workpiece with an edge is much easier than doing it by hand. But we still need to remove the edge and bring the workpiece to its final shape, and for this I turn to the router.
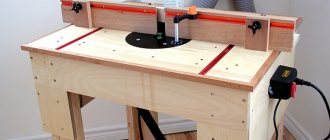
Two ways . There are two ways to form blanks to the template shape. You can use a router table with a straight bit or a hand router. Both methods will give good results. Let's look at a few details in each method that will help give the best results.
Milling table. Let's start with the router table as shown in the photo above. I use this option more often. Possibility of visibility of the bearing and cutter along the edge of the template. One of the biggest advantages of this method is that other than adjusting the cutter height, there are no other adjustments.
Fiber direction. When cutting the edge, pay attention to the direction of the grain. On curved areas, you may notice small chips, if this happens, it is better to back off and try routing in the opposite direction (reverse routing).
Manual frezer . The method discussed above works better for small and medium-sized workpieces. But when making large workpieces, I use a hand router. And I think it’s easier to control the router this way than trying to wrestle with a large workpiece on the router table. Let's also note a few other differences.
The first difference is in the cutter, where the bearing is mounted on the shank, as shown in the detail on the left. This allows the template to remain on top of the workpiece. However, there is a downside to using a jig with a cutter like this. Make sure that the cutter will not touch the workbench when routing and that the workpiece is securely fastened to the workbench.