Content:
- Wood carving with a chainsaw
- Chainsaw carving training, video
- Geometric wood carving
- Volumetric thread
Photo 1 - Slotted shelf
Slotted thread is also known as through and saw-cut. The peculiarity of this carving is that the background is removed from the product, this gives the impression of airiness and lightness to the product. The slotted carving looks advantageous in combination with relief and geometric carvings. In combination with relief carving, slotted carving is called through openwork. The most convenient way to carve using sketches.
Photo 2 - Sketch (slotted thread)
Wooden lace looks great on window frames. Rusinok on platbands is created using through holes of different shapes. To create markings during the work process, stencils are used. Stencils allow you to decorate all the trim in the house with the same ornament, which creates stylistic unity of the exterior.
Photo 3 - Slotted trims
How to choose a chisel?
A chisel for wood carving can be characterized by a different shape of the cutting edge. When choosing it, attention is paid to the following points:
- Power tools are selected according to the thickness of the blade. Impactless modifications have a thickness of about 1.5 mm. It cannot withstand high impact loads.
- The choice is made depending on what type of work will be carried out. There are several dozen varieties of chisels, each suitable for obtaining a specific carving.
- On sale there are electric chisels with a battery or a wire for mains power.
- Attention is also paid to the popularity of the brand. More well-known manufacturers produce high-quality products that can be used for a long period.
In specialized stores you can find sets of chisels. They may include several instruments of different types.
Which chainsaw is best to use for carving?
You can’t just come to a specialized store and pick up any chainsaw for wood carving, because all manufacturers’ models differ in certain characteristics. Therefore, the choice of a tool should be taken seriously, just like the choice of any other technique. The key characteristics of a saw specializing in artistic cutting are:
- engine power;
- size and shape of the chainsaw;
- tire and its shape;
- direct weight.
You need to understand that a more compact and lightweight tool will allow you to reach places that a larger analogue cannot reach. For initial work, a chainsaw with the following characteristics is suitable: weight up to 5 kg, chain pitch - up to half an inch, tire size up to 14 inches. This is enough for a beginner to do wood carving.
After gaining initial skills in carving, you can purchase narrowed tires with a smaller size - this will make the contour, protruding parts, and curly patterns of the object more beautiful and clear.
Professionals who have sufficient experience to teach beginning carvers note some of the nuances of wood carving. Every newcomer to this interesting activity should know them:
- Large workpieces are processed with a chainsaw with greater power and bar size. So, you can use a saw with a power of up to 2.5 kilowatts and a 50 cm bar. This will allow you to quickly remove a huge amount of unnecessary wooden material.
- It is worth considering that carving is by no means a quick process, so the chainsaw, like you, must withstand long-term work. This is helped by the anti-vibration system found in almost all chainsaws, which allows you to protect yourself from vibration waves and make smoother, continuous movements.
- Professionals note that the best species for wood carving are elm, oak, larch, and maple.
Important!
All species behave differently during use, so for the best performance you need to try all types of wood to evaluate the maximum comfort specifically for yourself.
In this video you can see the progress of making a bear statue, and the whole process is shown quite clearly and interestingly. It is clear from the actions that a professional carver is working with a chainsaw, from whom you can learn a lot:
The process of creating an owl figure from wood using a chainsaw by carver Evgeny Akimov at his master class is captured in this video:
The result of the work of a person who is fluent in using a chainsaw is illustrated in the following video:
What is carving?
In English, carving means “carving.” This term is used both in hairdressing and in landscape art, where it is necessary to decorate objects in a certain way. Carving, as applied to wood carving, is a form of carving that uses a chainsaw. For this direction, you need to have excellent command of this instrument and constantly hone your skills. This will help you create beautiful wood sculptures that will decorate almost any interior.
With the help of carving you can create many objects: fantastic characters (mermaids, gods, garden gnomes), animals, images of people, etc. Wood carving is becoming increasingly popular due to the relative ease of creating things and the variety of crafts, but for competent work it is necessary to comply with many technical and practical requirements.
It is worth understanding that carving can be carried out in two ways: geometric and volumetric. The first carving method is more suitable for beginning carvers: it uses harder types of wood (apple, pear, maple or conifer to create massive objects). In this case, it is first better to depict the desired craft on paper, and then just start working on wood. The second method of carving requires some practice and is more used in creating decorative interior items (balusters on beds, carvings on the legs of chairs and tables, etc.). This type of work involves such tree species as alder and linden.
Simple lesson
So, to start with the materials, what do we need?
The choice of wood for carving is influenced by many factors, such as density, grade, texture and color of the wood. You should know in advance what kind of result you want to get at the end. The wood should already be old, dry, without cracks.
If you are a beginner, we advise you to take soft trees, for example, cedar wood or a good option is birch. Linden is also often used. It is a soft wood and cuts easily, but you have to be careful. If the tools are not sharp enough, the linden will simply wrinkle.
Previously, they cut from coniferous trees because of the resin. Some experienced craftsmen recommend using coniferous trees, but also give preference to some deciduous trees: oaks, beeches, poplars, pines, alders, lindens, apple trees, walnuts, birches, larches, aspens.
First, draw a sketch with a simple pencil (a square in the middle of a log 10*10 cm long and the outline of the drawing).
We remove the resulting blocks.
Now cut out the rectangle. We cut out this particular figure first, so that later it will be easier to work. The gas must be turned up to full, only then try to insert the saw into the tree. Moreover, you need to push the tire not at 90 degrees, but at about 45, bringing it up to 90, but do not brake too much at this moment, if you hesitate, cut more than necessary. And we also remove what we cut out.
Now cut out the triangles along the edges.
You can see more details in this video tutorial:
There is a huge selection of books on the Internet that you can buy, download or watch online. You should choose those publications that suit your skill level. That is, a beginner should not choose books for experienced masters. Despite the fact that at first glance each book will say the same thing, it is worth choosing the one that will be easy and pleasant to read. Fortunately, the selection of books is quite large. Here's a good list of books on wood carving.
Wood carving using a chainsaw is one of the new and promising areas of processing materials and creating original products of artistic value. To bring all ideas to life, you must adhere to certain rules and take a responsible approach to the choice of tools.
Recommendations for the master when starting work
Most often, felled trees become a potential material on which wood carving with a chainsaw is subsequently carried out. In view of this, many amateurs in this art are simply lost in the order of organizing the process.
In view of this, it is worth figuring out where to start and what exactly needs to be done in order not to expose yourself to unnecessary danger:
First you need to find out where the tree itself will fall and direct it to the free space. If it is not available, then it is necessary to prepare it. You should also ensure that you have free movement for yourself, since if it falls, the tree can fall in any direction and so that, due to this, you do not have to literally run away from it with the saw running. After preparation, you need to outline the incision. Be sure to adjust it in the direction where the tree should fall. This is quite easy to do. It is necessary to cut it at an angle of 45 degrees by 25% of the total thickness. Then the next step of the horizontal cut is to cut it out and pull it out. The final touch is called a felling cut and should be done from the back side of the trunk. In order to control, the trunk is not cut all the way, but about 1/10 is left, and if the tree begins to bend, the chainsaw must be quickly removed and turned off. After the tree has successfully fallen, it must be logged. That is, completely remove all branches from the trunk. Next, the trunk is cleared of bark. For sanding, you can purchase a special attachment, but you can also use a regular tire with a chain.
Sharpening chainsaw chains on a machine
Sharpening the chain of a medium-sized tool is quite lengthy and takes at least 6–8 hours. In this regard, it makes sense to use electrical appliances to solve the problem.
If sharpening is performed using a drill, then it will have to be used in combination with a conventional “sharpening stone” attachment. But you need to make sure that the width of the nozzle matches or slightly exceeds the plane of the tooth blade. Otherwise, the chain will be sharpened unevenly.
In addition, to ensure high-quality sharpening, it is necessary to use a sharpening stone, the surface of which should not have unevenness or any other defects.
The algorithm for preparing for sharpening of this type is as follows:
- You need to loosen the screw that adjusts the chain clamp.
- Then you need to adjust the chain so that its teeth are directed towards the sharpening element.
- Finally, it is necessary to fix the equipment at a certain angle.
If you use a standard stone for sharpening, you will have to grind it to the required size or use special grinding stones. The latter are smaller in size compared to sharpening ones, made of less durable material and quickly exhaust their working life.
At the same time, due to the lower strength, overheating of the metal is eliminated, and this allows the steel to remain just as strong. If the work is done using a sharpening stone, then it is necessary to take pauses between every 2-3 sharpenings of the tooth - these are necessary to cool the stone.
Moreover, it is unacceptable to use water for artificial cooling; here the option is to use a fan or apply a sharpening stone to pieces of ice previously wrapped in rags.
Considering that the sharpening machine has quite a lot of power, it is advisable that the sharpening operation on it be performed by professionals. If you use a regular household sharpening machine, it is able to return its former sharpness only to the upper cutting edge.
This limitation is due to the size of the machine. However, if you use the machine only to sharpen half of the teeth, then this work will take half as much time.
Expert advice
If you are interested in a sharpening and grinding machine in order to perform a number of other operations in addition to sharpening knives and saws, then it is best to buy a compact, low-power unit, which will be similar in its characteristics to a dentist’s drill.
This machine is not only smaller in size but also has different functions as it can be used for carving wood, metal and stone. If necessary, it can be improved so that it can be used to sharpen small parts.
A special group is formed by special machines for sharpening chainsaw chains. However, due to the high cost, the purchase of such installations for the average consumer will be impractical.
Each tool has a limited working life, so to extend its service life it is necessary to take certain measures. In relation to a chainsaw, this is chain sharpening.
Naturally, not in all cases this operation will allow the sawing tool to return to its previous level of performance. Therefore, you first need to understand the reasons for the deterioration in performance, after which you can move on to choosing a sharpening device.
How to carve sculptures
If the design is the first, then you should not bother yourself with extraordinary creations. It is enough to test your strength on something simple, for example, carving a mushroom or a geometric figure.
To begin with, you need to make a definite plan and strictly follow it. For example:
Take the required workpiece in the form of a hemp or other shape and place it in a convenient place.
Prepare the tool. Wood carving with a chainsaw, it should be noted, does not involve the use of long bars. As they say, the lighter the tool, the easier it is to work with. In addition, a short tire increases safety.
After preparation, you can begin to create a general outline. This step is very simple and does not require extreme precision. The only thing is not to be zealous, as you can overdo it and remove the extra layer of wood. It is advisable to be guided at first by either a video or a sample.
After this, the exact outlines of the future masterpiece should be cut out. When working, you should ensure that the chain tension is maximum, otherwise, due to increased vibration, flaws are likely to occur.
When the work is finished, it is advisable to thoroughly clean the figure using sandpaper, and then cover it with varnish or liquid glass. These compounds will significantly increase the protective properties of wood, and your first masterpiece will be able to delight you for many years.
Where to start learning
What do virtuosos most often cut with a chainsaw? Of course, totem poles and various representatives of flora and fauna.
I would like to note that for beginning carvers, creating complex natural reliefs and intricate bird figures will be quite difficult. For this reason, it is advisable to leave such an idea for another time, when there is more practical knowledge.
The easiest way to start learning is with simple totems of Slavic deities or animal figures.
Important! For a beginner in this industry, it would be a good idea to familiarize yourself with all the available recommendations that describe in detail the rules for working with a chainsaw. You can find them in the usual attached instructions. To begin with, you should familiarize yourself with the equipment, prepare it and, of course, carry out maintenance from time to time.
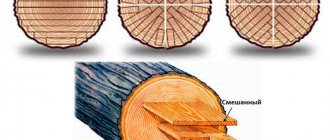
Material properties
Material procurement procedure:
- selection of wood (knots, branches, logs),
- removal of bark and sawing in the transverse direction,
- grinding the cut, drying, polishing,
- treatment with compounds to reveal the texture of the pattern,
- treatment with anti-rot compounds, varnishing.
Working on blanks will require time and skill. The result will be beautiful parts for making a wide variety of products. There are many options for products made from end-cut wood, ranging from crafts for children to home or garden interior items.
For further work you need a jigsaw and glue, and additional decorative elements if necessary.
Special tools
There are quite a large number of specialized tools on sale that are used only in the mass production of various wood products. An example would be:
- Flexible shaft. This design option is suitable for producing threads of almost any complexity. Even a novice master can afford it.
- Laser engraver. A household model of such a device costs 7 thousand rubles. Execution options that are capable of working on 3D projects cost at least 30 thousand rubles.
Recommendations for carrying out work
If you are a beginner, then you will need to study all the recommendations prescribed in the instructions, which must be included in the kit.
It is important to prepare the equipment and periodically maintain it so that it lasts as long as possible
Tree cutting
The thicker the tree, the greater the precautions required
Often the material for sculptures and figures is trees cut down on the site, and many beginning craftsmen do not know how to organize this process.
Let's look at how to properly cut trees with a chainsaw, since this type of work is very dangerous:
- First of all, it is necessary to determine where the trunk will fall; a free space without buildings and other objects is selected. If there is none, then you will have to clear the area first; its size should be generous, since the tree may move if it falls.
- Be sure to provide yourself with space to ensure an unimpeded escape with the chainsaw; stumbling with a running chainsaw when a tree falls is not the best option.
- First, an undercut is made, which is located in the direction in which the trunk falls. To do this, a cut is made at an angle of 45 degrees through about a quarter of the thickness of the wood. Using a horizontal cut, this piece is cut out and removed.
- The felling cut is made from the side opposite to the direction of fall; for clear control, the tree is not cut to 10% of the thickness; when the trunk begins to tilt, the chainsaw is quickly removed and the engine is turned off.
This is what a tree felling diagram looks like
The felled tree is cleared of branches and bark; for this, both a standard tire and a chainsaw attachment are used to sand the tree.
Carving sculptures
Mushrooms are an excellent solution for beginners
For the first time, you need to choose a simple design: a mushroom, a cube or something similar, the work is organized as follows:
A workpiece of the required size is taken and placed on a platform that will provide you with free access to the element from all sides.
Chainsaws with small tires are best suited for the job and must be equipped with high-performance chains.
Working with a light tool is much more convenient and easier, and the safety of work will be much higher. First, the general outline of the product is given; this stage does not require much precision, but it is important not to remove excess material, so you should not get carried away too much. It is best to have a sample of the product or a drawing of it on hand so that you can accurately imagine the proportions of the finished version. Next, the figure is given precise outlines, and you will have to master this type of work, such as cutting the end of a tire, this is done carefully and requires a good tension of the chain, otherwise it will vibrate very strongly during operation
(See also the article Wooden panels: features.)
The work requires accuracy and precision, so a heavy chainsaw will not work
The finished figurine can be sanded with sandpaper and coated with a protective compound so that the wood is not exposed to the harmful effects of moisture.
Operating rules to remember
Whatever operation you perform, be it chainsawing wood or felling trees, it is important to remember and strictly follow several rules that will ensure your safety:
| Use of protective equipment | To complete the work, you need to stock up on everything you need: clothing made of thick material, safety glasses, cotton gloves and comfortable shoes with non-slip soles. Don’t neglect at least one element; the better you are protected, the lower the likelihood of unforeseen situations occurring. |
| Good chain condition | In order for any operation to be carried out efficiently and quickly, it is important that the chain is sharpened and well tensioned; the teeth should not come out of the groove when pulled at the top of the tire. In addition, conduct a visual inspection to ensure the integrity of all elements and absence of damage. |
| Availability of lubrication | If the chain is not lubricated, it will wear out several times faster. Always check the oil before starting work, it is better to use high-quality options, their price is higher, but you will provide the best protection for the structure |
| Ensuring comfortable working conditions | Before cutting down a tree with a chainsaw, it is important to make sure that there are no obstacles to movement and work. If danger arises, you must move away unhindered, this is very important for safety. |
Important! If the chainsaw has been left idle for a long period of time (several months or more), then it is recommended to replace the lubricant and fuel with fresh ones, this is due to the fact that over time, petroleum products may begin to decompose into their components, and their quality will inevitably decrease.
To cut shapes out of wood with a chainsaw with your own hands, you need to purchase protective equipment and wear comfortable, durable clothing.
How to do it yourself - step-by-step instructions
To make a carriage, you must perform the following steps:
- create a working drawing of the device, indicating all the necessary dimensions.
Figure 3 - Drawing of the saw carriage. Based on it, a specification is drawn up for all materials, connections, and additional assembly elements. When creating a drawing of the carriage, the expected volume of work, the dimensions of the workpieces, the brand of chainsaw, as well as the capabilities and preferences of the owner are taken into account; - All necessary materials and tools are prepared. Ready-made structural elements are purchased (if possible), the necessary devices and machines are sought;
- the manufacture of guides requires a flat platform on which to weld the base for the carriage.
It consists of two guide strips connected to a workpiece support structure. Sections of timber, sleepers, and metal cross members can be used as a base. If you plan to make a portable version, you will have to think in advance about how to quickly assemble the base using threaded connections; Figure 4 – Guides on the chainsaw carriage - The trolley consists of two pairs of wheels on axles, which are attached to a support frame through hubs. Sometimes they use ready-made wheels that rotate around their axis on a special platform. This option is quite acceptable, but it reduces the accuracy of movement of the cutting tool, which is why the boards can get a wavy surface. It is necessary to take into account that a massive trolley will ensure greater accuracy and safety of sawing;
- The tool locking mechanism is usually combined with a size adjustment device. There are two options - with a stationary chainsaw and a moving limiter, or with a movable platform on which the tool is fixed. The second option is much more effective, but technically more difficult. As a rule, they use parts from a mechanical jack, to the upper part of which a platform for attaching a chainsaw is welded, and the lower part is rigidly fixed to the trolley. It is necessary to install vertical guides that provide sufficient rigidity and reduce the load on the lifting mechanism during operation;
- The control and measuring rod with divisions allows you to adjust the lifting height of the saw. The easiest way is to weld a vertical bar to the cart, and a pointer on the saw platform. Subsequently, you can attach a ruler to the bar, having previously calibrated its position using a test cut. The device is simple, but very useful and greatly simplifies the work process;
- The chainsaw feed mechanism is usually an electric motor with a reduction gear. It is installed so that it is possible to move the cutting element in both directions. Considering that connecting the power supply is not always possible or advisable, a manual feed mechanism is usually used. The simplest option is a handle installed on the cart in such a place as to eliminate the possibility of injury if the chain breaks or other situations. This option is convenient because the operation of the chainsaw has to be constantly adjusted by increasing or decreasing the fuel supply.
The described option is not the only possible design. Other methods of feeding tools, attaching chainsaws or logs may be used. The choice of the optimal technique is the prerogative of the owner.
Instrument care
Hand tools can be serviced at home. As a rule, after long-term use it is necessary to sharpen the cutting edge. To do this, you can use special equipment or a regular sharpening stone.
If the working part is made using ordinary steel, then the surface must be cleaned of liquid and contaminants.
From time to time, the rust that forms is removed.
Most problems arise with electrical equipment. An example is a laser engraver, which has a complex design. If timely, high-quality maintenance is not carried out, the accuracy of processing will significantly decrease.
If you find an error, please select a piece of text and press Ctrl+Enter.
Source: stankiexpert.ru
Recommendations for beginning carving masters before starting work
Where to begin?
Sketch for wood carving
For craftsmen who are just mastering the technique of wood carving, you should not choose very complex intricate patterns or figures. It is recommended to start your creative journey with the simplest things possible. You can cut out ordinary geometric shapes - a cube, a ball, a parallelogram, a mushroom. More complex products like animals and people are best left for later, when the necessary experience and skills appear.
Before carving wood, it is recommended to make a sketch first. Only when all the calculations have been completed and the basic concept of the future creation has been chosen can work begin.
Wood carving should be started only in a good mood, when a calm environment is ensured. The presence of any distractions will not only lead to damage to materials, but can also cause injury. It is best to do this business in a place remote from people - in a country house, in a garage or in a specially equipped workshop.
Rules for operating a chainsaw
Parameters that need to be checked before starting to operate the chainsaw
To perform high-quality cutting, you should ensure that you have a professional chainsaw. Although it costs a lot, it will make all the work easier. It is necessary to ensure that the saw chain is well sharpened and fits carefully to the bar. The technical condition of the tool must be checked at all times. If any malfunctions are identified, they must be corrected promptly.
It is very good if you use a chainsaw with automatic lubrication when carving wood. This will keep the instrument in full technical suitability for a long period of time. In any case, the presence of lubricant in the saw must be carefully monitored. If this is not done, the working mechanisms of the tool will quickly fail.
How to fell trees
Most often, felled tree trunks or branches are used as the base material for chainsaw carving. Beginning craftsmen are often lost when organizing the work process and can put themselves in danger. Therefore, practicing carving specialists recommend adhering to certain rules:
Felling forest with a chainsaw - diagram
- before felling a tree, it is necessary to clearly determine where it will fall and prepare a space free of any objects;
- It is recommended to provide free waste for yourself. During felling, a tree can fall in almost any direction;
- After preparation is completed, a cut is marked on the tree. It is adjusted in the direction that has been previously selected;
- Along the intended cut, saw through a quarter of the thickness at an angle of 45 degrees. After the horizontal cut is completed, it is pulled out;
- A felling cut is made from the back side of the trunk. Approximately 10% of the tree's thickness is left, after which it begins to slowly bend;
- quickly turn off the chainsaw and put it aside;
- When the tree has fallen, all branches are removed and the trunk is cleared of bark. For sanding, use a special attachment or a tire with a chain.
How to cut down a tree correctly
https://youtube.com/watch?v=qscohIDkwu4
Chainsaw wood carving for beginners
Before starting work, beginning carvers not only need to draw up a rough plan of action and prepare the tool, but also become familiar with safety precautions.
What do you need for work and where to start?
If you are just learning how to carve with a saw, then you should not take on unimaginable and difficult to implement projects as your first creation. It is advisable to start with the simplest possible objects, for example, a geometric figure (cylinder, ball, cube, rectangle) or a mushroom (fly agaric, boletus, etc.). It’s best to leave complex objects (animals, human figures) for later, when you’ve gotten better at less sophisticated creations. You should always try to make a sketch first, and only then, with a ready-made idea and technical calculations, start carving.
It is also necessary to ensure in advance that you have a professional chainsaw designed for wood carving, for more comfortable working conditions. The cost of the saw is rather high, but with its help it will be easier to make more complex carvings. The saw chain should always be perfectly sharpened and fit tightly to the bar (tensioned). To do this, it is necessary to carefully inspect the condition of the saw each time and promptly correct any detected defects, since this will not only help in creating figures, but will also protect its owner from unforeseen and unpleasant consequences.
It is also important that the chainsaw has an automatic lubrication system, which allows the tool to remain in good condition longer. The presence of lubricant must be constantly monitored so as not to damage the saw set (bar and chain).
When cutting out products, it is better to create the most calm and creative conditions for yourself, when nothing will distract or irritate you. This will provide greater pleasure from creating objects and prevent damage to the future masterpiece. Therefore, you should choose a place for wood carving that is remote from other people. For example, a dacha, industrial zone, private house, garage or something similar.
Beautiful mermaid made of wood made using Carving technology
An original sofa created using a chainsaw, perfect for a summerhouse in a summer house
Safety and protection
Do not forget about your own safety, this is the most important thing. Carving assumes that the worker will be provided with all necessary protective equipment.
Professionals use special helmets, underwear, gloves and shoes (the most injured parts of the body are the head, legs and arms).
The helmet, in addition to direct protection from chips, also isolates excess noise that does not allow full concentration. Therefore, it is recommended to take special noise-reducing head protection, and the rest of the equipment should consist of compacted fabric. You need non-slip shoes to make it easier to maintain balance.
Additional Information! Professional and novice carvers do not use any of the equipment, which exposes them to additional danger that could have been avoided.
Wood selection
It is believed that the ideal material for beginners is linden, which has soft, flexible wood. In fact, without practice, such a craft can be quite easily ruined by careless movement, which is much more difficult to do with hard rock. The choice of wood type is important for the type of craft. So, for example, for sculpting a face, light, plain wood is chosen (dark varieties are less expressive). Recommendations boil down to the following tips:
- If you are planning medium-sized wooden figures, apple, birch, hazel or cypress wood is suitable.
- If you are planning a miniature with a lot of detail, choose birch, alder, pear and linden; Both aspen and maple will do.
Fairytale storySource dachnaya-zhizn.ru
- Pine and spruce wood with a pronounced texture (striped pattern) are used for crafts with large elements; These varieties are not suitable for working with small parts.
- For large figures, you can use aspen: durable, inexpensive wood is not afraid of moisture and does not rot when it comes into contact with the soil.
About wood carving with a jamb knife in the following video:
Manufacturing stages
The process of making a garden sculpture goes through the following stages:
- Rough processing. Its goal is to draw the basic shape of the figure based on the sketch, which is transferred to the workpiece through a system of control points. Work begins with the projection where the greatest material removal is expected. Based on the sketch, the general silhouette and proportions are outlined.
- Refinement of contours. It is carried out along four edges: frontal, rear and lateral. At this stage, you can refine the lines, and then, slowly, remove excess wood, getting closer to the outline and not trying to overly round the outline.
ElderSource cs2.livemaster.ru
- Doubling of edges. Four corners are removed from the workpiece, 8 faces are formed. At this stage there is no need to deal with detailing; its goal is to clarify the position, plasticity and character of the sculpture.
- Detailing. Using a chisel and mallet, they get rid of the edges, and then begin to work on small details. It is not recommended to mark details with a pencil - it will leave dirt that is difficult to remove.
- Polishing and protection. The finished figurine is treated with sandpaper or a grinding machine and coated with wax, stain or varnish.
- Coloring. If you plan to paint, the figure must first be dried for one to two weeks. If the sculpture will stand in the garden, it is painted with alkyd paints and varnished. Alternative option: the sculpture is well primed and covered with stain.
OwlSource res.cloudinary.com
Selection of material
In accordance with the plan, the wood for work should be selected. The final result depends entirely on its quality, so immediately exclude materials with loose structures and give preference to the following options:
- linden is one of the best options for beginning craftsmen; figurines made from this type of wood are easier to make, thanks to the soft structure of the material, it lends itself well to processing, and is often used for small sculptures and ornaments;
- aspen - similar in basic characteristics to linden, another good option for making small figurines;
- pine - can peel, but if its growth rings are positioned correctly, the product will look especially impressive;
- maple - has good density, processing such wood is a little more difficult, but miniature animal figurines are especially good from it; chess is often made from this type of wood;
- oak is especially good; dense wood is difficult to process, but high-quality polished and varnished wood looks attractive; products made from this material are highly expensive.
All these types of wood are soft to process, they will not dull the tool and will allow you to make a product of any shape. The main thing to consider when choosing a material is its quality; it must be whole, dry, not damaged by rot and beetles.
Main types of tools
There are a wide variety of carving tools available on the market. All of them are divided into two main groups:
- Manual ones are characterized by low cost and ease of use. However, we must not forget about the low productivity of manual labor.
- Electric ones have recently become widespread, since their use can significantly speed up and simplify wood processing. As a rule, electric tools are purchased during serial production of products; they are characterized by a higher cost, but allow obtaining more accurate dimensions and high quality of the machined surface.
Electric hand engraver
Despite the widespread use of electric tools, you still cannot do without hand tools. They are often used to treat hard-to-reach places.
When producing such instruments, a certain numbering is used, which is quite difficult to understand. Many experts recommend purchasing wood carving knives included in standard sets. They are produced by specialists in the field in question and can be used to perform work of varying complexity. Only after gaining experience will the master be able to expand his range of knives depending on genre preferences and needs. The most widely used types of the instrument in question are:
- Bogorodsky is a design option that can be used to obtain a black outline. With a blade of 6-3 cm, the knife is suitable for obtaining thin work or semicircular shapes. The handle can be made using a variety of materials.
- Tatyanka is a knife with a long handle, the bevel of the blade is located at a distance of 2 cm from the hand. This simplifies the wood processing process.
- The jamb is a design option similar to a shoe knife; the blade is beveled at an angle of 45 degrees. Sharpening is one-sided, used when obtaining a wide variety of shapes.
A wood carving gravel is also often purchased. To process large surfaces, a wood cutter can be used, which is also characterized by a certain shape of the cutting edge. The set often includes a knife and hatchet for wood carving. Its cutting part can have different sizes and shapes, it all depends on the specific task at hand when processing the surface.
Let's call a chisel a fairly common tool. The best offer is considered to be the products of the Kirschen Studia company, but any modification costs no less than 1000 rubles. There are many different types of wood carving chisels. The classification is carried out as follows:
- Direct.
- Angular with V-shaped profile.
- Reverse with a convex working part.
- Curved.
Chisels for wood carving
A chisel for carving wood of low density can be made from inexpensive materials. If desired, you can purchase budget options from Japanese manufacturers. It is worth considering that models with a short working part are intended for manual work and are not easier to operate. Options with a longer working part are intended for impact work.
Saws can be used to work with solid wood. There are a variety of options for this instrument; when choosing, attention is paid to the following points:
- Tooth size.
- Length of the working part.
- Handle type and comfort.
- What metal is the working part made of?
Wood carving with a chainsaw
When considering a similar tool for cutting wood, it is worth considering that most are designed to change the length of the workpiece.
Too large a tooth allows you to speed up the work process, but the quality of the cut is poor.
To improve the quality of the resulting end surface, you can use saws with a fine and frequent tooth arrangement.