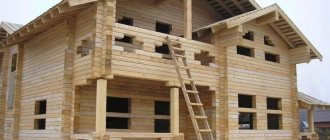
Timber is a log that has undergone special treatment; the construction of walls from it is a little simpler than from a log house.
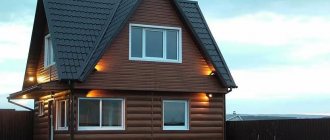
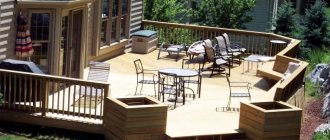
The result is a durable, warm, “breathable” house that can last for more than 50 years.
What does it represent?
Untreated wood has several significant disadvantages, which are successfully eliminated in the production of timber.
Elements are manufactured according to technological calculations , using the same measurements.
Thanks to the same length, thickness and width, walls made of this material can be assembled quickly and without additional hassle.
The timber does not shrink and retains its properties over time if you take care of the house. The finished surface is smooth, no additional finishing is required, you can immediately begin facing work.
Types of timber for wall construction:
- Non-profiled solid wood .
For this, the logs are given a square shape, where the sides are 100-250 mm, depending on the purpose of the future structure. The elements are dried under natural conditions. Such timber does not have a tight fit; it is used for outbuildings and non-residential buildings. Additional processing of seams and walls until smooth, impregnation against fungus and moisture will be required. This is the most inexpensive and accessible option. - Profiled . Here the logs are processed using high-tech equipment, and finished timber is also produced from solid wood. The connecting side edges are fastened using the tongue-and-groove method. They close securely during construction and do not form cold bridges. The surface of the timber is smooth and does not require additional processing. You can put insulation between the elements and make the house even more reliable. Disadvantages include shrinkage.
- Glued . Each element consists of several boards glued together horizontally. The production process is carried out under pressure, the technological properties of the timber are improved, the material becomes stronger and can withstand heavy loads. Deformation and the appearance of cracks are excluded. The elements are connected by a tongue-and-groove system.
- LVL – veneered . It is created from wood waste, which is combined into a mass, then into boards and then glued like laminated veneer lumber. The result is flexible elements that have high strength and stability. This is the most expensive material presented; it is used for individual components of the building.
All of the listed types of timber are suitable for wall construction. Before making the final choice, you need to understand what goals the home owner is pursuing , whether he is willing to spend time on additional processing, and what the construction budget is.
Read about what a wooden beam is here.
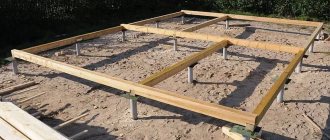
Foundation preparation
For building a house, the optimal foundation is considered to be a strip foundation. To arrange it, stones and vegetation are removed, mounds and holes are leveled. When the site is leveled, the territory is marked. After this, a trench is dug, the depth of which depends on the height of the future building and the soil, the width is at least 25 cm. The profiled beam is quite light, so for a one-story building you can use a shallow foundation.
For multi-story construction or construction on unstable soil, the foundation must correspond to the freezing level of the soil. On average, this figure reaches 1.2-1.5 m.
The following materials are needed for the foundation:
- concrete, sand, crushed stone;
- formwork;
- reinforcing rods.
Any house begins with preparing the foundation Source penza-press.ru
The trench is filled with sand and crushed stone, and a mesh is laid with rods to reinforce the foundation. It is recommended to use tying wire rather than welding to connect the rods. The formwork is laid out, and then everything is filled with concrete. To make concrete mortar, cement, sand and crushed stone are used - all components are thoroughly mixed. The ratio of materials is 1:3:4, cement grade is at least 400. The foundation stands for about 2 weeks.
Wall thickness requirements
The choice of timber thickness for wall construction depends on the minimum temperature and climate that will surround the building:
- for cold regions where the temperature drops to -40 degrees, elements at least 18*18 cm thick are suitable;
- at -30 degrees, the dimensions of the timber should not be less than 15*15 cm;
- for partitions and non-load-bearing walls, elements of 10*10 and 10*15 cm are used.
You can buy timber of the required thickness right away or create it yourself and cut off the excess using a saw. The cut part is called a slab and is used in the construction of roofs, attic floors and other parts of the building.
Main stages
When assembling a house, you must remember about its shrinkage. This rule is especially true if the construction is carried out using the technology of installing natural humidity units. Shrinkage will be approximately 15 cm if a material of natural moisture is used. The dried log house shrinks to about 9 cm. The assembly is divided into several stages.
At the first stage, a project is drawn up, then the foundation is built. The main stage is the assembly of the log house. The final work is the installation of the roof. After shrinkage, external and internal work is carried out.
Noise and sound insulation technology
Wood is not the best material to protect a house from unnecessary sounds from the street. The first thing that owners of houses made of timber do is create reliable sound insulation so as not to hear everything on the second floor that is happening on the first floor.
There are several ways to create reliable sound protection:
- Finishing . Any additional material on the wall creates noise protection. There are special finishes that help increase the benefits of the coating. One of them is natural cork, which supports the concept of environmentally friendly construction. Drywall is considered optimal - an inexpensive, functional and corrosion-resistant material.
- Special soundproofing materials . The main one is high-density mineral wool. It is inserted between the elements for insulation, laid over the wall overlapping, and secured with a construction stapler. To ensure that the wall surface remains straight and the material does not roll off under gravity, a frame made of thin timber is used.
- Roll sound insulation . If there is a task to preserve maximum working space, roll material will be the optimal solution. The thickness of the polymer coating can be only 3 mm, and it will also become an additional waterproofing layer. The vinyl noise block is attached to a frame made of thin timber.
When creating soundproofing walls, you need to follow 2 rules: the material must be attached to the wall tightly, leaving no space for sound penetration and, if necessary, combine materials to create several layers.
Work is usually carried out inside the house . In critical cases, on both sides of the wall.
Using dowels as a connection
Self-assembly of a house from profiled timber is accompanied by the use of dowels. They are spikes and pins for fastening structural elements. The products are oblong in shape and have a round or square cross-section.
The base can be: plastic; metal; wood. If the walls are assembled from profiled timber, then wooden dowels are better than others. This fastening is used when the moisture content of the timber is more than 20%. This is done so that when the material dries, it does not deform and cracks do not form between the rims. The dowel will work on bending and will not allow the beam to bend.
Hydro- and vapor barrier
Steam and waterproofing is carried out for all wooden houses due to the characteristics of the material.
Wood is hygroscopic, quickly absorbs moisture and swells. Waterproofing is laid on top of the insulation before the final finishing layer.
You can prevent unpleasant consequences from moisture penetration with the following materials:
- Single-layer polyethylene film . Suitable for partitions, thin, but inexpensive and easy to install.
- Reinforced polyethylene or propylene film . Double-layer material, durable, but can create a greenhouse effect. Not the best option for residential buildings.
- Vapor barrier membrane . There are several classes for interior and exterior decoration, durable, ventilated, but the price is much more expensive than competitors. There are 2 main types: anti-condensation and foil (they retain heat better).
- Izospan . Strong, durable vapor barrier, but not ventilated.
The vapor and waterproofing is fixed with tape or a construction stapler to the frame holding the insulation.
There are 3 more ways to carry out waterproofing:
- Coating . This is done using bitumen mastic. The timber is cleared of small debris and snags. Afterwards it is treated with a primer and covered with mastic. After complete drying, insulate or apply finishing material.
- Coloring . The most technically simple way. For implementation, special liquid polymer-based compositions are used.
- Impregnation . Suitable for those who want to keep the appearance of the timber as it is, without finishing. As an option, liquid glass is used. The composition fills microcracks in the wood, creating a reliable transparent layer that prevents moisture penetration.
When applying film vapor and waterproofing, it is necessary to create high-quality ventilation in the building. Otherwise, there is a risk of condensation and damage to the finishing material.
Main advantages
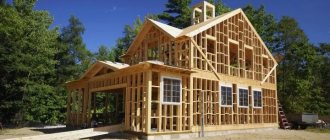
The first main advantage of a timber house is the same as that of all wooden ones: the foundation for it can be of a lightweight type - columnar, pile, non-buried strip, insulated slab (Swedish slab). It’s clear why: wooden buildings are lighter than stone ones and more resilient.
The next factor is that timber construction technology does not actually require technological interruptions. More precisely, it does not require “deaf” breaks, when the building must simply stand still and nothing can be done there. That you can move into a log house right away is, of course, nonsense. But, firstly, it will take a year for complete shrinkage, while a brick one needs 2-3. Secondly, while the log house is settling, a lot of things can be done in it that you won’t have to do later, see below.
Other main advantages of houses made of solid wood (cut and prefabricated beams, see below) are due to the ratio of the heat capacity of wood to its thermal conductivity. In modern climatic conditions - global warming and the increasing frequency of abnormal, warm and cold winters - it turns out to be optimal from the point of view of heating engineering. For brick and stone, this ratio is too high, and for aerated concrete, insulated frame and composite structures (SIP panels, etc.) it is small.
What does this look like in practice? An adult at rest emits approx. 60 W heat. A family of 5 people, not all the time lounging in a chair - ok. 350 W. Lighting, household appliances, and heat generation during cooking in the kitchen also provide, on average, 700-1200 watts per day. Roughly speaking, the house consistently produces approximately 1.3 kW of waste heat. In a brick building, not to mention a concrete one, this heat will go uselessly into the walls, and from there outside. In aerated concrete or composite, it will have to be released into the ventilation or through a window, otherwise it will become hot. And in a wooden one it will be evenly distributed in time and space.
With intensive combustion, such an addition is unnoticeable, but when the boiler operates almost “on guard,” the fuel savings are quite noticeable. True, in pyrolysis and solid fuel combustion boilers the efficiency drops sharply in this mode, but in gas and surface combustion boilers this effect is weakly expressed. As for stove heating, it becomes possible to reduce the number of firings per day without reducing the fuel load to a value at which the efficiency of the stove decreases. The advantages of a log house for stove heating are especially clear if the stove has 2 modes, “spring/autumn - winter”.
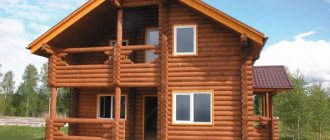
The next advantage of timber/log houses is related to the previous one: the mechanical properties and geometry of wood properly prepared for construction do not deteriorate from periodic freezing/warming, unless the tree is drenched with moisture to a drip. The reason is the very thin pores in it. Water in ultra-narrow capillaries freezes at a temperature much below 0, but only becomes viscous. That is why winter animals survive under snow, and small animals overwinter in frozen soil or under the bark of trees. The walls of a brick and aerated concrete house, if it has to be heated at minimum for 2-3 years in a row, can become damp and after another 3-5 seasons begin to crumble. The thermal insulation of the frame wall from the “underflow” also becomes damp; composite panels delaminate. But a wooden house can be left unheated as many times as you like, and after the fire starts, it will warm up in 2-4 hours, and not in 2-3 days, like a stone one. In the Russian outback you can find wooden log houses abandoned to the mercy of fate 50-100 years ago. Many of them can be moved into after renovation.
Note: a log is a round beam, and the construction techniques for timber and log houses are very similar. Therefore, further the log is considered on an equal basis with the timber, specifically stipulating what is being discussed only if there is a difference in relation to a given moment.
Construction technology
The seams in timber walls are straight and horizontal, unlike in log buildings. There are 2 main ways in which timber is laid out:
- “in the area” – the remainder of the material remains at the edges;
- “in the paw” - without a trace.
Thermal insulation material is laid in the seams . They can be tow, felt or mineral wool. Afterwards, the outer walls are caulked and covered with paint or other finishing material. Internal and external walls are erected simultaneously.
Cladding is carried out only after complete shrinkage of the walls.
Brief instructions for assembling a wall from timber:
- Rolled waterproofing is laid between the first row of the wall and the plinth. A board is placed on top of it and soaked in mastic. A layer of tow is placed on top of it, followed by another layer of waterproofing to prevent possible rotting of the timber due to moisture in the base.
- The bars are laid with bandaging in the corners. Elements of the internal and external walls can have different lengths. The corners of the first row (crown) are connected using the “half-tree” method.
- The corners of the remaining rows are connected by ligating with a root tenon. A groove is made for it, the element is driven tightly inside, secured with a dowel (made of metal or wood) with the current and subsequent crowns.
- The connection between the internal walls and the main walls is made using tenons and dowels. Installation is carried out in a groove created using an electric saw.
- Window and door openings are also created using a saw.
Assembly by connecting to the main tenon is considered one of the most difficult, but it creates a windproof corner. The joints turn out warm and smooth, however, everything has to be cut out by hand, so the process is long and expensive. Pays off in savings on heating costs.
You will find more information about the construction of timber walls here.
Insulation
Used to protect your home from cold winds:
- Hanging materials: mineral wool, polystyrene foam, polystyrene foam . For installation on the wall, a frame is created, the insulation is attached in layers to brackets or plate-shaped dowels. The wall is covered with finishing materials.
- Polyurethane foam spraying . Installation is carried out using special equipment. The material adheres well to the surface and is environmentally friendly.
Features of insulating walls made of timber:
- work begins after the house has completely settled;
- before starting insulation, it is necessary to repair all cracks, strengthen the seams, and treat the surface against fungus;
- The thermal insulation material must be combined with the wood from which the timber is made.
A correctly carried out insulation procedure allows you to save a decent amount on heating the house during further operation.
The process of insulating timber walls is shown in the video:
More information about insulating walls made of timber is described in our material.
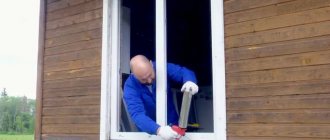
Rules for forming openings
It is most convenient to create door and window openings on a completely finished wall with insulation and waterproofing. Procedure :
- Using a laser level, mark the future opening, taking into account the size of the door/window + framing that will strengthen the structure.
- Using a regular saw, cut through the top layer, remove all excess down to the timber (insulation, frame).
- Use an electric saw to cut the required opening. To strengthen the inside of the building, they make a frame - decorating the doorway with timber around the perimeter.
Openings in contact with the street require additional insulation. To do this, before installing the frame, a groove is cut inside it around the perimeter, insulation is laid, and only after that the reinforcing material is laid.
Fastening timber: tool
Connecting timber is not the most difficult and difficult task. But you should prepare. To do this you will need:
A measuring tool (tape measure, carpenter's corner, level) and a pencil, with their help the marking of the forming surfaces of the fastening is carried out.
Saw, possibly a hand saw
or chain with electric drive,
but it is better to use a mechanism with a gasoline engine;
Hammer, drill and screwdriver.
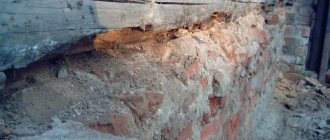
About cracks and the reasons for their appearance
Cracks in timber are rare, but trouble can appear already in the first year of operation and even during the shrinkage process. There are several main reasons that lead to material damage :
- Huge pressure . Incorrect calculations in the project, thickness or wood that is not able to withstand high pressure lead to the appearance of cracks.
- Poor quality timber . If the material is poorly dried and a wall is built from it, during the natural drying process the outer layer will begin to shrink. Under pressure a defect will appear.
- Incorrect installation . The appearance of cracks is caused by the lack of compensation gaps when forming openings or by improper connection of elements in the wall.
- Premature exploitation . Before heating the house for the first time, at least 12 months must pass so that the walls have time to shrink. Otherwise, the material cannot withstand temperatures and cracks.
You can remove the crack with a mixture of PVA glue and sawdust, use a special sealant or caulk it.
You will learn about cracks and how to combat them in this article.
Design
To build a timber residential building, an approved project is required. Minimizing design costs will also result in significant savings in overall costs. Standard projects are the cheapest, and more or less reputable contractors do not charge a separate fee for their own. But it is not always possible to fit into the “type”, either due to one’s own needs or local conditions. In this case, computer construction design programs will help. There are several of these, aimed at private log houses:
- VisiCon – interior design and planning, designed for amateurs. We need to start with it. If everything you want in the house fits into a “standard box”, then is it worth straining your wallet, yourself and people’s heads?
- FloorPlan 3D + House-3D, for facades and stairs - will allow a non-professional, right down to the user, to get a sketch from which the designer will understand exactly what the customer wants. This will reduce the cost of consulting with specialists and finalizing the project.
- CyberMotion 3D-Designer is a semi-pro software, designed for a user who can read technical documentation and is superficially familiar with computer-aided design systems (CAD, CAD). After using this software correctly, the specialist will only have to check the project and submit it for approval.
- Total 3DHome Design Deluxe, HomePlan Pro, Xilinx Planahead are professional products. If you have already designed houses yourself, here you have at your disposal extensive sets of templates, a database of technical and architectural solutions.
The SEMA software deserves special attention - a complete software package for designing timber and frame houses. Even a beginner can master it, but the result is:
- General layout and premises.
- Determination of the dimensions of surfaces and openings along the axes.
- Weight distribution is the determination of the centers of gravity of all structural elements, which will greatly simplify the work of the designer, and will give the customer serious reasons to demand a discount on the project.
- Layout of the rafter system for the selected roof, calculation of the sheathing and roofing pie. The effect is the same as before. case.
Particularly valuable to the developer directly at SEMA is planking - a full calculation of timber for building a house:
- Layout in rows along the axes.
- House kit cards.
- Summary material sheet with specifications of all elements.
- Schemes for laying out timber along the crowns.
Having an accurate layout, you can, firstly, while the papers are wandering through the authorities, reduce the estimate for construction and calculate your capabilities according to it. Secondly, find a supplier, select and order the material in real life. Thirdly, for screeding, you can purchase materials in parts as needed, rather than shelling out the entire amount at once.
About processing rules
Treatment of timber is done to protect the material from dirt, rot, damage, precipitation and humidity. Several technologies are used for these purposes:
Antiseptic .
The walls are treated with a special compound that prevents the appearance and spread of microorganisms and protects against insects. Non-profiled construction timber can be completely immersed in antiseptic. It is enough to process the glued one only on the outside.- Coloring . It is carried out at the final stages of construction. The paint changes shade and protects from the sun and moisture. In this case, the texture of the wood can be preserved (this type of coating is called glazing) or not (covering coating).
- Complex processing . Combines coloring and antiseptic. It turns out to be more profitable economically.
After the house is ready, the walls are checked according to the following rules:
- Humidity measurement. Optimal limits are 12-15%.
- First sanding. It is carried out to remove excess elements and prepares the surface for rapid penetration of the antiseptic.
- Applying an antiseptic if it will be used separately from the paint.
- Padding. It is carried out to prepare the timber for painting. For external walls, paint with an antiseptic is used, applied in a thin layer.
- Re-sanding. Removes excess particles remaining after priming.
- Painting in several layers, depending on the type of paint.
- Sealing joints using the technology indicated on the packaging of the selected sealant.
Painting a house made of timber is carried out within 3-6 months after construction. The process is recommended to be carried out at an air temperature of at least 15 degrees.
Find out how and with what to treat timber walls from this article.
Calculation of materials and construction costs
Before starting calculations, you will need to clarify the parameters of the future structure , the type and size of the timber that will be used. To calculate the amount of timber per 1 cubic meter. m will need:
- Calculate the perimeter of the building.
- Multiply the perimeter and height of the walls.
- Multiply the resulting product by the thickness of the timber.
Next, we find out how many units of elements are in one cubic meter:
V=H*B*L , where
- H and B thickness and height of timber,
- L is its length.
To determine the number of elements in one beam, divide one by the resulting product.
Ready calculation of the amount of timber per 1 cubic meter. with a length of 6 m.
| Section size + beam length (cm*cm*cm) | Quantity per 1 cubic meter |
| 10*10*600 | 16,7 |
| 10*15*600 | 11,1 |
| 15*15*600 | 7,4 |
| 10*15*600 | 8,3 |
| 15*20*600 | 5,6 |
| 20*20*600 | 4,2 |
The approximate cost of building from laminated veneer lumber without finishing is 6,500 rubles/sq.m. With finishing – 8500 rub./sq.m.
For turnkey construction, a small building up to 100 sq.m costs 500-700 thousand rubles. box without decoration. A finished house with finishing of more than 100 sq.m – 2.5-3.5 million rubles.
Read about calculating the cost of a house made of timber here.
Recommendations for using dowels
If you decide to use dowels as fasteners, you can use some tips that will simplify the work. No more than two beams should be connected to each other.
The pins are arranged in a checkerboard pattern. The step between them should not be more than 1,500 mm. The dowels should have approximately the same moisture content as the timber. Holes for installing fasteners are drilled vertically at 1.5 beams. The diameter of the holes can be 1 mm larger than the diameter of the fasteners.
It is better if this parameter is the same. The dowel is hammered in with a mallet and recessed into the beam. When assembling a house from profiled timber, you should choose dowels whose length will be 30 mm less than the length of the hole. This requirement is due to shrinkage compensation.
Pros and cons of use
The advantages include:
- optimal vapor permeability;
- Absolutely environmentally friendly, harmless to health;
- excellent thermal insulation;
- lightness, minimum load on the foundation;
- durability;
- aesthetics;
- strength;
- availability.
Flaws:
- noticeable shrinkage after completion of construction;
- difficulties when finishing “wet” rooms (bathroom, kitchen);
- the likelihood of resins;
- the need for treatment against the appearance of microorganisms, the possibility of attack by insects and rodents;
- poor fire resistance.
Read more about the pros and cons of houses made of timber here.
Dismantling: how to disassemble?
Dismantling of timber walls is required when the building has served its purpose and it is time to replace it with a new one, as well as when the material is critically damaged. The process is not easy and can become dangerous if done incorrectly. Main methods :
- Manual . Suitable for small buildings, you can save part of the walls for later use.
- Automated . Recommended for large buildings, it helps to carry out work quickly and safely.
- Combined . Suitable for cases where accuracy is needed and some material needs to be preserved.
Before starting work on dismantling the entire building, you will need to obtain permission, draw up a demolition project and coordinate it with the responsible authorities. After dismantling, a demolition report is drawn up and submitted to the authorities.
According to the rules, the roof is dismantled first, then the floor beams and sheathing. Then the timber itself is disassembled.
If the house is located in a place that is difficult for machinery to reach, it is necessary to carry out work with the assistance of specialists and manual equipment. It is dangerous to disassemble the timber yourself, since the structure could have become dilapidated during use and there is a risk of collapse.