Analysis of the condition of a wooden building
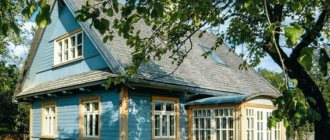
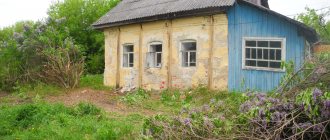
You will often come across advertisements that a wooden house is for sale. Most of these buildings are over fifty years old. That is, buildings from the 50-70s of the last century. In those years there was a shortage of building materials, so people built houses from wood.
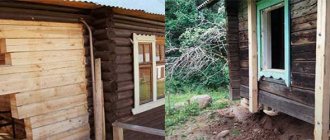
The age of the house is, of course, an issue. Just don't panic in advance. Even when, upon visual inspection, the building seems dilapidated and falling apart before your eyes. Sometimes behind the appearance there is a strong frame that will last for many more decades.
This refers to log buildings. Logs are a reliable and durable material. And if the log house was made with high quality, from good logs, then its restoration will extend the life of the house for many years.
Therefore, advice to buyers! When buying, you need to come to the site, inspect the house, find all the problem areas. If there are a lot of them, then you should not invest in such real estate. Perhaps only into the ground for a new building.
A wooden house has its own specificity, with significant details. Here are the points you need to pay attention to if you decide to buy an old wooden house:
- arrangement and appearance of the foundation;
- the condition of the walls, what damage is there;
- condition of the crown logs;
- integrity of doors and windows, their quality;
- interfloor ceilings, attics - their condition and reliability;
- roof integrity;
- condition of the floor and ceiling;
- the presence and appearance of the porch;
- the presence and functioning of communications inside the house.
When inspecting a house, they pay attention to all the details, but without getting hung up on the little things. There is no need to “cry” that the wallpaper is torn or the paint on the windows is cracked. You will change this anyway. But it’s worth checking the condition of each rafter board in the attic. To understand what kind of roofing work awaits you.
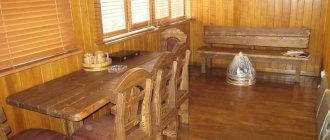
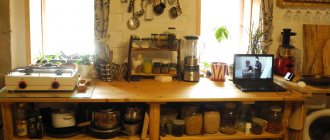
A little cheating in the interior
The family received almost all the furniture for free or practically free of charge: the doors and laminate flooring were left over from the sister after the renovation, an old chair was pulled from the balcony, where it had been collecting dust for years without use, something was found at a flea market and put in order.
Twin beds were once a bunk structure. The man simply sawed it and nailed the legs.
A solid wood double bed made to order from a village craftsman. It cost only 100 rubles.
The kitchen was made from MDF by a neighbor carpenter from Zarechan. Cost about 400 rubles.
The table was left over from the previous owners - it just needed to be cleaned and painted. Covered with a tablecloth, he looks completely fine.
We also got the interior doors almost free of charge; we only had to spend money on a metal entrance door and plastic windows.
As an example of prices for PVC windows for the home, here is the price list of the company Window Factory (Vindal), a link to their website.
Price per m2, excluding installation
Single-leaf window - from 6,700 rubles. Double-leaf window - from RUB 8,900. Three-leaf window - from 10,700 rubles. Balcony block - from RUB 15,700.
The paintings were painted with my own hands, all textiles were purchased at discounts and in inexpensive stores.
The guys also spent about $2 thousand on interior work. Of course, if it weren’t for the furniture donated by relatives and personal supplies of the owners, the amount could have increased significantly, but many people have such belongings. In addition, the flea market, where such interior items are often sold for next to nothing, exists for a reason.
Preparation for repair work
Even cosmetic repairs begin with preparation. When renovating an old wooden house, preparation is even more necessary.
First of all, they evaluate how worn out the building is, determine the scale of work, the urgency of completion and financial expenses. Preparation for repair (but this is conditional) is divided into the following stages:
- Freeing the house from unnecessary objects, things, garbage.
- It is advisable that all parts of a wooden building be inspected by specialists for the presence of rotting. If a tree rots (even when there is the slightest sign of rot), then urgent action is taken. Sometimes you need to change logs by carefully removing them from the building structure. New logs are laid in their place, protected with roofing felt.
- In the house itself, the walls and ceiling are inspected, cracks are identified and they are repaired. When sealing, special antiseptics are used.
- The floor is being inspected. Usually in old buildings the floors are already rotten and require dismantling.
After the inspection, a plan is drawn up in detail and, of course, an estimate.
Tools and materials
To put the walls in order, repair and restoration work can be divided into 3 stages :
- diagnostics;
- replacing old logs, removing cracks, etc.;
- redecorating.
At the initial stage, the master will need:
- change of clothes;
- respirator for working with loose substances, chemicals and fungus;
- a chisel and hammer to check the degree of rot of the logs;
- a candle for finding cracks and detecting drafts in the house.
When all the defects have been identified and a work plan has been outlined, it is necessary to begin with large-scale work on the restoration of log walls. For this you will need :
- materials for insulation of walls, floors, ceilings;
- hydro- and vapor barrier material;
- stapler;
- a screw jack with a lifting capacity of at least 10 tons for raising a house;
- scrap;
- axe;
- sledgehammer;
- chainsaw;
- chisel;
- roulette;
- a wheelbarrow for garbage removal and a shovel.
The last few tools are necessary if the lower ring is replaced completely or partially. If such work is not necessary, then after removing the old insulation, the wood must be treated before starting to seal the cracks.
What you will need :
- a grinder or grinder with a special attachment;
- brush for removing dust and dirt in large crevices;
- bleach to remove fungus and blue stains;
- antiseptics;
- fire-resistant mixtures;
- foamed polyethylene cord;
- tow;
- acrylic sealant;
- metal spatula;
- brushes or sprayers for applying chemicals;
- water;
- dry rags;
- primer;
- paint or varnish.
At the last stage, when all the cracks are sealed and the logs are processed and restored, you can move on to the final stage - painting the walls inside and out or varnishing them.
Stages of repair work
Repair of a wooden house is carried out in stages:
- completely change or repair the foundation;
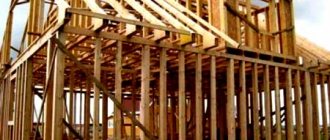
- restore or erect a new rafter system and cover the roof;
- replace communications if necessary, change plumbing;
- install new windows and doors;
- dismantle the rotten floor and lay a new one;
- make external cladding;
- carrying out renovations inside the house.
Restoring the foundation of the building
All owners of private houses know the importance of a reliable foundation. The durability of the house depends on the condition of the foundation. It is obvious that you received the foundation of the old building in poor condition. It is also possible that the house was built without it at all.
Therefore, the primary repair work will be to restore the foundation.
Without repairing the foundation, there is no point in carrying out other work and investing in it. A building with a damaged foundation will not last long and may collapse at any time.
To restore the foundation, in most cases it will be necessary to raise the entire house. To do this, strong beams are placed under the building box using several jacks.
Important! Before lifting the house, it is necessary to inspect it in detail. This applies to parts of the walls, which often have to be dismantled before starting repairs due to emergency areas.
If the foundation has only sunk or cracked, it is restored with concrete mortar. To do this, install the formwork, fill it with concrete, always adding a reinforced belt of metal rods.
If the base is partially destroyed, it is restored using stone, brick or cinder block.
When there has been no foundation since the “birth of the house” or it has been completely destroyed, then the foundation will need to be rebuilt.
If the house is medium in size, then the best option would be piles as a foundation. To distribute the load-bearing weight of the building onto the foundation, a strip foundation is erected between the piles, but only at a shallow level.
A new or renewed foundation definitely needs to stand. And only after the concrete has completely hardened, which is 25-28 days, the house is lowered and restoration work continues.
Stages of reconstruction
When reconstructing a house, it is very important to identify all the weak points of the building and carry out the construction work correctly, but it is equally important to do everything correctly from the point of view of the law and paperwork.
The reconstruction of a private house takes place in several stages:
- technical expertise to assess the condition of the house and determine the necessary reconstruction measures;
- development of a reconstruction project, drawing up an estimate;
- strengthening the foundation, its complete replacement;
- wall repair;
- redevelopment of the premises if necessary, completion of floors;
- roof renewal;
- replacement of utilities;
- facade works.
Roofing repair work
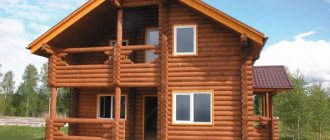
The roof of an old house will most likely need to be completely redone. After all, the building lasted 40-100 years and the roofing material, in any case, lost its characteristics.
Today, building material manufacturers offer a wide selection of roofing materials. Before starting work, you should thoroughly study each modern roofing material and make a choice.
The choice of building material is influenced by the type of roof. Most often it is pitched. Residential buildings are rarely equipped with a flat roof due to the impossibility of creating an attic. It is used both as a utility room and as ventilation for the house.
Therefore, if an attic is needed, then a sloping or gable roof is erected.
If the building is one floor, then a high roof is built. This design will give the building solidity. And the height increases the performance of the roof. When it rains or snows, moisture will not linger on the roof.
Roof Repair Steps
:
- The old covering is removed and damaged rafters are dismantled.
- Rotten elements of the rafter system are replaced with new ones or completely new rafters are erected.
- Wooden parts are treated with pest control.
- Install new covering.
The attic will not be damp if the roof is hydro- and thermally insulated. To do this, perform the following work:
- Foam or mineral wool is laid between the covering and the rafters.
- The lining is carried out using lining.
- Expanded polystyrene is laid in two layers on the attic floor. It is important that the sheets fit end to end, but do not lie on top of each other at the joints.
- Expanded clay is poured onto polystyrene foam. The backfill layer should be 20 cm.
Several recommendations on how to improve the performance properties of the roof:
- When replacing the roof, gutters are also installed. It is important to place them from the foundation at a distance of two to three meters. Otherwise, rainwater will flood the foundation, and this will negatively affect the condition of the foundation.
- If, during an inspection of the attic, bark beetles or traces of their vital activity are found in the beam, then the damaged parts are replaced with new ones. The beam is cut out and a new log is laid in the vacant space.
Sometimes the roof frame also has to be replaced. All roofing repair work is carried out in dry, warm weather.
Roof repair
The roof of the old building will probably have to be completely redone. It doesn’t matter what it was covered with, if the building has served for half a century or more, the material is guaranteed to have lost its properties. The best repair option, unless we are talking about the restoration of a wooden house that has historical value, would be a complete replacement of the roof using modern roofing materials.
You can work on the roof only after the issues of foundation reliability have been resolved and the load-bearing walls have been completely restored. The work should begin by climbing into the attic and checking the condition of the rafters and sheathing. These structural elements do not experience excessive loads, but if the roof leaks, moisture could render them unusable.
Replacement of windows and doors
We can say with 100% certainty that windows and doors in an old wooden house must be replaced. Over the years of long service they have fallen into disrepair. Moreover, modern window sizes are completely different, and the owner will want to get a new appearance for the building.
To ensure that replacing doors in a house does not lead to distortions, it is important to carry out such construction work by professionals.
You can avoid distortion if, before installing the doors, the door frame is dismantled and the walls are leveled. The door frame is then reassembled (often using new materials) and pushed into place.
All cracks must be treated with polyurethane foam. Which doors to choose is up to the owner of the building, taking into account his wishes and finances.
When it comes to replacing windows, plastic window models are often installed. High-quality windows have high thermal insulation qualities. They are easy to use and durable. The installation is usually carried out by a team from the company where the windows themselves were ordered.
Many owners of wooden buildings also install wooden windows. The choice of such windows must be taken responsibly. Poorly processed frames will reduce the service life of windows. If you still decide to go with the classics and don’t know which wooden windows to choose, then by clicking you will be taken to a useful resource dedicated to window products.
Remaking windows is not particularly difficult. Especially if the owner knows how to work with a saw. Then the house with updated windows will undoubtedly take on a modern look.
Restoration of vaulted windows in a private house
The window openings gave a special touch to our home. White plastered window sills, very wide - 60 centimeters, brick vaults - it was beautiful in its laconicism and simplicity, nothing superfluous. We really wanted to preserve this ascetic charm.
When they began to remove the old plaster, the window sills collapsed, one of the vaults miraculously did not collapse, some bricks in the masonry were loose, and huge cracks appeared.
Cleaning windows
After a moment of despair, a list of tasks for window restoration was compiled:
- Fill the window sills with concrete mortar (with the addition of bricks and metal reinforcement)
- Fill deep cracks in openings with a solution of sawdust concrete. Sawdust was added to make the mixture lighter and give less load on the support
- To strengthen the vaults, insert wooden boxes into the window openings. This way we gave support to the fragile vaults and created a level base for installing the frame with double-glazed windows
- Make window frames. To do this, we used timber for the door frame; the choice fell on it because the required groove for the double-glazed window was selected there, this simplified the task. Double-glazed windows were made to order, single-chamber, according to our non-standard sizes
Window boxes inserted
Window. Inside view
Floor installation and laying
The floor covering is usually laid on a concrete screed. To create it, you will have to dismantle the logs and clear the room of debris and building materials.
The concrete screed is laid in this way:
- a layer of sand or small crushed stone is poured onto the bottom;
- an insulating film is laid on top;
- then a layer of concrete mortar is poured.
Be sure to level the screed. For the concrete to dry, it will take up to one month at a temperature of + 20 degrees.
✦ We recommend that you read: Laying and installing warm electric floors under tiles - an expert shares tips
When the concrete has dried, they begin laying the flooring. The choice of material is large, although laminate is more often used. It is laid on a cork base. A gap of about 1 cm is left near the walls for the plinth.
If a board is laid as a floor covering, then screed is not performed. The boards are nailed to the joists. To prevent moisture from forming under the floor, a 20-centimeter layer of expanded clay is poured under the joists. Such backfilling is required when logs are installed on the ground.
After laying the boards on the joists, they go over the board with a sanding machine.
Major renovation of the house facade
The types and sequence of operations for repairing a façade structure depend entirely on its type. The repair includes operations such as cleaning the surface of the walls and drying them. For exterior decoration, you can use siding or other finishing materials. These structures not only strengthen the facade, but significantly improve the appearance of the house as a whole.
Repair work on walls
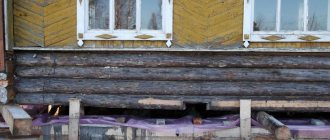
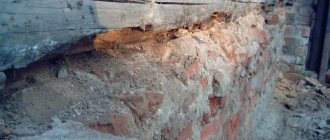
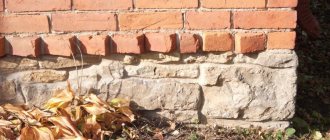
Often the most vulnerable part of the wall are the crown logs. Cracks are more likely to form in them. In the lower part of the building, wood is most exposed to dampness. As a result, the tree begins to rot and lose its quality. As a result, damaged logs often break under the weight of the structure. If during the examination the condition of the lower logs caused concern among specialists, then they should be replaced.
There are two options for developing repair work with walls. The first option is to literally completely dismantle the building, replace the lower timbers and reassemble it. This option will take a lot of effort and time. But there are advantages to such repairs: you don’t need to hire special equipment for the work. Also, during disassembly, the remaining parts of the house are checked and, if necessary, damaged elements are replaced with new material.
The second option will take less time, but the work will require special equipment and skills. In this case, during the construction or reconstruction of the foundation, the rotted crowns are replaced. When the house is raised, they install piles or strip foundations and remove rotten logs.
A new crown is placed on the new dried base and the building box is lowered on top.
Advice! There is no need to save when choosing material for the crown. Choose durable and reliable wood species.
Larch is perfect for a crown. Its wood is resistant to moisture and is durable, although difficult to process.
Insect-infested logs are also replaced. When the house is completely disassembled, the logs are replaced during assembly. If the building is being repaired without dismantling it, then use a chainsaw to cut out damaged logs. They cut at an angle - this ensures the reliability of subsequent fastening and simplifies the work.
The cost of the master's work
For each individual job, construction companies set their own price, for example:
The price for replacing the lower crowns costs approximately 1,500 rubles. for 1 linear meter excluding the cost of material.- Grinding of rounded logs costs 250 rubles per 1 m2, chopped logs – 340 rubles, ends – 340 rubles. separately.
- Painting walls for rounded and chopped logs costs the same - from 1300 rub./m2 with an oil composition, from 1780 rub./m2 with a glossy agent and from 1400 rub./m2 for covering paint. Indoor painting is estimated from 600 rubles/m2 for the most simple, watery paint and up to 2500 rubles/m2 for expensive, glossy paint.
- Applying an antiseptic is the most inexpensive service, excluding the cost of materials; you can carry out bioprotection starting from 50 rubles/m2 for processing grooves during assembly and treating walls for an amount starting from 120 rubles/m2.
Exterior decoration of the house
If rotten crowns are found, then, as already mentioned, they must be replaced. If minor damage is detected, repairs are carried out without replacing the logs. These areas are thoroughly cleaned, treated with an antiseptic and sealed with sealant.
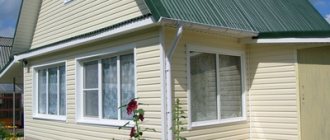
To make an old wooden house stylish and modern, it is lined with siding or facing bricks.
For example, siding is installed like this:
- Brackets are attached to the logs.
- Install vertical beams on all walls.
- Mineral wool (or other heat insulator) and an insulating film are placed in the resulting space between the timber and the wall.
- The timber sheathing is covered with siding.
You can use brick as exterior decoration. Then the house will have a more respectable appearance. And brick increases thermal insulation performance. Cladding work is carried out as follows:
- The building is treated twice with an antifungal drug. A daily interval is maintained between treatments.
- For brickwork you will need a foundation, the width of which is 25-30 cm. Only such a foundation, a blind area, will not be suitable, since it is not designed for brick loads.
- To isolate the foundation from the brick, roofing felt is used. Some builders recommend laying roofing felt in two layers.
- The next stage is insulating the walls. Sheet heat insulation is most often used. Expanded clay backfill is rarely used for insulation. It is not recommended to insulate walls with roofing felt, but when used, cover the walls with two layers of material. The second layer covers the joints of the first.
- Then the base is laid and the next step is laying the brick.
Reconstruction of an old house: crowns
The lower crowns of wooden houses rot, gradually becoming saturated with moisture through the foundation. This occurs both due to the lack of a waterproofing layer and due to technology violations. Several forum members, including val-lel, encountered a strange method of protecting a log from water.
val-lelFORUMHOUSE Member
My log house was built in the 50s; on the foundation strip there was just waterproofing between the log and the base, but! Along the first crown, the edges of this waterproofing were raised and attached to the log itself, and the segment between the foundation and the crown, with the edges of the waterproofing neatly nailed to it, was “carefully spanked” with cement mortar along the entire first crown, both outside the frame and inside, apparently so that the log does not move anywhere.
Replacement of crowns is usually carried out together with foundation work, when hanging the box. If possible, materials are used that are as close as possible to the original ones - logs or timber, some replace rotten parts with brickwork. Arty-CooL used the sleepers.
Arty-CooL
I installed the sleepers because I got them for free, and it’s easier to work with them (even though I didn’t do it), under the weight of the house they won’t go anywhere, and I’ll install galvanized studs into the foundation, and I’ll put the house on them. The cost of concrete by volume of sleepers will definitely be more expensive.
When choosing a material for replacing the crowns, they mainly start from the intended finishing layer - even the brick can be hidden under the siding. If you plan to leave the walls in their original form, the new segments should be as close as possible to the existing ones.
Waterproofing must be laid between the foundation and the new crowns, and the wood is pre-treated with an antiseptic.
Interior decoration of a wooden house
Finishing the inside of the building involves repairing the walls. Before work, they are cleared of debris and nails. Next, they make sheathing on the walls from thin slabs or thin boards.
To create a smooth surface, sometimes you have to cut out individual, interfering parts of the log. Fiberboard sheets are mounted on the sheathing and all gaps are sealed.
If there is no particular damage to the interior walls, they are painted or varnished.
If the joints have been puttied, then after drying they are sanded. Further renovation of the premises is carried out taking into account the desires and capabilities of the owner of the house.
The walls are either painted, covered with decorative plaster, or covered with wallpaper. Any of these materials does not require regular special treatment, unlike wood.
If desired, the walls are left in the form of logs. You just need to keep in mind that they need to be treated with special means. And the treatment should be carried out once a year.
Renovating old walls is carried out in this way:
- old finishes are removed from the walls;
- the entire surface of the walls is treated with sandpaper;
- then the walls are coated with several layers of yacht varnish.
You can also use plasterboard as interior decoration. In addition to it, plastic lining, MDF, and self-adhesive are used.
Home renovations begin with non-residential rooms: toilet, bathroom, kitchen. In the listed rooms, the humidity is high, so the floor is often covered with ceramic tiles. The material is resistant to moisture and temperature changes. Many people today install a “warm floor” system in the bathroom and kitchen.
In the bathroom, the walls are covered with plastic panels or covered with tiles. In the bathroom, the upper part of the walls can be covered with wallpaper.
The kitchen is also either painted or wallpapered. To decorate the apron, tiles are used.
In non-residential and residential rooms, many people install suspended or suspended ceilings. A huge selection of colors and textures allows you to implement any interior design ideas on the ceiling.
Before renovation, new plumbing is installed in the rooms.
When choosing the style of interior decoration, take into account the size of the premises, the direction of the world, your own wishes and financial capabilities. For wooden houses, the ideal interior style would be, for example, Russian style or Provence.
Common defects and their causes
Here it is worth considering in detail the most common defects that can be repaired and restored. Some of them can be prevented in the future, and some will have to be eliminated regularly.
Cracking
The most common cause of cracks is temperature changes, which affect the moisture content of the logs.
During shrinkage of a house , a long time must pass before the wood reaches equilibrium moisture content .
This is the average humidity indicator, which can fluctuate, because the tree constantly absorbs moisture, then dries out, this process is constant.
However, if at the shrinkage stage the logs were dried forcibly, for example, the heating system was installed ahead of time or the house was in direct sunlight, large, sometimes through, cracks form in the walls. Rounded logs are more susceptible to this defect than debarked logs, since during the processing process the strongest part of the log, the sapwood, is removed from them.
A crack is considered critical if it runs along the entire log and/or has a thickness of 3-5 mm. Its danger lies in the fact that moisture, debris, and also insects get into it, which destroy the log from the inside.
Read more about cracking logs and what to do about it here.
Skew
This defect occurs in the first year of operation of the building. The following factors can influence the skew of walls :
- no dents under the lower crown;
- absence of window frames and beams supporting cut logs;
- connection of the log house with the stove until shrinkage;
- rotting of the lower crown;
- using nails as fastening;
- pressure on the walls from heavy pieces of furniture that were nailed to the logs.
Also, distortion and deformation of walls occurs due to soil movement and poor-quality foundation. When laying the main crown, it must be checked that it lies horizontally and not at an angle. If this is not done, the entire structure will be skewed to the side. You may not be able to see the bevel with your eyes until it shrinks completely.
Interventional gaps
Gaps between layers and in joints most often form during the shrinkage process .
The reason for this is that there is little pressure on the upper logs. Especially when it comes to gables, on which, in principle, the pressure is minimal. As a result, the lower crowns sag, and the upper ones remain suspended.
Another reason is the use of iron dowels or reinforcement as fastenings. A log often hangs on its corrugated surface.
The dowels must not only be made of wood, but also have the same moisture content as the logs themselves so that shrinkage occurs evenly.
Sometimes inter-crown gaps are not a defect. They can occur temporarily during the shrinkage process until the upper logs are completely dry. It is for this reason that after a year the tow is hammered into the cracks again; this process is mandatory.
Rotting
The wood begins to rot due to the appearance of mold. It settles on a log when conditions for reproduction become favorable. This is almost always increased humidity to 80% or more in combination with heat.
Cases in which rotting of logs develops:
- insufficient ventilation of the room;
- poorly laid insulation that collects condensation;
- the appearance of deep cracks in which moisture accumulates;
- freezing of wood at temperatures below 50 degrees;
- contact with the ground.
It is possible and necessary to stop the rotting that has begun before it spreads further along the log and to neighboring crowns. You can recognize it by dark, sunken spots with a loose structure. A large area affected by mold cannot be saved and must be removed.
Read more about repairing rotten logs here.
Sineva
Blue stain is a fungus that gets into the microfibers of a tree even at the stage of cutting it down .
The customer is already purchasing the contaminated log. After removing the bark, the spores are activated, receiving oxygen. They begin to reproduce when the air temperature increases to +5 and above. Therefore, blueness can often be observed in the spring.
The fungus affects the entire sapwood part, feeding on the starch and sugar of the tree. It is impossible to get it out 100%. But it does not affect the strength of the log, but only worsens the external attractiveness of the house.
Heating a wooden house
Do not be surprised if the only source of heat in an old wooden house is a cracked stove. You will have to install either individual heating or connect to the gas supply. Yes, it's expensive, but it's convenient and safe.
You will need to purchase a boiler, radiators, gas pipes, and spend money on creating a project. But in the end, the housing will be warm, with the ability to independently regulate the temperature in each room.
It happens that there is no centralized gas supply in the village.
In this case, a solid fuel water boiler project or an electric heating project is created.
In a country house, a skillfully laid fireplace is also of great importance. It is both functional and effective. But in a wooden building, open fire is very dangerous. Therefore, only professionals should be involved in the construction of a fireplace.
Floor repair
The old floor of a log house, even one that is expertly made using high-quality materials, will also need to be replaced. Creaky floorboards are less of an evil that can lurk in an old wooden building. Moisture over many years of use has taken its toll; the boards are probably rotten and could break at any moment. The old floor will need to be completely removed. This applies not only to the floorboards, but also to the entire system that supports them.
Before making a new floor, you need to provide maximum protection from moisture. A wooden house is very demanding when it comes to waterproofing. In addition, it is important not to forget to treat the joists and floorboards with an antiseptic during repairs; this will ensure the longevity of the building and protect it from pests.
Wiring and communications inside a wooden building
After restoring or creating a foundation, restoring walls, updating the rafter system and roof, we begin internal communications.
And the first thing they do is wiring. In old houses it is usually aluminum. Of course, the wiring is changed even before the interior decoration of the house. Naturally, the inspection and installation of new wiring should be carried out by an experienced electrician.
Old wiring in a house, and especially in a wooden one, is really a time bomb. Old wiring will not allow you to turn on all the necessary electrical appliances. And at any moment a short circuit can occur, the possible sad consequences of which we will not write here.
If other communications were carried out in the old house, then these are rusty pipes and old plumbing. This needs to be replaced with modern materials and plumbing. If water and sewerage have not been installed, then the new owner will have to deal with communications issues.
During the restoration of wooden buildings, some of the premises can be rebuilt or new ones can be added. For example, equip an attic room or add a bath complex to the house.
Flea market and reconstruction
The owner also did the interior decoration himself; he only had to hire an electrician and a plumber. Marina took care of the decoration: she painted pictures, hung wallpaper, and bought small things in inexpensive Minsk stores.
The room is divided into three rooms: they decided to combine the kitchen with the living room, and the second half of the house was divided into two medium-sized rooms.
The center of attention is a large Russian stove, which serves as a stove, fireplace and heating system. The man did not dare to dismantle the old structure: it was too expensive, and there was not much point in it.
— If we were building from scratch, we would put a potbelly stove or a fireplace stove here. But since it’s difficult to disassemble this bandura and it still works well, I didn’t bother with nonsense and left everything as it was,” the owner shares. — Our biggest dream now is central heating. This would make our life a lot easier. Well, for now as it is...
Another major problem is the lack of a shower and a full toilet. So far we have only installed a dry toilet and a washbasin with a small boiler. I think we’ll bring everything to fruition a little later, but for now we don’t have the strength to do it all.
Mikhail decided to cover the ceilings and part of the walls with OSB boards: not very environmentally friendly, but quick and cheap.
— I also regretted that I also covered the walls with OSB boards. Only later did I realize that it would be much better to use imitation timber: they cost almost the same, but the wood looks much nicer.
Mikhail bought an imitation timber, also with defects, and then simply foamed the holes from the branches and painted the board with white paint.
Replacing logs under windows
Wooden buildings often begin to rot from the crowns under the roof, windows or at the base. Such logs are replaced and crowns are restored in two ways - conventional and underlay.
You should focus on one more nuance of the repair. When at least one log from the crown is replaced, window frames and door frames should be removed. If the log house is deformed, this will not cause damage. After replacing and returning the frame to its place, you need to carefully seal all the cracks.
Danger of moisture in the attic
Scheme of the roof structure of a log house.
We begin our inspection from the roof of the house.
The first thing that should not make you particularly happy or alert is the air humidity. Dry air in the attic of a log house indicates that moisture has not entered here and the entire supporting structure of the roof is in perfect order. But it’s worth being on the safe side: a visual inspection and tapping of the rafters should confirm your hopes.
As a rule, wood structures in the attic of a house should have an almost fresh lumber appearance. There is no direct sunlight here, which is why the wood has this appearance. Moist air in the attic always indicates that moisture is getting in there.
Finding a “weak” place is not at all difficult: darkened rafters, sheathing, insulation, or the appearance of fungus will tell you. If fungus is present, then you will have to reconstruct the entire roof and replace (possibly) part of the ceilings. This procedure is not a simple one, but it cannot be ignored, since such a house will only last a couple of years.
Log house and its walls
Tools needed for work: hammer, building level, chisels, jacks, stepladder.
Next we inspect the walls.
Durable logs have a long sound when struck. The old ones don’t “sound” at all. Yes, even without tapping they are easy to notice by their external differences from the general texture of the log house.
Most often, walls deteriorate at the points of contact between the frame and the foundation or under window openings. They are the ones who have to be replaced. For all proposed work you will need the following tools and materials:
- lumber and round timber; chainsaw; axe; staples; jacks; cement, crushed stone and sand; chisels; hammer; building level; roofing felt; stepladder.
Renovating an antique log house should also begin with the roof, if necessary. However, there is no need to rush to secure the slate or other covering more firmly. When moving the walls during the replacement of the frame wreaths, it is even good if the nails slightly loosely press the slate to the rafters.
Window and door openings
The wall of a log house may have leaky parts of the frame near window or door openings. Here repairs can be carried out much easier. It is enough just to calculate the dimensions of future windows and make window openings according to them, while removing the weak parts.
The frame must be kept intact, so when cutting out a window opening, you can use metal staples.
Replacing the crowns of a log house.
After installing the windows, these brackets should simply be removed.
After replacing the logs (or even several wreaths), the wall will look somewhat ambiguous, so appropriate finishing of the outer part will be required. This is especially important if a more detailed reconstruction has been carried out. Various materials can be used to decorate a house with your own hands.
There is an opinion that wooden lining is best suited for this. There is no point in insisting, since everyone can refine their log house according to their personal desire and taste. But you definitely have to secure the slate on the roof of the house more tightly: after the repairs described earlier, all the fasteners may not be very tightly connected at the joints.