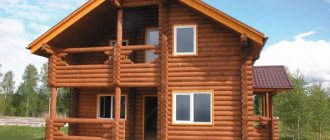
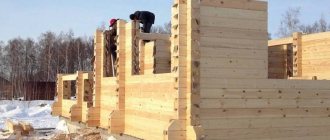
The foundation is the main component of buildings. Over time, any structure can partially collapse or fail completely. Restoring or replacing the foundation of a wooden house will help extend the life of the structure. In this review we will look at working repair methods.
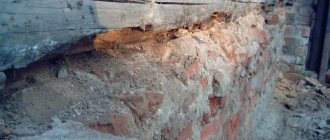
Destruction under a wooden house Source sdelai-lestnicu.ru
As a preface
Replacing the foundation can rightfully be considered a radical measure caused by the need to restore the reliability and safety of the house, as well as to increase its service life. It is advisable to carry out such a solution for wooden buildings, the structure of which, if the base is replaced, can last for many more decades. Of course, you can implement your plans on your own, but if you are not confident in your own abilities, it will be in your best interests to pay money to qualified specialists. In this case, the information presented below will allow you to navigate the issue and control the situation. If you decide to do everything yourself, then this article will serve as good instructions for carrying out repair work.
Causes of foundation destruction
The cause of destruction of the foundation of the house may be adverse environmental influences:
- High humidity.
- Problematic soil.
- Sudden changes in temperature.
It is impossible to predict the actions of nature, but some factors can be taken into account at the design stage.
But the cause of foundation deformation can also be the human factor:
- Incorrectly designed project.
- Incorrect type of foundation.
- Neglect of reinforcement and waterproofing when pouring the foundation.
- Use of low-quality materials.
- Failure to comply with technological construction requirements.
As a result of the influence of one or several factors, the foundation ceases to perform its functions. Therefore, it is time for repairs. Depending on the degree of destruction of the foundation of the house, repair work is carried out in two types: complete replacement of the foundation or strengthening it. In both cases, you will first have to raise the structure. To do this, you can use a crane installation and slings. But most often construction jacks are used to lift wooden houses.
Main question
How to raise a house for major work to replace the foundation?
Cranes are not suitable due to the incredible cost of work. The most popular method is the use of jacks, which can be rented from specialized organizations or from the railway depot. Most likely you will need more than four of them - about a dozen, depending on the massiveness of the building. Furniture should be removed from the house and floorboards removed to lighten the overall weight. The crowns, especially the lower ones, are fastened with steel brackets.
ATTENTION! Raising the house diagonally is not allowed.
Jacks are placed on both sides of the wall, on supports made of metal sheets, thick plywood, boards, or tightly spaced beams. It would not be superfluous, in order to avoid the logs falling off the jacks, after installing the jacks, put a load on them so that the substrates are firmly sunk into the ground, release the pressure and install the jacks again. The emphasis is made only on well-preserved logs, starting from half a meter from the corners; worn-out ones must be replaced along with the foundation. In places of emphasis, it would be correct to install elongated metal plates to distribute the pressure of the jacks on the logs.
Then low, repeated lifts of 1-2 cm are made, carefully monitoring the condition of the logs, walls, roof, and distortions of door and window openings. In these cases, they must use a level or an observer who, from a distance of ten to twenty meters, evaluates the synchronicity of the rise. It is extremely important to install and change supports each time you lift. Bricks and oak boards are ideal (you can use floorboards from home). In case of unexpected deflections of the logs, the lower crowns should be supported by two free jacks. The entire structure is raised to a height of 15 cm.
IMPORTANT! The process of raising a wooden house takes about a day and is not rushed.
Repairing the foundation of a wooden house with your own hands
The wooden foundation is mainly made of pine or larch. A wooden structure always requires complete replacement, since over time it becomes completely covered with fungus and rots. Replacing old elements of such a base with new ones is carried out as follows:
Using jacks, the house is raised above the old foundation to such a height that it is convenient to carry out work on dismantling old pillars and installing new ones
It is important not to overdo it, otherwise the lower crown of the house may crack or sag.
Rotten pillars are removed, and rickety, but still high-quality supports are placed straight. In places where new pillars need to be installed, soil is removed. The bottom of each base under the support is covered with sand in a layer of 10 cm
A concrete “heel” is created on a compacted sand “cushion”. It consists of a layer of cement mortar 20 cm thick. A new wooden pole wrapped in waterproofing sheet is placed in the concrete before it hardens.
The installed pillars are covered with earth and coarse crushed stone. After leveling, roofing material is placed on the supports and wooden beams are placed. The building is lowered onto them.
The damaged foundation of a dilapidated wooden house can be put in order. To do this, you need to obtain the necessary knowledge and choose a repair or replacement technology. You can do the reconstruction of the foundation of a house yourself, if you have the desire and at least a little experience in construction work.
When is it required?
Most often, reconstruction or repair of the old foundation under a wooden building is needed:
- If the base is heavily worn. This is usually expressed by the shedding of not only the finishing layer, but also the concrete or brick itself, large cracks, and also the distortion of the house.
- If just one of the support posts breaks, the entire house may tilt or break, requiring replacement.
- When the piles are skewed, which can occur if calculations are made incorrectly during installation.
- If a wooden house has sunk to the ground level, which most often happens after long-term use of the house and incorrect foundation calculations.
- In some cases, foundation replacement is done to improve the thermal efficiency of a home or reduce wear and tear from water spills during snowmelt periods.
Let's get down to the main work
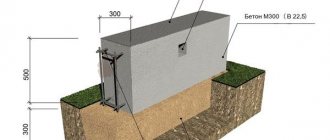
Now it's time to pour the foundation itself. To do this, you need to prepare high-quality concrete in a concrete mixer. Mix cement, sand and small crushed stone in a ratio of 1:3:2 and add water. This is the optimal proportion - you will get very durable and at the same time quite cheap concrete. After thorough mixing, the concrete is poured into the formwork.
After two to three hours, the concrete sets and the formwork can be carefully removed. The vacated space is filled with earth and compacted well.
All that remains is to wait until the concrete gains sufficient strength - on average this happens in 3-4 weeks. The exact period depends on the temperature and humidity of the surrounding air, as well as the thickness of the foundation. When this time has passed, you need to start waterproofing the foundation. The upper part on which the house will rest must be covered with roofing felt - preferably in two layers. This will provide reliable protection from moisture, which means that the lower part of the wall will not be affected by rot or mold.
After this, all that remains is to carefully lower the house into its original place. This should be done as gradually as lifting was done before.
The support beams are carefully pulled out, after which the work can be considered completed - you have created a new foundation that can serve you for many decades, with your own hands
As you can see, it is quite difficult to build a new foundation for a standing house, but this work can be done without the involvement of specialists.
Construction of the ribbon
If a strip foundation is used as a new foundation, then its installation is not much different from the usual foundation laying:
- After dismantling the old foundation, the trench is cleared of debris and a sand and gravel cushion is laid.
- Lay waterproofing.
- Formwork is installed and reinforcement is made, after which new concrete is poured.
The main differences can be considered:
- The need to arrange special openings that are needed for installing jacks. These places can then be sealed with brickwork.
- Before lowering the house, you need to check its lower crowns and floor for damage. If possible, they should be eliminated.
- The house is lowered onto a completely dry (hardened) foundation. This occurs at least 2-4 weeks after pouring concrete.
Strengthening the foundation of a wooden house
When repairing the foundation, it makes sense to immediately strengthen it. This can be done if you are confident in the stability of the soil, which is below the foundation level of your house. Strengthening the structure under the building may also be required in the case where it is planned to add another floor to the house, but there is a suspicion that the previously installed foundation will not withstand the increased load.
You can strengthen the foundation in two ways, depending on the load it has to withstand.
Instructions for strengthening the strip structure
To make the foundation more durable, perform the following work:
A trench is dug along the perimeter of the base. The pit must be wide, otherwise it will be inconvenient to work. In addition, it must be taken into account that the new foundation will become stronger. Soil is cleared from the excavated foundation
To do this, use a metal brush.
Holes are made in the old base with a drill. It is important that their diameter exceeds the thickness of the purchased reinforcing bars by no more than 1 mm. In this case, the metal elements will be installed securely and without gaps. Reinforcement rods are inserted into the drilled holes using a hammer.
They will help connect the new foundation to the old one.
Further metal elements are welded to the hammered rods, forming a reinforced belt. It is better to solder the reinforcement with already installed rods only in a few places. For the most part, it is wiser to tie metal elements with wire to avoid deformation of the reinforcing belt during pouring and hardening of concrete.
The formwork is installed and filled with concrete. After waiting for the solution to harden, the structure of the boards is dismantled. The new foundation is left untouched for several days so that it becomes even stronger.
The created base is covered with waterproofing material. An asphalt strip is created around the foundation at an angle.
Thanks to the reinforcement, the weight of a wooden building is distributed over a larger area. This method allows you to stop subsidence and destruction of the house.
Repair depending on the type of foundation
Before starting work on repairing the foundation under a wooden house, you need to carefully inspect it. It must be said that inspection of that part of the foundation that is located above the soil surface may not reveal the full severity of the damage. It usually happens that there are much more problems underneath. We must take this into account and begin repairs as quickly as possible, and not put it off until later.
During the inspection, you can also find out exactly how to update the foundation, what material to use and what design to choose. The choice depends on the weight and condition of the house, the type of soil and the capabilities of the owner.
Here's what you can use to replace the old, worn-out foundation:
- Place the piles. This option is practical and quick to implement.
- Pour a reinforced concrete monolithic or strip foundation. It is the most durable and will last the longest.
- Build pillars from brick, stone or install concrete ones. Brick is most often used, since it is an accessible and relatively cheap material, but it also has a drawback - it is destroyed by moisture, so it will also require replacement over time.
- Place wooden posts around the perimeter of the house. This is the simplest option, but also the most short-lived, since the tree, while in the ground, will be destroyed by moisture and fungi.
So, according to their characteristics, pile, reinforced concrete and columnar foundations are the best. It's worth stopping at them.
Now let’s talk about what types of foundation you can choose for a wooden house, depending on its characteristics and soil type.
Columnar
A columnar foundation is suitable for light, small houses built on solid ground. The posts are installed at a distance of 1-2 m, always in the corners and at points with maximum load.
Tape
This is a monolithic concrete or prefabricated tape, which, thanks to its durable material, can withstand impressive loads. This type of foundation is suitable for large buildings. The depth of burial will depend on:
- soil composition;
- proximity to groundwater;
- soil freezing depth;
- total weight of the house;
- design features of the structure, for example, the presence of basements.
Pile
Piles for foundation restoration can be of 2 types: screw and bored. The first ones can be installed under houses built on an uneven plot, and also if the soil under them is waterlogged in places or freezes deeply in winter, on sandy or swampy soils.
The advantages of screw piles are that they are installed quickly and are relatively inexpensive. The second type of piles are holes in which a metal frame is installed and filled with cement, and then such piles are connected with a concrete frame (grillage).
Replacing the crown
Since the toothed rim is pressed onto the flywheel disc, it cannot be removed/put on without heating. The main problems with self-repair in this case are:
- the car owner does not have special equipment - they use burners, blowtorches and even heating a gas stove in the oven;
- the temperature of the crown is difficult to determine - heating is done “by eye”;
- technological requirements - the toothed rim should be heated to 200 degrees, but without special devices it is very difficult to maintain the temperature.
To increase the strength of the steel, the gear rim is hardened at the factory. It is not recommended to heat hardened parts, since in this case the crown is automatically subjected to another heat treatment - tempering. The performance characteristics obtained during hardening - hardness, wear resistance of the structural material - change into the opposite properties of the metal - toughness and plasticity.
In other words, if you overheat the rim, after putting it on the disc and cooling in the air, the teeth will become softer and grind off much faster. There are three types of leave:
- high - heating to 450 - 600 degrees to obtain a sorbitol steel structure;
- medium - heating to 300 - 450 degrees to obtain a troostite steel structure;
- low - heating to 150 - 300 degrees to obtain a martensite structure.
When overheated, the structure of the metal will change
Dismantling
The crown has no additional methods of fixation other than an interference fit on the flywheel, so it can be removed quite easily, even without heating:
- the part is placed on stands so that the toothed rim hangs down;
- uniform blows are applied with a hammer around the circumference of the crown.
Removing the toothed rim
If the toothed rim is definitely rejected for replacement, you can knock directly on the teeth. When the crown is rotated 180 degrees for further operation, the blows are applied through the gasket - a second hammer, a chisel, a piece of reinforcement.
Ring gear selection
Before replacing the flywheel crown with a new consumable part, it is necessary to select a complete replacement:
- centrifugal forces tend to rupture the disk during operation;
- the flat surface against which the clutch is pressed is distorted;
- friction of the linings on the flywheel causes heating, further increasing the warping of the plane.
After an interference fit, the toothed rim tightens the flywheel disc, eliminating the above defects. In addition to increasing the service life of the flywheel, the service life of the car’s clutch increases.
All of these design features are present in the rims manufactured by Tanaki. The number of teeth must match initially. In internal combustion engines of some manufacturers, the flywheel is used as an element of the DPKV crankshaft position sensor. In this case, two teeth on the crown are missing; before dismantling, it is necessary to create a mark of the relative position of the area with the missing tooth relative to the disk.
Installation
You can mount the crown of a car flywheel without heating only when turning it. However, even in this case, there remains a risk of the rim turning relative to the disk during operation, so after installation this part is secured by welding at 4 points.
Methods for heating the crown
The main heating methods when installing the crown on the flywheel are:
- oven or burners of a gas or electric stove - it is very difficult to overheat the part, you will have to turn it periodically on the burners;
- blowtorch or gas torch - it is necessary to control overheating visually, preventing the toothed rim from changing color.
Heating on an electric stove
Heating with a gas burner
In any of the above options, the flywheel disk must be in close proximity to the place where the rim is heated in order to install it on the seating surface as quickly as possible using pliers, pliers or hands wearing special heat-resistant gloves.
After cooling, the part will shrink on its own; if necessary, tacks are used at several points.
Flipping the old rim
To turn over the flywheel ring in use, you need to knock it off its seat, turn the disk over, and put the heated rim in its place. If at the factory or during subsequent replacement this element is put on with the chamfer inward, then when turned, the chamfer automatically remains on the outside.
Tooth rim revolution
Solutions for a wooden house
To inspect the entire foundation around the perimeter of the house, they dig a trench deep to its base. First you need to assess the condition of the foundation and decide what to do with it next. To work you will need to prepare:
- a bayonet shovel (possibly a selection);
- crowbar, bolt or tooth (wedge);
- sledgehammer or axe.
Jack installation diagram.
To repair or redo the foundation, the walls of the house are usually jacked up to the required height and hung on channels or reinforced concrete beams on temporary supports made of concrete blocks or boards. If necessary, replace the lower crowns.
If a house is built on brick pillars, the brick may simply collapse over time. The same thing happens with wood if the house is built on wooden chairs. The strip foundation may have partial destruction due to areas of weak soil.
Foundation pillars can be repaired or replaced. The wooden pole is pulled out and immediately replaced with a new one treated with an antiseptic. It is better to disassemble the brick one immediately using the prepared tools. Whole bricks can be left to repair the pillar.
If the soil is heaving, the internal foundation pillars in the spring often collapse or protrude from the ground above the perimeter pillars, raising the floor. In summer, on the contrary, they sink, leaving the floor without support. In this case, it’s worth thinking about, you need to strengthen the pillars every year: maybe it’s better to put the house on screw piles or on a monolithic strip.
Scheme of raising the house above the foundation and replacing the crown.
To do this, they pull out all the pillars, dig a trench under the strip foundation, make a cushion of sand and crushed stone, install the formwork, reinforce it and fill it with concrete. When it gains strength, a layer of waterproofing is placed under the base and the house is lowered. At what depth to dig a trench, what kind of reinforcement to use, etc., depends on many factors. It is better to consult a professional designer on this issue.
If the old strip foundation does not require complete replacement, its individual sections can be repaired. To do this, a metal mesh is attached to the damaged section of the tape, previously cleaned, with anchors, leaving a small gap from the wall, formwork is placed and this area is filled with concrete. Small cracks are simply filled with cement mortar. Individual problem areas, for example, on weakened soil, are poured on both sides of the tape.
Strengthening the structure around the perimeter of the building
If the house sags noticeably on one side, it means that its supporting part needs to be expanded on that side. In some cases, reinforcement is carried out along the entire perimeter of the house if, for example, it is planned to build another floor. The width of the expanded foundation must be determined by precise calculation in accordance with the new project.
Work to strengthen the structure is carried out in stages, dividing its entire length into sections of no more than 2 m. Along this
Scheme of strengthening rubble foundations by installing a reinforced concrete cage.
The site is dug with a trench deeper than the base of the old foundation to make a cushion of sand and crushed stone.
The new structure needs to be tied to the old one; for this, holes are drilled in the old foundation, where reinforcement pins with a diameter of 12-14 mm are laid and secured with cement. A new reinforcement grid is tied to them. Next, the formwork is set strictly according to the level and height and concrete is poured. For connection with another section, free ends of the reinforcement are left.
The next section is taken at a distance of 2-4 meters. If the length of the wall is short, you can fill in the corners. Each section must gain the necessary strength. Only after this can the load from the house be transferred to it. Then the entire tape is also reinforced and filled in completely.
If necessary, you can increase the height of the foundation by raising the entire house first.
Installation of pile
To install a new pile foundation you need:
- Place I-beams under the house with a margin of 5-7 cm at each end.
- At a distance of 30-40 cm from the wall, piles are screwed or driven in pairs. These will be the supports for the beams.
- A head and a channel (U-shaped metal fastening) are installed on the top of the pile.
- The old base is dismantled.
- The house is gradually lowered by beams onto piles.
The columnar base is mounted according to a similar principle, only for it it is necessary to dig special holes for the pillars.
Asbestos pipes are installed in these cavities, which are filled with concrete or brickwork is laid.
How to repair cracks in the foundation
Cracks at the very beginning of formation can be easily eliminated. Do not miss the moment and do not delay repairs, as the cracks will grow and increase. Then the damage will develop from moderate to severe. To determine the degree of danger of cracks, the rate of subsidence and the nature of destruction of the foundation, beacons are made.
Apply a little putty to a clean, dry foundation wall, use a spatula to draw a straight line and make a mark up to 5 mm thick. Such a beacon will break with any movement of the surface. Instead of putty, plaster plasters or plain paper are also used. But if the paper gets wet, it will no longer provide reliable results.
If the subsidence is temporary and does not pose a threat, the mark remains motionless. This means that the foundation has moved along with the soil and taken its place. In this case, cosmetic repairs of the cracks can be carried out. To eliminate the defect, the crack is widened, cleaned and sealed with a primer. The resulting seam is secured with cement.
Diagnosis of the problem
Although the opening of cracks is an alarming signal, when they are detected, you should not drop everything and immediately start opening the foundation.
Perhaps, having given a slight subsidence, the soil has settled and deformations will not progress in the future. Special beacons will help you determine exactly what is happening with the building:
a beacon (marker) is a strip of gypsum or cement mortar with the addition of gypsum, laid across a crack. Its length should be about 100 - 120 mm, width - 30 - 50 mm, layer thickness - from 3 to 5 mm. The use of polymer mixtures to create a beacon is not allowed, since they are plastic, and such a beacon will simply stretch if the crack opens further
It is important to thoroughly clean the surface of the wall with which the marker will come into contact so that the latter has good adhesion to the base. Beacons are placed in the extreme zones of the crack, at least two for each of them; on a freshly applied beacon, use the edge of a trowel to squeeze out a long thin groove
If cracks develop, the lighthouse will also crack, and by the displacement of the grooves on its halves relative to each other, it will be possible to accurately determine how individual parts of the building move;
If the size of the cracks increases over time, a recess is dug in the problem area along the foundation - a pit, with the help of which hidden building structures can be directly examined.
The pit should be about a meter long and reach the base of the foundation. The slopes are reinforced with wooden panels.
Foundation depth, is this what you want to know? Go to this article of ours.
If you don’t know what a distribution box for electrical wiring is, but you are very interested in it, then look here.
Production of monolithic reinforced strip foundation
Common options for reconstructing the main part of the building
To replace the base of a wooden structure, you can use three methods:
- Partial, in other words, budget type of repair. From the point of view of financial savings, this method is considered the most effective. If you notice damage to the foundation under a wooden building, then you will have to remove the presence of defects and install all the necessary wooden elements in this place. However, carrying out cosmetic repairs risks the fact that over time you will still have to carry out full-fledged repair work, since the integrity of the structure will become unusable.
- Dismantling wooden walls. This method of carrying out construction work involves completely dismantling the walls. At the same time, at this stage of work it is imperative to change the entire frame located on the lower tier. After this, the walls are put in order, putting everything in its place. To carry out this type of work, you must have experience in this field of activity.
- Reconstruction of the foundation. To do this, you need to remove a 20 cm layer of base. At the same time, the crowns are replaced and all required restoration work on the foundation is carried out. To replace wooden crowns, you can use a jack. Thanks to this, the time required to carry out this work will be significantly reduced. To learn how to raise a house and place it on screw piles, watch this video:
It is worth noting that in order to replace the base of a wooden structure, it may be necessary to carry out the necessary work using elements such as jacks, supporting beams and bars.
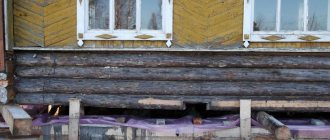
Using jacks
The jack is in the process of lifting the box.
It is better to invite specialists to carry out the work.
If you want to do this yourself, then you will be interested in the instructions:
- Jacks are installed on both sides of the building at a distance of half a meter from the corners. The device must stand on a compacted platform and a wooden panel, and its rod must rest against the lower crown through a steel plate of at least 5 mm, 100x100 mm thick;
Be sure to place a steel plate under the bottom crown.
- The log house is raised 2 cm at a time, and the result is immediately fixed with temporary supports made of timber and boards. The full rise is usually at least 6 cm;
The full lift height depends on the specific situation.
- When the structure is raised and fixed, the old base is dismantled. It is removed completely, and the trench is dug a little deeper;
The old structure is completely dismantled.
- Next, gravel is added, wooden formwork is built for the strip foundation, a reinforcement frame is knitted, and a U-shaped fragment with turns of 40–50 cm is concreted. The ends of the reinforcement must be brought out for tying with other fragments;
Formwork is built in the trench and concrete work is carried out.
- When the fragment gains strength, the frame is lowered onto it and the procedure is repeated for the opposite side of the house. Then the missing fragments are completed, connecting two U-shaped sections into a single structure.
The old base is gradually being replaced with a concrete monolith.
Important! It is advisable to replace the two lower crowns during the work, since this is the most susceptible part of the frame to destruction.
This is interesting: How to fix a flooded basement in a private house? Step by step
Types of destruction
You can’t just say that the foundation is destroyed or damaged. In construction, there are certain standards that are regulated by the degree of damage to the old foundation. Based on them, the restoration technology is selected. Therefore, before redoing the foundation, you need to determine the type of damage.
Minimum
These are damages that do not change the load-bearing capacity of the foundation of the house. This includes peeling trim, cracks, gaps and crevices that are small in size: neither deep nor wide. Moreover, such defects are clearly visible to the naked eye, which means that you can calmly approach the repair of the foundation of an old wooden house with your own hands, because fixing all this is not a problem.
Moderate severity
These include cracks, but you need to understand that there are different cracks
The most important thing is the direction of formation of the defect. If it is horizontal, then it does not affect the load-bearing capacity of the old foundation
If it does, it is insignificant. But if the crack is vertical or zigzag, then the problem is big.
Therefore, you need to immediately decide whether the defect is growing, that is, progressing, or whether it is a temporary disorder. This can be defined as follows:
- Apply putty solution to the crack.
- Mark the crack line on it with a marker.
- As soon as the putty layer cracks, the crack has progressed.
In this case, you can immediately determine how quickly a concrete defect is growing.
If the putty layer is not damaged, it means that the soil simply shifted and stopped. There will be no further destruction. All that remains is to seal the cracks themselves with cement mortar. This is done simply:
- Defects are embroidered - they increase in size in width.
- Cleaned from dust and weak areas.
- Primed.
- Filled with cement mortar.
Repairing the foundation of a wooden house with your own hands with such defects is a small investment in money and time.
Catastrophic
Unfortunately, when the moment comes that determines this type of damage, then we can only talk about repair as reconstruction. That is, this process is costly and requires large capital investments. The foundation of an old wooden house with such defects is restored, taking into account the type of foundation structure. The tape type and columnar type can be repaired. Unfortunately, if catastrophic damage affected the slab base, then the moment can be considered lost.
Preparation and equipment
Before you begin, you must prepare all the required tools. To rebuild the foundation of a wooden house with your own hands, you will need a crowbar, a sledgehammer and wedges, as well as a jack for lifting the foundation, bars, beams and other materials.
If the replacement concrete slab cannot be restored manually, it is necessary to use special equipment for the work. In particular, hydraulic jacks that are capable of lifting loads of up to 10 tons are suitable. Such cars can be rented from special companies.
You will also need strong beams, bricks and blocks for the construction of temporary supports, as well as boards for spacers. To avoid problems with lifting the crowns, you need to use a steel plate with a thickness of more than 5 mm.