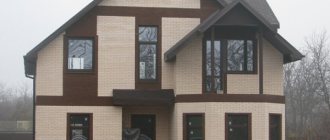
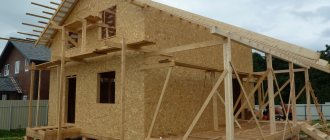
Brick is reliable and durable. This material looks attractive and presentable. But brick walls have one significant drawback: thermal conductivity. Even relatively warm ceramic material conducts heat well and does not sufficiently protect the building from the cold. In our climate, it will be necessary to build walls 64-90 cm thick to provide sufficient thermal resistance. A more rational option would be to make the external walls of the building from other materials with insulation and cladding. How to cover a house with facing bricks? It's not difficult if you know the technology and the nuances of the work.
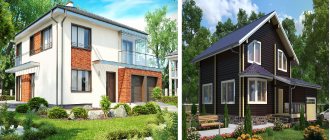
The house, lined with brick, looks solid and presentable, it is protected from wind and other unpleasant weather phenomena. This finishing option is used for both lightweight concrete and wooden houses.
How to choose facing bricks for your home
Before you line your house with brick, you should carefully select the material. It is important to select cladding not only by cost, but also by technical characteristics and properties.
Ceramic bricks are most often used in construction. This material has fairly good (compared to other types) thermal insulation properties. The disadvantage in this case will be high hygroscopicity. The technology involves the use of both ordinary ordinary material and special facial material.
Ceramic brick is simple, durable and easy to use
In the first case, it is strongly recommended to treat the outer surface after installation with a hydrophobic composition. Facing brick does not need such treatment. The composition for treatment is selected with sufficient vapor permeability. This is especially important when finishing a wooden house with brick. It is required that the impregnation does not form a film on the surface that prevents the permeability of the walls to air and steam. Which brick to choose for frost resistance? The brand must be no lower than F35 according to the standards, and no lower than F50 according to the recommendations of the builders.
Another popular option is silicate material. It is the cheapest, but is not durable. Facing a house with this type of brick conducts heat well and absorbs moisture. Most often, silicate is heavier than ceramic. This option is not recommended when finishing a timber house (we also include a frame house and a log house).
Sand-lime brick is less durable than ceramic brick, but for 20-30 years you won’t have to worry about the problem
To decorate bricks with your own hands, you can use clinker material. It is specially designed for cladding a house, therefore it has low moisture permeability and high strength. Clinker finishing looks attractive, but this pleasure is not cheap: prices are on average 50-150% higher.
Undoubtedly, clinker brick is the best choice among all options. You can choose almost any color and shade
Show finishing options for facades with facing bricks: types and characteristics
The whole variety of facing bricks can be classified into three main types:
Clinker. Hyper-pressed. Ceramic.
All of them have their own production characteristics and scope of application.
Clinker bricks of “real” brick color are always in trend
Clinker brick
The technology for making clinker bricks is based on firing a special type of clay with increased plasticity. It is pressed and fired at high temperatures until baking occurs. Colored dyes from natural raw materials can be added both during the firing process and at the stage of mixing the mass. It is noteworthy that the color of the finished product depends on the temperature and duration of firing.
The combination of clinker bricks with hyper-pressed bricks together with plaster looks very modern
Due to the fact that clinker production occurs at very high temperatures, its strength is very high. Even roads and squares are paved with bricks and tiles made using this technology. Resistance to aggressive environmental influences makes this material indispensable for use in places with high humidity. Masonry made from such material can withstand more than 100 years. The disadvantage of clinker is its high cost. It is more than 2 times higher than that of ceramic bricks.
Ceramic brick remains a “classic” when finishing facades
Hyperpressed brick
Strictly speaking, it is more correct to call this material artificial stone. It is produced by semi-dry pressing of bulk components. These include: crushed limestone, cement and dyes. All this is mixed and pressed to the required shape. Then the blanks are kept for 3 to 7 days on pallets and go on sale.
Durable facade made of hyper-pressed brick
Hyperpressed brick has the following advantages:
- High strength.
- Frost resistance.
- Moisture resistance.
- Low wear and tear.
- Easily tolerates temperature changes.
- Excellent decorative characteristics. Available in various colors and surface types. Some of its types successfully imitate natural stone.
The finishing of the façade with hyper-sanded brick, together with the surrounding area, looks gorgeous
When using hyper-pressed facing bricks for the facade, each owner of such an object can show options for finishing geometrically complex architectural forms. This is possible due to the ease of machining of the material. The disadvantages of this brick include high cost and greater weight than other types.
Hyperpressed brick goes well with siding
Ceramic brick
This type of brick is made from a special type of clay. The formed blanks are dried and fired at a temperature of 1000 to 1200 degrees. Thanks to this, ceramic brick has sufficient strength and frost resistance. It has the correct shape with even ribs. The surface of the edges can be smooth or embossed.
Ordinary ceramic brick coated with facade paint
This is the most common type of brick. Due to its relatively low cost, it is used not only for cladding facades, but also for the construction of fences, as well as internal walls that do not require additional modification. Its disadvantage is the penetration of moisture into the structure of the brick, which leads to the release of salts to the surface, creating a whitish coating.
Hyper-pressed facing brick successfully replaces natural stone when finishing facades
How to cover a wooden house with bricks
Brick and wood have very different characteristics, so certain difficulties may arise during the work process. When facing a wooden house with bricks, it is imperative to provide for sufficient ventilation of the main part of the wall. Otherwise, the wood will begin to rot or become moldy. Before covering the house with facing bricks, it is worth carefully examining the wall pie. Three-layer walls with brick cladding in this case will include:
- wooden supporting part;
- vapor barrier;
- insulation;
- waterproofing and wind protection;
- ventilation gap min. 50-60 mm;
- brick lining.
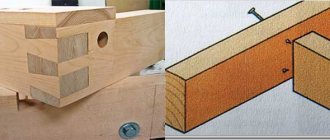
1 - ventilation layer;
2 - fastening the cladding to the wall; 3 - facing brick; 4 - additional insulation with windproof membrane; 5 - vapor barrier; 6 - finishing; 7 - thermal insulation; 9 - log wall It is important not to confuse vapor barrier and waterproofing. The latter must be permeable to steam so that it can easily escape from the insulation and brick into the ventilation gap. It is recommended to use modern vapor diffusion windproof membranes.
To ensure free movement of air, when clad with bricks on a wooden house, it is necessary to provide vents in the lower part and outlet openings in the upper part. It is recommended to use mineral wool as thermal insulation. It is characterized by low cost, ease of installation and good air permeability.
Before properly covering a wooden house with bricks, you must wait time for the walls to shrink. This process can take a couple of years, so it may be easiest to re-clad an older house.
Video
This video provides tips for brick cladding:
Return to content
Adobe houses have excellent thermal insulation properties, but they quickly settle and lose their aesthetic appearance. In order to extend the life of adobe houses, preserve the structure and prevent complete destruction of the structure, the walls are reinforced with bricks. How exactly the technological stage occurs, we look further.
Before starting construction work, draw up a construction estimate in which you carefully calculate the quantity and type of building material needed. So, in any case, each of the components presented below will be needed when facing walls with brick. Construction materials and tools for working with the cladding of an old house: bricks, cement, sand, insulation, water, plumb line, level, bucket, shovel, concrete mixer (you can mix the masonry mortar by hand, then you will need a spacious trough).
If you are deliberately constructing a house from adobe, after construction, allow the walls to settle (naturally) and settle for several years to further strengthen and protect the foundation. Over such a period of time (3-4 years), the walls will be sufficiently strengthened and will be ready for further action.
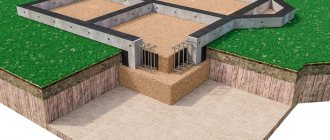
If you have such circumstances that you have purchased your own summer cottage in addition to an old adobe rickety house, do not be upset and do not make drastic decisions. In most cases, the situation can be corrected. It is enough to strengthen the corner joints of the building and add foundation. Brief description of how this happens:
- It is necessary to drill holes with a diameter of 12 mm and a depth of 100 mm into concrete (or 200 mm into brick) with a downward slope of 15-20 degrees;
- 12 mm reinforcement is immersed in the holes made. The remaining 150 mm length should extend to the surface of the foundation;
- Pour a new foundation 30 cm deep and leave the anchors in the concrete;
- You perform waterproofing from a two-layer roofing material.
After the issue with the foundation has been resolved, do not forget to raise the base (if you have not done this before) - complete the formwork and fill it with concrete, or, alternatively, lay it out of brick.
When starting to line the walls, make an approximate calculation of the bricks - at the most inopportune moment, the supply of building materials may run out, causing unnecessary trouble. Lay out the “trying on” row without using a binder mixture - on a dry one. On average, brick consumption is 55-58 pcs. per m2. Consider the ventilation system and do not place bricks close to the walls, leave space for air exchange. The inability to ventilate the walls will lead to their rapid destruction, dampness, and the spread of mold and mildew.
Don't forget about the wall connection. Simple 10 cm nails can be used as a cohesive material. It would be a good idea to fill the resulting gaps not with cement mortar, but with a heat-insulating mixture (for example, expanded clay).
Prepare cement mortar for laying walls in a ratio of 4 buckets of sand to 1 bucket of cement. After mixing thoroughly, add water to a medium consistency (“sour cream”). During the laying process, it is necessary to leave 11-13 mm seams between the bricks.
Place metal lintels on door and window openings. Maximum strength and minimal clearance allow them to be used as reinforcement.
Bricks must be laid out in a checkerboard pattern and the walls must be regularly checked for “evenness” using a level.
Building and renovating a home requires a lot of expenses. Drawing up an estimate will allow you to accurately calculate the quantity and cost of the required material. Plan your expenses. When buying bricks, consider a stock of at least 500 pieces. additionally. Anything can happen, but you won’t lose the building material; in extreme cases, use it for another need.
Advantages and disadvantages
In construction it is very difficult to combine materials with different properties. In this case, nuances and negative aspects always appear. Finishing the facade with brick for a wooden building has three disadvantages:
- decreased ventilation, likelihood of moisture accumulation in the insulation;
- different shrinkage of parts of the wall, which does not allow rigid connection between the cladding and the main wall;
- the high mass of brick compared to wood (more than 3 times) forces the construction of more powerful and expensive foundations.
In general, we can say that it is better to decorate an old house with brick. For new construction, it is recommended to consider other more economical and efficient options.
But the technology has its advantages:
- improvement of thermal performance (especially when using ceramics);
- reducing the level of fire danger;
- reliable and durable protection of wood from negative weather conditions.
Features of wall cladding made of different materials
The facing masonry runs in half a brick.
The self-supporting capacity of such a false wall is low. It must literally be tied to the facade. For this, different materials are used: ready-made flexible connections, anchors, nails, strips of sheet metal, masonry mesh.
The method of bonding, the need for insulation, the presence of a ventilated gap and vents depend on many properties of the facade material: strength, vapor permeability, holding force of fasteners, size of building blocks, etc.
Technology
Cladding the façade of a house with brick is done after treating the wood with an antiseptic. You should choose a special composition for impregnation - for outdoor work. It will protect the wall from mold, mildew and other dangerous microorganisms. Next, a vapor barrier is attached to the wall using a construction stapler. Installation is carried out with an overlap of at least 10 cm.
A vapor barrier located on the inside of the wall will prevent moisture vapor from entering the insulation from the room
Facing the facade with brick begins with the installation of the sheathing. The dimensions of the frame bars depend on the required thickness of the insulation. The thickness of the thermal insulation can be selected approximately based on the recommendations of neighbors or the Internet, but it is better to use a special calculation. Using the fairly simple Teremok program, even a non-professional can make thermal calculations. You only need to know the thickness of the wooden wall and its thermal conductivity, as well as the thermal conductivity of the selected insulation. The brick (and all layers after the ventilation gap) are not taken into account in the calculation.
The frame block is attached to the walls with screws or nails. Next, the house needs to be sheathed with insulation. Mineral wool is placed tightly between the sheathing. To do this, the distance between the bars should be 2-3 cm less than the width of the insulation.
Methods for attaching insulation to a wooden frame
Waterproofing and wind protection are fixed on top of the insulation. Fastening is carried out using a construction stapler. After such preparation, they proceed directly to lining the house with bricks.
The hydro-windproof membrane protects the insulation from wind and moisture, but does not prevent excess water vapor from escaping from the wall to the outside
The thickness of a brick verst is usually 120 mm. This is not enough to ensure stability, so the wall must be connected to the main part of the external structure.
This can be done in two ways:
- attaching a reinforcing mesh to the wall and inserting it into the facing layer by half the width (such a mesh is installed across the entire width of the wall with a certain vertical pitch);
Fastening the cladding using reinforcing mesh (steel or flexible) is only possible for new construction - separate special bindings that are nailed to the wall and inserted into the masonry.
The fastenings are located in the places where the supporting frame passes.
The finishing installation technology is also relevant for frame buildings. The only difference is that the connections between the wall and the external materials are attached to the frame posts. In all cases, cladding must take into account the ventilation gap.
Slope finishing
The slopes are decorated with interlocking bricks, which creates an additional decorative effect and strengthens the perimeter of the opening. The material is installed in an even column, creating a dense edge of the masonry fabric and emphasizing the accuracy of the geometric lines.
For a more expressive design, you can use a brick of a different color, combining it with the main tone of the material. This option will decorate the slopes and make the facade more elegant.
Reinforcement
To cover a building with brick, it is recommended to provide reinforcement for the finishing. To increase strength and rigidity, a wire mesh with a diameter of 3-4 mm and cells of 50x50 mm is used. The mesh is laid in the seams between the horizontal rows. The frequency depends on the brick:
- covering the building with a single brick (65 mm high) - every 5 rows;
- one and a half (88 mm high) - every 4 rows.
The dimensions of seams with and without reinforcement must be the same. To control, the mesh on one side is moved slightly beyond the masonry. This option increases reliability, but increases the cost and complexity of the work.
Required Tools
To lay facing bricks with your own hands you will need:
- Trowel (trowel).
- Hammer-pick.
- Grinder for precise cutting of bricks.
- Plumb, level.
- Rule.
- Order.
- Joining.
- Cord.
- Square, etc.
NOTE!
The number of tools used largely depends on the skill of the mason. Experienced craftsmen can get by with a few tools; less trained workers need a wider range of tools.
How to clad a house with lightweight concrete
In this case, a lined house can be built from aerated concrete, gas silicate, foam concrete, cinder blocks, and expanded clay concrete. A house made of facing bricks allows air to pass through worse than the listed materials. For this reason, just as in the previous case, it is necessary to provide a ventilation gap.
The installation method is very similar to a wooden house. The only difference is that you can use rigid connections between the wall and the cladding. The minimum number of connections is 3 pcs. per 1 sq.m. Ties are not allowed to be placed in the seams of the main wall; they are nailed to the surface.
When constructing a building from fragile cinder blocks, it is recommended to build a frame that will take the load from the floors and other building structures. In this case, the walls will be self-supporting. Finishing the house with facing bricks is attached to the cinder block very carefully.
Your own brick-lined house is beautiful and reliable. But when carrying out work, you must follow certain recommendations.
Painting brick facades
Painting walls with cladding is done to vary the appearance, as well as to protect against further damage. The paint protects against moisture, sunlight, frost and severe temperature changes.
When painting walls with cladding, you should adhere to the following important requirements:
- after the construction of the walls, at least 1 year must pass, after which work on the arrangement of the facade is carried out - cladding and painting;
- before painting the surface of the masonry, it should be cleaned of mold and fungal infections;
- after this, the wall should be rinsed with soapy water and dried for about a day;
- then the surface of the wall is treated with a primer mixture;
- at the end the wall is covered with paint. It is worth remembering that the paint must be vapor permeable.
The following types of paints can be used for painting:
- acrylic;
- water-dispersed;
- silicate;
- silicone.
A variety of color schemes will add brightness to the structure and make it an object that attracts the attention of others. What type of brick can be used to make a brick cladding? Photos with types of this material can help you figure out this problem.
Types of masonry
The pattern of the seams on the cladding depends on the method of laying. To understand the varieties, you need to clarify the basic terms. The brick is a block with six planes, they are called edges: the largest is the bed, the smallest is the butt, the long side is the spoon. The last one in most masonry is the front one.
- Spoon masonry is the most common type of masonry; the spoon edge extends outward, and the stones are butted together. The dressing is carried out halfway across the block, which means that the vertical seams fall in the center of the brick of the top row.
- Spoon with offset - similar to the previous one, but subsequent rows are shifted only by 1/4. This makes the masonry pattern more interesting.
Spoon methods of laying cladding are the most profitable from an economic point of view, since the length of the ceramic is used to the maximum.
- Chain masonry - the row includes butts and bricks, which are directed with a small lateral plane towards the facade. The vertical dressing seam falls in the middle of the poke. It must be understood that this type of masonry increases material consumption, since every third brick is located perpendicular to the row. The bonded beams must be cut or tied with ordinary masonry, which generally complicates the complex of work.
- Bonded - masonry in which all the facing bricks are located perpendicular to the wall. The wall becomes thicker and the costs of their construction increase.
There are many types of masonry, but they are all, to some extent, variations of the simplest ones.