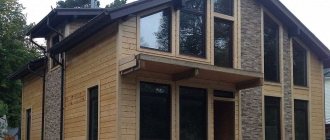
A frame house with an attic is not much more expensive than a one-story house, but due to the additional space, the owners' capabilities are significantly expanded. The attic is an attic-type room, the ceiling of which is the insulated and finished roof of the building. Usually the top floor is completely furnished. The window openings in the attic room are located on the ceiling, at an angle. They let in much more light than windows in other parts of an attic frame house.
How it all began
Introductory:
- The plot is 6 acres, rectangular, slight slope (about 0.5 m).
- Geodesy - a layer of black soil, 1 m thick, 30-35 m of clay, then clay with sand, aquiferous sand at a depth of 40-45 m, no high water.
- The house is permanent, for permanent residence, one and a half floors (attic), 7.8x8.4 m, ceiling height 2.6 m.
- The foundation is an insulated Swedish slab according to the standard scheme for light houses.
- Construction - classic platform, thickness of external walls 150 mm, internal 150 mm, pitch of external racks 625 mm, internal 100 mm, external cladding of OSB. Wooden floor with joists, 50×200 mm, pitch 500 mm, span length 3.7 m, rafters 50×200 mm, metal tiles.
- Insulation – stone wool, 150-200 mm, between double racks, crossbars and trims inter-crown insulation (tow).
- The facade is imitation timber.
Layouts.
Design project.
Frame.
General form.
Calculation.
Construction of an attic superstructure
So, if a new house is being built or the roof of the old one does not meet modern operating requirements, then the attic superstructure can be built, as they say, “from scratch.” What does that require. First of all, the project. You can’t just buy building materials and start construction. The attic is not a heavy structure, but this does not mean that it should be treated with less responsibility.
It is better to order the project from professionals who will take into account the load-bearing capacity of the building walls, foundation and other building structures. And on the basis of this, they will create a project that will guarantee that an old or new house with an attic will serve faithfully for decades.
Installation of the attic begins with laying the Mauerlat on the walls of the house. This is a beam with a section of 150x200 or 200x200 mm. It is attached to the walls using anchors that were previously installed in the reinforcing belt. The latter is poured onto the external walls of a private house. How this turns out in the end result is very clearly visible in the photo below.
Mauerlat laid on anchors around the perimeter of a private house Source nauka-i-religia.ru
Attic projects
The first construction operation has been completed. It is carried out regardless of what configuration of the attic was planned by the project. As mentioned above, living quarters can be organized under any roof. For example, the photo below shows an attic under a pitched roof. It would seem that this is not a very successful example, but such projects exist, which means this confirms that it is possible to live under roofs of any configuration.
Attic under a pitched roof Source houzz.se
And yet there is one design that is called attic. It has a broken roof, which cannot be confused with any other.
Classic mansard roof Source favoritst.ru
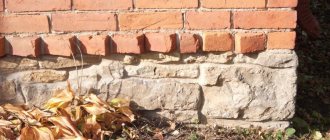
Foundation
The insulated Swedish stove in 2015 also just began to spread in the central regions, and in the Southern Federal District, specifically in Taganrog, adenart became a pioneer.
adenartFORUMHOUSE Member
According to the USP technology, the black soil had to be completely replaced, but this would not be very cost-effective. After consulting here on the forum with experienced comrades, I decided to make a pillow without removing the entire black soil layer. I removed only 30-40 cm of the root-forming layer. This decision was agreed exclusively for a light house; I would not risk a heavier one.
Implementation according to all USHP rules.
- The bottom of the pit was compacted and covered with geotextile with a density of 160 g/m².
- I filled it with the first layer of crushed stone (one KAMAZ, 5-7 cm), compacted it, the subsequent layers required two unloadings, pouring, careful compaction, and with the last layer I brought the plane to the horizon.
- I filled it with sand, after compacting the 10 cm layer was compacted to 7 cm.
- I marked out the contours of the walls in the sand, assembled a sewer system for fitting, according to a previously drawn up diagram, dug trenches with a slope, laid pipes, backfilled them, compacted them.
- The water supply was introduced using a PP32 pipe with a thick wall, led towards the future well at a depth of 1 m, and insulated.
- I laid EPS with foaming of the joints, additionally fixed them with disc-shaped dowels, foaming the hole before driving in the fungus.
- The ribs were reinforced in two rods with a diameter of 12 mm, on top of a 3x150 mm mesh for attaching the contour of the heated floor, after laying the main line, on top of the pipes there was a 5x150 mm mesh and two more reinforcement rods in the ribs, on stands.
- For the warm floor, I immediately assembled and installed a manifold cabinet and a manifold; I specially took a larger one in order to later install a mixing unit in it, which will be needed to reheat the attic with radiators. The cabinet is located between the technical room and the bathroom, the partition will be assembled from a 50x150 mm board, between the bathroom and the kitchen there will be the same wide partition, inside of which there will be a drain riser and ventilation. The underfloor heating pipes were laid using a combined method: a snake above the external walls in increments of 15 cm and a snail inside in increments of 30 cm, secured with clamps. In the area of connection to the collector, the pipes were covered with thermal insulation; the length of the circuit is about 300 m.
- The electrical distribution panel was placed in the area of the future wall between the technical room and the vestibule, and from this point the cable was routed to the internal walls of the rooms. Wiring in HDPE pipe (20 mm), two cables in one, cable VVG NG ls, in the bedroom, cross-section 3×2.5 mm, in the kitchen two such cables, in corridors and bathrooms with cross-section 3×1.5 mm, similar threw it at the VOC and the well.
- Distribution of the water supply with the same pipe as the TP (Compipe 16×2.0 mm PE-RT/EVOH), because it was left after laying the circuits. From the entrance to the technical room there is a separate pipe for each consumer, a collector for cold water with six outlets, for hot water with four (bathtub and sink in the bathroom, kitchen sink, sink in the bathroom in the attic). I immediately laid the pipes for the attic, leaving about 5 m in reserve. Next, I pressurized the TP system before pouring.
- I assembled the formwork from a 50x150 mm board in order to use it later on the frame, covered it with film, supports and pegs from an inch that was taken on the roof sheathing. All leads and the manifold cabinet were covered with film from EPS packaging so that they would not become clogged when pouring. The lighthouses were assembled from a 28x27 mm profile, on studs; the structure turned out to be flimsy, but when this became clear, it was too late to change it.
- I ordered 9 m³ of concrete at the factory, with the estimated 8 m³, it took approximately 8.5 m³, concrete M300 P4, it began to grab in the middle of the pour, which is why they accelerated and it was not possible to get a perfectly flat surface, but no critical errors occurred. I didn’t do any grounding in the slab, I threw it onto the well casing pipe.
The budget for the USHP foundation with an area of 65.5 m² was 236,850 rubles, approximately 3,616 rubles per 1 m². He hired assistants only for pouring, paying 5,000 rubles for the work. I spent almost 60 thousand more on tools and consumables.
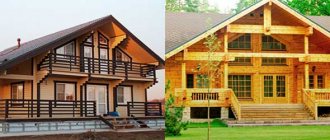
Why choose a frame house with an attic?
The attic design adds aesthetics to the house, providing the opportunity to choose an unusual roof option due to its complexity. The presence of planes of different shapes distinguishes an attic house from single-story frame buildings.
Also a plus is the illumination of the room - windows at an angle let in more light , opening up opportunities for variability in design.
As a rule, it is difficult to live in such a room due to low ceilings, so the attic is used for other needs. For example, arranging a children's playroom, library or office would be perfect.
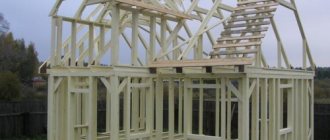
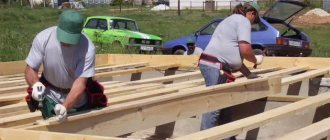
Frame assembly
While the slab was standing, I took care of the fence, and at the same time poured crushed stone over geotextile on the entrance area in the entrance (entrance) area from the gate and gate to the house. The fence had to be abandoned at the stage of assembling the formwork in order to complete the warm contour before winter; the first two walls were assembled and raised in almost one day, another day was spent on assembling and lifting the third.
Assembly was complicated by the disgusting quality of the lumber - due to the curvature of the boards, the corners had to be tightened with bolts, the nails could not cope. The quick-release and screw clamps purchased ahead of time were very useful.
Not everything went as in Larry Hohn's films; if it was level at the bottom, a lot of effort had to be made to level the top, but things worked out, the box grew. I finally leveled the walls with the help of a winch and a tow rope, cut corner jibs into the corners, the region is windy, it’s not superfluous to insure OSB for your own peace of mind. At the same time, I made an insulated blind area.
There were no difficulties with the overlap - joists with a pitch of 488 mm, bridges (lintels) every 1220 mm, for laying OSB 1220x2440 mm, plus I added a lintel on the walls between the joists. Even without slab cladding, there is no trampoline effect with a span of 3.7 m.
But how to tighten the OSB to the top in one, I had to rack my brains, but even then everything worked out.
adenartFORUMHOUSE Member
I threw 4 50x150 mm 6-meter boards from the ceiling to the ground, near the stack of OSB, fastened them with an inch at the bottom in two places and made a support so that they would not sag. I nailed another board on top, about a meter from the ground, to support the sheet. He pulled the sheet from the stack onto the boards, pushed it a little and rested it on this board, then hooked two clamps on top of the sheet and a cable to them, and pulled it up from the ceiling by the cable. The most difficult thing was to drag the first sheet, or rather, it was more scary, because I had to drag it and step back along the joists, then it was calmer on the OSB.
I couldn’t find any rough nails on sale, so I fastened the sheathing with self-tapping screws (5 and 56 mm), with sizing using “liquid nails” from the middle price category. I twisted the screws “like in a book”, along the edge of the sheet along the edges of the walls after 10 cm, along the edges of the sheet inside the house after 15 cm, inside the sheets after 30 cm.
I covered the first floor with OSB sheets, horizontally, with staggered seams, assembled and raised the outer walls of the attic, gables and internal supporting walls. Raising a ridge made of double boards 50x20 mm, 8.4 m long with a gable height of 4.3 m alone is another puzzle. The decision is risky, but the winners are not judged.
adenartFORUMHOUSE Member
And I lifted the skate, although I didn’t make the scaffolding - I lifted it with a winch as I originally wanted, in one piece. To be honest, it was scary when a 100 kg fool was hanging on a rope above you. And then I had to climb onto a wall 100 mm wide and, standing on it, having no other supports, lift the ridge with my hands and push it into the opening on the pediment. Somehow I was able to lift one side and put it in place, and lifted the other side with a winch, but then I couldn’t do much with my hands, but then the neighbor with whom we raised all the walls looked in, and together we finally defeated him !
The quality of the lumber had an effect here too, even the boards that seemed even were bent, and the ridge tilted a little to the side, but further loading should correct it. I installed supports, the spans along the edges are 2 m, the central one is 3.5 m, there is no deflection.
Before assembling the rafter system, I worked out all the controversial areas (strengthening the ridge, fastening the rafters, friezes, etc.) in a graphic editor, and after the approval of the collective mind, I assembled all the elements.
I laid the membrane, filled the sheathing, laid the metal tiles in the color “moss green”.
I covered the attic with OSB, installed energy-saving windows, as usual, having first carefully studied the theory and consulted with forum members. During installation, I was guided not only by other people’s experience and advice, but also by the current GOST for the installation seam.
I installed a metal front door, I wanted a Finnish one, but the budget didn’t stretch it, so I had to make do with a more affordable option in the first place.
Important points
Having decided to use the attic space to your advantage, you will have to come to terms with the reduction in space due to sloping walls. To make a room comfortable and functional, you need to properly plan the arrangement of furniture.
Windows in the attic are also very specific - they differ from ordinary ones in size and, most importantly, in price. Their cost is higher than classic double-glazed windows for installation in walls.
It is important to take care of thermal insulation and choose the right roof. Without this, the attic will not be able to provide the required level of comfort for living.
Interior decoration
The insulation was laid flat, without trimming, although in a compressed state the thermal conductivity increases, but I didn’t waste time on trimming, the difference in the coefficients “per circle” is not so critical. The attic floor was insulated with 200 mm stone wool slabs, plus another 50 mm of glass wool underneath from the ceiling of the first floor, for sound insulation. I considered the vapor barrier purchased for the whole house to be a bit sticky and laid it in two layers in the attic, and on the first floor I used 200 micron film.
Next, I installed the electrical panel, carried out ventilation and closed the box with a membrane.
I taped the windows and made counter-insulation on the first floor.
The rough cladding of the walls is standard for frame frames - gypsum plasterboard, first I did the first floor.
I decided to make the staircase “solid”, a wooden frame with a niche, covered with plasterboard, and in the niche there was a couch and a house for a cat. The wooden base platform, stringers 60x300 mm, even in the rough version, the design really helped when I had to haul 90 sheets of gypsum board up.
At the same time, I connected a treatment station so that water could be used.
Before laying the tiles, I coated the base around the wet areas (bathroom, sink) with waterproofing mastic, and treated the remaining surfaces with a regular primer.
At this stage, construction costs amounted to about 1.25 million, which included all expenses:
- USHP – 260 thousand rubles.
- VOC – 70 thousand rubles.
- Well – 100 thousand rubles.
- Tools – 70 thousand rubles.
Condition of the house: closed circuit, ready for finishing of the first floor with floors (tiles, linoleum), interior doors, plumbing, simple kitchen and boiler room (electric boiler, boiler, etc.). The second floor is only covered with plasterboard. Both finances and time ran out, and the family decided to move. What remains to be purchased and completed:
- Putty, fiberglass and paint - on both floors.
- Floor coverings are on the second floor.
- Doors to the second floor.
- Facade.
- Fence.
Construction started in the early summer of 2015, almost single-handedly adenart built a one-and-a-half-story house, hired an engineer, practically finished the first floor, and moved in with his family in early March 2016.
Harness
Before laying the beams, the tops of the piles must be coated with mastic and two layers of roofing material must be placed on them. They will serve as waterproofing. The bars themselves are treated with an antiseptic.
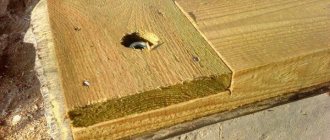
The bars are installed on piles along the entire perimeter of the base. They are connected to each other in half a tree using nails 120 millimeters long. At the corners, the joints can be strengthened using metal corners secured with nails 50-60 millimeters long.
The strapping is fixed to the base using fastening screws. The beams are placed in the heads (in special grooves) and screwed.
It is necessary to lay a board on top of the strapping. It should cover the joints of the beams. This is where the frame racks will be mounted in the future. The board must also be treated with an antiseptic. The length of nails for fastening is 120 mm.
Subfloor installation
The logs are attached to the harness using metal corners. Boards are fastened to them with nails.
Insulation is laid between the joists, and a vapor barrier film is spread over it. The last layer is plywood, which is laid on the logs around the entire perimeter.
Frame installation
First, the corner posts are installed. They are fixed using reinforced steel corners.
Next comes the installation of all other racks. Corners are also suitable for this purpose. All racks are equipped with jibs. They will prevent loosening.
Top frame beam
In the corners, the bars must be secured using notches, in other places - with steel corners. The corners are fixed with self-tapping screws.
To give the structure strength, diagonal slopes are installed.
Installation of ceiling beams
Installation is done in three ways:
- By cutting method
- Perforated brackets
- Steel corners
You can combine several methods, for example, corners and the cutting method. The beams must rest on the frame beam. Fastening is done with self-tapping screws.
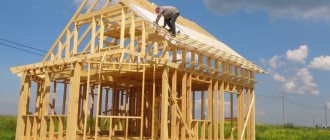
Installation of the rafter system
Installing a roof is a labor-intensive process, so we included a description of it in a separate article, “Do-it-yourself roof of a frame house.”
Exterior finishing
- First, a sheathing of bars measuring 40 by 50 is installed. The fastening step is 60 centimeters. You can also use metal profiles
- The lathing is treated with an antiseptic and fire-resistant compound
- Next comes the installation of finishing material using a certain technology.
A vapor barrier film is attached on top.
Interior decoration
There is no one to advise you here and you have the right to make it as you please.
In this article we told you step by step how to build a frame-panel house with your own hands. We hope the information received will be useful to you.
Photo report on the construction of a frame house with your own hands
In this section you will find photos of the construction of a frame house, which our reader built with his own hands on weekends.
Video of building a frame house with your own hands
Facade, finishing touches, fence
Work continued with cladding the façade with imitation timber, which the craftsman still preferred to “all kinds of siding.” As fasteners I used galvanized nails 2.5×5 mm, in a tenon at an angle of 45˚. Before installation, the boards were treated with colorless fire-bioprotectant, and on the façade they will already be coated with a tinted antiseptic – red-brown “Teak”.
At the same time, interior finishing was carried out.
adenartFORUMHOUSE Member
On the advice of a friend, I do this:
- I putty the joints/screws with starting putty;
- I go through a primer with the addition of glue;
- I glue fiberglass;
- I putty the entire surface with finishing putty;
- Cleaning up;
- I paint it with white interior paint in 2-3 layers.
Living room on the first floor.
Entrance hall and corridor.
As the heating season has shown, it is still impossible to do without radiators on the second floor, since the temperature difference is noticeable. But the stove, as intended, turned out to be an excellent heat accumulator and maintains heat after the heating system is turned off, although the boiler is set to 40˚C and is turned on only at night.
A staircase with automatic illumination of the steps; I made the controller myself, since a ready-made one is twice as expensive. The backlight is dynamic - the room darkens, the first and last steps light up at a third of the brightness. When someone goes up or down, the remaining steps gradually light up along the way and go out behind them.
Children's rooms are on the second floor.
Using leftover drywall, adenart made an imitation of old brickwork in the office; everyone liked it, especially considering the “zero cost.”
The office table is also homemade - edged board 50x150 mm, but in fact, 45x140-45, which after processing became even narrower and thinner. The frame was planed and sanded, the lid was only sanded, everything was varnished.
We also got around to the fence - a wooden picket fence on a metal frame. Initially, a chess game was planned, but the live appearance was not impressive.
Preparatory stages of construction
At each stage, you can act independently if you have confidence in your abilities. Or you can attract specialists to solve certain problems. For example, entrust the planning and design decisions to an architect or designer, and entrust obtaining an official building permit to a lawyer.
So, we list the necessary actions:
- building layout;
- creation of constructive solutions;
- choice of heating method;
- studying the possibility of connecting to utilities (electricity, water supply, sewerage);
- calculation of cubic capacity of building materials;
- selection and purchase of consumables for construction;
- approval of the project and obtaining a construction permit from regulatory authorities.
Conclusion
adenart was not afraid of difficulties and lives in a house built with his own hands for his family, which is what he wishes for everyone. And its topic can be used practically as a visual aid for anyone who is just about to build or is already in the process, but is running out of energy.
If you have doubts about your own abilities, the advice and experience of other self-builders is most welcome. If you also have a frame structure in your plans, find out how not to build the RSK its most unsuccessful version. The video is about a frame house based on a Scandinavian design, on an old foundation.
Subscribe to our Telegram channelExclusive posts every week
Construction guidelines
There are several recommendations for the construction of frame houses that can facilitate the construction and operation of a frame house and help avoid some mistakes during construction. When choosing materials and performing construction work, you should adhere to the following tips:
- To build a frame house correctly, you need to use wood with a moisture content of no more than 10-15%. Such wood is practically not deformed;
- It is better to take building materials with a small reserve;
- The columnar foundation must be driven 20-30 cm deeper than the freezing level;
- All wooden building materials must be treated with a special impregnation to protect against rodents and fire;
- All work must be carried out consistently, according to plan;
- Before starting construction, it is necessary to work out the house design as carefully as possible; remodeling it later will be very difficult and expensive.
Material calculation
Building a house with a wall length of 6 m is economically profitable. This is due to the fact that the standard length of the board is 6 m, that is, it does not require cutting, and waste is minimized.
To build a “frame” you will need the following types of lumber:
- timber of various sections;
- edged board with a cross-section of at least 2–5 mm;
- tongue and groove board with a cross section of 2.5 mm.
As a rule, to calculate the number of cubes of lumber, it is more convenient to use special online calculators, which are offered by many large hardware stores.
When calculating roofing materials, you should take into account how much the rafter system weighs, as well as the roofing material used, insulation, as well as the wind rose (that is, that part of the roof that most often bears the wind load).
To calculate façade materials, you also need to know the area of the façade; however, make calculations taking into account the sheathing. It is more convenient if a separate diagram is drawn up for this, since installation of the sheathing can increase each side of the house by 7–15 cm.
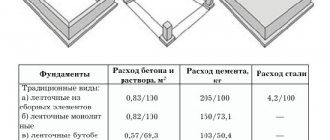
To calculate the foundation, you must first decide on its type. The columnar one will be the most economical, but it is only suitable for seasonal dachas. If we talk about the pile option, then preference should be given to screw piles. You can calculate their number by finding out how much load from the house falls on 1 square meter. m.
Start of construction
The construction of any building begins with a project. Even taking into account the simplicity of an 8 by 8 frame house, it is better to make a calculation and draw up a plan. A detailed estimate will make further work easier and cheaper.
Next you need to choose a place for construction and clear the area. To do this, it is necessary to remove the top fertile layer of soil. After this, you can proceed to the construction of the foundation. The choice of its type should be based on data on the type of soil, freezing depth, and landscape of the site. If necessary, it is necessary to carry out or order a geological survey.
Most often, frame houses are built on piles or strip foundations. The solution is poured as for ordinary houses - there are no special features. In the case of a strip base, a bundle of reinforcement is required, which requires wire. Concrete can be purchased mixed and ready for pouring, or you can mix it yourself using a concrete mixer on site.
If you are building an 8 by 8 frame house with your own hands, then the easiest way will be to build a shallow strip foundation. For this foundation, it is necessary that the depth of soil freezing in your region is no more than 50 centimeters. Otherwise, it is recommended to install a slab base, which, although not cheap, is the only way out in the presence of groundwater. In controversial situations, it is recommended to seek help from professionals.
Roof
Before you start work, determine the degree of slope, the number of slopes, the type of roofing cladding, and the design of the rafter system.
Dependence of the roof slope on the material used
The cross-section of the rafters is determined according to the thickness of the insulating material placed between them. It is best to take a board with a caliber of 150x50mm and a length of 6 m. Two boards need to be knocked down in the shape of the letter L, and then they are lifted up and the angle is determined, making sure that the overhangs extend beyond the level of the wall by 30-50 cm. Now the boards can be assembled using a crossbar, and we get something like rafters.
Design of a gable roof truss system
The upper trim acts as a Mauerlat here. Based on the manufactured sample, rafters are created for the entire roof, not forgetting about a pitch of 600 mm. The rafters on the ridge are installed on the pediment and the installation of the remaining elements continues along them. The type of roofing material determines what type of sheathing will be used.
Ceilings and roof
Before starting this stage, it is necessary to install floor supports. If a two-story frame house 8 by 8 is being built, then for the second level the role of these supports will be performed directly by the walls themselves.
To install the roof, you need to install a frame. The rafter system is most often assembled on the ground and then raised to the top. For rafters, a beam with a cross-section of 50 by 150 millimeters is usually used and is fixed at an angle of 50 degrees.
To cover the roof of an 8x8 frame house, you can use soft tiles, ondullin or metal tiles. The roof structure must be stable enough to withstand the weight of the snow cover, as well as the negative external influences of the environment.