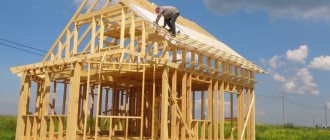
Building a frame house with your own hands is a feasible task if you have the skills, the necessary funds, a great desire and detailed step-by-step instructions for installing a small building measuring 6x6 m. It is unlikely that a large project can be completed on your own; it cannot be done without contractors. And it’s quite possible to raise a country house or a bathhouse with the help of one or two friends or relatives.
Where to begin
Frame construction technology was chosen for the following reasons:
- rapid erection;
- low cost;
- ease of construction;
- environmental friendliness;
- good “warmability” and ability to retain heat;
- "flexibility" of the design.
Based on the size of the building material (pine boards), the dimensions of the building were determined: it should be a 6x6 frame house with a terrace. The layout of the first floor included three rooms. Instead of the second floor there is an attic.
layout of a frame house 6 by 6 house diagram
House dimensions
The peculiarities of frame construction limit the size of the house to tens of meters in length and 5 - 6 in width. For one family, the optimal choice is 6X6. It can be built as a one-story, two-story or attic version. There are quite a few ready-made projects for such buildings - they are developed by almost every company involved in the construction of frame-type houses, and you can easily buy the project.
House 6x6 scheme drawing
If you have sufficient skills and understanding of the construction business, for reference, you can use one of the projects on our website or download a house project from the Internet as a base one and rework it to suit your tastes, not forgetting, of course, about the strength and stability of the house. The peculiarity of frame houses is that the main load falls on the external load-bearing walls and partitions inside can be installed at will.
Interior layout of a 6x6 house
But the layout of the house must be chosen before construction begins - the laying of communications, flooring and other preparatory work must be fully consistent with the chosen project. This will help save both time and money.
Foundation
Based on the publications studied, the calculation of the weight of the structure and operational loads was determined to be 36 tons.
The bearing capacity of the foundation is determined based on the total weight of the structural elements: roof, frame, plinth, operating load. For calculations, you should use SNiP “Loads and Impacts”, choosing the appropriate building material and its quantity. The snow load must be taken into account.
Screw piles were chosen to construct the foundation. During one working day, 16 piles with a diameter of 89 mm and a length of 3 meters were installed. The depth of embedding of the piles was 2.5 m. The bearing capacity of such a foundation is designed for 48 tons.
For the strapping, 50x200 hardwood boards were chosen, which were combined in threes to imitate 150x200 timber. The wood was treated with Senezh Ultra antiseptic in two layers. The boards were attached to the heads using 250 mm studs and wide nuts on both sides. The strapping boards were fastened together with M12 180 mm screws in increments of 1 meter. Additional consolidation was carried out with 100 mm nails. The body of the house was subsequently secured to the frame with steel tape.
screwing in the pile
screw piles
twisted pile, caps are put on, strapping with boards
scheme for tying a screw foundation with boards, laying from moisture-resistant plywood
studs for the tie fastening the harness with the head
Know-how: combinations of pitched roofs
There is one new architectural fashion: a gable roof, which consists of two single-pitch roofs, but not connected at the ridge. And technologically, we are still talking about two separate pitched roofs, which are built according to all the rules. And in the middle they place either a flat part or an open terrace between the two halves of the house. An incredibly successful and functional solution, we note, which allows you to add more natural light to the house.
Houses with a pitched roof are recognized throughout the world as the most favorable in terms of energy saving. Which is not surprising, because the cube also takes first place in this regard, but what then is such a house if not a cube?
Now we’ll tell you a secret: it’s all about compactness. Any structure is called compact if it has the minimum possible area of all external surfaces. Thus, a house is sometimes built according to rather intricate designs, when almost every room has three external walls, plus a complex roof. And sometimes it happens that the rooms have only one such wall, and the roof is generally pitched.
What's the point? The fewer external surfaces that come into contact with cold street air, the warmer the house itself will be. This is why compactness is so important in construction!
In this design, everything is simple: pitched roofs are built according to the same templates, but rest on two parallel mauerlat purlins. And the main advantage is that such a non-thrust structure does not “pull apart” the walls of the house with its pressure, and, therefore, there are much fewer strength requirements for the frame structure itself. True, such a house must have at least two internal walls.
And in modern architecture, a new style has recently appeared: roofs united into a single whole, which are inclined in different directions.
Selection of lumber
The choice was limited to a meager supply of dry, but not sawn, or sawn, but damp wood. After deliberation and calculations, pine boards 50x150 were chosen for tightening the rafters, forcing walls and gables, 50x200 for laying floors and rafters, 25x150 for jibs and sheathing.
A careful examination showed the presence of knots, unevenness in thickness and width, so one had to be careful when choosing boards for constructing the frame: defects in the wood could lead to a decrease in the reliability of the structure. To calculate the strength of the structure and design of openings, the book Advanced Wall Framing was used.
Timber tying
Horizontal beams are laid on top of the finished piles. This design is called a grillage. When you decide to build a frame house with your own hands, the step-by-step sequence begins with the installation of a grillage, which is also the bottom frame of the frame with vertical fastening of the racks on them.
For the bottom trim, choose a wooden beam with a cross-section of 150x150 mm. This is a load-bearing element of the structure, which must have sufficient strength and support the walls, roof, decoration and internal household appliances.
To connect the corners of the strapping, choose one of the methods suggested in the picture - half-tree or half-paw.
Half-tree connection options
Half-tree and half-leg connection
They differ in the thickness of the wood cut for corner joints. Half a tree - exactly half the thickness of the beam is cut, half a tree - the beam is cut at an angle to each other. The connection is reinforced from above with a metal bracket or plate. Then the corner of the trim is secured to the foundation with a metal anchor. After installation is completed, the timber is treated with an antiseptic.
Floor installation
The logs were pre-cut to size and then laid taking into account the irregular geometry of the lumber. Next, the logs were secured with spacers. When laying the joists and struts, defects made during the installation of the piles appeared. Izospan D insulation to block soil evaporation was laid on the ground and pressed with a layer of crushed stone.
aligned the joists on one side
on the other side, we measured the length of the installed joists; the joists made spacers to stiffen the platform
Instructions for the subfloor
To build a frame house, the instructions will describe in detail the entire construction process. First of all, the floor of a frame house with your own hands consists of a rough layer and a finishing coating. The subfloor is made of concrete or wood. Finish coating made of wood, laminate, linoleum and other finishing materials.
Concrete subfloor
The concrete floor is poured on top of the ground. It represents a multilayer structure, which contains a layer of waterproofing, thermal insulation, and reinforcing mesh.
Concrete subfloor - concrete screed
The bottom layer is 10 mm sand. On top - thermal insulation made of expanded clay, sawdust with clay - the so-called adobe, penoplex. Next is concrete with a waterproofing additive.
Wooden subfloor
If wood is used to construct a subfloor, then empty space will form underneath it.
Subfloor between joists
Wooden logs are laid on top of the bottom frame and are used as a base, to which subfloor boards are nailed from below. Insulation is laid on the subfloor boards. Then the flooring is spread on the logs: laminate, linoleum, OSB, parquet.
Walling
The main techniques that guaranteed the energy efficiency of a 6 by 6 house without compromising its strength are:
- compliance with the location of frame elements relative to each other: joists, rafters and racks;
- arrangement of ties of the top boards with a metal plate;
- use of spaced beams of openings;
- arrangement of openings without beams in non-load-bearing walls;
- due to the fastening of beams with metal plates, there are no double posts in the openings.
High-quality material was selected for the racks, and the pitch between them was calculated taking into account the sizes of insulation sheets and drywall - 2.45 m and 0.625 m, respectively.
The position of windows and doors was determined by the step between the posts. The beams in the openings were fastened with metal plates, the window sills with 40x40x40 corners.
When knocking down the boards of the wall frame, as elsewhere later, the nails were not immediately driven into the head, leaving the opportunity to evaluate the completed part of the work and make corrections.
To lift the wall, it was necessary to connect the upper edge and the foundation with a rope of limited length to prevent tipping, and the lower edge had to be connected to the floor with tape to prevent slipping. The raised walls were fastened with nails to the base and additionally with jibs.
nails until the window opening without double mullions is completely nailed in
crossbar on the corners (controversial decision)
temporary jib
so that the wall does not move away when rising
limit tape
first floor frame
Frame assembly
Frame house construction is based on the norms of SNiP 31-105-2002, compiled on the basis of foreign regulations.
A strapping beam is placed on top of the foundation and secured strictly to the level. The frame is assembled traditionally, installing the racks alternately in a vertical position, or using the “Canadian platform” method. In this case, the assembly is carried out horizontally on the finished subfloor, followed by installation of the sectors in the design position.
Racks made of planed boards measuring 150x50 or 200x50 mm are installed in increments of 600 mm, attached to the lower trim beam, starting from the corner. The frame is fastened along the top with a strong beam - the top trim.
Window and door lintels are reinforced with boards laid on edge. The thickness of such an element depends on the size of the opening. If it is wider than 800 mm, the crossbar should be no thinner than 150 mm.
The frame is reinforced with board jibs, cutting them into the upper and lower chords, or with a perforated steel strip. If rigid sheets are used for cladding - multi-layer plywood, OSB - no additional elements are installed.
The outer cladding sheets are placed in a checkerboard pattern with the seams staggered, with the long side parallel to the foundation. This installation rigidly binds the frame in the horizontal direction.
Ceiling installation and rafter installation
When installing the ceiling, the relative positions of the racks and joists should be strictly observed: the spread should not exceed 5 cm. A stretched cord was used to align the ends. So that during the laying of the board connecting all the logs it was possible to adjust the accuracy, a pin was placed under the end of the board, which made it possible to easily move the board over short distances. The laid logs were fixed with spacers installed in three lines with a step of 1.5 m. The length of the spacers was slightly longer than required so that the drying boards did not weaken the structure. It is planned to make the ceiling suspended, like here: https://potolkilider.ru/informatsiya/natyazhnye_potolki_murino/
we throw the logs onto the second floor; the second floor floor joists are installed
transverse for floor rigidity
After determining the snow load (240 kg/m2) and the weight of the roof (40 kg/m2), a high-quality 50x200 board was selected for the rafters. Since the ridge was not provided, the legs were assembled in pairs into a triangle and connected with a nail plate on one side, and on the other with a plywood triangle. The width of the supporting cut was determined using a measuring board, the length of which was equal to the width of the ceiling. To provide rigidity, each pair of rafters was additionally fixed with a screed at a level of 2.5 m from the floor and a special jumper at an angle of 30 degrees. From the inside, the rafters received additional insurance in the form of a metal tape attached to the joists and stretched diagonally in a cross. To make lifting the structure easier, a cord was used.
OSB for floors with locking joists coated with liquid nails
lifting osb sheets to the second floor
fastening steel tape additional fastening of rafters to the ceiling, sealing the technological gaps with sealant
A “staircase” had to be put together to accommodate the excessive roof overhangs, since the removal of the beams had not been thought out. The pediment with a pitch of 40 cm corresponded to the location of the racks on the roof.
The large roof created significant windage, so for insurance it was necessary to run a metal tape from the rafters along the racks to the trim before installing the OSB boards. This was not done; the rafters had to be attached to the racks from the inside. I did the same with the lags, which I fixed with the strapping. It is better to use metal perforated tape.
The canopy for the veranda and the roof of the house formed a single whole. The posts and beams are made of 100x150 timber. The pitch between the pillars was 2 m, the beam had a protrusion of 60 cm to form the roof overhang. To prevent the structure from moving, 37x37 window corners were used to add rigidity.
The time spent on installing the rafters is 10 man-days.
rafter joint
rafter legs rafter system checking the verticality of the roof gables
Roof
A pitched roof consists of a rafter system supported by a frame of external and internal load-bearing walls. The cross-section and pitch of the beams are taken according to the tables of the current SNiP; they depend on the type and material of the roof, expected loads, and design solutions.
Roofing is a complex cake, including:
- A continuous roofing deck attached to the supporting frame and protecting the house from precipitation and melt water;
- Rafter beams that take all the loads from the roof;
- Insulation, vapor barrier;
- Binder.
This design ensures heat retention in the attic space. If it is not in use, the ceiling of the first floor is insulated.
Wall cladding
The 6x6 frame house was sheathed with 2.8 m OSB boards produced by Egger, and fastened with 60 mm screw nails, which were driven in at intervals of 15 cm along the perimeter and 30 cm along the middle post. The position of the stand on the sheet was marked before installation. The strapping was covered with a sheet using a 25 cm guide board.
The joints of the slabs should be nailed staggered, and the nails should be directed at a slight angle.
Labor costs – 3 man-days.
rough nails
slab wall cladding
technological gap using a nail
6x6 frame house floor frame
The next step in the step-by-step instructions is constructing the floor frame.
- To prevent the wood from becoming saturated with moisture from the concrete base, waterproofing is necessary. Cover the base with bitumen mastic or waterproofing.
- Fix boards (beds) made of well-dried wood along the perimeter of the foundation.
- Between them, place the strapping boards on edge every 40-50 cm.
- Attach logs to these boards - boards that evenly transfer the load to the foundation.
- Lay insulation sheets (for example, polystyrene foam boards).
- Then lay a rough wooden floor on top of the insulation and cover it with sheets of plywood.
Roof covering and platform decking
Before laying the roof, a layer of vapor barrier was laid on the rafters - a Tyvek membrane film, and on top of it - lathing. The material chosen was “Puretan” metal tiles with a slightly thicker galvanization and durable coating compared to others. During the laying of the tiles, ventilation ducts were made for the bathroom and room, as well as a stove exit.
25mm OSB with 4-sided tongue and groove was chosen as the decking. The installation took 1 day.
Tyvek membrane film installation of metal tiles finished roof
metal tiles
Advantages and disadvantages of a small house
In many ways, the pros and cons of the size of the house depend on the size of the family.
Maintaining a large house can be a challenge for a small family. To prevent mold and dampness from appearing in empty rooms, they need to be heated, as well as cleaned and repaired. Of course, in a modest area there are more problems due to space constraints, but there are also advantages that can outweigh the disadvantages. Pros of a 6X6 house:
- It is easier to heat in winter, energy resources are used economically;
- Saving on building materials;
- Saving money and time on home maintenance and repairs;
- There is more land left for setting up a garden;
- Possibility to make a more spacious yard.
One of the disadvantages can be highlighted: cramped space. Of course, in a small house it is difficult to fit everything you want. But with the right approach to the layout of premises, it is quite possible to create a cozy home environment if the family consists of 2, 3, or even 4 people.
Insulation
Insulation was chosen based on the optimal price-quality ratio. Most of all, Rockwool Light Butts Scandic (60x80 cm), Scandic XL (60x120 cm) for interior spaces and Technolight for external insulation met this criterion. The thickness of the slabs was chosen to be 100 and 50 mm in order to maximally close all openings in the walls and ceilings. The most suitable pitch between frame elements for laying Rockwool is 57-58 cm. To keep the insulation in the ceiling opening, plywood sheets were used. The sheathing for external insulation was made in increments of 59 cm. After laying Technolight, a Tyvek membrane was stretched over it. Foam plastic was used to insulate the windows.
insulation Rockwool Light Butts Scandic floor insulation
internal insulation external insulation
windproof membrane
Price
Determining the cost of a frame house includes the following mandatory calculations: the cost of the foundation; wall frame cost; cost of frame floors; roof cost.
Evgeniy Filimonov
Ask a Question
All calculations are made on the basis of preliminary estimates of materials and working tools at market prices. The calculations also include payment to workers and fees for supplying and connecting all communications. The cost of interior and exterior decoration of the house.
Window
Before installing Veka Softline 5-chamber windows, the opening was thoroughly waterproofed with Niconband roofing tape and pieces of membrane film. After cladding, flashing, slopes and platbands were installed. The cracks are sealed with sealant to match the painted trim.
roofing tape Niconband gluing the window opening with a roofing flight taped the entire opening at the bottom gap
gap at the bottom
gap at the bottom
low tide metal mesh
Common mistakes when planning a house
When drawing up a construction plan, it is worth taking into account certain inaccuracies made by other builders.
Popular mistakes and methods for solving them:
- When drawing up a drawing, pipes are schematically placed next to areas of high humidity, i.e. next to the bathroom.
- Living rooms are left without natural light - the bedroom is placed so that the maximum amount of sun rays enters it.
- Single entrance - private housing must have 2 entrances (front and additional), which will be used for household needs.
- The exit from the bathroom is led to the living rooms - this will cause discomfort for guests and owners.
- Living rooms are not fenced - this will also cause inconvenience.
- There is no space left for a storage room or other utility room - housing must have an area for household tools and gardening equipment.
If a stove is installed, then it is necessary to allocate a place for it, taking into account fire safety and free space.
A small house outside the city is economical and convenient. To make life in it comfortable, you should select a building project with approximate dimensions and diagrams. It must take into account the need for available space and necessary amenities. You will have to think about the comfortable accommodation of each family member. Zoning of the premises should take into account the available space and the number of residents.
Sources
- https://dizlandshafta.ru/dizajn/planirovka/doma-6-na-6/
- https://remoo.ru/stroitelstvo/planirovka-dvuhehtazhnogo-doma-6-na-6
- https://roomester.ru/dom/planirovka-doma-6-na-6.html
- https://m-strana.ru/articles/proekty-domov-6-na-6/
- https://PlanVsem.ru/dom/planirovka-doma-6×6.htm
- https://zemeljka.ru/doma-i-kottedzhi-6-na-6-proekty-i-planirovki-domov.html
[collapse]
Facade
The decision to use imitation larch timber as cladding for a 6x6 frame house was made due to environmental friendliness, relatively low cost and the ability to change color. A ventilation gap should be provided under such cladding and a sheathing with protection from insects and mice made of mounting mesh should be installed. Galvanized nails of 50 mm were chosen as fasteners.
Tikkurila products were chosen for the finishing because the primer and paint preserve the wood structure and have significant durability. A total of 10 man-days were spent on cladding and painting.
metal mesh against rodents
lathing for imitation timber installation of imitation timber from scaffolding imitation timber coating the joints
window bypass
sheathing completed
painting the facade final view of a 6 by 6 house
Formations in 6 on 6 football: pros and cons
Tactic 3-2
The 3-2 scheme can be successfully used by both novice teams and more experienced teams. This formation includes three defenders and two attacking players. (Fig. 1)
Rice. 1. Diagram 3-2
Let's look at the advantages and disadvantages of this tactical model.
Advantages of the 3-2 scheme
Easy to understand
Each player knows what position he should take. The defenders divide the central, right and left zones of defense among themselves. One striker is to the left, the other is to the right.
Reliability in defense
This advantage partly follows from the previous one. When everything is clear to players, fewer errors occur. If all the players are behind the ball line, then it is very difficult to break into such a defense. The flanks are closed, and so is the center of the field.
This formation is good when you need to maintain an advantage.
Your team can easily adapt to a 2-3 formation.
Disadvantages of the 3-2 scheme
Vulnerability of the center of the field
In this scheme, there is no clearly defined support zone player who would be the designer of your attacks and the destroyer of the opponent’s attacks.
Tactics 3-1-1
The 3-1-1 formation has 3 lines: defense, midfield and attack. This allows the team to develop attacks more smoothly. There is a distinct midfield player who functions as a playmaker. (Fig. 2)
Rice. 2. 3-1-1 formation
Pros of the 3-1-1 scheme
More options for breaking out of defense through passing
With the help of the center player, triangles appear, which help the team to control the ball well from the bottom.
The threat from the flanks is blocked
The formation of 3 defenders allows you to cover all zones in defense.
Playing on counterattacks
This formation has good ground for creating dangerous counterattacks. Your team can take the striker one-on-one with the opposing goalkeeper in two passes. (Fig. 3. Black arrows show gear directions, orange arrows show opening directions)
Rice. 3. Counterattack pattern in 3-1-1 formation
Disadvantages of the 3-1-1 scheme
High class performers
Have you noticed that there is only one player each in the midfield and attack lines. It is possible that they will have to act against two opposing players. The skill level of such players must be quite high.
Threat from midfield
If the opponent plays with two central midfielders, then in the center of the field a 2-on-1 situation will often arise that is not in your favor. This can lead to dangerous shots from the central zone. (Fig. 4)
Rice. 4. Opponent's advantage in the center of the field
Tactics 2-2-1
2-2-1 in 6v6 football is the same as 4-4-2 in 11v11 football. This is why this formation is popular among amateur teams. (Fig. 5)
Rice. 5. Tactics 2-2-1
Pros of the 2-2-1 scheme
Balance
This model provides a balance between defense and attack. Two midfielders manage to help the defense and attack without any problems.
Ability to defend compactly
A 2-2 defensive formation provides good density in front of your goal.
Playing on counterattacks
The 4 players on your team behind the ball have a great chance of winning the ball and quickly delivering it to the attacker.
Disadvantages of the 2-2-1 scheme
Risk of failure in the center of the field
A failure in the center of the field is possible when both midfielders of your team are delayed in attack. The opponent can take advantage of this and “fall out” 3 on 2 on your goal. Very often such outings end with a goal being scored.
Tactics 2-1-2
The 2-1-2 formation can be classified as counter-attacking. If your team has fast players, then it makes sense to try it. (Fig. 6)
Rice. 6. 2-1-2 formation
Pros of the 2-1-2 scheme
Good counterattack potential
After the tackle, the ball is delivered to the central midfielder, who then chooses the most promising option to continue the attack. There is a good chance of catching your opponent by surprise. (Fig. 7. Black arrows - gears, orange - openings)
Rice. 7. Counterattack with 2-1-2 formation
Allows for good attack width
Two attacking players can operate on the flanks, creating the necessary width.
There is a distinct midfield player
Constantly having a player in the middle will allow you to develop attacks through passing.
Disadvantages of the 2-1-2 scheme
Great workload for the central midfielder
The central midfielder needs to be able to keep up both in attack and defense. This is a very difficult task. In this case, it would be good to have a replacement player who is capable of playing equally well in this position.
The defensive line consists of two people. If two attackers act against the defenders, this can lead to dangerous moments at your goal. It is better not to create a 2v2 situation in defense, especially if the opposing attackers are stronger individually.
Bottom line
After calculating all the costs, the cost of the house was obtained, which turned out to be more than 800,000 rubles without taking into account communications.
Apart from laying the foundation, laying the roof and installing windows, all other work was carried out, with rare exceptions, by two hands. The main difficulty was moving lumber around the construction site. As GrauRu’s experience shows, building a 6x6 frame house on your own is a completely solvable task that allows you to save, if not time, then money, and enjoy the work done.
Ventilation
Ventilation of a frame house must be clearly defined and thought out at the design stage. With proper ventilation, an optimal microclimate will be provided in the house.
Ventilation can be:
- Natural (vents, windows, ventilation pipes);
- Artificial with an installed fan (for example, a kitchen hood);
- Combined, when both types of ventilation are used;
- Combined with an air heating system. Ventilation is simply necessary in the kitchen and toilet. At the same time, thanks to the special design of the house, all ventilation elements can be hidden behind the walls.