What association does a person have when he hears or pronounces the word “home”? It's hard to imagine whether this is an old Gothic castle or a modern cottage. Many, most likely, imagine a solid and not very pretentious-looking structure made of wood, personifying reliability and naturalness. What explains this association? Everything is very simple. Any home, as you know, should give a feeling of comfort and warmth, and wooden structures do this perfectly. It’s not for nothing that wooden architecture was so popular among our ancestors. It is these kinds of structures that will be discussed further in this article.
Choosing material for building a wooden house
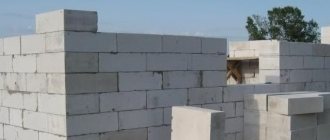
Construction of a house from laminated veneer lumber
When choosing a building material, the purpose of the building and its size, the cost of consumables, and further finishing costs are taken into account. No less important are the thermal insulation properties and quality of the wood.
timber
For construction, solid, glued and profiled timber is used. The first type is made from a tree trunk by cutting on four sides. In this case, the element receives a rectangular or square cross-section. The surface of the timber is sanded or not treated. Elements with a thickness from 9 cm (for internal partitions) to 25 cm (for load-bearing walls) are suitable for work. During construction, they fit tightly together, ensuring reliability and thermal insulation of the structure.
Profiled timber is characterized by the presence of polished surfaces and locking elements: a tongue-and-groove connection. In this case, additional fasteners are not required. Glued laminated timber is made from dry wooden lamellas, the length of which is 12 m and the thickness is 7.5-35 cm. The elements are treated with glue and pressed. The result is a beam with increased strength and resistance to warping. The structure made of laminated veneer lumber is strong, reliable with a flat, smooth surface. This is what is used most often.
Logs
House made of rounded logs
A debarked or rounded log is suitable for building a house. In the first case, the bark is removed from the trunk with an ax or using a special machine. The length of the element reaches 6 m, and the diameter is 45 cm. A house made of “wild” logs looks impressive, but the presented material is rarely used today.
To make a rounded log, not only the bark, but also the top layer 2 cm thick is removed from the surface of the trunk. The length of the elements is 6 cm, the diameter is 15-30 cm. During construction, the crowns are the same, with a clearly defined texture.
Panels
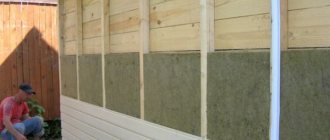
The panel is based on a frame made of dried boards or timber, inside which insulation is placed. The product has a layer of vapor and waterproofing. A house made of such material costs the same as one made of timber, since the main funds are spent on finishing it.
The advantage of the panels is the speed of construction of the structure, as well as the absence of the need for additional insulation.
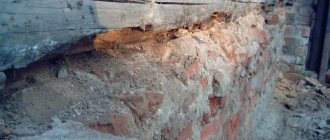
Laying the basement structure
Next, we build a frame house from the stage of laying the basement. The operation is carried out with the direct placement of bricks in three rows, while a special masonry mesh is located between the second and third rows. Then we begin assembling the formwork. When installing the formwork on the beams, the planned position of the septic tank must be marked, after which an excavator is used to carry out excavation work. When we build a frame house, we take into account that the septic tank is located directly away from the house itself and closer to the road level. On the site, one section of the fence is expected to be removable, which will allow the sewer truck to quickly access the pit.
Features of building a wooden house
Finnish house made of timber
Before building a wooden house with your own hands, you need to decide on its type. In addition to Russian, there are Canadian, Norwegian and Finnish types of structures. Each of them has its own characteristics:
- Finnish. Such houses are now very popular. Their peculiarity is the simplicity of lines and restraint of color. The building is characterized by a gable roof, a rectangular shape of the structure, and an area of up to 120 square meters. m., simplicity of layout, good sound and heat insulation properties. The building is often one-story, with the minimum length of the roof overhang being 20 cm and the height of the plinth being 40 cm. The Finnish project provides for low ceilings and the presence of a sauna.
- Norwegian. The building is monolithic and proportional. It is characterized by a simple layout, large premises with a minimum of corridors.
- Canadian. The house has a complex fundamental structure, characterized by a high roof, spacious rooms, and terraces. For the work, large diameter logs are used, installed using the “post and beam” technology.
Canadian technology
In the Russian style Norwegian style
In Russian house construction, several directions can be distinguished:
- country: the interior contains ancient Russian symbols;
- hut: no unnecessary decorative elements, restrained design, presence of a traditional stove;
- tower: the use of expensive decorations.
When choosing a “Russian estate” project, pay attention to the presence of carvings, shutters, and cladding on the top of the roof.
Construction of the foundation
An 8x10 frame house is built with the construction of a high-quality foundation. The trench is prepared using a standard dig; a grillage built on bored piles is selected as the foundation. When working on wells, first a drill using TISE technology is used, after which a special machine is used to prepare 38 holes, the depth of which is 220 centimeters. For a pile diameter of 30 centimeters, reinforcement with a diameter of about 14 millimeters is accepted.
10 centimeters of sand mixture are laid, the work is controlled using lasers. After checking the level, another 10 centimeters of gravel is laid, and the reinforcement frame is tied. It was planned to choose a foundation using TISE technology, but the fertile layer under the structure is not the optimal solution. The grillage made it possible to quickly build an 8 by 10 frame house, making it an excellent alternative. The columns are cleaned and coated with special concrete contact.
Pros and cons of a wooden house
The mass of a wooden house is small, so a strip foundation is sufficient.
Before you build a wooden house with your own hands, you need to consider its pros and cons. The following design advantages are highlighted:
- high strength of building material;
- light weight of the structure (no need to build a heavy foundation);
- low level of thermal conductivity;
- aesthetic appearance;
- high installation speed.
Wood has some disadvantages:
- The boards or logs may contain knots or other flaws: such elements are prohibited from being used for the construction of permanent walls.
- Untreated material will rot when exposed to moisture.
- Temperature changes lead to deformation and warping of the wood, and uneven shrinkage of the house.
- Timber or log is a fire hazardous material, so it requires additional treatment with protective compounds.
Disadvantages can be easily eliminated using specialized tools.
Preparing for work
All that is available is a site unprepared for construction; there is no gas, water or electricity supply. There are 20 tons of sand, approximately 10 tons of gravel and within 3 cubic meters of boards. At the preparatory stage, a temporary work shed is built to store materials and working tools. The temporary structure is made of wood and covered with metal.
Designing a wooden house
You can buy a project ready-made or make it yourself.
If you have made a choice about what kind of wood to build a residential building from, you need to start creating its project. First, the location of the building is determined. The distance from the neighbors’ site, the placement of communications, the well, the level of soil freezing, and the risk of flooding of the structure during spring floods are taken into account.
The design stage includes the following sections:
- architectural: information about external decoration, arrangement of rooms, number and type of windows, doors;
- constructive: includes information about the type and technical parameters of the foundation, roof, walls and ceilings;
- engineering: information about communications (heating, water supply, sewerage), electrical wiring, ventilation system.
When planning a house, the following parameters are taken into account:
- building configuration: today preference is given to buildings of complex shapes, which are expensive, but it is worth considering simple projects that can be made no less comfortable;
- number of storeys: if the house has more than one level, you need to consider the location and type of stairs;
- foundation type: a shallow strip foundation is suitable for light structures;
- roof shape: the standard option is gable;
- number of residents;
- heating system;
- purpose of the building: for permanent residence, for summer use;
- use of the “warm floor” system;
- features of interior and exterior decoration.
When drawing up the project, additional extensions and financial possibilities are taken into account. At this stage, it is necessary to provide ways to protect wood from the negative influence of external factors. The location of the heating system is determined taking into account the increased fire risk.
Project plan
The decision has been made, we are building a frame house using new technology. Specific plan:
- The house is designed to accommodate no more than 4-5 people
- In summer the house is used daily, in winter from Friday to Sunday.
- Estimated area up to 150 square meters.
- A site was selected located 20 kilometers from the city limits.
- The heating system includes a heat pump with a special geothermal circuit element.
- The "warm floor" technology is used.
- The sewerage design is based on a septic tank with three channels, discharging compounds into a drainage pipe.
Tools and materials
To lay out the foundation you will need an excavator.
To build a wooden residential house with your own hands, you will need the following equipment:
- shovels (for preparing a trench for the foundation);
- measuring tape, level, level, as well as cord and stakes for marking the territory;
- jigsaw, circular saw;
- concrete mixer;
- hammer.
Also required are components for preparing concrete mortar (for pouring the base), a waterproof and vapor barrier film, and insulation. If necessary, finishing materials are selected. To strengthen the foundation, metal reinforcement is used.
Sewerage preparation
Two drainage pipes are drained from the septic tank. Appropriate holes are drilled into the brick, having a depth of within 3 centimeters, after which the corresponding rods are inserted into them. In the dug trench under the right and left branches of the geothermal type circuit, it is planned to install a water well, as well as a collector. Water pipes, of which there will be three, are laid in trenches.
We reuse the formwork at the stage of constructing the beams; the second span is installed 50 centimeters narrower than the first, which makes it easy to use no more than four sets of beam formwork. When it is necessary to create permanent formwork, an inch board is used. A septic tank, a geothermal circuit, and a water well have already been added to the foundation.
A pit with a width of three meters and a similar depth is constructed as a septic tank. The depth is chosen in reserve, the bottom is filled with sand, leveling is carried out, and sewer pipes are laid. The length of the pipe is 20 meters; in case of cleaning it, inspection pipes are inserted in the central part so that a technological hole is provided for cleaning. The slope of the pipe is 2.5 centimeters per meter, the entire length is 0.5 meters, the end will be above the established ground level exit.
The pipe is wrapped in geofabric, which is secured with Mylar twine. The drainage pipes are filled in the reverse order with gravel and sand. The septic tank was chosen to be a three-chamber one, although it actually consists of one, but additionally equipped with special partitions. An asbestos cement board is used for the partitions; the liquid outlet is regulated by a check valve. The volume of the septic tank is 7 cubic meters, which is enough for 11 people.
Wooden house installation technology
The work involves erecting a foundation, building a box, installing a roof, and subsequent finishing.
Foundation
For a wooden structure, you do not need to make a very powerful base: it is not very heavy. A shallow, tape-type version is suitable here. The following sequence of actions must be followed:
- Cleaning and marking the area.
- Digging a pit. Its depth is 50-60 cm, and its width is equal to the thickness of the walls with an increase of 15-20 cm. A waterproofing layer is laid at the bottom of the compacted trench, on which a layer of sand (20 cm) is poured. The pillow is compacted.
- Reinforcement and filling. Formwork is made from boards and a reinforcing frame is laid. The boards are pre-coated with moisture-repellent material. Now pour the solution. To prevent air from appearing inside, the concrete is compacted.
- Waterproofing the base. To do this, use roofing felt or coating compounds.
When arranging the foundation, you need to make a drainage system and blind area. Moisture is removed from the foundation and walls, reducing the risk of structural failure.
Walls
The logs for the walls are lifted using a winch.
After the foundation has settled, you can begin to build the walls.
- Laying the floor and the first crown. The first row of timber or logs is placed on a waterproofed base surface. Larch material should be used, as this species is the most resistant to rotting. Jute is placed between the beams for insulation.
- Installation of subsequent rows. The elements are treated with antifungal agents. If natural logs are used for construction, the corners are connected using the “bowl” or “paw” method. Profiled or laminated timber is laid using a tongue-and-groove system.
After the walls are built, a temporary roof is built. Before installing windows and doors, the house must go through a shrinkage process. When using laminated veneer lumber, this time is reduced to 6 months. During work, it is necessary to monitor the level of the walls.
Roof
Gable roof for a wooden house
Before building a wooden house, you need to decide on the type of roof. It is best to use the gable option. The work includes the following stages:
- Floor installation. It is secured using special nails. Temporary flooring is placed on it.
- Installation of rafters. This procedure is carried out directly on the roof. Bolts are used to connect the rafter legs. The lower part of the elements rests on a protruding beam. In the area of the joints they are fixed with nails and tightened with staples. Several layers of waterproofing material are laid on top of the rafters: roofing felt or thick polyethylene film. The material is spread overlapping by 20-25 cm. Counter slats are nailed on top of the waterproofing. They are necessary to create ventilation space.
- Arrangement of sheathing. Screws are used to secure it.
- Roof decking. After this, they begin to attach the roofing material.
There are 2 options for arranging the rafter system: hanging or layered. The first option is used if the structure will rest on the side walls. She is easy. The distance between the walls is 6-14 m. The load on the capital side foundations increases. To reduce it, I use horizontal supporting elements and diagonal connecting bars.
If the house has internal load-bearing walls, you can use a layered rafter system. It has several points of emphasis in addition to the main side structures. The main support area is the ridge. Before building the roof, waterproofing and Mauerlat are laid on the walls. Lastly, the interior and exterior finishing of the structure is carried out.
Making a grillage
The formwork is made from high-quality laminated plywood and OSB material - 9 mm. Next, the structure is poured with a mixer, and the material is dispersed over the surface of the formwork. The last procedure is simple, but when the formwork is squeezed out by the earth, we must strengthen the structure. The construction of the basement structure is underway, for which bricks are being imported. The bricks are sorted to eliminate defects, reducing their quantity to a minimum.
Pouring the floor
When pouring the floor, the structure is not tied to the outgoing reinforcement beams. The floor is reinforced with fiberglass, thickness 6 cm, “shell” design. The beacons are nuts; they are screwed onto rods that are installed at a higher height. For control, a cord was pulled across the span, at the level of the nuts. After filling the floor, we strengthen the strapping beam. The structure is drilled through where the rods pass. A recess for the nut and washer is drilled in the upper part.
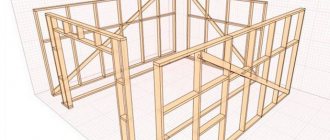
Installation of wall frame
We put the geothermal circuit pipes into the boiler room, fix the second end in the well well, and place the collector. Three PND-40 water pipes are installed in the bathroom. One of them supplies water, the second supplies electricity to the well, and the third will be a spare one in case of freezing.
The wall frame is laid, fastening points and problem areas are calculated. During the installation of walls, attention is paid to strengthening problematic beams, and the load on the surface of the material from the second floor structure is taken into account. It was decided to strengthen the overall structure of the frame by adding a number of beams (in areas with a distance of 1.5-2.0 meters). After installing the frame, the walls are installed, bosses are nailed at the bottom of the racks, and OSB forms the rigidity of the walls.
Construction of the second floor, roof
By the time the second floor is erected, electricity is connected to the first floor. Passage racks are installed on the beams (the base of the second floor floor) at the joints. To lift weights, a hoist placed in the structure of the house is used. The walls are covered with glass wool (approximately 2/3), and gypsum board is filled around the entire perimeter. For waterproofing, the inner surface is lined with reinforced film, pressed with 4 mm plywood.
For blowing, a lattice is used, dividing the space into individual pillows. Beam fasteners are used as ceilings. The spans between the joists are lined with plywood; technicol, 40 cubes, is used as insulation, which is covered with a membrane on top of the ceiling. The rafters in the structure lie on racks, thanks to the presence of windows with different pitches. After the first slope, the second one is laid, using the same insulation. Onduvilla was chosen as the material for the roof; it was decided not to use any iron.
Application of dowels
If wooden dowels are used in the construction of timber buildings, it is important to make them from the same type of wood as the timber itself.
It happens that for greater reliability, the timber is tightened with metal dowels. In this case, such a solution will be significantly more expensive, which may affect the overall cost of construction.
Installation of dowels occurs by analogy with brickwork. A hole several centimeters in diameter is drilled for the pins so that they can be inserted without effort. The installation of dowels should be done at a distance of one and a half meters from each other.