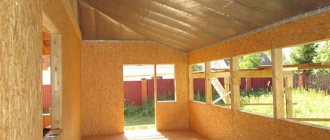
Wood is a living material, its main feature is its ability to breathe. In wooden houses there is a natural exchange of air, and steam from the interior easily goes outside without lingering in the wood. Today, many owners of wooden houses are trying to further insulate their home, turning its walls into a multi-layer cake of thermal insulation, waterproofing and decorative finishing. In this case, an additional layer of such a cake should be a vapor barrier for the walls of a wooden house. From the article you will learn why it is needed, what material can be used for steam and waterproofing of the external walls of a log house, as well as methods for attaching the insulator.
Why is vapor barrier necessary?
For the walls of a wooden house, a layer of vapor barrier (also called waterproofing) is necessary in almost all cases. The reason is in the characteristics of wood as a building material: it allows air to pass through well, but at the same time absorbs a lot of moisture, which is why it swells. If timely measures are not taken, this can lead to negative consequences:
- the walls will begin to curve or heave;
- the structure of the house will inevitably begin to sag due to increased wood density;
- finishing materials (lining, drywall and others), as well as wall coverings (wallpaper, MDF, PVC) can be damaged due to wall movement;
- mold may grow in the thickness of the walls and corners, which will create an unpleasant odor in the house;
- if water freezes during the winter cold, it will increase in volume, which will cause cracks and microcracks in the wood to increase, and the material will wear out faster;
- an increase in cracks also has another negative effect - over the years, the walls will freeze much faster, which is why you have to spend more resources on heating the room;
- finally, when moisture is absorbed into the insulation material, this quickly leads to its softening and deterioration - eventually you will have to dismantle the wall and install a new layer.
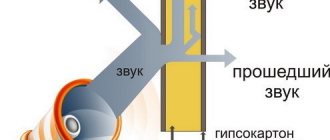
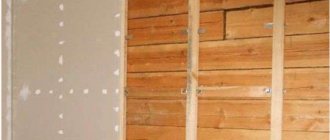
All these consequences can be easily avoided if, after completion of construction, a vapor barrier layer is laid, which follows immediately after the finishing material (for example, lining) and is tightly adjacent to the insulation, as shown in the diagram.
NOTE. Sometimes a vapor barrier layer is understood as a material that does not allow moisture to pass through, but allows air to pass through, and waterproofing is a material that does not allow either water or air to pass through. In a practical sense, the words are often used as two synonyms.
Do not use impermeable vapor barriers.
Construction methods that allow interior wall materials to dry out are considered better than those that seek to prevent moisture from entering
Vapor barriers are usually best installed on the side of the wall that experiences hotter temperatures and more humid conditions: the interior surface in colder climates and the exterior surface in hot, humid climates.
Under existing conditions, oil paints or vapor barrier latex paints provide an effective barrier to moisture.
Avoid completely impenetrable barriers, such as polyethylene or vinyl wall coverings, in air-conditioned areas. This can lead to mold in the home and other air quality problems.
Avoid installing vapor barriers on both sides of the structure. Walls and ceiling cavities should ideally be able to dry in one direction as long as the other side is built to prevent moisture penetration.
Seal all wall cracks and openings in the wall. Use special sealing tape to join the sheets if using polyethylene sheets.
Use caulk or weather stripping tape to seal around electrical boxes at outlets, switches or ceiling fixtures.
Is it possible to do without vapor barrier walls?
This option is, in principle, possible if the walls of the house are made of rounded or laminated veneer lumber, which is thoroughly dried during production. In addition, all the dimensions of the grooves where the logs will fall are calculated to the nearest millimeters, which ensures their tightest contact with each other.
But even in such cases, it is impossible to give a firm guarantee that moisture will not penetrate the tree, since the following risks remain:
- Wood as a material has its own specifics - it is porous, fibrous, and serves as a breeding ground for the development of microorganisms.
- Protective varnish treatment works well during the first 5-10 years, but over time it tends to disappear - accordingly, after this period, moisture can gradually begin to penetrate into the wood.
- Finally, if you plan to live permanently in a wooden house, it is best to take care of a vapor barrier to protect its walls - the constant action of moisture coming from the kitchen, bath, aquarium and other household sources will make itself felt over several years.
- To house a bathhouse, a layer of vapor barrier is, for obvious reasons, necessary in any case.
If the house is located in a humid coastal climate, then waterproofing is an absolutely necessary measure: it is done both inside and outside.
Approximate calculations show that in 1 year an ordinary family consisting of 3 people (two adults and a child) releases 150 liters of moisture into the air.
Vapor barrier materials: types, selection rules and prices
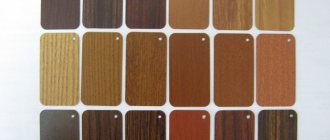
Modern industry offers many types of materials for waterproofing. Almost all of them are artificial polymers, because natural fibers always absorb moisture well and allow it to pass in both directions.
The main indicator of the quality of such products is vapor permeability, which is defined as the amount of water (in grams) that a unit of material area (1 square meter) will let through in one day: g/m2. Normal vapor permeability does not exceed 15-20 g/m2.
From the point of view of advantages and disadvantages, the material is judged on the basis of the following consumer qualities:
- life time;
- mechanical strength;
- ability to pass air, i.e. “breathe” while retaining moisture.
Many waterproofing materials have low air permeability, which creates a greenhouse effect in the house - you have to constantly ventilate the room, including in the cold winter.
A comparison of the pros and cons of the most common materials is presented in the table (price - in rubles for 1 roll, the total area of which is standard 70 m2). In the case of a vapor barrier membrane, the average cost is given for a roll with dimensions of 75 by 1 meter (area 75 m2).
| material | pros | minuses | price |
| single-layer polyethylene films | affordable price, easy installation | low mechanical strength, insufficient vapor barrier | 1000 |
| reinforced (double-layer) polyethylene film | affordable price, high strength | create a greenhouse effect | 1400 |
| polypropylene film | high strength and long service life | 1300 | |
| vapor barrier membranes | long service life, good vapor barrier, high strength and good ventilation properties | high price | 6500 |
| isospan (reinforced polypropylene film) | high strength and long service life, good protective qualities | Greenhouse effect | 1200 |
If you make small holes in a polyethylene or propylene film, this will not provide enough air - the walls must “breathe” the entire surface. In addition, warm air currents will penetrate into these cracks along with the moisture evaporated into them. Therefore, such a vapor barrier will not give the desired effect.
Types of vapor barrier membranes
From the point of view of consumer properties, materials for waterproofing the walls of a wooden house can be divided into membranes and all others. The reason is that membranes are a new generation material, different from traditional artificial polymers (polyethylene and polypropylene).
Their key advantages are as follows:
- allow moisture to pass through in an amount of no more than 10 g/m2 per day (they are especially often used in baths, saunas, and swimming pools);
- thanks to the porous structure, they retain condensation well, preventing it from penetrating into the insulation;
- withstand temperature changes from –40°C to +80°C;
- thanks to the reinforced structure, the fibers are able to work without wear for decades;
- the porous structure of the material ensures sufficient gas exchange between the room and the environment;
- Some membranes are reinforced with foil, which reflects heat coming from the house - thanks to this, it helps the insulation maintain the internal temperature in the room in winter.
Thus, from the point of view of their functions, all membranes are divided into:
- anti-condensation – i.e. preventing moisture penetration;
- foil - which, along with a vapor barrier for the walls of a wooden house, retain its heat.
They are much more expensive on the market and are mainly sold in rolls of 75 m2. Comparative prices in rubles indicating the roll dimensions are presented in the table.
| product brand | price, rub |
| Tyvek Soft | 5200 |
| Delta Vent N | 8900 |
| Delta Maxx | 12100 |
| EUROTOP T150 | 8000 |
The main manufacturers of high-quality membrane films are German brands. High prices pay off if a major renovation of the house is planned, since if you make a calculation, then frequent replacement of insulation and laying a new vapor barrier layer will become more expensive than the initial selection and installation of high-quality material.
Types of vapor barrier materials for a wooden house
Depending on the location of the material in one or another part of the house, the following are distinguished:
- type A and AM - protection of insulation in walls and roofs from external influences;
- type B and C – protection of insulation in walls and roofs from internal moisture;
- type D – protection of the floor from dampness coming from the ground.
Type A
The materials of this group are intended for external insulation of the walls and ceiling (roof) of the house from the action of wind and air moisture. Installed:
- for external wall finishing on insulation;
- under the roof of the roof;
- into ventilation shafts.
In order for the membrane to work correctly, allowing moisture to pass through from the inside and blocking it from the outside, you need to carefully lay the layers - with the marked side (with the brand inscription and towards the street.
The material is installed on the counter-lattice so that excess moisture can drain off. It is important to create an appropriate angle on the roof (at least 30-35o).
Type AM
At the place of installation, this material is mounted in the same way as type A. It has a more complex multi-layer structure:
- layers of spunbond (1-2);
- diffuse film.
It is thanks to the diffuse film that steam escapes from the inside, but liquid does not pass through from the outside. An important feature of this material is that it does not require a ventilation gap, so it is mounted close to the surface of the insulation.
Spunbond refers to a special technology for the production of polymer moisture-proof film, as well as the product itself of this production. In this case, the fiber consists of artificial threads that are stitched together under the influence of chemicals, heat or water jets.
The result is a very durable porous fiber that allows air and moisture to pass through well, but at the same time reliably protects not only from precipitation, but also from the effects of wind. All these valuable properties are explained by the structural features of the multilayer material.
Type B
This vapor barrier is used to protect the walls of a wooden house from internal moisture. It is also used for finishing the roof from the inside, especially in cases where it is intended to create a living space in the attic with the possibility of year-round living (like an attic).
And another use option is internal insulation of the floor, as well as the interfloor ceiling.
Multilayer materials additionally protect from wind, and foil materials retain heat inside by reflecting it from its surface.
Type C
It is a particularly durable membrane consisting of 2 layers. It is used in the same cases as B. It is also used for insulation in unheated rooms adjacent directly to the house:
- attics;
- basements;
- plinths;
- verandas, canopy.
Type D
Such materials are made of polypropylene and reinforced with an additional laminating layer, due to which they are used in floor and roof insulation - i.e. in cases where heavy mechanical load is expected (pressure from furniture, movement and wind exposure).
Methods for fixing vapor barrier film
Materials are fixed using two methods:
- construction stapler;
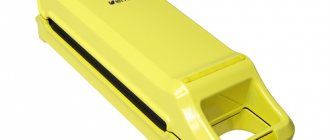
- special tape (adhesive tape).
Often both methods are combined together. At the same time, the adhesive tapes themselves are made from approximately the same materials as the vapor barrier. They are reinforced using spunbond technology, since it is assumed that they will be subject to constant load. There are several types of adhesive tapes that correspond to the types of waterproofing membranes discussed:
- Izospan KL is used to fix type A fabric. It has great strength, can withstand temperature changes, and is also resistant to moisture. Serves without complaints for several decades. The canvases should be glued with an allowance of at least 15-20 cm.
- Izospan KL+ has increased mechanical strength due to the two-layer structure of the polymer with reinforcement. It is intended for use in Siberian winters, as it can withstand temperatures down to –50°C. Another advantage is the versatility of this tape: it can be used to fix membranes of all types.
- Izospan ML professional is an excellent option for finishing complex surfaces (with junctions of pipes, bends in the ceiling and walls, protrusions of corners and communications), since it not only fixes the membranes well, but also creates a good vapor barrier itself.
Accessories for the job
In order to perform a high-quality vapor barrier on wooden walls, you will need a small set of tools. This list will include:
- construction stapler;
- hammer;
- screwdriver or drill;
- building level or cord;
- chisel;
- wood hacksaw;
- construction knife.
The set of materials for the work will consist of: vapor barrier material, thin slats for sheathing, wide tape, self-tapping screws and nails.
Do-it-yourself vapor barrier installation: step-by-step instructions
The technology for laying a vapor barrier layer into the walls of a wooden house depends on its design:
- frame house;
- house made of timber.
In addition, there are features of laying the material indoors and outdoors. Since in the latter case it makes sense to protect the house from cold winds, a layer is almost always installed that protects against them. And waterproofing is installed in cases where the house is quite old and the walls need to be protected from the destructive effects of moisture.
Vapor barrier from inside
When laying a layer of waterproofing inside the walls, you must take into account that water, evaporating on the surface of the material, must drain somewhere. Thus, the layer should not be in too tight contact with the insulation - a small gap is necessary.
The sequence of actions is as follows:
- If the house is built from a cylindrical beam, then due to its natural rounding it creates a sufficient gap for moisture removal - in this case, the membrane is attached directly to the logs using a stapler.
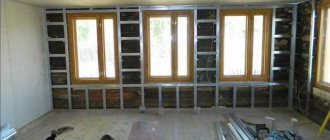
- Next comes the sheathing and internal finishing material (lining, drywall, etc.).
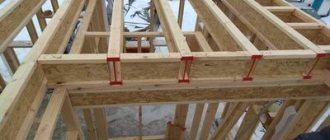
- In the case of houses made of rectangular timber, as well as when installing insulation (in cold winter conditions), the membrane is attached to a counter-lattice, which is mounted to the main beam through small wooden beams of the same size. They are located at a certain interval and hold the insulation, on top of which a vapor barrier is placed. The same technology is proposed for a frame wooden house.
A visual representation of the installation method for internal vapor barrier can be seen here.
Possible errors that are important to take into account immediately when laying the layer are presented in the video.
NOTE. The layers of material are overlapped by at least 15-20 cm and securely fastened with joints.
Vapor barrier outside
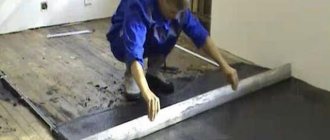
In this case, the film or membrane should lie immediately under the sheathing layer (for example, siding) and fit tightly to the insulation.
Space for the accumulation and natural removal of condensate must also be present.
The technology is as follows:
- On a round log, the vapor barrier is also attached using a construction stapler.
- All joint surfaces are fixed using construction tape (if a foil membrane is used, using metallized tape).
- In the case of a frame house or a house made of rectangular timber, the membrane is mounted on the counter-lattice in the same way as it is done from the inside.
- Next, the film is fixed with wooden slats at the same intervals as the counter-lattice posts.
Features of the technology are shown in the video.
The external vapor barrier membrane must allow air to pass through well. The use of polyethylene, polypropylene and other films in this case is unacceptable, since the moisture leaving the house will encounter a barrier and will not be able to go outside - it will settle on the walls and insulation, which is why they will begin to rot.
General questions about installing steam protection
Before you begin installing a vapor barrier, you must follow a number of general recommendations. They are carried out regardless of whether the installation is carried out outside or indoors. They consist of the following:
- installation of the material must be carried out with markings on itself;
- the canvases should overlap each other;
- construction tape for gluing strips must be at least 10 cm;
- the exit of strips at window and door openings should be carried out with a margin. The reserve is added up, necessary in case of wood deformation.
Do not confuse waterproofing and vapor protection. Waterproofing serves to protect against moisture that may result from rain, fog, melting snow or ice. Vapor barrier protects against formed condensation and creates conditions for normal air movement.
- The vapor barrier material must be protected from direct exposure to sunlight.
- Before installation, the work surface must be cleaned of dust and dirt. The presence of dust can subsequently lead to clogging of micro-holes, and the material will stop breathing.
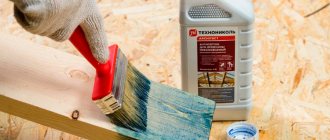
- The wood must be cleared of bark, treated with a fire-resistant liquid, a solution against pests and fungal diseases. It is prohibited to use wood material that has diseases or defects.
Vapor barrier and insulation: what is the ratio
Since vapor barrier of walls in a wooden house is carried out mainly to protect the insulation, you should figure out in which cases this is especially necessary, and in which cases it is enough to simply cover the walls, for example, with plastic film. In this sense, there are 2 options:
- If polystyrene foam, polyurethane foam and similar materials are used as insulation, then a film or membrane is not needed directly to protect them, since they do not absorb moisture.
- If the house is insulated with mineral or ecowool, as well as sawdust, the membrane is extremely necessary - damp cotton wool will turn into dust in literally 1-2 years.
If the house is old and made of wood frame or infill construction, a moisture retention layer will be needed anyway to protect the wood itself.
By correctly choosing and installing a vapor barrier layer, you can not only improve the microclimate in the house, but also significantly extend the service life of the insulation and wood.
Approximate costs
Calculation of the cost of work on external hydro- and vapor barrier using the example of a residential building as part of a ventilated facade.
Initial data:
- residential building 10x10 m, one-story;
- building perimeter, 40 m;
- wall height, 300 cm;
- insulation - mineral wool, 10 cm;
- insulation density, 30 kg/m3;
- cost of insulation, 1500 rub./m3;
- cost of dowel “fungus”, 4 rubles;
- window area, 3.6 m2;
- door area, 2 m2;
- total insulation area, 114.2 m2;
- lumber consumption for sheathing, 1.2 m3;
- membrane consumption, 115 m2;
- construction tape consumption, 265 m;
- total weight of insulation, 343 kg.
Cost of work
| № | Name of expense item | Quantity | ISOSPAN price of work per m2, rub./total | Ondutis price of work per m2, rub./total | JUTA SP-1 price of work per m2, rub./total |
| 1 | Installation of step lathing, m2 | 115 | 200/23000 | 200/23000 | 200/23000 |
| 2 | Installation of insulation, m2 | 115 | 380/43815 | 380/43815 | 380/43815 |
| 3 | Installation of hydro-vapor barrier film and counter-batten, m2 | 115 | 120/13800 | 145/16675 | 150/17250 |
| 4 | Ventilation gap installation, m2 | 115 | 150/17250 | 150/17250 | 150/17250 |
| 5 | Cladding with clapboard, m2 | 115 | 300/34500 | 300/34500 | 300/34500 |
| Work, rub. | 132365 | 135240 | 135815 |