Very often there is a situation where there is not enough money or no money at all for some very necessary equipment (a wood lathe for a home workshop). At the same time, to work, you constantly need to sharpen something.
That’s when the need arises to make the missing equipment yourself, and in this case, a wood lathe. Is it possible to make it yourself in a home workshop and is it expensive?
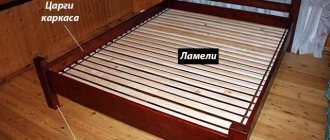
General design and structure of a homemade unit
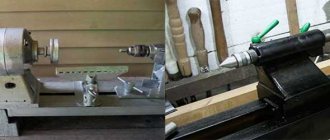
When designing a homemade lathe for turning, you can consider two design options: with an electric drive and without an electric motor. Despite the antiquity of the method of processing wood using human muscles, this option has the right to exist in conditions where it is necessary to process wood, but there is no possibility of using electricity.
The main structural elements of a lathe are listed below.
bed
The bed is the frame of the entire mechanism. The safety of the craftsman and the quality of the future product depend on the reliability of the frame.
Electric drive
Drive: motor rotor or pedal for foot drive.
Headstock
The headstock is a chuck for clamping the product and its subsequent rotation. Rotation from the engine is transmitted to it through a gear transmission, pulleys or a belt. At the end of the headstock there is a spindle with a faceplate for fixing the product.
Tailstock
The tailstock is needed for additional fixation of the workpiece, which will help improve the accuracy of the rotation axis and avoid unnecessary vibrations. It is a freely rotating blade that can be moved along the axis of rotation of the product to adjust the distance between the headstocks.
Podruchnik
A tool rest is necessary to support the chisel while processing wood. Without a stand for a hand tool, it is impossible to maintain high accuracy of the blade tip hitting the sketch lines and it is extremely difficult to regulate the pressing force of the cutter.
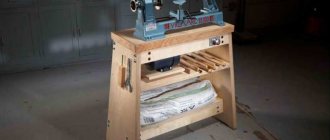
Wood sanding machine
The design of such a machine has a cylinder on which sandpaper is placed. This unit rotates while processing the part. The assembly of a homemade machine is often performed for grinding cylindrical workpieces. A device is also made to create a flat surface of the workpiece.
When fixing the sanding paper, follow these rules:
- the width of the abrasive cloth should be approximately 250 mm;
- the sanding belt is connected without a gap exclusively end-to-end;
- The sandpaper is attached using a high-quality adhesive;
- at the edges of the shaft for the abrasive cloth there must be a side, the protrusion of which is from 2.5 to 4 mm;
- a rubber backing should be placed under the tape.
The shaft of the device is rotated by an electric motor. These two parts of the machine are connected by a belt drive. The design of the frame itself can have different designs. The option is chosen depending on the size of the workpieces being processed.
Device for polishing wooden parts Source notperfect.ru
A simple way to make your own frame
The reliability of the bed is a key characteristic of the machine. Human safety and the quality of the product depend on the properties of the material and the quality of the connection of the parts of the frame.
Based on these requirements, the choice falls on metal profiles, chipboard, plywood or solid wood (preferably solid wood: oak, birch or the most common: pine).
If the choice is on a metal frame, then you need to choose a channel, an I-beam or a profile pipe that will carry the load-bearing functions of the machine. Here the choice depends solely on the availability of the material, its price and ease of installation. However, the metal frame is the simplest in design: you only need two I-beams, on which the engine, tailstock, tool rest and caliper are then mounted.
If the choice is wood or chipboard, then based on a preliminary sketch-drawing with the existing dimensions of the engine and all other elements, the design of the frame is formed. As a rule, it consists of a table top, which acts as a base, a stand for the tailstock and a box on which the motor and headstock axle are mounted.
In addition, two parallel slats are run between the headstock racks, on which a movable support board is attached. A gap of 5 cm is maintained between the slats. Afterwards, it is necessary to weld the frame with a welding machine - this will give additional strength to the structure.
If the machine is supposed to be a tabletop machine, then there is no need for legs, but when processing heavy and massive elements, the bed should be independent and its stability should not raise questions. In this case, it is necessary to provide legs. They are made from rolled steel, for example, angle or timber.
The dimensions of the machine primarily depend on the goals pursued by the master. Most operations at home are performed with products up to 80 cm in length, so most often the length dimensions of the machine are 80 cm. If the frame is made of metal, then two blanks of equal length are cut with a grinder.
Copier for turning unit
A craftsman who produces a certain number of identical parts simply needs to have a copying device for a lathe. Such a device, despite some complexity in manufacturing, will greatly facilitate the turner’s work.
How to make a wood lathe with your own hands? And what is this - a copier? This is a device that allows you to make an exact copy of any wood product made without turning. It is fixed on the machine in front of or above the workpiece. The principle of operation is quite simple: in the upper or lower part of the frame (this depends on the copier device), the product (or stencil) that needs to be repeated is fixedly fixed. Next, by means of a rolling roller, the contour pattern is transferred to the cutter, which is rigidly connected to the roller. The following must be taken into account: a convexity on the stencil will give a depression on the part and, accordingly, vice versa.
The use of a copier provides an undeniable advantage in the manufacture of such things as table legs or balusters for stairs. All products turn out identical, which is impossible to achieve with manual processing even with the best eye.
Choosing an Electric Motor for Woodworking Operations
An equally important element of the machine is the engine. The main characteristic that needs to be given enough attention is power. Regardless of the type of motor - single-phase or three-phase, the power can range from 1200 to 2000 W.
Perfectly suited engines:
From a washing machine, if a lathe is needed for small-volume work and the size of the workpiece will not exceed 30–40 cm, in this case the exact maximum length is selected experimentally. Such engines can help in processing small items, dishes, small knobs for stairs and similar interior elements.
Some models of washing machines are equipped with an asynchronous electric motor, in which, by changing the winding, you can step by step change the shaft rotation speed. Similar motors are also installed in floor fans, only there they have a lower power of about 40–100 W. This motor is enough for a mini-machine for small household products.
Stationary circulation saw
The stationary circular saw is placed on a sturdy table. Its working surface is usually made of metal sheet. It is reinforced with stiffening ribs. For their manufacture, a steel angle is used.
On the working surface there are usually:
- stops;
- guides;
- elements for adjustment;
- cutting disc.
On a note! The circular saw is powered by an electric motor. Its power should be approximately 800 W, and its rotation should be 1700 rpm. The electric motor of the angle grinder corresponds to these characteristics.
Angle grinder for a stationary circular saw Source tdrim.ru
Before making a device for sawing wooden parts, prepare a working angle grinder with the necessary characteristics. Further actions are performed in the following order:
- Assembling the frame.
- Prepare a worktop in which a slot is made for the cutting disc.
- Two wooden blocks are fastened in parallel. They will be used as stops.
- Set the scale necessary to control the cutting of wooden parts.
- Clamps are installed so that workpieces and guides can be fixed.
- The grinder is secured by first installing the disk into the previously created slot in the table top. The power tool is fixed from below the working surface.
Selecting a transfer method
The transmission of torque from the engine to the workpiece can be carried out in two ways.
Direct transmission
Direct transmission of the drive to the workpiece is the simplest design method, but not the most perfect. Disadvantages of direct transmission:
- It is impossible to regulate the rotation speed, since the motor without additional units cannot change the rotation speed by simply changing the incoming voltage. This drawback is especially noticeable when working with hardwood, such as oak, teak or apple tree.
- High load on the motor shaft and shorter service life compared to belt drive. Heavy products will have a particularly strong effect on engine wear. This is primarily due to the fact that the bearings of most motors (except for motors in washing machines) are not designed for longitudinal load. You will also have to pay more attention to the centering of the material, because any inaccuracy will lead to excessive vibrations, which at high speeds can make the work impossible.
Belting
This method of transmitting rotation guarantees a longer service life of the motor and makes it possible to regulate the speed of rotation of the workpiece. In this case, the engine itself is located offset from the axis of rotation of the wooden product, and the torque is transmitted using a belt and several pulleys.
If you provide the machine with pulleys of several radii, it will be possible to change the rotation speed of the headstock. With three or more pulleys of different diameters, you can tackle hardwood with confidence. If you stock up on the necessary tools, you can even work with soft alloys.
Peculiarities
Experienced specialists have long known that homemade CNC machines made from plywood are in some cases not inferior to full-fledged factory-made metal analogues. Such structures are used, of course, only where there are no significant mechanical stresses, strong vibrations, heating and the need to remove heat with water.
The technical qualities of plywood devices may well be at a decent level. At the same time, the cost of such equipment is reasonable.
Attention: such systems are designed for private use only. A plywood machine is not useful as a full-fledged production workplace. Before doing it, you need to soberly assess your abilities and knowledge in the field of carpentry. In the absence of special skills and the ability to work with power tools, you will have to forget about making machines yourself.
In addition, you will have to carefully select the main construction material.
Installing the headstock and tailstock
One of the most important parts of the machine is the headstock and tailstock. The workpiece is clamped between them. The headstock directly rotates the product.
Important!
To make the base of the headstock - the spindle shaft - you need to turn to professional metal turners or find a finished part or generally ready-made headstock modules in specialized stores.
The design of the front tank consists of two bearings of type S, V or U, which are bolted to the frame of a shaft machined from carbon steel with a diameter of 40 mm, a chuck for clamping the part.
The shaft is equipped with three or four pins that help eliminate vibration. The shaft is passed through the bearing and pins are attached to it with a key or other fastener for cylindrical parts, after which the shaft is fixed on the second bearing, which is already tightly bolted to the steel corners or the board of the frame.
The tailstock also produces rotational movements, but does not set the product in motion. It is especially important to fix the tailstock on the same axis as the front one, because all subsequent work will depend on this.
Reference. For subsequent control of the axis, the headstock can be designed with adjustment screws, which will allow slight changes in the axis of rotation of the headstock.
The tailstock consists of the following elements:
- A base of angle steel or similar material, similar to the base of a headstock.
- Guide pipe.
- Inner tube or quill. It is made in such a way that it can be placed in a guide pipe, and then a drive screw can be passed through the quill.
- Drive screw. A screw with a nut thread for the quill tube. An 8 mm thread is provided for mounting the flywheel on the rear.
Design
Machines, even the least critical ones, cannot use sheets with a thickness of less than 0.6 cm. In any case, this applies to the supporting and load-bearing parts of the assembly. Sometimes an exception is made for housings and other light parts. However, even then you have to carefully weigh the pros and cons in order to give a correct assessment of the selected details. Mistakes in their selection can be fatal.
Some experts believe that a sheet with a thickness of 1 to 1.2 cm is quite enough for individual machines, for example, if we are talking about a cutting table.
Other experts proceed from the fact that parts of large thickness are always needed, even for minor sections of the structure. There is also an opinion that volumetric parts glued together from medium-thick plywood are more effective at damping harmful vibrations during occasional vibration. But real masters always give preference to considerations of reliability and safety. That is why they try to make maximum use of plywood sheets with a thickness of 19 mm or more, despite the heaviness and significant prices.
But you should not focus on just one thickness. The type of original wood must be taken into account. Coniferous wood is lighter and softer, it is used mainly for secondary nodes. Hardwood veneer is more expensive, but is still used more often.
But differences in the chemical composition of adhesives and the level of resistance to moisture practically do not matter; in most cases, FK grade plywood is quite sufficient.
What is much more significant is the veneer category. An increase in the number of knots threatens cracking and delamination. Experienced professionals try to take sheets of second grade and higher. You should not try to buy very cheap unsanded material. Bringing it to the required parameters in artisanal conditions is almost impossible.
Fully sanded workpieces are also easier to glue.
A 4-in-1 plywood machine can be considered as an optimal homemade sample. This design involves the use of a box measuring 54x32x88 cm and a table measuring 65x98 cm. The plywood for these parts is 10 and 18 mm thick, respectively. The cross-section of the disc grinding unit will normally be 18 cm.
To work on wood, you need a different apparatus, the types differ sharply, namely:
- sawing based on a hand-held circular saw;
- jigsaw;
- using a drill;
- universal model, suitable for hanging various devices.
How to make a handicraft at home?
The support for guiding the cutter along the shaft of the workpiece is a tool rest. It is best to make it from a steel pipe or angle iron, because wooden supports wear out quickly and are not able to withstand as heavy loads as a metal part of the same size.
You can make it by welding two pipes in a T-shape, or you can do it even simpler and fix a piece of board with a wooden boss on the frame, but the accuracy and wear resistance of such a design is not durable. The main thing in arranging a tool rest is that the upper edge of the pipe or angle must correspond to the axis of rotation of the workpiece: in this case, the risk of breaking the chisel is minimal.
Important!
When working on a lathe, only the lower part of the workpiece can be processed! Failure to do so may cause the incisor to become jammed or fractured, which can result in serious injury. When operating a woodworking machine, be sure to wear safety glasses to reduce the risk of injury.
Tool used in work
How to make your own wood lathe? You need to start with a simpler, that is, wooden, product. The tools used for its manufacture are ordinary carpentry tools - a hacksaw, a circular saw, a milling machine, a screwdriver. The assembled structure will need to be sanded, so you need to have a grinding machine available. Tools such as a hammer, screwdrivers and measuring instruments are not even worth mentioning specifically; any craftsman should have them.
Working with metal requires the use of a grinder, a welding machine, and possibly a rivet gun. It is also worth having tools for cutting external and internal threads with a diameter of 6, 8, 10 mm.
In all cases, it is necessary to use protective equipment - goggles, gloves, a protective mask (when carrying out welding work).
How to securely secure a workpiece
Wood is a capricious material: it easily splits, chips and wrinkles. Most often, a trident is mounted in the headstock - this holder is universal and is most often equipped with household machines and many homemade ones.
The only thing is that it is extremely difficult to make a trident yourself, so it is better to purchase one. In addition to the trident, there is also a screw chuck and a clamping chuck, which is a tube with screw holes along the radius; clamping screws are screwed into the holes and firmly fix the workpiece.
Often the faceplate is made independently from plywood 12–16 mm thick. So, the washer is assembled from two layers of plywood and, on the one hand, attached to a steel sheet about 2 mm thick. In such clamps, through holes are drilled and spikes are inserted there; the points of nails can play their role.
Workbench for a carpenter
This type of equipment is a table. It is distinguished by its high strength and the presence of 2 vices on the tabletop. The table is also equipped with clamps that clamp the workpieces during planing. In addition, the workbench may still have places where other homemade devices, such as a router, will be attached.
A special table must have a comfortable height. She matches the height of the master. The minimum length of the workbench is 1000 mm. Often it is equal to 1700 mm or even 2000 mm. The standard width is 800 mm.
Before making a workbench for carpentry, get acquainted with its main parts Source infourok.ru
A workbench table is created as follows:
- The table surface is created - this is a shield, which is made from oak, beech or hornbeam boards with a minimum thickness of 55 mm. They are tightly fitted to each other. The boards used are impregnated with drying oil before joining. To create a rigid structure, a 50 mm block is used. It is fixed around the perimeter of the working surface.
- The supporting elements of the workbench are made. To do this, use linden or pine timber. Its size is 120*120 mm or 150*150 mm, and its length is approximately 1200 mm. The supports are connected by jumpers in the horizontal plane. To do this, take boards that are fixed at a distance of 300 mm from the floor.
- Make homemade devices to accommodate the tool. These are shelves located under the countertop. When they are open, they are often replaced with bedside tables.
- Attach a vice.
If a stationary workbench is created, its supporting elements are fixed to the floor. Depending on the specifics of the work being performed, mobile and collapsible tables are also manufactured.
Mobile workbench on wheels Source foamin.ru
Carpenter's workbench vice
This homemade tool is made using a screw rod. Its thread length must be at least 160 mm. In this case, the diameter of the rod itself must be 20 mm. For the vice you will also need wooden blocks and metal pins. The manufacturing sequence is as follows:
- Prepare a block of 200*300 mm. Its minimum thickness should be 50 mm. This will be one of the sponges. A hole for a screw is drilled in the center of the workpiece. On the sides of it, two more holes are made for the studs.
- A second movable jaw 200*180 mm is cut out and similar holes are drilled in it.
- A threaded pin is inserted into the workpiece. A handle is installed at one end. To prevent the jaws from moving, pins with a cross section of 10 mm are passed through other holes.
Wooden vice for a carpenter Source infradom.ru
How to choose cutters yourself?
Wood cutters are a must-have tool for woodworking. You can make them yourself or buy them in a store. Wood cutters have the same design, although different shapes.
The following tools are the most popular among wood cutters:
- A universal knife-jamb, which is shaped like a triangular shoe knife.
- Clukarza is a chisel-like tool with a curved blade.
- A spoon cutter is a ring-shaped cutter that is used for cutting out dishes with deep recesses.
- Chisel, the most common type of wood cutter.
Chisels, on the other hand, come in all sorts of shapes to perform a variety of tasks.
Cutters for manual turning of wood are divided into the following types:
- Semicircular.
- Flat obliques.
- Cut-off.
- Cut-off with figured sharpening.
- Angular.
- Shaped.
- Hook cutter.
- Ring cutter.
- Beveled corner.
Special ones can consist of two metal plates that can be moved relative to each other, so that a unique cut or pattern can be obtained. The most popular cutters for turning work are:
- Reuter is a tool with a semicircular cutting tip.
- Meisel is a tool with a beveled flat blade.
It is used for processing wood and bringing it to the state of a finished product.
Turner tool
Despite the apparent simplicity of the wood processing process, there are many turning devices. The cutter consists of a working part, which is metal, and a handle, most often wooden.
There are two main types of incisors:
- Reyer - for roughing. This is a cutter that has a semicircular cutting part, with its help the workpiece is given an approximate shape.
- Meisel - for finishing. The blade of this cutter is straight, cut at an angle of 45°. Intended for giving the product a finished look and for cutting.
Several other types of cutters, called shaped ones, are used:
- chisel - designed for leveling cylindrical parts;
- hook or ring - they are used to create cavities in the part;
- comb - copes with applying grooves or threads to the workpiece.
Turning masters have a tradition of not buying cutters, but making them themselves. This matter is not particularly complicated, the requirements for the material are not too high.
A used file will make an excellent reyer or meisel. To do this, the cutting part is given the appropriate shape on a sharpening machine, then sharpened on a fine-grained emery wheel and polished. It is advisable to sharpen a straight cutter on a special mandrel, commercially available or homemade, to maintain the sharpening angle.
A hook or ring can be made from the cage of a small bearing, only to do this the metal must be released. It is dangerous to use hardened incisors, as they may chip and crack, and the broken part may fly off and cause injury.
We can summarize: a homemade wood lathe made by yourself should be equipped with self-made cutters.
How to make cutters?
The cost of sets of high-quality models is high, but making them yourself is not difficult. Moreover, professionals prefer to make instruments on their own.
To make wood cutters on your own, you need an electric machine for sharpening metal tools or a grinder with cutting and grinding discs.
Wood cutter blades can be made from high quality steel.
It could be:
- Drill.
- Scalpel.
- Soviet files are especially widely used for making homemade cutters.
- Hacksaw blade for metal.
- Circular saw blades made of carbon steel are also popular because sharpened carbon steel cutters hold their edge longer than others.
The process of creating a cutter is simple:
- First of all, the strips of the required size are cut with a grinder (angle grinder).
- Using a grinder or an electric sharpening machine, the required shape of the blade is formed.
- After changing the grain size of the abrasive discs, the workpiece is sharpened and the cutter tip is ready. All that remains is to design the handle. The hardest wood species, oak, is excellent for making handles. Also popular are birch and apple trees, which are not much inferior in their flexibility when processed.
The blade is placed halfway, cut lengthwise, into the blank of the future handle and glued with wood glue. You can also choose a notch in the bar that exactly follows the shape of the point. Afterwards, the bars are pressed and glued together. The handle is turned to an ergonomic shape and fired with a gas burner, treated with oil or varnished.
The optimal dimensions of the handle are considered to be about 12 cm in length, and the blank for the handle can have a cross-section of 22*22–24 mm. After sanding the handle, a clamping ring is put on the chisel, which securely fixes the blade in the wooden handle.
An important step in preparing a wood cutter is sharpening it.
The chamfer sharpening angles are equal for all types of cutters and reach about 18–25 degrees. The length of the tip is on average 20–35 mm. To maintain the sharpness of the blade during operation, it is periodically cooled in a container with cold water.
Sharpening is done as follows:
- Using a sharpening stone, periodically moistened with water.
- Sharpening on a less grained stone and on the finest grit sandpaper.
- Polishing with a leather belt with GOI paste. GOI paste is sold in any automotive or hardware store.
How to make a wood lathe with your own hands
The choice of material for such an important task is quite wide - from chipboard or plywood to channel or steel sheet. Of course, these wood materials are only suitable for a mini-machine; more serious products will require the use of solid hardwood.
When making a metal lathe, a variety of products are used. Round and rectangular pipes, rolled angles, channels, I-beams, steel sheets, etc. are used.
In home-made structures, materials such as textolite, getinax, vinyl plastic, fluoroplastic, bronze, and brass are also successfully used.
Naturally, you cannot do without purchasing individual ready-made components. These will be bearings and various fasteners - wood and metal screws, bolts, nuts, washers and studs.
Parts from broken or burnt power tools, in particular drills, will provide good assistance in making a wood lathe with your own hands.
What other types of machines can be made?
Before creating your own lathe, you should study those varieties that were invented by many interested people. Among the machines, both home-made and factory-made, the following types are distinguished.
Turning and milling
Such a machine is already a powerful modification of previous versions of machines. Most often, a turning and milling machine is equipped with a CNC, because it is extremely difficult to manually control the milling machine with high precision. However, such a machine has a right to exist and is widely used for domestic needs. Its design consists of:
- Beds.
- Electric motor for rotating the headstock.
- A manual milling cutter placed on guides that ensure its movement along the axis of rotation of the workpiece.
With a copier
A lathe and copying machine is necessary when creating a large number of identical products; most often you hear about dishes and balusters for stairs.
There are several options for making a copy lathe: with a router, with a circular saw and with a chisel. All these methods involve the use of patterns. A pattern is a profile of a future product, which is cut from thin plywood.
A handrail is attached along the lathe along the entire length of the workpiece. The pattern is mounted behind the lathe. A cutter or cutter is attached to the handrail, the movements of which are regulated thanks to a stop running from the cutter, cutter or saw to the pattern.
Thus, during the rotation of the block, the cutting tool completely repeats the silhouette of the plywood profile with sufficient accuracy.
Mini
For many household needs, it is not necessary to create a unit of impressive size, capable of rotating a log with a radius of 300 mm. Sometimes a machine with an extremely simple design is sufficient, in which the engine can be a drive from an old tape recorder, powered through a power supply. For the bed of such a machine, you can use a board 150 * 20 and long, which depends only on the needs of the craftsman.
For such a mini-machine, a belt drive would be superfluous, so most often the headstock is mounted directly on the motor shaft. And the head from a drill or a homemade chuck with three clamping screws serves as a faceplate.
The tailstock is made of a block, in the center of which a hole for the shaft is drilled exactly at the height of the motor axis, which can be a dowel-nail. If you provide the machine with a power supply with adjustable output voltage, you can get the unit with a speed controller.
From an electric drill
An electric drill can be found in almost every home. The advantage of a machine driven by an electric drill is that there is no need to buy a separate motor. Drill-powered designs range from the most basic, where the drill is clamped to the table.
On the contrary, the tailstock is mounted using a pair of angles and a nail or a sharpened screw, to a more advanced one, in which the drill serves as a source of rotating force, but is not directly involved in the process of rotating the workpiece. The second method protects the motor from overheating and stalling under overload.
In the video you can see how to make a wood lathe with your own hands from a drill.
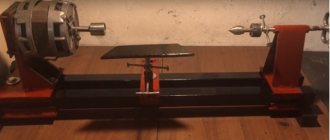
From a washing machine motor
It is a standard layout of a lathe with a motor, direct or belt drive, bed and two headstocks.
When constructing a lathe from a washing machine motor, it is necessary to remember that the motor of a household appliance is designed to circulate with an unbalanced load, but this does not mean that the tailstock can be abandoned. Its presence is mandatory especially when working with long and heavy workpieces. The design of such a lathe is easy to implement at home. To do this you need:
Weld or bolt two steel pipes and attach a motor from a household appliance to one end. Fix a block between the pipes with the ability to move it along the frame; the corner of the tool rest will be attached to it. On the opposite side, the tailstock is installed in accordance with the instructions outlined above.
Turning and milling machine
An important and useful addition to turning equipment is a milling attachment. With the help of such a kit, you can make things that are not possible with each machine separately. An example is balusters for stairs that have longitudinal grooves.
The milling machine can be installed either on a stationary lathe, or on a table lathe, or even on a foot lathe. How to make your own wood lathe with a milling function if a router is not available? The answer is simple: use an electric drill for this purpose. Of course, its rotation speed is not sufficient for high-quality processing, but for roughing it will be just right. Moreover, you can use both cutters and drills. A do-it-yourself wood turning and milling machine will seriously expand the capabilities of a home craftsman.
General operating rules
When working on a lathe, compliance with safety regulations is the key to comfortable work.
Necessary:
- Remove all jewelry, especially chains or earrings. Tuck long hair under overalls. Anything that could wrap around the product cylinder must be securely removed from the machine.
- Always securely secure the workpiece before starting work and then remove the key, if provided.
Important!
It is prohibited to pass objects through a running machine. Any little thing can fall on the product and not only damage it, but also bounce off in an unexpected direction.
Homemade options
lathe using plywood To work, you will need, in addition to the material itself, the following elements:
- glue;
- circular saw and miter saw;
- pencil or marker, ruler (for marks);
- fixing clamps;
- bearings, paint, screws, screwdriver;
- metal plate, electric motor and pulley;
- a number of other details.
To form the base of the machine, 1.2 cm thick plywood is used. After cutting and gluing the workpieces, the edges are trimmed, and the grooves are used to install racks. The headstock is also made of plywood; it is necessary to drill a hole in it for the bearing. It is advisable to place some nuts and washers on glue.
The width of the platform and the guide part must match, and a well-made platform with clamps moves freely in two planes.
The production of tailstocks and frontstocks is no different. Both of them require special protection. The power drive must be mounted on a board connected to the base using a loop. To make a spindle, you need to weld two nuts in a washer, and then make “teeth” in the nut. The machine must be painted.
Of course, you can also make a drilling machine from plywood. Since it is usually designed for relatively small workpieces, plywood sheets 1 cm thick can be used. All parts must be fitted as tightly as possible so that there are no visually noticeable breaks.
Important: sheet material does not tolerate rough mechanical influences well, so joining parts with nails and self-tapping screws would be a bad idea; you can only use tenons and grooves, and sometimes PVA glue for maximum hardening.
If you plan to drill other plywood pieces using a plywood machine, you need to provide space for backing another sheet. Otherwise, the processed products may crack and even split. Painting drilling equipment is not very justified. They are subjected to very intense vibration, thermal and mechanical influences.
But applying a primer is very useful, especially in workshops without heating.
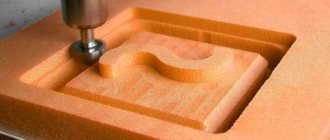
It is also possible to assemble CNC milling or woodworking machines. The trajectory of the processing part (as in other types) is calculated along three axes. If there is not enough space in the workshop, you can use universal stands designed for a wide range of tools. Typically the working field is 60x90 cm with a vertical stroke of 25 cm.
But if you do a little less, then no problems usually arise.
There are two main schemes for constructing any homemade plywood machines. In one version, the table moves, but the portal remains motionless, in the second, the roles change. The first method simplifies the design, but is only suitable for very small desktops. Therefore, in practice, the approach of moving the portal and immobilizing the table is much more often used. But in the second scheme there may be private options.
First of all, they relate to the use of a single central or two lateral drives.
The 2-drive option is suitable for relatively bulky designs. It allows you to minimize the risk of the portal warping relative to the guides. Moreover, the entire assembly has excellent rigidity. The size of the treated area is determined by the tasks to be solved.
The larger the machine, the more expensive it is, and besides, on small models it is easier to correct mistakes.
It is often believed that the geometry of the portal, the proportions of the distance between the axes and working guides, the gaps between bearings can only be calculated taking into account strength of materials and precision mechanics. This is largely true, but the basic points are accessible even to non-specialists, namely:
- reducing the gap above the table increases the rigidity of the structure;
- the axles should also be made stiffer and not too long;
- If possible, the gap between the X-axis guides should be increased to reduce abnormal twisting;
- the center of gravity of the portal must correspond to the location of the cutter and at the same time be between the Y-axis bearings (because of this, the vertical posts often bend backward);
- it is required to use only ball screw drive screws that give the least backlash;
- the screw must be equipped with a pair of independent bearings and connected to the motor through a flexible coupling (then a balance of simplicity and quality is achieved)
- All key parts can be assembled on box tenons (this is much more aesthetically pleasing than nuts sticking out in all directions).
Installation of the second clamp
The purpose of the rear analogue is to support the conditional cylinder to be sharpened and provide it with freedom for rapid rotation. The more firmly the tailstock holds the workpiece, the better the final result will be.
- An indispensable condition for proper installation of the second clamp is maintaining alignment with the first.
- Faced with great difficulties at this stage, it makes sense to significantly simplify the task by purchasing a completely finished unit.
The use of an electric drill chuck will allow you to significantly modify the engineering solution. A shaft is clamped in it, the end of which must be pointed.
Errors and shortcomings that you may encounter
- During the process of assembling a machine, you may encounter a number of problems, so I recommend that before you start ordering and understanding what you need to look for, decide on the dimensions of the machine and the dimensions of the products that you will process. So, mistake number one is that a drawing of the machine is not created with the smallest details, from every screw to every wire.
- The next mistake is the incorrect selection of the spindle and frequency drive, so be careful.
- And of course, errors that arise due to lack of experience, here we can advise you to think through the drawing more carefully and be guided by the proverb “The one who walks can master the road.”
Any chosen option for creating a homemade woodworking machine will be cheaper than buying ready-made equipment on a specialized market. Moreover, you can assemble a suitable model from improvised devices, improving them.