How to plan boards
Boards as a building material are used almost everywhere. It can be different in structure and size, but only planed wood can be used to make some objects.
The quality of the planed board determines what the surface of the table or bench will be. To find out in more detail how to plan a tree, read useful articles on this topic here.
We use a plane
There are several methods to obtain a planed board:
- Use hand tools. These can be various types of planes.
- Mechanical processing with a jointer.
Let's take a closer look at how to level the surface of wood using a hand plane.
The right tool is half the success. For such purposes, you can use one of the following types of mechanisms:
- jointer;
- sherhebel;
- end plane;
- sander
Each of them has its own dimensions and is used for certain types of work. To get a smooth wood surface, you need to position the tool blade correctly. You need to start planing by removing a small layer of wood. To do this, just slightly extend the plane blade.
It is also important that it be sharp, as the quality of the work depends on this. If the knife is dull, it will tear the wood and you will get a ragged surface. You should start planing from the edge of the board and move the plane along the board with smooth movements. Do this in different directions to achieve the most even surface possible, but it is not recommended to plan against the grain.
We use a jointer
This method already applies to mechanical processing. Planing a board using this mechanism is possible when the material already has a flat surface.
The operating principle of the machine is based on the fact that the product is fed into a special hole, in which, with the help of rollers, it moves to the knives, which level the surface.
Before carrying out this process, you can configure the specific thickness of the board that you want to obtain, and also install a special limiter that will not allow you to make the board thinner than this indicator.
At the very beginning of the work, the wood is carefully inserted between the rollers, which grab it and feed it to a special system of knives.
When feeding, the board must be held lightly at the entrance, not allowing it to fall, as this can lead to uneven chips. The same should be done when it is already coming out of the machine.
Watch the video to see how to plan a board:
Tweet glavspec.ru
Tools used to plan wood
Sherhebel
This type of plane is used for primary rough processing of wood. The oval-shaped blade of the knife can, if necessary, extend 1-3. mm.
Planer with single blade
The tool is used for planing wood treated with Sherhebel and for initial planing of wood materials. The knife of the tool is straight, protruding approximately 1 mm beyond the body. A plane with a single knife does not have a device for breaking chips, as a result of which the chips come out intact. For this reason, unevenness and scuffing appear on the treated surface.
Planer with double blade
The tool is intended for finishing wood (planing the ends, eliminating various irregularities), which is due to the presence of a chipbreaker in it.
Jointer
The jointer is used for final finishing of surfaces. This tool smoothes out uneven surfaces and levels out large surfaces. The jointer is 3 times longer than a regular plane, as a result of which it is easy for them to plan long boards.
The jointer blade is 180 mm long and 65 mm wide. In front of it there is a device designed to remove the knife from the taphole using a mallet.
Half jointer
This tool is suitable for processing small surfaces. The length of its body is 530 mm, the knife is 180 mm, and the width is 50 mm.
Sander
It is a plane with a shortened body. It is designed for planing and cleaning surfaces with knots and burrs. Thanks to the narrow slot, it removes the top layer of the treated surface in the form of thin chips.
How to plan a board: sharpening methods
The process of planing a board requires responsibility, care and precision.
In this material we will talk about how to plan a wide board, and generally about the sharpening process. Its main task is to obtain a perfectly flat plane without height differences. This stage is also preparatory to the aesthetic treatment of wood. Only after sharpening can you polish the board and cover it with special decorating compounds or varnish. There are several ways to perform this procedure, and the following table will give you a rough description of these processes.
A visual comparison of the planed and original surface.
If you do not know how to calculate the cubic capacity of timber for a house, then the following table will help you with this.
| Sharpening method | Peculiarities |
| Using a plane | Manual method, which requires large labor costs. As a rule, it allows you to process surfaces that are not too wide and does not give an ideal result. Requires planer skills. |
| Using an electric planer | Also a manual method, but less expensive than in the first case. At the same time, there are models of electric planers that allow you to work with boards of impressive width. |
| Using a surface planer | Thicknesser is a compact planing machine that can be used in domestic conditions. Allows you to achieve the highest quality results, but does not provide large volumes of work. |
| Using a planer | A professional way that allows you to work with a wide range of material sizes. In addition, it provides almost perfect results. |
How to plan a board with an electric planer
An electric planer is a tool that greatly simplifies the planing process.
Let's move on to how to plan a wide board with an electric planer. This task is not an easy one, although of course it is easier than working with an ordinary hand plane. The fact is that the uniformity of the edge depends on you, which is regulated by the force of pressure on the device. In this case, the force must be exerted with a constant, identical force. Otherwise, the surface you are planing will turn out to be non-uniform. This is especially true for wide boards, where you need to go through several lines with a plane. The first run is an adjustment run; it will set the surface removal depth for all other runs. Now let’s talk about how to plan boards correctly with an electric planer. As we have already said, uniform pressure on the surface and consistency of the applied effort are very important. In addition, it is important to guide the plane along a straight path, without moving to the side. Preliminary markings or a laser level can help with this. Well, it is also very important to position the board correctly. It should lie on a perfectly flat surface, then the result will be maximum. By the way, there is a more advanced version of the electric planer - a surface planer, with its help the process of controlling the evenness of the edge becomes simpler.
This is what a surface planer looks like
What to plan a board on
The ideal device is a workbench. So if you don’t know what to plan a board on, take care of creating or buying a workbench. It will ensure simple and efficient work without unnecessary hassle.
If you need high-quality lumber such as edged boards, timber, etc., contact us!
Using a workbench will greatly simplify the process of working with a plane
Go to the catalog
pilotorg.ru
Platform for planing warped boards
It is worth noting right away that it is suitable for a thickness planer, because... the board is located on top. Using self-tapping screws, the board is leveled on the platform: each self-tapping screw is screwed into the required roughness. The board is laid with the concave side up. This allows the planing board to be laid tightly. The stop prevents the workpiece from slipping.
PS Yes, yes, you can create a plane on a jointer without these million self-tapping screws. It's just an idea.
Based on materials from startwoodworking.com
How to plan boards and bars correctly?
Often, when building a bathhouse, there is a need to obtain a flat, smooth surface of a log, beam or board.
Let's find out how to plan boards and bars correctly .
To plan a smooth surface, use the tools designed for this. The most basic of them are sherhebel, plane and jointer.
Sherhebel is used for rough surface treatment. It allows you to quickly remove a layer of wood to the desired depth.
In this case, the surface is not completely flat, since the Scherhebel knife has a rounded shape, unlike the plane knife, which has a flat cutting plane.
If you want to make the surface more smooth, you need to go through it with a plane after the sherhebel. With its help, the excavated surface is leveled and gets a completely marketable appearance for further use.
If you want to get a perfectly smooth and flat surface, use a jointer.
If you need to get several planed short parts, then it is more convenient to first plan the entire board or block, and then saw it into short parts of the required size.
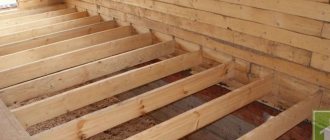
For convenience when planing, a board or block is fixed on a workbench so that the plane being planed is on top, and the fibers are located along the direction of movement of the plane and not towards it. If the fibers are located towards the movement of the plane, the wood will lift up and chip.
When planing, you need to firmly grasp the plane with both hands and take a comfortable position. Pressing the plane, first remove one strip, then next to it the second, and so on until the entire width of the board or block being planed has been covered.
If the part to be planed is very long, then it is convenient to plan first one part of it along the length, and then the next, so as not to run to the very end each time. This will allow you to plan with the same pressure in all areas.
When laying out a wooden part, you should press slightly harder on the toe at the beginning, in the middle of the movement, evenly press on the toe and heel, and at the end of the movement, press slightly harder on the heel, easing the pressure on the toe. This will avoid blockages at the beginning and end of the planed part.
After the required layer of wood has been removed, the planed plane is checked by applying a long metal ruler with its edge. If the plane is maintained, then the ruler along its entire length should be in contact with the planed surface.
If necessary, unevenness is corrected with a jointer.
With the advent of electric planers, planing boards and bars has become much easier. Therefore, if you have such an opportunity, then purchase an electric planer. Such a purchase will significantly reduce the time spent on surface treatment.
We also recommend you an article on choosing an electric planer, in which you will learn how to choose an electric planer depending on the planing depth, power, availability of additional accessories, and also find comparative tables of the most popular models of electric planers from manufacturers such as DeWalt, Makita. Skill, Bosh, Black&Decker.
See also:
Latest publications:
Even a properly laid brick oven will require repairs over time. High temperatures, traction problems, mechanical damage to the masonry - all this leads to the appearance of defects that require elimination. After all, good draft and the absence of cracks in the walls are... Read... The choice of stoves for baths today is very wide. The industry produces heaters for every taste and color. You can select a ready-made stove for installation in a bathhouse in accordance with the required heating output, depending on the volume of the steam room, and select the desired one... Read... In order to take a steam bath in a bathhouse today, it is not at all necessary to lay out a solid Russian stove, the laying of which can only be done by experienced stove makers. Today, a wide range of metal heaters are produced industrially, providing... Read...
- < How to make a rectangular or oval groove in a log?
- How to cut boards and bars correctly? >
russkaya-banja.ru
Answer
1.Plane, chisel, hammer.
2. The sherhebel has an oval cutting edge, while the plane has a straight edge.
3.Because the knives can be damaged.
4. Without a breaker and automatic feeding, the chips can be up to 5-10 meters of screws.
then it will hook it, wind it, and hit the turner with its end.
Tools for planing are called planers. Planes are used to process straight, curved, flat and shaped surfaces. Planes include planes (sherhebel, planers with single and double knives, zenzubel, folding plane, etc.), jointers and tsikli.
Planes consist of a knife, a block and a wedge. For ease of use, planes can have a horn and a stop; jointers have a handle. The purpose and dimensions of the planes are given in table.
The Scherhebel planer is designed for primary and rough planing of wood. Scherhebel cuts a layer of wood up to 3 mm in a narrow strip with traces of grooves in the form of grooves. The knife has a rounded cutting edge. Release the blade above the sole up to 3mm. Knife rounding R-35, knife thickness 1.9 and 3 mm.
Sherhebels can be small-sized wooden with a knife width of 30 mm and a length of 150 mm, wooden with a knife width of 35 mm and a length of 180 mm, metal with a knife width of 35 mm and a length of 100 mm. The knife sharpening angle is 25-30°.
A planer with a single knife is used to level the surface of wood after sawing and cutting off processing allowances. Often used after planing with Sherhebel. The blade extends above the sole up to 0.5 mm. They produce small-sized planes with a knife length of 150 mm and a width of 40 mm, wooden planes with a knife length of 180 mm, a width of 50 mm and a thickness of 4 mm, metal planes with a knife length of 100 mm and a width of 50 mm. Last length 205, 240 mm, width 50, 65 mm, height 50, 65 mm. Horn height - 120, 150mm.
Knives for planes: a - scherhebel, b - single, c - tsinubel, d, e - zenzubel, f, g - caleves, h - fillets, i, j - folded gobel, l - rabbet, m - double plane, jointer, semi-jointer , n - installation of chipbreaker
How to plane a wide board with an electric planer: instructions
Carrying out work with an electric planer is not a very difficult task if you have minimal skills in working with it. But it will be somewhat more difficult to plane a wide board with an electric planer. Not every specialist can do this kind of work efficiently. This is due to the difficulty of removing a uniform layer between the processing boundaries.
The device of a modern electric planer.
Execution of work: instructions
In order to achieve high-quality processing of the board, before this you must first do a trial processing on waste lumber. At the same time, the plane can be used in different operating modes: manual mode and stationary. The stationary mode consists of passing the workpiece through the rotating blade part of the plane.
In order to carry out work using manual mode, it is necessary to configure the tool before starting the process. Setting up an electric planer is not much different from setting up a regular hand plane. To do this, you need to adjust the cutting depth of its knives. Most often this size is 1-4 mm. When making adjustments, it is necessary to take into account the fact that a smaller depth of planing of the material will improve the quality of its processing.
Moreover, setting the knife to a shallow cutting depth will allow it to move more easily across the workpiece. In this case, you need to press the tool on the edge of the passage and round the back edge of the edge (which will help avoid injury).
Characteristics of well-known brands of electric planers.
The less the rotating knife protrudes beyond the sole of the plane, the smaller the layer of wood it will remove, therefore the boundaries between different passes will be less noticeable.
In the case when deep processing of the material is necessary, then during the first pass the plane knives are adjusted to the maximum processing depth. And then they are reconfigured and more precise finishing planing is performed.
Over time, you can acquire the skill to correctly complete a pass on the back edge of the material and select the correct planing depth. This will help speed up the work process and complete it not in 8-10 passes, but in 4-5.
To correctly adjust the knives, which depends on the difference in the upper marks between the front and rear ends of the plane, it must be done using a bench ruler.
Return to contents
Proper wood processing
When using an electric planer, it is necessary to choose the correct direction for processing the material.
It is usually taken along the direction of the grain of the wood. But in the case when workpieces are processed, which are assembled from several boards or bars that have large protrusions at the joints, then processing can be carried out in a diagonal direction. The electric planer knives rotate at a fairly high speed and therefore allow this procedure to be performed. Of course, you won’t be able to do this with a regular hand tool.
In order to ensure that the processed edge does not turn out when processing with an oblique, it is necessary to use an angular stop, and not rely only on individual skill and eye. It must be attached to the side of the instrument to its base, in a strictly perpendicular position relative to its axis. Now to plan, you need to place the plane firmly on the plane of the board, and its base should be located exactly at an angle of 90 degrees.
The miter gauge must be secured very firmly, since during long-term work the screws securing it may loosen, which will lead to tarring of the working surface of the plane. If this does happen, then you need to wipe it with white spirit.
To avoid chipping the edges of the board, they need to be dulled a little. This is done by chamfering. The same procedure must be performed on parts that will then be varnished. This will help create a smooth transition line between the two surfaces.
Having completed the processing of the wide board, you can resort to the procedure of sanding it. Sanding is the process of aligning the seams between different passes on a board. It is performed using a special machine. Processing such as scraping must also be performed in the direction of the grain of the board. Its use will remove all unnecessary roughness.
moiinstrumenty.ru
Included with electric planer
When installing a separate side stop on the electric planer (it is usually supplied as a kit), you can make. The stop, fixing the tool at a certain distance, must touch the workpiece.
Important: If the surface being processed with a plane is uneven, it means you are using dull knives or have released them incorrectly (see at the beginning of the article).
Folding depth
depends on the number of passes with the plane over the workpiece. The more passes, the deeper the rebate.
After planing, remove the knives from the electric planer, wash them with kerosene and place them in a separate box until next time.
Planed board - application, how to choose and make it yourself?
Various lumber is used in construction work, interior decoration and furniture manufacturing. Its most popular variety is planed board. It differs significantly from its prototype in the processing method and scope.
What is a planed board?
The choice of lumber on the construction market is large. Each variety has its own characteristics, size and price. Planed board is a type of edged board processed on a thicknesser or jointer. During the production process, the log is sawn into boards and sorted. Some of the products remain simply trimmed, while others, of higher quality, are sent to a special drying room, where they spend from one to three weeks. After this, the dry planed board is processed on a specialized machine:
- all burrs and irregularities are polished;
- the geometry is leveled to an almost perfectly even section.
Characteristics of planed boards
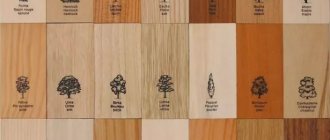
To make planed boards, larch, pine, oak and more expensive and rare tree species are used, the wood of which serves as the finishing material: cedar, ebony and sandalwood. The quality of the finished product has its own classification:
- The third grade is considered the lowest quality and is used for rough construction work.
- Second-grade lumber has minor drying and traces of bacterial and disease activity.
- The disadvantages of first grade timber are the smallest chips and cracks.
- The highest grade is used for the construction of finished floors in premises, wall decoration and furniture production.
Planed boards have dimensions similar to edged ones:
- thickness from 20 to 50 mm;
- width from 100 to 200 mm;
- length 3, 4 and 6 m.
Advantages of planed boards
Unlike simple edged wood, planed wood has a number of positive characteristics that affect the life and method of its operation:
- Thanks to artificial drying, the timber has a moisture content of no more than 8-14%, which increases its hardness.
- resistance to moisture and ultraviolet radiation;
- increased strength;
- durability;
- high accuracy of geometric cuts;
- flat and smooth surface;
- absence of shrinkage deformation and cracking;
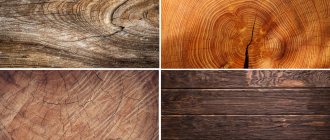
- beautiful texture of natural wood;
- woody aroma;
- natural shades.
How does a planed board differ from an edged board?
The main differences between sanded boards and edged boards are:
- Mandatory drying in a drying chamber. Edged lumber can be either dry or wet. Now a new variety has appeared on the market - a wet board treated with antiseptics.
- Processing of planed boards on a special grinding or jointing machine. During the turning process, all roughness and irregularities are removed, creating a perfect edge cut.
- The appearance and performance characteristics allow the use of lumber at various stages of construction, repair and furniture production.
Planed board - application
The treated board is used in various areas of production and construction:
- production of wooden fences;
- covering roofs, facades and terraces;
- decorating false timber and beams;
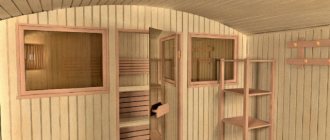
- organization of gazebos, country houses, bathhouses, outbuildings or summer showers;
- arrangement of the finished floor of a residential premises;
- Planed oak boards are often used for the production of racks, shelves, tables, stools, cabinets and other furniture.
How to choose a planed board?
Before you buy an edged or planed board, you need to make sure of the quality:
- Different grades of material are used for different jobs, so when purchasing, you should make sure that the selected raw material corresponds to the grade declared by the manufacturer.
- You need to decide in advance on the type of wood. Will it be more affordable larch and oak for building a roof or fence, or expensive cedar for lining a bathhouse or flooring in a house.
- Select the appropriate thickness and width. The length of most sellers is standard - 6 m. Deviations on the larger side should alert you, since this size is not standard.
- The durability of wood raw materials is directly affected by its humidity. Conscientious manufacturers pack lumber in plastic film, creating a kind of vacuum. Humidity is calculated as the average of the sides and end. High-quality material has a humidity of no more than 14%.
- An additional advantage will be the impregnation of raw materials with antiseptics and fire retardants.
How to make a planed board?
Factory processing of wood increases its cost, albeit slightly. If you wish and have the tools, you can create a planed board yourself from a regular edged board. To do this, you can use two types of tools:
- Manual
, which includes a plane and an electric plane. The quality of the resulting lumber directly depends on the skill of the craftsman to use the tool. The pressure on the plane must be the same all the time, otherwise you will end up with an uneven planed board made of larch or other type of wood with height differences and noticeable processing stripes. - Electromechanical
: surface planer, planer or jointer. This processing turns out to be more accurate, because the machine itself regulates the width of the board at the output, and special mechanisms do not allow making a crooked or oblique cut. A fence board, planed on a machine, is similar in properties to its production counterpart. However, this equipment is expensive and not everyone has it.
Is it possible to plane painted boards?
When you have painted old material and need to reuse it, you can go in two ways:
- Try removing the paint using a machine or plane. Paints have a different density than wood, so this method is not the best, especially if you need to treat a large surface or the paint is applied in several layers. The knives will become dull and clog, and in some mechanisms you cannot sharpen them - you can only change them.
- A planed board for a fence will turn out much faster if the paint layer is removed first. This can be done by heating the board with a hair dryer and cleaning the paint with a brush or chisel. There are also special chemical removers on sale, which you only need to work with while wearing protective gear. After this, the treated surface can be sanded.
womanadvice.ru
Processing boards without a planer with your own hands | With your own hands
Don't have a planer?
No problem! You can make the sides of the boards even and the edges rectangular without its help. Your grandfather would most likely have picked up a plane, but today there are easier ways. With a few basic power tools and machines, you can choose any of these five methods to quickly level your boards.
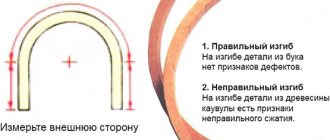
Quick tip! Before you begin, assess the extent of the board's warpage by using a bench of short, straight strips of wood or metal, as shown in the photo below.
1. For a warped board, cut a pair of straight runners, the length of which is slightly longer than the workpiece, and glue them to both edges. When the glue is dry, remove the clamps and run this glue through a thickness planer (convex side up).
Continue processing until the entire top side of the board is flat. Then turn the piece over and run it through the machine again to line up the other side. Using a saw, remove the glued runners and file the edges at right angles.
2. For a board twisted with a screw, cut out a load-bearing strip with a width and length slightly larger than the workpiece from even scraps of thick plywood or MDF board. Glue a strip along the back end of this board, against which the workpiece will rest as it passes through the machine. Using wooden wedges secured with double-sided tape, stabilize the workpiece so that it does not wobble. Now run the carrier board with the workpiece through the planer to level the top side. Remove the workpiece from the supporting board, turn it over and sharpen the second face.
Boards, continue wood processing
Now that you have your board pieces cut to size, the following steps help bring the rough, unplaned pieces to their final size. For this, three tools will be used - a jointer, a thickness planer and a table with a circular saw. The first step is usually to choose the flatter side and plan it on each board. My tool in this case will be a jointer. Of course, you can use a hand plane, but if you have a lot of workpieces, then an electric jointer will do the job more quickly. The zigzag chalk lines on the side that will be planed make it easy to see when the piece is completely flat.
Additional tool features
To remove chamfers, you need to use a special triangular groove cut out on the front plate of the plane.
The tool should be positioned with the groove at the angle to be processed, launched and moved along the part while maintaining the tilt. The first pass is made along the slot; subsequent passes, if necessary, are carried out in the usual manner.
To make quarters on a plane, you need to install an additional stop to limit movement away from the direction of movement. The second stop, limiting the depth of the quarter, is located on the side surface. The stops must be set to the required dimensions. The distance should be measured from the angle of the cutting edge of the knife in the upper position. The quarter selection is performed in several passes. If the vertical surface of the quarter turns out to be steps, it is necessary to increase the protrusion of the knives beyond the side surface of the plane.
A wide surface of lumber can be processed in several passes. Processing should begin from the left edge, setting the adjustment to the minimum depth. The next pass should be performed offset to the right by about a third of the length of the knives. In this way you need to go across the entire width of the workpiece. If the quality is unsatisfactory, repeat the surface treatment in a similar way.