One of the advantages of private home ownership is the ability, if necessary, to increase the usable area by adding an additional one to the main structure. In this way, residential or utility rooms are obtained for whom some functionality is no longer enough. In order for the extension to improve the living conditions of the owners, and not create problems for them, it must be built using existing technologies, and not according to the principle “somehow, as long as it’s cheaper.” Therefore, we will figure out how to properly attach to a house, relying on generally accepted methods and the experience of FORUMHOUSE users.
Important stages are design and approval.
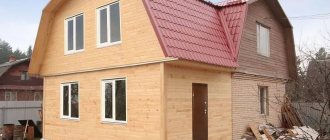
An extension to a log house can be made in the form of a veranda, terrace, garage, where a workshop or storage room can be located, it can be a summer kitchen or an additional room. But there are always two important stages between the idea of construction and its implementation: you need to create a project and then obtain a building permit.
The project allows:
- determine the scope of upcoming work;
- assess how difficult it will be to build an extension from timber;
- record the types of upcoming events.
The amount of materials is reflected in the estimate to determine the cost of construction. Design documents contain a lot of useful data, and therefore are a guide for builders.
For example, a project for an extension to a log house may contain the following information:
- the extension will have one or two floors;
- will it be necessary to make new openings for windows, doors, or carry out redevelopment;
- what communications in the house require installation from scratch, complete replacement or repair;
- technical documentation contains explanations of the junctions between the building and the extension, how the piping will be done, what the roof of the residential building will be like;
- what work needs to be done on the site: clearing the area, marking the foundation, depending on what type of foundation is chosen: strip or columnar (on bored piles). Each of them can be made by hand.
When choosing a material for finishing the facade, the architectural features of the existing house are taken into account.
1.1. Permission to build an extension to a house made of timber
Permission to build an extension made of brick or wood is not always required. It is necessary in case of construction of a capital structure. A canopy, covered terrace or a new porch for a summer house does not require approval, since they do not change the key building elements of the main building, do not affect utilities, or the foundation.
If, according to the project, the usable area of an additional room to the house (kitchen or room, second floor) becomes larger or the configuration and size of the roof changes, then it is also mandatory to obtain permits for construction. Then in the future there will be no problems with selling real estate.
Due to the extension, the territory it occupies on the site changes. If the building was one-story, but became two-story, then its volume and layout will change. All this data must correspond to the previously developed and then agreed upon project and be included in the new technical passport. If this is not done, then after unauthorized construction, according to the law, the premises will need to be brought into compliance with the current documentation.
Roof
One of the important stages in the construction of an extension to a wooden house is the construction of the roof. Depending on the type of structure, the rafter system is installed with the preliminary dismantling of the main roof or the construction of a new frame with rafters.
Carry out the roof construction process in the following sequence:
- align the frame of the rafter system in accordance with the project. Install perpendicular posts and lay crossbars. Secure the elements with corners and pins;
- on top of the ridge crossbar along the extension to the edge of the walls, lay thick boards at intervals of 50-70 cm;
- make a sheathing over the rafter system from boards 10-15 cm wide in increments of 30-40 cm;
- sew the sheathing with a waterproofing layer;
- lay the roofing material overlapping over the waterproofing - slate sheets, ondulin, corrugated sheets, tiles, polycarbonate;
- fill open joints with sealant;
- seal the segment connecting the roof to the main roof;
- install valleys and drainage gutters.
Important!
Before planning an extension, read the regulatory documents governing the requirements for attached structures - Article No. 3 of Federal Law 169, Article No. 25 of the Housing Code of the Russian Federation, SNiP 30-02-97 and 2.07.01-89
To insulate the roof from the inside, attach foam plastic or mineral wool to the sheathing plane, and sew a vapor barrier on top. Cover the top with lap boards or fiberboard. If heating with a chimney is planned in the attached room, provide for the pipe outlet at the stage of installation of the rafter system.
Profiled timber for the walls of a house extension: material features
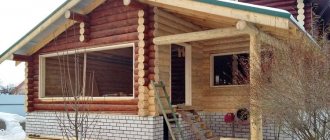
An extension to a log house can be made of any material. Often, among other available options, they choose construction from concrete blocks, bricks, wood (frame technology). At the same time, if you need to hire a mason to build masonry, you can make walls from blocks or wood with your own hands, following simple rules.
It is better to choose a similar material as a material for building an extension for a private wooden house if there is a task to build an additional warm room or veranda. Block or stone walls require a layer of thermal insulation (mineral wool is recommended) as well as decorative finishing. Such an extension to the house will cost more, and the building will also require a more powerful foundation.
Glued laminated timber has many advantages. This is profiled lumber, consisting of several lamellas of coniferous wood (cedar, spruce, pine, larch). This material has a landing groove at the ends, which ensures high-quality installation. The boards are glued together and then pressed.
Regardless of its purpose, an extension to a house made of laminated veneer lumber always looks noble and emphasizes the advantages of architecture and the design of the main building. The material is treated with protective compounds at the manufacturing stage, and therefore there is no need to carry out additional protective measures. The construction of an extension to a house is carried out quickly, and due to the stability of the material, no time for shrinkage is required.
A rounded beam or log is not suitable if the construction of an extension to the house needs to be completed quickly. In this case, a non-heavy frame structure is suitable. Its advantages include the following:
- low price;
- low draft rates;
- low load on the ground, which allows the use of a lightweight foundation, for example, strip or pile;
- high construction speed.
The use of foam blocks will also reduce construction time due to the high speed of construction of the external walls of the building. Installation happens quickly. Interior finishing can be done immediately. But increased costs will be required for decorating the walls outside.
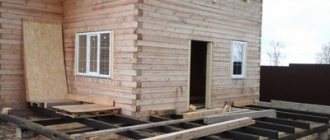
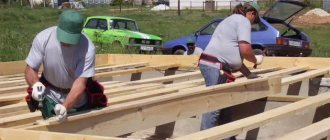
Flooring assembly
The next step in building an extension for a wooden dwelling is to assemble the floor. At this point, the foundation should be completely ready for use. Let's look at what flooring installation methods exist:
- pouring screed;
- installation of wooden floor.
The first method is more expedient, but it will cost more. To fill the screed, you will need to remove about 35 cm of soil located inside the foundation. Next, a cushion of sand and crushed stone is poured into the bottom of the niche, after which beacons are installed (using a level). Upon completion of preparation, the screed is poured and covered.
A simpler and more environmentally friendly way is to install a wooden floor. For such a covering it is necessary to lay beams (floors). They are fixed to the foundation using special fasteners - anchor bolts. At the next stage, the corner connections of the beams are installed. It is worth saying that such connections are installed along the perimeter of the foundation of the frame extension.
Then it is necessary to lay the cross beams and insulate the structure using a suitable heat insulator. Finally, as in the case of a concrete floor, the coating is covered. Before starting floor installation, it is recommended to study photos of the different stages of this event. This will allow you to quickly understand all the nuances.
Method of attaching joists to a concrete base
You might be interested in: We build a utility block at the dacha with our own hands
Foundation of an extension for a house made of timber
When constructing even an ordinary building, such as a gazebo, calculations are performed to select the optimal type of foundation. If a major extension is being built, then many factors must be taken into account. The bearing load of the base and supports on which concrete floors are laid is determined if a second floor or balcony is to be built. A screw foundation is considered unreliable. To make pillars, it is better to use concrete blocks or bored piles.
In order for an extension made of laminated veneer lumber to serve for many years, you must initially create a solid foundation for the future veranda, porch or living space. For several reasons, a strip foundation is most often chosen - it is relatively inexpensive, suitable for any room - room, veranda, bathhouse. If necessary, you can choose the level of its immersion in the ground to arrange a cellar or basement.
The installation of a strip foundation with your own hands is done as follows:
- Before starting construction of the extension, preparations are made on the site: the area must be level, cleared of debris and vegetation;
- markings are applied, the boundaries are indicated in the project;
- a standard trench is dug from the corner; when choosing the size, take into account the width of the foundation (it should be the same as the thickness of the foundation of a residential building) and the space required for arranging the formwork;
- install the formwork. The manufacturing material used is boards or plywood, which are secured on the outside with self-tapping screws to make it easier to disassemble later. Immediately make holes for communications;
- A sand-gravel mixture is placed inside the trench and compacted;
- then they begin laying the reinforcement;
- It is necessary to fill the formwork with concrete in such a way that this happens simultaneously, without interruption.
When the foundation of the extension is ready, before the supports are attached, it is recommended to lay a layer of waterproofing along the perimeter of the structure on top of the base - any moisture-resistant material, for example, roofing felt.
If you build an extension on a foundation with similar load-bearing characteristics, then there is a high probability that due to uneven settlement a crack will appear at the junction of the two foundations.
note
To build a major extension, you need the same type of foundation as the main building, so that you end up with a single load-bearing structure.
In this case, the foundation of both buildings must have the same parameters in terms of width and height, as well as depth, then they will “behave” the same. The same technology is used when it is necessary to make an extension to a house from timber during reconstruction. The foundation under the old wooden structure and the new foundation must be identical.
Legalization of extension
Before constructing a major extension, permission must be obtained. Within the city limits, this is done by the department of architecture and urban planning; in rural settlements, by the administration. You can build without papers, but then when you try to sell, bequeath or donate a house with an extension, you will still have to draw up documents, but it will be more difficult, through the court. In the event of a confrontation with neighbors, they can sue for self-development and insist on demolition.
For anyone planning an extension, it is useful to study the topic General questions about major extensions to the house on the forum. The experience of the user of our portal in the topic of adding an extension to a house with their own hands is also interesting. An article on choosing a foundation will help you decide on the type of foundation for your future structure. And our video will teach you how to work with aerated concrete.
Subscribe to our Telegram channel Exclusive posts every week
Connecting the walls of the timber extension with the house
Not only a reliable foundation guarantees its strength and long service life. The comfort and safety of the attached object depends on the quality of fastening of the two buildings. The joint will need to be insulated and protected from moisture.
A brick building will behave differently than a timber extension to a brick house or a wooden frame structure. Stone and brick are stable materials that do not settle. Therefore, after the main construction activities, the joint will simply have to be sealed with polyurethane foam, followed by sealing with cement-sand mortar.
To properly connect a timber extension and an old brick or wooden house, it is not enough to make an identical foundation. The shrinkage process, especially if wood with natural moisture content is used, is inevitable. It is better to avoid using polyurethane foam - such a seam will simply deform and cease to be airtight. Therefore, the area to which the wooden frame adjoins must be designed in the form of a movable insulated connection. The photo is shown below.
This type of joining occurs when connecting a window frame and wooden walls in extensions made of timber or logs.
4.1. How to connect to a wooden house
There are three types of connections that are used to connect a timber extension to a log house.
First option. First, check the wall surface to ensure it is level. A block will have to be nailed to it. It can also be fixed to the cut ends of the log house. Before this, insulation is laid in the place where the frame extension will be connected to the wooden house.
If the block is fixed to the wall, then wood is selected for it on the opposite side (end). The result is something like a sliding tongue-and-groove joint.
If the walls of a residential building have a pronounced relief (wooden frame), then there will still be a distance between the block and the extension. You will need to use other methods. One of them is to make a groove directly on the facade. When joining, insulation in the form of tape must be used. This type of thermal insulation makes the expansion joint as airtight as possible.
In the area where the fastening unit is located, the timber is fixed to each other. This must be done in order to ensure uniform movement of the wall and prevent divergence of the crowns.
If you plan to use staples to connect the building and a frame extension made of timber, then after the fastening with mandatory insulation has been completed, you need to additionally consider protecting the joint from water. To do this, it is recommended to fix the panels - flashings - from above. After the active settlement of the frame extension is completed, new cracks and holes may appear, so the joint is caulked again.
4.2. Joining timber to a brick or concrete wall of a house: nuances
The details of attaching an extension to an existing brick house can be done in the same way as to a wooden one - using a beam with a groove. You can use a block, but it is problematic to fix it on the masonry, and when fastened with corners, it will interfere with the free movement of the wooden extension.
Therefore, it is better to use another option, which provides better insulation of the joint and adhesion of the extension to the house.
What materials are suitable for building extensions
An additional room attached to the house can be built from different materials. Most often, to comply with the architectural style, the structure is built from the same building material as the residential building.
Attached premises are built from:
- logs, beams;
- frame panels with insulation;
- bricks;
- foam, slag, gas blocks.
The most popular among private developers is the construction of a wooden extension to a brick house, a wooden structure and the use of frame technologies. The additional room is insulated and electrified. To equip the kitchen and bath, sewerage and water supply will be installed.
Timber extension: walls
An extension made of timber has one common wall with the house, and the rest are made on the basis of a frame or without it. In the first option, the wooden frame is covered with OSB boards or boards, and insulation is pre-attached inside.
This option will be cheaper since the material is used only for making the frame. On the outside, a special cladding is used to imitate timber. You can cover the walls of your house with your own hands. To do this, you need to fix the sheathing on the facade, to which the external finishing is nailed.
If you want a house made of timber with a warm veranda, bathhouse or additional living space to look like a single whole, then choose a frameless assembly.
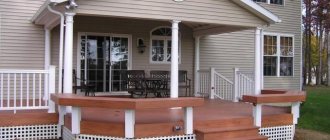
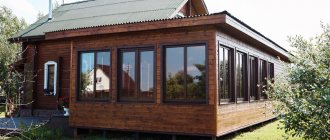
Glazing of verandas and terraces
We will glaze the extension with panoramic or regular windows, install sliding or sliding portals, and install impact-resistant, heat-saving or noise-absorbing double-glazed windows. For seasonal use of terraces and verandas, we recommend ordering cold glazing - it is cheaper, puts less load on the foundation due to single-chamber double-glazed windows, and reduces heat loss in the house. Warm glazing means the extension can be used all year round. In addition to installing windows, we will carry out work on insulating walls, floors and roofs, and do interior decoration. This is an ideal option for organizing a separate recreation area, dining room, office, gym, greenhouse, nursery or room with another purpose. As frames for double-glazed windows, you can choose reliable aluminum, lightweight plastic or timber with natural energy.
Roof installation
The roof is installed using standard technology, taking into account the characteristics of the building materials used. The roof can be gable or single-pitch. In both cases, the rafter system is made simply: the sheathing is installed along the load-bearing elements, and then the roofing material is attached.
note
In order for a house made of timber to look harmonious, the roofing material must match or be identical to the roof covering of the main building.
Among modern materials there are the following popular varieties: soft roofing, ondulin (Euro slate), metal tiles (in the form of profiled metal plates imitating tiles).
The roof of the extension can be made separately or be shared with the house. The second option is carried out during the reconstruction process, when, for example, an attic room (bedroom, children's room) is built and the configuration and size of the roof of the old house is changed entirely. It is difficult to do such a volume with your own hands; it is better to hire professionals.
Projects
Your timber extension can be located on any side of the house, the main thing is that it looks harmonious against the general background and does not block the windows of other buildings.
When building an extension, you should start with a plan for the future structure. In this case, it is necessary to take into account a number of important factors.
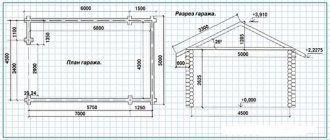
- The first is the purpose of the future premises (veranda or attic, garage, recreation room, workshop or storage room, toilet or bathhouse). A lot depends on this, namely: what building materials will be used and how many window openings will be in your extension. An additional building can also have a separate entrance or be connected to the main house. Your future entrance to the house can be of completely different sizes, for example, 4x9 or 6x9 meters. But the standard size of the timber is 100x150 millimeters.
- The second is the presence of utilities at the site of future construction, that is, sewerage, water supply, gas pipelines, etc. They must be freely accessible during and after construction.
- Third is the choice of material for construction. A very important point. After all, the material from which you are going to build an extension greatly affects its cost and durability.
You need to decide on the format of the extension. You can use either framed walls or solid frameless ones made of stone or wood. We must not forget about the number of floors, area, availability of free land, as well as other features of your home.
How we are working
Leave a request
We will contact you and give you a free consultation
We coordinate the departure
Our specialist will visit your site to make the necessary calculations and take measurements.
Commercial offer
Based on the data collected by a specialist, we prepare an estimate for you and send it for your approval.
We conclude an agreement
If you are satisfied with everything, we conclude an agreement and carry out all the necessary work.
All planned activities are carried out in accordance with the schedule, without delays - plumbing, electrical, connection of communications and other types of work are performed by our qualified specialists. The quality is confirmed by a guarantee certificate.
Contact us if you need a timber extension. There are no difficult tasks for us: a porch, a veranda, a garage, a second floor or a bathhouse - we will build any object.
Purchase of building materials and preparation of tools
To determine the amount of construction and finishing materials, fasteners and insulation, a project for the future extension with dimensions is drawn up. It is used to calculate the total estimate of the planned work. This takes into account the number of floors of the building, the total area, and the number of window and door openings. Considering that the annex will be used as a room or kitchen, the cost of connecting communications is included in the estimate.
Tools you may need:
- roulette;
- Bulgarian;
- fastening elements;
- corner;
- hammer;
- wood hacksaw;
- building level;
- hammer drill;
- screwdriver
Important! Don’t forget about personal protective equipment: gloves and safety glasses should be in the arsenal of any builder.
Foundation
An extension made of timber cannot be installed simply on the ground; such buildings require a solid foundation, so it is impossible to do without pouring a foundation. In most cases, strip foundations are used for attached structures as the simplest and most practical option.
Note! The depth should be similar to the main foundation on which the house stands, with the two foundations connected to each other by reinforcement.
This is a mandatory requirement that cannot be ignored. If reinforcement is neglected, the foundation of the extension may sag or move over time, which will entail additional financial costs for restoration.
The strip foundation is poured according to the following scheme:
- the territory is marked;
- a ditch of a given depth and width is dug;
- formwork is installed;
- a reinforcing ligament is performed;
- the internal space of the formwork is filled with concrete.
Further work is carried out after the concrete mixture has gained the necessary strength. The initial stage of setting usually takes 2-3 days, this is enough for the foundation to withstand the pressure of the walls being built without the risk of deformation.
Before further construction begins, the foundation is protected from groundwater by a waterproofing layer. Roofing felt or special bitumen-based mastics are suitable for these purposes.
Walling
In general, this stage is no different from the construction of an ordinary wooden house made of profiled timber.
The structural elements are folded into a crown and, if necessary, fixed together with metal bridges. When building walls, you should not forget about the ability of wood to linearly expand, so all areas of fastening and connecting elements using the tongue-and-groove method involve leaving a small gap. For these purposes, an expansion joint is also left, which is subsequently filled with polyurethane foam.
If the main structure is also made of wood, the house and the extension can be connected to each other with metal brackets, which are installed through 2-3 crowns.
Roof
Regardless of whether the extension will be residential or temporary, it is recommended to make the roof pitched to ensure unhindered drainage of rainwater. If we are talking about a veranda or a summer room, it is not necessary to connect the roof of the extension to the main roof. Here you can get by with the installation of additional timber, which will give the structure a certain rigidity and strength.
It would be correct to place the residential extension under a common roof to eliminate gaps in thermal insulation. To do this, part of the main roof of the wooden house is dismantled and the extensions are connected to each other, a layer of hydro- and thermal insulation is laid, and roofing material is laid.
Interior decoration
This is the final stage of construction, which remains at the discretion of the homeowner. The timber has a fairly presentable appearance, so it is quite possible to do without interior decoration.
If such a need arises, professional finishers recommend waiting 10–12 months until the wooden extension settles into place. Otherwise, deformation of the finish coating may occur.
Before carrying out interior finishing, it makes sense to lay a waterproofing layer and insulation, and only after that proceed to finishing.
By cooperating with us you get
Guarantee of meeting deadlines
- Delivery of the project is always on time
- In case of delay, we incur a penalty of 3% per day
Transparent, fixed estimate
- No hidden extra work
- You pay only for what you need, and you choose what you need yourself!
Daily photo and video reports
- Work progress reports via WhatsApp or email
- You will be in the know, even if you cannot be present on site.