In situations where it is not possible to purchase long enough lumber for the construction of floors, there are many ways to solve this problem.
You can use the so-called method of splicing two short beams so that the output is one beam of the required length.
The features and types of extension and connection of beams are discussed further in the article.
What is elongation?
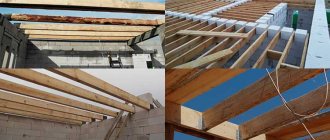
Builders resort to the method of splicing beams when the length of the boards or timber that was chosen for these purposes is not enough to lay the floors. Since the work to begin the construction of the rafter system begins after the construction of the box, there are many fragments of lumber left at the end, and these can also be used in construction.
Beams are also spliced during the construction of a house from timber or logs at any stage, be it walls, the lower crown or rafter legs. That is, the extension technology is suitable for any elements of the house that have a sufficiently large cross-section, which do not receive a large load from above that can bend the lumber into an arc.
In what situations is it used?
There are situations when changes occur in the calculations, the width of the well is increased, but the material has already been purchased, and it no longer corresponds to the required length. In this case, there is no need to purchase other lumber or spend large amounts of money. You can resort to the technology of merging two logs, due to which the required length of the beam or log will be achieved.
Joining wood occurs in 3 ways:
- by lenght;
- in width;
- at an angle.
The last two methods are used to thicken the timber, and the first, along the length, is used to increase the length. The standard dimensions of beams produced on the market rarely exceed 6 m. While the required length of the beam can be 10 m. In this case, extension by means of a second beam with the same cross-section would be the right solution.
When is this not possible?
No matter how strong the lock is at the junction of 2 bars, this place will still remain the most vulnerable along the entire linear meter. Since the solidity of the tree is disrupted, in a given place, it can dry out and become deformed. Plus, you need to take into account the additional weight that will come from the attic or second floor : insulation, furniture, human weight, etc.
As a result, the place at the junction may weaken over time and the entire structure will collapse, especially if the build-up was not just one beam, but several. The lock should be located on that part of the floor where the least impact occurs, for example, where the floor is closest to the wall.
If the connection is somewhere in the center, then such a house must have an internal ceiling, one more room. This indoor ceiling will support the weak spot. Or an additional column or several columns are installed in the room to support the ceiling. With this approach, spliced bars will be as durable and safe as monolithic ones.
It is also impossible to splice beams with a small cross-section. The wider the house, the larger the cross-section should be. Calculations of the required timber thickness are made according to the table:
| Span width, m | Distance between beams, m | Beam section, cm |
| 2,0 | 1,0 | 12×6 |
| 2,0 | 0,6 | 10×7 |
| 2,5 | 1,0 | 14×10 |
| 2,5 | 0,6 | 12×8 |
| 3,0 | 1,0 | 16×11 |
| 3,0 | 0,6 | 14×9 |
| 3,5 | 1,0 | 18×12 |
| 3,5 | 0,6 | 15×10 |
| 4,0 | 1,0 | 20×12 |
| 4,0 | 0,6 | 16×12 |
| 4,5 | 1,0 | 22×14 |
| 4,5 | 0,6 | 18×14 |
| 5,0 | 1,0 | 22×16 |
| 5,0 | 0,6 | 18×14 |
| 5,5 | 1,0 | 24×16 |
| 5,5 | 0,6 | 20×14 |
| 6,0 | 1,0 | 25×18 |
| 6,0 | 0,6 | 22×14 |
Suitable methods for this
There are many options for merging beams; they differ in methods, of which there are only 3:
- by cutting out a lock;
- using a wedge;
- using additional boards.
It is desirable that any of the listed methods include additional fastening with bolts, clamps, glue and other auxiliary elements. Otherwise, there is a risk of the bar moving.
How to dock with a lock?
This method is the most diverse of all, requiring precise calculations. From the joining ends of 2 beams, shaped locks are cut out with a chainsaw or using a hacksaw, which, when connected, grab each other, turning 2 small beams into 1 large one. The most common cutting methods are :
- half-tree butt;
- with end comb;
- frying pan;
- into an oblique overlay;
- oblique cut with tooth, etc.
Each of them has options. Somewhere several ridges or spikes are used, somewhere only one.
Sometimes the cuttings are combined, for example, a half-tree cut is made oblique. The principle of operation is always the same: on each beam, from the side of the joint, the cutting areas are marked out, and the excess is cut off. The connecting beam should have the same pattern, but in a mirrored form.
Build up with a wedge
The wedge method is most often done for miter cutting with an onlay . Two beams are cut according to the pattern, connected in the center and a beam is driven in the width corresponding to the width of the beam. This method is considered the most durable, but also the most difficult, since it is necessary to maintain high accuracy of calculations for 3 elements at once.
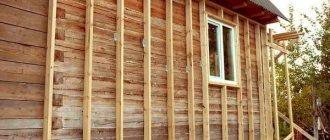
Connect with boards
In this case, locks are not cut into the beams and wedges are not driven in. They are held in place only by boards on 2 or 4 sides, which are bolted to the surface of the beams being connected. Aesthetics suffer in this case. But with this method, it remains possible to repair the joints and change the insulation. The bolts are secured in a staggered pattern using rubber washers.
In some cases, beams are simply placed one on top of the other and fastened with 4-6 bolts, without using any boards or cutting. Displacement at the junction is excluded in both cases. This method is suitable for small-caliber timber or boards .
Technological features of the process of gluing and bending wood
Wood is recognized as one of the safest materials for human health used in construction and in the manufacture of various furniture. Its environmental friendliness can be rated five points, which significantly expands the scope of use of wooden products. Wood can be used to produce workpieces of various shapes and sizes. Special technologies for working with wood help with this. These technologies also include wood bending and gluing, which is widely used in the modern production cycle.
The entire woodworking process takes a significant amount of time. First, the wood is dried, sawn, treated with special compounds - all this happens at woodworking enterprises. Subsequently, boards and other materials are prepared from wood.
These blanks are sent to factories, where they are used to make special construction materials or various furniture. During the production process, wooden blanks of different shapes and sizes may be required, and therefore woodworking techniques such as bending and gluing are widely used.
Bonding is used to produce parts of the desired size and shape. Wood splicing can be done by width, length or thickness. Pre-prepared ends of the workpieces can have special grooves or tenons, which increases the strength of the parts being connected. Different types of wood glue are used in the gluing process.
What rules should you follow?
In addition to the basic calculations for the length of the beams and cutouts with which the connection will be made, it is necessary to take into account other nuances that make it possible to lengthen and install the ceiling efficiently.
- To join beams, choose wood of the same species and preferably the same color, if the beams will not be hidden under the finishing. Different types of wood behave differently, some are stronger, others are more prone to cracking.
- The moisture content of materials should not exceed 15%. It must be dried wood that will not dry out during use, forming a gap in the clutch area. If it is not possible to achieve the same indicator for 2 bars, the difference should not exceed 3%.
- The wood chosen is of high quality, without defects, blue stains, or rot. You shouldn’t take risks trying to save money, especially when it comes to attic flooring.
- Before installing beams and connecting, lumber must be treated with an antiseptic and fire retardants.
- After gluing the parts, the remaining adhesive must be removed on site. Once it dries, it will be more difficult to clean the surface.
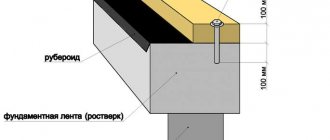
- Splicing is done vertically relative to the front side. That is, the cut itself must be parallel to the wind flow to avoid blowing through the gap.
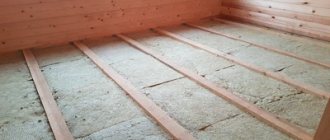
- At the junction, a layer of insulation is laid before the connection. The wood should not touch each other at the cut site. If parts of the timber begin to dry out, the insulation in the lock area will prevent blowing.
- The timber for splicing is chosen to be of one caliber (one thickness).
- The extended beam should not thicken at the joint.
- The splicing of beams must be done in a running start, not in one line, so as not to create pressure on one, the most vulnerable section of the floor.
Selection of raw materials for the production of laminated lumber
The quality of the final product is directly related to the quality of raw materials. Despite the fact that laminated wood involves the use of off-grade waste, for a greater yield of high-quality products there are still selection criteria for raw materials. You can also glue sawdust, but then it will be a completely different product. Since our goal is to obtain high-quality lumber, in order to reduce costs when choosing raw materials, we must adhere to certain standards:
- Wood with too many knots will require too much labor to prepare and much of it will be wasted. Therefore, we take only wood from the first and second cuts.
- We select blanks of such length that will make it possible to obtain acceptable quality of the product. Trims that are too short will increase glue consumption and reduce quality. Plus, a significant part of such raw materials will turn into sawdust during the manufacturing process.
- For processing, accept wood with an allowance the size of which eliminates the formation of additional production waste.
The correct splicing technology includes the entire production cycle. Everything matters, from the correct locations for raw materials and semi-finished products to the quantity and quality of manufactured products and the percentage of waste.
Tools and materials for work
Before performing the main work of cutting out locks, it is necessary to take into account and prepare all the necessary tools so that they are at hand at the right time.
What you need for work:
ruler and square;- marker;
- axe;
- chisel;
- chainsaw;
- electric drill;
- stationery knife;
- chisel;
- bolts, nuts, a key for them;
- antiseptics and fire retardants.
You may also need a sander or sandpaper to smooth the cut surfaces.
Step-by-step instruction
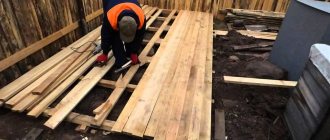
When all the tools are ready, the wood has been processed and cleaned, you can proceed to the main work of cutting out the joints. It looks like this.
- Each working beam is aligned along the edges. To do this, use a square with which to measure each of the 4 sides of the beam, draw a control line and cut it with a chainsaw or circular saw from 2 wide sides. If the disk is not enough along its entire length, the remainder is cut off manually with a hacksaw.
- Next, draw the drawing itself, lines on the beam also on all 4 sides.
- The cuts are made using a chainsaw or hacksaw. If you are not sure that the master will make an accurate cut using a chainsaw, it is better to use a hand saw. In this case, errors will greatly affect the quality of the joints; it will be extremely difficult or impossible to restore or repair them.
- After making the cuts, the unnecessary piece of timber is carefully removed using a chisel and hammer.
- When the excess parts have been removed from both beams, it is necessary to place one beam against the other to check the accuracy of the connection. As a rule, there is always a small gap at the joint; it should not exceed 1 cm. Jute will be laid in this place.
- Next, both parts are glued or connected using bolts, after drilling holes with a drill. The ideal option would be gluing and bolting.
The boards are joined using the overlapping method. Since the lumber is of small cross-section, it cannot be sawed and any, even small parts, cannot be removed. Thus, the boards are connected using 4-6 bolts.
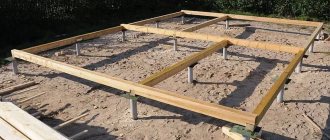
The overlap length varies from 20 to 50 cm depending on the length of the beam itself. When installing finished beams on concrete walls, they must be insulated with roofing felt or similar material so that the board does not come into contact with the surface of another material.
How to splice timber along the length
In this material you will learn how to splice timber along the length. It's no secret that for products used without load, with loads in tension, compression and bending, various splicing methods are used. We will introduce you to each of them in more detail, as a result of which you will learn how to make a strong and beautiful connection.
How to splice timber along the length: main points
| Technology for splicing timber without load (the simplest scheme). |
| Splicing technology under compression load. |
| Splicing technology under tensile and bending loads. |
| Splicing of open beams, purlins, rafters. |
| Features of splicing furniture, railings. |
Errors during the connection process
The greatest attention in this work requires the calculations themselves when creating the castle, as well as the accuracy of its cutting.
Before lengthening, it is necessary to inspect the timber or board and discard it if there are cracks at the places of the planned connection.
While the wood is monolithic, they do not affect its integrity, but if it is damaged in a vulnerable place, when cutting, this chip will fly off and create an unnecessary gap.
The second point is related to the choice of tool. This should be a high-precision electric or gas-powered device that can create an even line without catching or cutting off an excess area. The most accurate and trustworthy tool is a sharp handsaw .
You also need to consider the length of the lock. It should not be too small so that the structure holds tightly. To avoid mistakes, it is necessary to use ready-made projects and calculations for a certain length of the castle in relation to the beam.
Main types of defects
A high-quality connection provides the spliced lamella with the strength of the original wood and should not be very noticeable. If the technology is violated or the operator is inattentive, the following defects may be present in the finished product received from the splicing line:
| Defect | Cause of occurrence |
| There is empty space between the spikes | Insufficient pressing or uneven application of the adhesive composition |
| The resulting product does not have the required strength | The spikes received less than the required amount of resin (glue) |
| Stepping - stepped surface of the finished part | Uncalibrated workpieces (of different thicknesses) are supplied for splicing. The resulting product is rejected and used for further processing |
| Helicality - the lamellas have planes with a slope - the final product can have the shape of a propeller. | Poor-quality workpieces are obtained from the use of parts with conical planes or due to incorrect initial settings of the machine, when the right angle between the plane of the cutting tool and the edge of the workpiece is not maintained. The permissible deviations per meter of the workpiece in length are 3 mm, in width – 2 mm. These products are also recyclable |
| Finished parts may have areas with torn wood fibers in the tenon joints. | Formed when working with blunt instruments or violating technology. Products with torn fibers are also rejected. Defective products are spliced again to achieve a high-quality product. |
All spliced workpieces must be left to rest for two to three days so that the glue used has time to polymerize and acquire working qualities. After aging, the workpieces are subjected to finishing processing and a product completely ready for use is obtained from it. The range of finished products may include painted floor slats, platbands, skirting boards, laminated veneer lumber or laminated boards.
The use of automatic and semi-automatic splicing lines makes it possible to find use for off-grade or oversized wood and significantly expand the range of products.