Planed tongue-and-groove boards are a common building material, since wood is an environmentally friendly, strong and at the same time durable material. In addition, the presence of a tongue and groove simplifies the installation process. Below we will take a closer look at the features of tongue and groove boards and areas of its use, and also consider what to look for when choosing and how to make it yourself.
General information
So, the main feature of this material is the presence of a tongue and groove. Actually, this locking connection is what makes it so popular. Thanks to the tongue and groove, the boards fit tightly and securely together, forming a continuous surface without gaps.
It must be said that a similar connection system can be found in materials such as:
- parquet;
- laminate;
- PVC panels, etc.
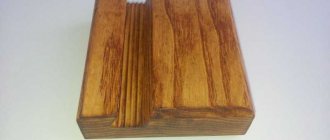
There is also another distinctive feature of this lumber, which is its processing - its front side is most often carefully sanded. The reverse side may be unpolished.
Advantages
Among the positive qualities of tongue and groove boards, the following points can be highlighted:
- is an environmentally friendly and vapor-permeable material, which makes it an excellent finishing coating;
- good durability even for outdoor use, which is achieved by modern processing technologies;
- low thermal conductivity, due to which the material has good thermal insulation qualities;
Laying tongue and groove boards on the floor
- As mentioned above, installation of tongue and groove boards is very simple thanks to the locking connection;
- has an attractive appearance.
As a result of these advantages, tongue and groove boards have become widespread in construction.
Flaws
As for the existing shortcomings, they apply to all lumber:
- high price compared to artificial analogues;
- tendency to warp, which is eliminated by the correct choice of material and compliance with installation technology;
- the need for periodic processing - varnishing or painting.
Tongue boards for wall finishing
The subtleties of working with a router at home
Having examined the technology that is used in production, we will understand the intricacies of making lining with a router at home.
At the initial stage, you need to stock up on boards planed on a circular saw and jointer (you can immediately buy ready-sawn material or make the necessary blanks yourself). All subsequent operations are performed with rigid fixation of the cutting tool and lumber.
All actions can be reduced to the following sequence:
- Setting the workpiece pressure. It is important to adjust the position of the board close to the stopper and securely fix it with clamps on the inside.
- Height adjustment of the cutter. It is important to clearly stabilize both cutters at the same height, otherwise the manufactured lining will be unusable.
- Wood panel processing. The workpiece is guided along the cutting element, forming a groove along one side of the board, and then, replacing the cutter, a tenon.
Making lining with a hand router is not difficult if you stock up on special tools and strictly follow the suggested recommendations.
Application area
The lumber in question is most often used as a finishing coating. In particular, its traditional area of application is the arrangement of plank floors. Using a tongue and groove board, you can lay it as a flooring, i.e. from long boards, and typesetting - from short ones.
This lumber is also used for wall finishing. True, wall panels, as a rule, differ in the profile of the front side, imitating timber. Therefore, tongue and groove boards for walls are also called imitation timber.
Small house made of sheet piling boards
It should be noted that imitation timber can be used not only for wall cladding, but even for building houses. The principle of their construction is reminiscent of construction from ordinary timber. The plank house can be used as a country house or garden house for temporary residence.
True, there is a technology that allows you to build a house from tongue-and-groove boards even for permanent residence. Its principle is to build double walls, between which a heat insulator is laid.
An example of a “double beam” connection during the construction of walls
This technology is also called double timber construction. The result is a warm and at the same time quite durable housing.
Stage 2 - preparing the base
The tongue and groove boards are laid along joists or beams. In this case, in each individual case, additional conditions must be taken into account:
- In terms of cost, laying a continuous subfloor will be more expensive than structures with logs laid in increments of 0.3 - 0.6 m.
- When arranging a basement or attic floor, they will need to be insulated and insulated from wet steam.
- When installing interfloor floors, acoustic materials are laid in the floor structure.
Wood flooring on OSB boards
When laying a finishing wooden floor on a concrete base, the boards are installed directly on the screed, traditional joists or modern adjustable analogues.
Waterproofing works
Wood, for all its positive qualities, is vulnerable to moisture, which can penetrate into the ceiling regardless of the floor of the structure. In connection with this, when installing a wooden floor on a concrete base or joists, take into account the following:
- To create a high-quality and reliable waterproofing layer, a dense polyethylene film laid in two layers (from 150 microns), dense membranes or weld-on materials are used.
- Waterproofing should have as few joints as possible. When using film, the sheets are laid with an overlap.
- All joints must be thoroughly sealed.
- Waterproofing must be installed on the walls to a height of at least 15 cm.
Self-adhesive waterproofing material
If the base for laying the logs is a floor slab, then the waterproofing layer is laid directly on the screed or expanded clay sand. Using coating waterproofing, you can get a monolithic coating without joints.
Waterproofing can not only protect the finishing coating from destruction, but also protect the property of neighbors in the event of some unforeseen situations. You will find the installation technology in a special article.
Methods for waterproofing a concrete base
Important! Before laying film waterproofing from the surface of the screed, it is recommended to remove obvious irregularities that could damage the integrity of the film.
If the floor is made of beams, then there will be no continuous rigid horizontal base. In this case, a sheet of edged boards is attached to the cranial block. In this case, the vapor barrier material is laid “ladder” on top of the beams.
Wood floor pie
Thermal insulation work
When installing floors on interfloor beams, you can do without insulation. But it is a mandatory element of a two-layer wooden floor located on the first floor of the building above the unheated underground space and in the attic. In the attic, if there is no living room there, the finished wooden flooring is made from edged boards or panels from it.
The insulation is laid in steps
It is recommended to use mineral (eco) wool as a thermal insulation material for wooden floors, which has the ability to absorb moisture and at the same time does not interfere with its evaporation from the wood.
The process of laying insulation - between the lags the material should be placed as densely as possible
The waterproofing layer does not fully protect the wood from moisture, as a result of which, in the absence of vapor-proof polystyrene foam, the wood begins to rot, and mold, fungi and microorganisms form in its structure.
Types of mineral wool
Laying vapor barrier
A layer of vapor barrier must be present in the wooden floor cake. This is due to the fact that the moisture absorbed into the wood and insulation begins to evaporate. Vapor barrier material is needed to release evaporated moisture and prevent excess moisture from the environment from reaching wooden structures. The structure of special vapor barrier membranes allows evaporation to pass in only one direction - outward.
There should be a small gap between the insulation and the vapor barrier material. If the height of the logs is not enough, then a rail of the required thickness is fixed on them
The peculiarities of this layer are that, freely passing through it, moisture is concentrated in the form of condensate on the outer surface of the membrane. In the future, its removal occurs in the process of natural ventilation of the wooden floor structure. In the case of a tongue-and-groove board, this process is organized due to the presence of one wide or several narrow cuts on the back side of each board. To ensure that air can freely flow inside the boardwalk, it is necessary to provide special hatches in its design in the area of the baseboard in the least noticeable place in the room.
Structure of the vapor barrier membrane
Logs and their purpose
Regardless of the floor design, joists are designed to solve a number of basic problems:
- The tongue and groove board is fixed to the joists using self-tapping screws when installing wooden flooring on the floor slabs. Under the finishing coating, insulating and soundproofing material is hidden, and a space is created for ventilation of the structure.
- When installing a finished wooden flooring over a wooden floor, joists are installed if the floor beams are located at a large distance from each other so that the tongue-and-groove board does not sag.
- Using logs and additional materials - spacers, plastic wedges and adjustable floor studs, the horizontal level of the coating is set.
- The logs form a spatial box, which is used for laying insulating material.
Adjustable joists for laying wooden floors on concrete bases
Wooden floor on interfloor beams
A beam of the required cross-section or a board with a cross-section of 50 x 150 mm is used as a log.
Gaskets under joists
Operating principle of adjustable joists
Read more about attaching joists to a concrete floor in a special article.
What to look for when choosing
To purchase high-quality lumber, when choosing, you need to pay attention to the following points:
- humidity - must be within 12-16 percent, otherwise the material may be deformed;
- type of wood - the cost of the material and its performance depend on this.
Most often, boards are made from the following species:
- spruce and pine are the cheapest lumber with good performance qualities;
- cedar – has an attractive appearance, in addition, wood is known for its bactericidal properties, which makes it an excellent finishing material;
Larch lumber
- larch – is resistant to moisture and is not susceptible to rotting. Therefore, tongue-and-groove larch boards are excellent for exterior decoration;
- oak has a number of positive qualities, among which are strength and durability. However, oak tongue and groove boards are the most expensive;
- the presence of knots and other defects - lumber with such defects is cheaper, however, it should be taken into account that knots not only affect the appearance of the board, but also its strength;
- drawing - plays an important role for the finishing material;
- thickness - depends on the purpose of the lumber. For example, for finishing walls you can use a coating 1-2 cm thick; for flooring on joists and building walls you will need a thicker board.
Advice! To determine the moisture content of wood, it is not necessary to have a special device. The fact is that dry boards have a shiny surface. And if you knock on them, they will make a ringing sound.
Production of tongue and groove boards
How to make a tenon pick-up device
When forming tenons on wooden workpieces with a manual router, it is not fixed in any way in space and is brought to the workpiece manually. That is why it is very important that when using a power tool, the workpiece is in a device that can ensure not only its reliable fixation, but also the accuracy of the spikes formed on its surface.
The design of the simplest device that is able to cope with such tasks is:
- several fixed guides (lower, upper, side);
- movable bar, due to which you can adjust the sampling length.
Device No. 1 – for removing the tenon
Such a device is manufactured, the dimensions of the components are selected individually, in the following sequence:
- Along the edges of the plywood sheet, vertical side elements of equal height are fixed, with cutouts made in the central part.
- Guides are installed on the side elements along which the sole of the hand router will move.
- To limit the movement of a hand router along the upper guides, the side strips should be fixed to them.
- On a sheet of plywood, which plays the role of the base of the device, it is necessary to install a movable element, with the help of which the amount of overhang of the edge of the workpiece will be adjusted. For fixation, you can use a regular thumbscrew or any other suitable fastener.
When manufacturing a device of the proposed design, the following points must be taken into account:
- The height of the upper guides should correspond to the sum of the thickness of the workpiece and the small gap required to install the locking wedge.
- The cutouts in the side vertical elements are made of such a width that it takes into account the length of the tenon being formed.
Self-production
The production of grooved boards on an industrial scale is carried out using high-precision automatic equipment. All processes are controlled by the program, so the person only controls them.
It is impossible to achieve the same quality at home, however, it is quite possible to perform basic tongue and groove work. And then we will look at how to make a tongue and groove board with your own hands.
To do this you will need the following tools:
- manual frezer;
- tape measure and pencil.
So, making a tongue-and-groove board with your own hands is carried out in the following sequence:
- before making a tongue-and-groove board with a hand router, you need to select suitable lumber, which must be dry and without signs of rot or fungal attack;
- if the lumber is damp, it must be dried - stacked in a dry room on stands. Drying usually takes several months. The period depends on the type and thickness of the tree;
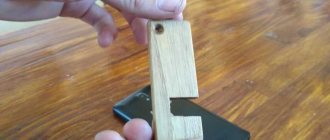
- you need to fix the prepared board on your work surface with your own hands using clamps;
In the photo - making a groove using a router
- Next, you need to mark with a pencil, having previously outlined the axes of the edges;
- in one of the edges you should select a quarter groove with a router;
- opposite the edge, using a jointer or router, you need to select quarters on both sides, as a result of which a tenon is formed;
- All other boards are processed in the same way.
Note! Wood should not be dried in the sun, as the outside will dry out quickly, but the inside will remain wet, which can lead to various defects.
This completes the work. It should be noted that do-it-yourself tongue and groove work is a painstaking task that requires the ability to handle wood and power tools.
On what basis can a floor tongue be laid?
The tongue and groove board can be laid on almost any base. In order for such a coating to last as long as possible, the floor surface must be prepared. Make additional thermal insulation and waterproofing.
Floor tongues can be laid on almost any base, for example, on joists
On what bases can you lay tongue-and-groove boards with your own hands:
- Tongue and groove boards can be laid on a concrete base. If there are pronounced irregularities on such a surface, then it must be filled with a new layer of screed.
- You can also mount such a structure on logs. The logs are attached to the base with screws, dowels or glue.
- If you decide to use tongue and groove boards as the front finish, you can lay down plywood. The plywood is attached to the base with glue or self-tapping screws.
- An old wooden floor can also be covered with tongue and groove boards. The main thing is that all its elements are intact and firmly attached to the base.
Whatever base you use, you need to take care of additional insulation of the floor. First, a waterproofing film is laid on the subfloor, then insulation, for example, glass wool, and the film is laid again as the last layer. Only after all the layers are in place can the tongue and groove board itself be used.
Conclusion
The main feature of a tongue and groove board is the presence of a groove and a tenon for reliable connection of the material to each other. This allows it to be used in a wide variety of construction areas. The only thing is that when choosing a board for certain purposes, you should take into account its thickness and some other parameters, since in some cases the best option may be a 20 mm tongue-and-groove board, while in others, thicker lumber will be required.
You can find additional useful information on the topic discussed in the video in this article.
The floor has fallen into disrepair and urgently needs to be repaired. What material should you choose for finishing so that it is pleasant to walk barefoot and the coating looks neat, fresh and cozy? An excellent solution would be to use a natural material - wood. Modern technologies make it possible to make a durable and attractive tongue-and-groove floor board from ordinary wood with your own hands.
Laying base
Before laying any floor covering, it is necessary to provide a rigid base, the strength of which is higher than the facing material. This is necessary to distribute uneven operational loads on the elements of the load-bearing frame. In addition, factors to consider:
- wood is sensitive to moisture - the floor covering should be impregnated with an antiseptic, cut off with your own hands from concrete structures that can absorb it by capillary method, from the soil, from which evaporation is always possible, and from the subfloor, if there is one;
- lumber is a flammable substance - the sheet piling is impregnated with fire retardants before installation;
- floor insulation – thermal insulation may need to be laid between the joists;
What is a tongue and groove board?
Classic edged boards have been used for floor finishing for many centuries. The result is a warm and even floor, but this coating has disadvantages that reduce comfort:
- the annoying creaking of floorboards, which can be very difficult to get rid of;
- gaps between the boards through which moisture and cold air pass;
- splinters and irregularities dangerous to the skin;
- protruding nail heads.
A tongue and groove board is an edged floor board with side surfaces treated for tongue and groove for better installation.
Today, solid wood flooring has no unpleasant disadvantages, although traditional varieties of hardwood, oak and coniferous species are used to create it:
- Larch perfectly withstands mechanical loads, it is resistant to abrasion and does not rot at high humidity levels. This floor can be used outdoors for the construction of terraces and verandas; it does not require varnishing; if desired, you can use colorless or tinting oil for maintenance;
- oak has dense and hard wood, oak flooring will last a long time and will not be scratched by chairs or heels;
- Pine and spruce are soft and pleasant to the touch, but require varnish.
Boards are also produced from birch, alder, ash, mahogany, teak, and other valuable and exotic wood species.
Why is it needed and where is it used?
This natural material is used in construction for laying finishing flooring and subflooring in private houses and apartments, on balconies and loggias, verandas and terraces, saunas and public spaces.
For industrial and commercial premises with a large number of people and equipment, the need for frequent wet cleaning and constant mechanical loads, the use of wooden floor boards is not recommended.
According to the current GOST 8242, alder and aspen can be used for flooring only in living rooms. Cheap grade C boards are usually used to make subfloors.
You will learn more about what a solid board is, what types and grades there are, the advantages and disadvantages of the material, as well as the difference from other types of coating in the article: https://pol-master.com/pol-pokritiya/massivnaya- doska-dlya-pola.html.
How it works
The tongue and groove board has its own design features, thanks to which it acquires improved technical characteristics for creating a high-quality finished floor:
- At the side ends, special locks are made, consisting of a protrusion, the so-called tongue, on one side and a groove, ideal for the tongue on the other side of the board. Thanks to this design, the boards are connected to each other, fitting tightly to each other without gaps, forming a single canvas. Materials are produced with tongues only on the long ends of the boards, and there are also models with locks along the entire perimeter;
- the upper front surface of the board is processed on high-precision grinding machines and is characterized by increased smoothness, it is completely ready for use and does not require finishing;
- On the bottom of the planks, special grooves are cut to ventilate the planks and maintain the level of humidity when laying floors on a solid base without creating a frame, for example, on a concrete screed or self-leveling floor. One or two wide grooves up to 3 mm deep or several narrow grooves are made.
The dimensions of such boards are given to several standard dimensions for ease of calculation of material consumption and ease of installation. The length of the board is usually chosen equal to the length of the room. It is possible to produce longer or thicker strips for individual orders.
- length varies from 100 to 400 cm;
- width reaches from 8.5 to 10 cm;
- thickness varies from 2.5 to 3.5 cm.
How to choose lumber
The choice of floor covering is significantly influenced by the installation of tongue and groove boards using existing technology. An individual developer needs to take into account the quality of lumber, size, type of wood and the method of processing it for use.
Quality
Standard laying technology involves fixing every 4-5 rows of boards to the joists with nails or self-tapping screws. Therefore, sheet piles with minor defects can be laid between them without serious consequences. The main quality parameters of a wooden floor covering are:
- humidity – 12%, in practice you can find chamber-drying boards packed in film with a humidity of 8%;
- roughness – 500 microns for back surfaces and ends, 200 microns for painting, 120 microns for opening with varnish;
- integrity - due to the above logging conditions, a wide tongue and groove (20 - 40 cm), manufactured according to the specifications of a specific manufacturer, can be assembled using furniture board technology with extension along the length using notched locks; boards 6 - 14 cm wide are always produced in one piece.
When purchasing certified lumber, the number of defects (wane, wormholes, knots) is controlled at the factory and complies with the permissible regulations of GOST 8242.
The grade of tongue and groove affects the quality of the interior.
Tongue pile is a profiled product for floor cladding; the raw material for its production is edged board. The manufacturer chooses the lumber grade B, A or Extra with a minimum number of defects in the wood of the floor board.
Dimensions
For most individual developers, it is preferable to lay the floor from tongue-and-groove boards with a width of 20 cm or more, the length of which completely corresponds to the size of one of the sides of the room, in order to reduce the number of longitudinal seams and not join them along the length.
Longitudinal joints in small quantities are almost invisible.
However, this is too expensive for its budget for finishing and operating floors, since when laying solid boards along the length of the room, cutting waste sharply increases; short trims cannot be used in partitions and rafter systems. Which increases the construction budget.
However, knowing how to properly fasten the tongue and groove on longitudinal joints with your own hands, you can ensure a normal coating life and a sufficient design of the floor covering. The above-mentioned GOST 8242 allows for the production of sheet piles with a length of 2.1 m, usually within 4 m for hardwood and 6 m for spruce and pine.
It is very important to choose the correct tongue thickness:
- tongue-and-groove floor board DP-21 should be laid on joists in increments of 30 cm maximum or on a continuous subfloor;
- DP-35 tongue and groove and BP-27 beam can be mounted on beams without a subfloor in increments of 60 cm maximum.
Distance between joists.
The length is less critical, since for most typical projects 4 m of products are enough without longitudinal joints.
In this case, the following nuances must be taken into account:
- only coniferous trees have perfectly straight trunks, so boards made of spruce and pine have a low cost compared to deciduous trees, whose trunks are shorter and have a natural curvature along the length;
- however, spruce and pine need to be treated more often with paints and varnishes during operation; this wood is less wear-resistant;
- from the trunks of cedar and larch, which are classified as coniferous species, long, smooth boards are obtained, by default impregnated with a natural antiseptic, highly wear-resistant, but they are less common and are classified as rare/valuable species by default;
- A tongue and groove with a wide face (the lower and upper surface of the board) has the original texture of a wood pattern, but is more susceptible to warping and drying out, therefore the service life and time between repairs of the floor covering are sharply reduced.
Advantages and disadvantages of the material
Improved with the help of modern technologies, tongue-and-groove floorboards have many advantages over conventional edged ones:
- The locking connection provides uniform load distribution, tight fit and absence of gaps between the boards, higher thermal insulation and noise absorption. The floor looks like a single seamless fabric and does not need to be sanded;
- The service life of the sheet pile is several decades. The renovation will get boring, but it will still look just as great. In this case, you can sand the surface and give it a different tone using stain or colored varnish;
- Standard sizes make it easy to replace a separate plank or combine different types of wood into an original ensemble;
- the smooth front side of the material looks luxurious immediately after purchase, it does not require additional sanding, it can be coated with varnish or protective compounds without the risk of raising the pile, it is pleasant and safe to walk on barefoot;
- The absolute environmental safety of this natural material and the glue-free connection allow it to be used in children's rooms and bedrooms. The antistatic effect does not attract dust to the floor surface and makes cleaning easier;
- Thanks to the presence of tongues and grooves on the back side of the product, the floor is more resistant to moisture, does not warp, does not dry out, and does not creak. Bottom ventilation prevents the development of fungus and mold;
- ease of installation allows even a novice specialist to lay the finished floor, which significantly reduces the cost of repairs;
- The variety of wood species, processing methods and various decorative effects provides ample opportunities for decorating the interior and giving the house a unique style.
Floor restoration and repair
During the operation of a floor made of tongue and groove boards, certain problems may arise caused by low quality materials or violation of installation technology. Let's look at common breakdowns and how to fix them:
- Gaps between boards - occur due to the high moisture content in the boards during their installation. After the laid boards have completely dried, the wood contracts, resulting in the formation of cracks. The most effective way to eliminate this problem is to dismantle the boards and re-lay them on the joists. If the cracks are not large, you can cover them with putty.
- Floor squeaking is a very common problem that occurs due to the friction of joists and boards against each other. Most often, floors begin to creak due to improper installation technology. Perhaps the joists were spaced too far apart, so the boards began to sag when walked and squeak. Another reason may be weak fastening of the boards to the joists. You can try to eliminate the cause of the squeak by screwing in additional screws; if this does not help, you will have to redo the floor again.
- Cracking of boards can occur for two reasons. The first is the wrong choice of flooring material. If the boards are made of soft wood, and the load on the surface is too intense, then over time, the floor will not only crack, but may even completely collapse. The problem can be solved by reducing the load or replacing boards with stronger ones. The second reason is wet wood. After drying, the wood tends to crack. In this case, it is enough to cover the cracks with putty.
- The appearance of resin on the boards is caused by the final drying of the wood. To get rid of resin, just remove it with a spatula, sand the area where it appears, and if the floor is covered with varnish or paint, apply a new layer of coating.
- Peeling of varnish can occur due to the contact of a large amount of water on the surface or due to the application of varnish to wet wood. In any case, it is necessary to remove the old coating with a spatula and a sander, let the boards dry and apply new layers of varnish.
- Rotting of joists and the inside of the boards occurs due to high humidity and insufficient air circulation under the floor. The problem will have to be solved by opening the floor, installing ventilation, replacing joists and rotten boards.
If after reading the article you have questions, you can ask them in the comments, we will be happy to answer them!
How to make a tongue and groove board with your own hands
Another important advantage of tongue and groove is the ability to make it yourself if you have certain woodworking skills. This painstaking work requires free time and knowledge of the intricacies of technology, as well as the rules for choosing quality raw materials. Based on the appearance and condition of the material, the board is divided into the following grades:
- extra - the most expensive grade, there are no knots or defects on its surface, it has an absolutely smooth, uniform structure;
- A is a high-class grade, but small spots and darkening are allowed on its surface without the presence of knots or other defects in the wood structure;
- B is the most popular variety in the mid-price category. Knots and other inclusions and stains on its surface do not spoil the overall appearance, but create an additional decorative effect of naturalness;
- C is a cheap grade with acceptable various structural inhomogeneities and through knots.
Having decided on the grade, you should pay attention to other criteria for choosing the original lumber:
- humidity should be 10–15%, and ideally up to 8%; such indicators are achieved using industrial drying in special chambers, after which the board acquires its stable size and will no longer dry out. High-quality drying can be determined by the shiny surface and a ringing sound when tapped, and a high level of humidity is determined by the presence of condensation on the inside of the plastic packaging;
- the integrity of the packaging will allow you to maintain a low level of humidity and the quality of the raw materials; when purchasing, you should also check for certificates, receipts and other accompanying documentation; it is recommended to choose products from well-known large brands that have earned the trust of consumers; a cheap board from an unknown manufacturer may be of low quality;
- Violations of the geometry and smoothness of grinding, especially for high-end products, are unacceptable; they will complicate installation and can spoil the appearance of the finished coating. These parameters are checked visually and manually;
- When combining several different types of wood, you should select boards of the same standard size to reduce the number of trims. The type of wood depends on the purpose of the room and the planned loads and operating conditions.
Required materials and tools
The boards have been purchased, now you can start working.
In large factories, tongue and groove work is carried out on high-precision computer-controlled machines.
For home tongue and groove you will need the following tools and materials:
- tape measure, level, ruler, square, marking pencil;
- impregnation against fire and biological damage;
- jigsaw or hacksaw for size correction;
- jointer with quarter selection function, milling machine;
- clamps for fixing the workpiece.
In cases where solid floorboards cannot be used, covering the floor with engineered planks may be a good option. We will tell you what an engineered board is and how to install it on our website: https://pol-master.com/pol-pokritiya/trehsloynaya-inzhenernaya-doska.html.
Step-by-step manufacturing process
Of course, it will not be possible to achieve production-grade extra-grade boards in a home workshop, but making a locking connection and subsequently getting a beautiful, flat floor without creaks and cracks is quite possible.
Stages of work to be performed:
- Before work, you should keep the purchased raw materials indoors for several hours to adapt to temperature and humidity conditions. A dry, clean board ready for processing must be secured to the work table with clamps so that it does not wobble or move during work.
- Measure along the long side the middle of the end side surface and apply markings for the locking connection.
Video: how to make a tongue and groove board with your own hands
A tongue and groove board will last for decades if the material is chosen correctly and the tongue and groove is done slowly and carefully. After laying the floors, it is advisable to cover them with several layers of protective varnish, then they can be washed, move heavy furniture and walk on them in high heels without the risk of scratching or pushing through. Hardwoods that are resistant to mechanical stress can be coated with a special oil, which will highlight the beauty and reveal the texture of the wood.
Choosing the best quality board
The next important aspect of the right choice is the compliance of raw materials with a certain class.
The quality of the final floor plane is built on this:
- Extra class. Known for the highest quality and impressive price. There are no cracks or other blemishes on the parts;
- Class A. It is a high-quality product, but structural heterogeneity of parts is allowed, and they also have some differences in color;
- Class B. Capable of accommodating small knots or cracks, as well as stains. Although this material is acceptable for forming an overlap on the floor, walking on it with bare feet will not be very comfortable;
- Class C. It does not seem very suitable for a finished floor, therefore only a subfloor is created from it. The raw material contains a large content of various cracks, holes and other wood defects.
The choice of the class of raw materials is determined by the material capabilities of the owner of the room, and also based on the location of the intended installation.
Grooved board and its features
Tongue and groove flooring has a number of distinctive features that make it such a popular and sought-after material. First of all, it is worth noting its design. Each board has a unique lock, thanks to which they can fit tightly together. This lock consists of a longitudinal protrusion on the edge of one board, which is called a tongue and groove, and a groove on the edge of the other, corresponding in shape. A similar system can be found in PVC panels, laminate, parquet, etc.
A distinctive feature of the tongue and groove board is also its processing: the front side has a smooth surface that does not require sanding. The reverse side may not be sanded, but there will certainly be grooves on its surface, which should ensure the ventilation process between the plank flooring and the base of the floor. Such ventilation will prevent wood rotting, fungi and mold.
The tongue and groove coating is an environmentally friendly material, which is undoubtedly a big plus in modern construction. But this advantage is not the only one. Among the advantages of this flooring are the following characteristics:
- high sound insulation material;
- high level of thermal insulation;
- long service life;
- fairly simple installation;
- does not attract dust;
- aesthetic appearance.
Finishing the floor
The final finishing of the floor is best done after all repair work has been completed. Otherwise, there is a risk of damaging the decorative layer of the coating. For finishing you will need:
- Putty knife.
- Vibratory and belt sanders.
- Sandpaper.
- Putty.
- A set of brushes or a spray gun.
- Solvent.
- Stain.
- Water-based or acrylic-based varnish. If the floor is to be painted, then paint.
- Vacuum cleaner.
- Mop bucket and rag.
- Carefully inspect the floor for cracks, chips, rotten areas, knots and irregularities.
- All detected defects must be leveled with a plane and covered with putty to match the color of the wood from which the boards are made.
- After the putty has dried, sand the treated areas with fine-grained sandpaper.
- Check the smoothness of the putty areas and, if necessary, repeat the procedure again.
- Use a vacuum cleaner to remove all debris and dust from the floor.
- If you decide to use paint as a decorative coating, then wipe the floor with a damp cloth and start painting.
- If you want to use transparent varnish as a coating, then first you need to do additional work on sanding and giving the floor the desired shade.
- To sand tongue and groove floors, it is best to use a belt sander. Use it to sand the entire floor surface.
- After sanding, vacuum up all the dust and wipe the floors with a damp cloth.
- To give the floor the desired shade, use stain, applying it to the boards with a brush or roller.
- After the stain has dried, you can apply the first coat of varnish. It is better to do this using a spray gun, evenly spraying the varnish over the surface.
- Before applying the second coat of varnish, it is necessary to lightly sand the first layer. This can be done using a vibrating sander and fine-grained sandpaper.
- The number of layers applied depends on the quality of the varnish and your desire, but usually 3-4 layers are enough for a normal-looking floor.
- After applying the final coat of varnish, let the floors dry completely for a week, after which you can treat the floor with polish and begin using the room.
Detailed instructions for applying varnish to a wooden floor are in the video:
Now it has become fashionable to use special oil to treat floors instead of varnish. There is a reason for using oil, especially for high-traffic areas, because oil is absolutely resistant to abrasion, unlike varnish. In addition, the oil perfectly emphasizes the texture of wood, giving it a soft and warm color. It is much easier to coat a floor with oil than with varnish, since oil does not require sanding each layer. Oil is applied to wood using both cold and hot methods. Mostly cold application with a brush is used. The number of layers applied depends on the absorbency of the wood; usually two coats are enough.
When painting the floor with oil, make sure it is evenly distributed over the surface and promptly remove smudges. After the oil has dried, the floor surface can be treated with wax.
Please note that violation of the work order and failure to follow instructions when using paints and varnishes can lead to rapid wear of the coating, and in the worst case, to the need for a new floor finish!
You can also find out how to coat a wooden floor with oil by watching the video:
How to make a tongue-and-groove board with your own hands: action diagram
On an industrial scale, the production of tongue and groove boards takes place on high-precision equipment. Everything is carried out by programmed mechanisms, and humans only control the process. And the higher the class of equipment the manufacturer has, the better and more expensive the final product. Grooving boards is a complex process, and at home you will never be able to achieve a high level of quality, but basic tongue and groove work can be done.
In production, milling cutters with complex cross-sections are used to cut the workpiece on the sides. In a home workshop, this mechanism can replace a manual jointer with a quarter selection function or a milling machine. Next, following the instructions on how to make a tongue and groove board with your own hands, you need to perform a number of actions:
- Carefully select the material for further tongue and groove. The most durable coating will be larch. It is less susceptible to rotting and insect attack than others. Larch can be used both for arranging floors in the house and for covering open terraces. This is a denser material, so it will be more difficult to work with than, for example, pine or spruce. The cost of larch is also higher than spruce and pine boards, but much less than the price of oak, ash or beech.
- Dry existing boards. It is better that the boards are already dry, since wood naturally dries for several months. And in order to dry the material to the required level, you need to place the workpieces on stands in stacks in a dry, well-ventilated room. There must be ventilated spaces between the workpieces. The humidity level can be measured with an electric moisture meter. You cannot dry wood in the sun, as the outer side will heat up and the inner side will remain wet, which will lead to the appearance of various defects in the future.
- The board, ready for processing, must be secured with clamps on the work surface (workbench, table).
- Determine the middle (axes) of the side surfaces of the workpiece and apply markings with a pencil.
- Using a router/hand jointer, you need to carefully and accurately select a quarter groove in one side of the board.
- On the other side of the workpiece, using a machine or jointer, quarters are selected alternately to the right and left of the intended axis, and the result should be a tongue and groove.
Do-it-yourself tongue-and-groove boarding is a very painstaking task that requires experience working with wood and certain tools, as well as free time. To carry out this procedure, a “steady hand” is also very important so as not to waver at the wrong moment. But it is also an interesting experience for anyone who likes to do things with their own hands.
Techniques. What can you do when working with a router?
Using a hand router, you can cut out parts and products of various configurations - shelves, racks, railings and other parts. This tool is indispensable when used at home. For example, when restoring old furniture. Once you gain experience, it is quite possible to do the following things:
- Treat flat and shaped surfaces, facades.
- Cut out various recesses: imitation of panels, grooves, ridges. Perform end processing of wood.
- Punch holes.
- Apply various inscriptions - engrave.
- Insert door hardware – locks and hinges.
- You can make a complex connection - a spike. Ensure reliable joining of wooden parts.
List of necessary tools and devices for working with a router:
- Milling cutter
- Jigsaw
- Electric drill with drills
- Templates for cutting parts
- File
- Protective clothing
The depth to which it is planned to go deep is adjusted by setting the distance between the pin and the washer near the electric motor. A straight guide is used to maintain the distance from the edge of the workpiece.
Note! Some models additionally include a circular guide, which is used for milling circles with large radii. For circles with a radius of less than 25 cm, technological holes are made in the base of the tool for the centering pin, into which it will be inserted at a certain distance. Cutting grooves can be done using an angle stop.
Tongue-and-groove floor boards: laying technology
You can purchase floorboards in several grades: Extra, A, B and C. The “Extra” grade coating has no knots or other similar defects. This is the most expensive class of material. The lower the grade, the more defects will appear on the wood. For example, boards of grade “C” may have through holes in places where there were previously knots; they are recommended to be used to create a so-called subfloor.
The technology for laying “Extra” and “C” grade coatings will be somewhat different. These differences will be in the base on which they are laid. If grade “C” can be placed directly on the logs, then for high-class grades it is necessary to prepare a frame or subfloor. But in both cases, installation of a tongue-and-groove board consists of the following steps:
A little about the price
Budgetary and resp. The most popular are tongue-and-groove boards made of softwood, but anyone who has ever wondered about purchasing them has probably noticed a decent price range among different manufacturers on the market.
At the same time, a high-quality board from one manufacturer can be offered to the consumer at a price lower than a low-quality board from a competitor. Needless to say, it is very tempting to use this fact to your advantage? In this short article we will not only indicate the required sizes, but also try to figure out where you can save money.
Technology for laying tongue-and-groove floor boards - step-by-step diagram
Step 1: Calculations and cutting of blanks
The first step is to measure the required length of the board. The length should be equal to the width of the wall from which installation begins. You can cut it using a hacksaw.
Step 2: Lay the first row
The first board is tongue-and-groove mounted to the wall. In order for the tree to expand freely in the future, you need to leave a gap of about 1 cm between the wall and the board.
Step 3: Secure the first board
The starting board is secured with self-tapping screws or screw nails through the entire thickness to the joists or subfloor.
Step 4: Lay the second row
The second row already fits into the groove of the first board with a tongue and groove and is secured with screws/nails into the lower part of the groove. Subsequent rows are installed in the same way.
Step 5: Installation of the final row
If the last board does not fit, it can be cut lengthwise with a circular saw. In this case, the cut will be turned towards the wall. It is attached in the same way as the first one through the entire thickness.
A tongue and groove floor board will last for many years if you install it correctly and do not forget about maintenance. In the case of spruce and pine materials, the floor should be sanded and sealed with parquet or yacht varnish. Larch, oak, ash can be left in their original form, or they can be coated with special oil. This procedure will give the tree a special charm.
Stage 3 – installation of wooden floor
There are several nuances that must be taken into account when installing a wooden floor:
- Considering the special properties of wood, even if it is carefully treated with protective compounds, it should not be used in rooms with high levels of humidity.
- Considering that wood inevitably shrinks, when installing boards, not all of them are subject to rigid fixation, but only the elements of the first row, every fourth and last.
- After six months or a year of using such a floor, it will be necessary to sort it out and reupholster it; boards with obvious signs of warping will need to be replaced with new ones.
The tongue-and-groove connection ensures a tight fit of the boards
Fixing the board with a self-tapping screw
Board installation diagram
The tongue and groove board is laid perpendicular to the direction of the beams or joists. In this case, you don’t have to focus on the location of window or door openings, as happens when laying laminate or parquet boards.
Warm wooden floor cake
It is worth abandoning the diagonal laying pattern. This is due to the annual need to tighten the boards. With such a layout, it will be necessary to trim the boards against the wall, which is not very convenient and generally complicates the preventive process.
Device for pulling together boards
The process of installing tongue and groove boards
Table 1. Installation process
| Illustration | Description |
| The first board is laid with a groove against the wall, leaving a small gap that compensates for drying out of the wood. | |
| It is secured with a self-tapping screw in such a way that the head of the self-tapping screw is subsequently hidden by the plinth. | |
| In the first case, the subsequent fastening of the boards is carried out using long self-tapping screws, the length of which exceeds the thickness of the board by 2 times. Such a self-tapping screw is fastened into each joist, placing the fastening element in the center of the board. The cap is recessed a few millimeters and subsequently masked using wood putty. | |
| A chisel is used to adjust the board. The next 4 rows must be spliced using a locking connection without rigid fixation. Row 5 is secured and the operation is repeated. The last row is made by fastening a board cut to width taking into account the gap between it and the wall. | |
| The second fastening option involves drilling a self-tapping screw into a tenon at an angle of 45 degrees. To avoid compromising the integrity of the board, it is first recommended to drill a hole for the screw. |
The floorboards are tightened using wedges, jacks, clamps and other special tools. This is done to prevent the formation of even a minimal gap between the boards.
Pulling together floorboards
Fastening the board at 45 degrees with self-tapping screws significantly reduces the possibility of repairing and disassembling the coating. But, taking into account the fact that some time after the final shrinkage of the boards, they will need to be tightened, it is better to perform the first stage of fastening vertically, and the second, final stage, using self-tapping screws at an angle.
Methods for fixing the board
It is not possible for a professional to lay a plank floor. You don't need any special skills or tools for this. After the flooring is completed, it is necessary to finish the coating.
Brief instructions for attaching the board
What are the benefits of such a floor?
A tongue and groove floor board allows you to achieve a perfectly flat surface. Each floorboard is adjusted to the other, reminiscent of laying parquet or laminate flooring. But the strength and quality of the joint of the boards is incomparably higher.
This flooring is resistant to wear, shock and mechanical damage. Able to maintain good appearance for a long time. If you want to “refresh” the coating a little, you can scrape it off and then open it with varnish.
The tongue and groove board is used, as a rule, for finishing the floor. It is made from solid pine or spruce. There is a tongue and groove on one edge of the tongue-and-groove board, and a groove for it on the other. This greatly simplifies the installation of the material. The boards mounted by connecting the groove and tongue form a single solid surface. After installation, the floor surface is treated (sanded and varnished) to acquire an attractive appearance and extend its service life.
There are different sizes of tongue and groove boards for ease of installation. You can find mounting units from 2 to 6 meters in length, from 9.6 to 15 cm in width and thickness in the range of 2.5-4 cm. After production, the boards are dried to 10-15% humidity and hermetically packaged. Thanks to this, you can immediately begin its installation without prior preparation.
Features of the material
There is an opinion that a tongue-and-groove board is no different from a regular one, only it costs much more. This statement is not entirely true. The material is very convenient for installation due to the presence of a tongue on one side and a groove on the other side, which allows you to quickly and firmly connect the floorboards.
Such floors are easy to clean; there are no gaps between the floorboards, which creates the feeling of a single monolithic space. Moreover, the universal connection allows you to completely get rid of squeaks and rapid wear of the wooden covering.
When choosing, be sure to pay attention to the wood that was used in the manufacture of the boards:
- Spruce or pine. These are relatively inexpensive wood species that can be easily processed. They have excellent heat capacity. Therefore, the floor of these rocks is always warm. The downside is the softness of this wood. Any dents from heels will leave an unpleasant impression if the floorboards are not protected with a special coating (varnish, paint, mastic).
- The tongue and groove larch board gives the floor a refined natural pattern due to the structure and fiber of the wood. It is durable and moisture resistant.
- A floor made of oak or ash has hardness and richness. Boards made from these tree species are considered the most durable and, at the same time, the most expensive in cost.