The technology for the production of modern finishing materials has reached the level that the imitation surface of any natural materials (wood, stone) so accurately conveys the texture of natural elements that it can only be distinguished upon close examination.
This applies not only to the external cladding, but also to the internal one. Imitation timber can be made from high-quality wood, from different types of wood. Accordingly, the texture and color of analogues of timber finishing may differ from each other.
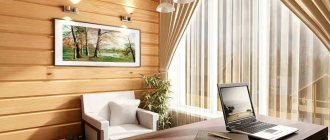
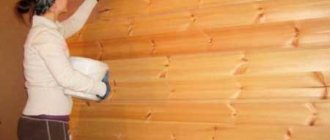
Wooden cladding gives the room the comfort and coziness characteristic of natural materials.
Why you should choose imitation timber for finishing the inside of a country house
First of all, natural wood meets the requirements for environmental friendliness and natural design of the room . Wood promotes a feeling of comfort and unity with nature. A country house, lined with natural wood on the inside, will mentally protect you from gray stone city buildings and help you feel the comfort and warmth of nature. It is especially important to decorate cold and gray brick or block walls.
From a practical point of view, timber trim is strong and durable, and has good sound and heat insulation characteristics. In addition, thanks to the specific design of lumber boards, a comfortable environment is created both in the space between the wall and the finish, and in the room itself.
Installation of wooden panels is not difficult, and the visual perception is no less impressive than with natural timber walls.
Video description
An example of interior decoration of a house using imitation timber in the video:
And then there are a few more interesting solutions:
Combination of timber and plaster finishing
As practice shows, facade cladding can be done with different types of finishing. For example, imitation timber and plaster. The appearance of the house is distinguished by smooth lines, severity and elegance, and the resulting “striped” pattern will visually increase the height of the building.
Combined finishing of a two-story houseSource betonicum-stroy.ru
Full exterior cladding of the house with imitation timber
Anyone can become the owner of such a wooden tower. The layout of the house is suitable for both active recreation and year-round living. Finishing with false beams can be done not only outside, but also inside, then your guests will definitely be able to find themselves in an old Russian fairy tale. The main thing is that the interior design matches this.
Finishing with imitation timber for a 9x9 house Source www.hmkmos.ru
Timber and stone
Wood and stone go well together in decoration. This can be seen in the following project. Moreover, if in the first option the ratio “wooden covering - plaster” is approximately 1:1, and they are equally responsible for the appearance of the building, then in this case the “stone” decorations are minimal and are designed to emphasize the naturalness and superiority of wooden compositions.
Timber and stone in home decorationSource zillow.com
House with attic
Wood always remains the most environmentally friendly material. Many people strive to make it a cozy home or cottage. Here is an option for a small cottage with an attic floor. It looks like an ordinary house, but to add color, the imitation timber is painted with stain, wrought iron railings give it an intriguing look, and finishing the foundation with a stone finish completes this ensemble. This is how even an ordinary house can be turned into a small miracle of design by adding a couple of highlights.
Combination of false timber, stone and forged elementsSource woodeco.org
Imitation of log walls
At first glance, it seems that the house is made of rounded logs, but, as in previous versions, this is just finishing with imitation timber. A simple way to replace expensive rounded wood, while maintaining the naturalness of the materials used, without compromising the quality of the construction project.
Project of a house with rounded wood trimSource profibrus.ru
The cost of finishing with imitation logs depends primarily on the price of the lining that will be used for the cladding, plus the geometry of the house - the simpler it is, the less labor costs.
Cladding houses with imitation timber allows you not only to save money, but also to get a full-fledged wooden house, feel the coziness and comfort of natural materials, and become the owner of a unique interior, which is the key to the beauty and grace of the entire building as a whole.
Types of interior finishing
The division of finishing according to the method and nature of the interior design depends on the design solution, which involves interior cladding with wood panels.
The imitation timber finish is divided into two types:
- monolithic _ It involves finishing with wooden panels over the entire surface of the room: floor, ceiling, walls. The panels are tightly attached to each other and form a monolithic covering;
- combined . This type involves finishing different parts of the room with various materials, the main area of which is occupied by imitation timber, and additional zones are decorated with other finishing materials suitable in style and color (wallpaper, tiles, plaster).
Regardless of what type of finishing is chosen for the timber, you should purchase additional finishing parts (moldings, cornices, corners) along with the panels, which will add completeness and decorativeness to the design.
Nails
They are valued for their low cost and are the easiest to implement method of fixing wooden panels. They can be driven in by hand, or using a nailer (construction gun). Nails to imitate timber must have a protective zinc coating, and their length must be sufficient for the total thickness of the sheathing and two-thirds of the thickness of the sheathing.
The disadvantage is that the result is quite brutal, given that not everyone has enough experience to hammer a nail neatly. And in any case, the caps remain visible, which destroys the illusion of using natural timber.
More often, construction or finishing nails are purchased, which differ in size, including the size of the head. With finishing nails it is miniature and goes entirely into the wood, which is a definite plus. Screw nails are suitable for fastening particularly massive, thick panels. They will ensure the stability of the fastener, even if the material is subject to deformation.
Source yandex.net
Preparation of lumber
The material for interior finishing must meet the following parameters:
- wood quality class must be at least B (A, AB or Extra);
- The optimal board width is 10-15 cm . Narrow boards will look more like clapboard than timber, and boards that are too wide will “steal” the space of the room, which is especially ineffective for small rooms;
- using a thick board is not advisable: the best option would be a 21 mm board (or even thinner).
In addition to the size, you should pay attention to the wood from which the board is made. For an unheated room, you can use wood of any species, the main thing is that the board is treated with protective moisture-resistant and antiseptic compounds.
For a warm room, it is recommended to use mainly deciduous wood. Due to the presence of resins in coniferous wood, the release of pine resin and the corresponding aroma is not always appropriate indoors, especially if the residents are allergic.
For steam rooms or baths, it is advisable to use a linden timber finish.
IMPORTANT!
The durability and appearance of the finish depends on the quality of the material and wood.
You should not skimp on materials, since high-quality timber panels can last for many years without additional maintenance.
The boards must be well dried and stored in a dry, heated room . Before installation, the boards should be unpacked and moved for several days to the place where they will be installed so that the material adapts to the environment of the room. Some types of lumber require additional sanding and treatment with special impregnations. It is advisable to carry out the treatment of the boards before installation, and then cover them with varnish or a special stain.
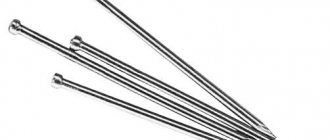
Alternative to nails: self-tapping screws
When choosing what to attach imitation timber to, owners often lean in favor of self-tapping screws, since they can provide a secret fixation. Such hardware has the following differences:
- They reliably connect parts thanks to a wide thread pitch.
- The small diameter and specially shaped tip allow the self-tapping screw to push the wood fibers apart, so the likelihood of cracks is minimized.
- Like nails, self-tapping screws should be purchased only with galvanization, and their size is selected depending on the thickness of the sheathing and sheathing materials. Ideally, the hardware should fit halfway into the sheathing, or better yet, two-thirds.
The choice of hardware is influenced by the material from which the sheathing is made - wood or metal. If you use massive panels (for example, for flooring), a specialized solution is suitable - SPAX self-tapping screws.
Source yandexcloud.net
How to calculate the amount of material
Based on the width of the timber board, you can determine the actual amount of material required to finish the inside of the room.
It is necessary to determine the total surface area for cladding: calculate the area of each wall (minus openings), ceiling and floor. The area of each surface is divided by the area of one board.
This is how the quantity for each plane is calculated. All obtained indicators are added up. This way you can understand how many boards are required to cover the entire room. This method involves calculating the material for a monolithic coating.
If it is planned to use combined cladding, then a calculation is made of each plane that will need to be decorated with a board under the timber, and the amount of material is calculated in a similar way: each area is divided by the area of the board, the indicators for all planes are added up.
NOTE!
The number of elements needed for cladding should be purchased with some reserve, taking into account defective or damaged boards.
In addition to the boards, it is advisable to calculate the number of necessary elements for decorating corners, cornices, moldings, etc. It is recommended to select materials in one batch at once so that the color of the boards does not differ.
Preparing the surface for installation
How to sheathe walls from the inside? Before installing the sheathing and the panels themselves, you should prepare the walls.
All walls under the panels need:
- clear away debris;
- level as much as possible;
- wooden walls should be treated with antiseptic compounds, and block and brick walls should be primed.
After the surface is ready, a vapor barrier is laid, and, if necessary, thermal insulation and lathing for imitation.
Thermal insulation and vapor barrier
A vapor barrier film should be attached to the prepared surface to prevent the formation of condensation moisture inside the skin . To do this, the film is attached using a stapler (to a wooden surface) or using sheathing beams (to a brick or concrete surface) so that the smooth side of the vapor barrier is in contact with the wall.
Cover the entire surface for cladding with film. The seams of the film should be overlapped by 100 - 150 mm and secured with tape.
CAREFULLY!
The location of the vapor barrier film should be free, without tension.
Otherwise, the membrane may break through during the installation of sheathing or thermal insulation, as well as during the natural shrinkage of the walls of the house.
In some cases (in the absence of external thermal insulation of the house), the installation of thermal insulation materials is required. In this case, when calculating the sheathing pitch, not only the length of the cladding board under the timber is taken into account, but also the width of the insulation. Roll or block insulating material is placed tightly between the sheathing guides without gaps or joining holes.
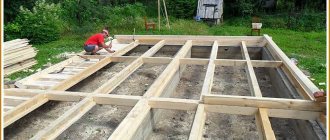
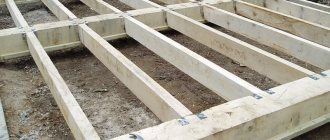
Distance between support system parts
Before starting all the work, I drew up a drawing with the location of the sheathing elements. He simplified the calculation of the required step through which they were recorded. When determining it, the thickness of the false beam was also taken into account. For me it was 16 mm. Thicker strips could be purchased.
Source remontnik.ru
Using relatively thin slats allowed me to increase the stride. If they were thicker, then the distance between the frame elements would have to be reduced. The pitch between the bars of the supporting system was chosen taking into account the size of the mineral wool slabs, since this heat insulator was used to insulate the house. Thermal insulation material 1000*500 mm was laid between the racks and girders of the frame.
Do-it-yourself selection and installation of lathing
For a house made of wood, it is advisable to use wooden blocks with a cross-section of 40 - 50 mm . The wood should be thoroughly dried and treated with antiseptic and moisture-resistant agents. Metal profiles are used for installation of cladding in concrete or brick walls.
Installation of the sheathing is carried out by attaching the guides in a vertical position in increments of 600 to 800 mm.
Corner guides should be mounted in such a way that there are two bars at each corner.
IMPORTANT!
When installing the sheathing, you should check the uniformity of installation using a level.
In addition to double corner strips, you should additionally install bars in places where shelves or other hanging elements are attached that can weigh down the structure.
The wiring should be pulled between the sheathing, insulated with a special corrugated tube.
Having completed the sheathing over the entire area, you should begin installing the facing panels.
Stages of work
The first step is to attach the waterproofing. Glassine or other similar material is fixed to the wall using aluminum tape or any other suitable fastener. The edges are overlapped.
The waterproofing is pressed on top with a lathing made of dried square timber. The intervals between the racks must correspond to the width of the insulation sheets.
The next stage is thermal insulation. In the spaces between the sheathing bars, a layer of insulation (foam plastic, mineral wool or any other material) is laid. This prevents condensation from forming inside the wall and helps keep the room dry.
A second layer of waterproofing is laid on the insulation, which is attached in the same way as the previous one.
For interior decoration it is not necessary to use insulation and vapor barrier. In this case, the imitation timber is attached directly to the grating. After completing all the preparatory work and acclimatization of the material, you can proceed directly to the cladding.
Installation of boards begins from the bottom. The first one is fixed exactly according to the level, and all subsequent ones are leveled according to it. The panels must be laid out so that the groove is on top - this prevents the accumulation of moisture. To prevent the sheathing from warping, gaps of 1-3 mm should be left between the boards.
How to fasten timber indoors
Boards under timber for internal cladding can be attached in several ways:
- fastening into a groove . The method differs in that the heads of the hardware are in a hidden position. The screws are screwed into the base of the tenon at an angle of 45°. When installed correctly, fasteners screwed flush with the beam will be securely hidden;
- driving in elements from the outside . The nails should be driven on top of the board. To do this, it is recommended to use decorative hardware with original caps, or use special plugs, sometimes putty with shavings is used.
- use of clamps . The most optimal method of fastening panels. More details in the video below.
Installation using clamps can be done on walls, but most effectively on the ceiling. Galvanized clamps in the form of brackets are attached to the board; they are the connecting elements between the panels. Fastening with clamps is used most often.
Wall paneling
The technology for installing panels under timber involves a sequence of steps (photo below):
- stepping back from the corner no more than 50 mm, you should install the first panel, then the first row;
- It is recommended to install the boards with the tenons facing up;
- a small gap (up to three millimeters) should be left between the panels for thermal expansion;
- when designing openings, corners and windows, the verticality of the cuts should be controlled;
- installation of panels is carried out from bottom to top along each plane;
- After installing the main panels, transitions from one plane to another should be made using skirting boards.
NOTE!
The panel should be fastened strictly perpendicular to the sheathing.
It is most effective to fasten boards using clamps: the fastening elements are hidden, and the covering looks like a single sheet.
If it is necessary to coat the cladding with special protective and antiseptic agents, then choose compositions that match the wood and the nature of the room.
Thus, imitation timber will help to translate into reality design solutions for creating a natural interior indoors. Imitation timber is a durable coating, so you won’t have to think about decorating the inside of your home for several years: the panels will create warmth and comfort. If the cladding material is made of coniferous wood, then in addition to comfort, the room will be saturated with the aromas of pine needles and forest.
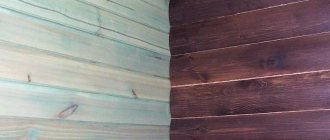
How to treat wood
Wooden cladding is exposed to pests and fungi, and also endures constant temperature changes or the influence of precipitation. To extend the service life of the material, the board must be properly processed. To do this, you can use one of the following substances:
- Impregnations are intended primarily for biological protection of materials. They penetrate the inner layers of the tree and prevent the development of fungi. Some compounds can also protect boards from ultraviolet radiation or fire.
- Varnishes, unlike impregnations, are not absorbed by wood, but create a protective film on its surface. They are usually not used for processing external cladding due to the fact that this film can crack due to temperature changes.
- Paints can not only prevent destruction, but also change the color of the cladding. Typically water-based acrylic paints are used here. They are safe for humans and create a durable film on the surface of the wood that is not afraid of moisture or temperature changes.
- Oil is also used to protect boards. Products based on it penetrate the wood and prevent it from absorbing water. As a result, the wood does not rot and retains its characteristics. However, after a few years, the material may need to be reprocessed.
Before applying the composition, it is necessary to clean the imitation timber from dust and dirt. It is recommended to plaster the cracks. This will prevent moisture from entering and damaging the wood.