The entire future “fate” of the structure depends on how accurately the first (or frame) crown of a log house or half-timbered frame is assembled and installed, and how well the foundation, for example, made of concrete blocks, is qualitatively insulated from moisture penetration. They say that in ancient times, log houses were built with their own hands without a foundation, and the frame crown was wrapped in several layers of birch bark and laid on the ground. The technology is very questionable, because it has long been known that a reliable foundation is the key to the strength and longevity of any building.
How to correctly lay the lower or embedded crown of a log house
The lower crown of the log house requires special attention, since it will be in close proximity to the ground and in contact with the foundation. Because of this, it suffers most from high humidity and fails very quickly. Very often it has to be replaced when the rest of the frame shows no significant signs of wear. The first crown of a log house (also called the frame) requires careful waterproofing of the base, and the strongest and thickest lumber is always chosen for it.
Protection of the lower crown during installation
How to protect the lower crown of a log house from high humidity and precipitation? To do this, you will need to organize proper waterproofing and take care of treating the wood with special protective substances.
Waterproofing must be installed on any foundation: these are several layers of roofing material or bitumen mastic, designed to protect the structure from water. In addition, it is necessary to treat the logs or beams themselves with antiseptics to prevent rotting.
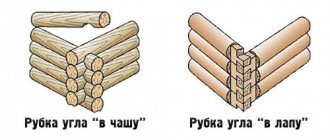
The frame of a log frame can be laid in two main ways:
- The lower part of the log is trimmed a few centimeters to create a flat surface necessary for a tight fit to the foundation. Before laying, a layer of inter-crown insulation is sometimes placed on the waterproofing material to prevent heat loss and additionally protect the wood from freezing.
The logs of the lower crown are stacked using the “bowl” method. The main disadvantage is that there remains a gap between the logs and the foundation; it is covered with bars, log halves, etc. The gap must be lined with insulation.
- There is another way: the first two logs are cut exactly halfway, the next two are cut a few centimeters. This allows you to ensure the most even fit to the foundation; there will be no gaps, which means heat loss is reduced. All lower surfaces of the log must be coated with an antiseptic several times, this will help significantly slow down the rotting process.
The casing crown suffers not only because of the proximity of the ground. It will constantly receive slanting rain, snow will accumulate near it in winter, and rainwater will flow down the wall.
The lower crown of a bathhouse frame needs increased protection: constant humidity makes the building much more susceptible to rotting, and this is especially true for the lower crown.
Sometimes a backing board is used in construction: it is placed between the foundation and the lower crown and must be lined with insulation.
The advantage is that the flashing board is much easier to change than the lower crown itself: if rotting processes begin, the building is lifted with the help of jacks, and the boards are replaced with new ones.
Common mistakes when laying the lower crown
Often the lower crown has to be changed very quickly, since gross errors were made at the very beginning of construction. If the protection is insufficient, the wood will quickly begin to rot, and very soon the building will require major repairs. First of all, this applies to log baths, since they suffer much more from changes in temperature and humidity.
The most common causes of premature wood decay:
- If the building has a columnar foundation, it is not recommended to fill it with backfill. The material will settle unevenly, which will ultimately lead to the formation of cracks into which water will begin to enter. The logs will freeze, and after thawing, rotting processes will inevitably begin.
- On heaving soils, the strip foundation constantly suffers due to soil movements. It can be pushed upward unevenly, which leads to the appearance of cracks at the points of contact with the wall. Even small gaps get atmospheric moisture, which is why the logs can begin to rot.
- The condition of the log house can be negatively affected by insufficient treatment with antiseptic compounds, insufficient ventilation of the subfloor, too weak a layer of waterproofing and other common mistakes. The bottom crown will always suffer more than any other wall elements, so it will wear out faster in any case.
Backing board: to be or not to be
When constructing log houses, some builders practice laying a backing board or plank on the foundation. Their task is to separate the first row of logs from the cold stone, and accordingly, increase the durability of the wood.
Many, of course, consider this point controversial, because in their opinion this will in no way extend the service life of the log house. If engineering communications are carried out incorrectly or are absent altogether, then no lining will save the tree from damage. If the board rots, the crown molding will also rot.
In general, this is food for thought, but if you still think this is a necessary element, then treat the board several times with an antiseptic. Its thickness must be at least 40mm.
Replacing the crown in a log house
How to change the crown of a log house without damaging the entire structure? This kind of work requires a lot of preparation. Half the house is being dismantled, and if there is a stove, then the pipe will also have to be disassembled.
The logs need to be inspected, choosing the strongest areas under which jacks can be placed. To lift a house, you will need powerful jacks with high lifting capacity, wedges and logs, with which you can make temporary supports.
Using a jack, the frame is raised, after which the damaged lower logs can be removed. Accuracy and caution are important in the work; in order to lift the building with minimal damage, it is also necessary to check the safety of the foundation: if it begins to collapse, it is necessary to take care of a new concrete belt that will hold the foundation. New material is installed on the foundation, after which the structure can be lowered and the disassembled elements can be restored.
half-timbered house
It is these buildings that have absorbed the best qualities and technologies of residential and commercial construction. When building a frame house, the consumption of basic and auxiliary building materials is reduced. New materials have also become widely used, for example, aerated concrete and laminated veneer lumber.
half-timbered house
In addition, building a half-timbered house with aerated concrete core is much cheaper than, say, a brick or block house. And in terms of construction time, a house with aerated concrete filler benefits. It is noteworthy that such a structure can be easily disassembled and can be moved quite simply from one place to another.
Only the foundation remains stationary. Frame buildings made of laminated veneer lumber and fillings made of aerated concrete, glass, blocks and other materials are resistant to precipitation, rot and fungi, and do not get wet. They are not subject to shrinkage, cracking, and are warm in themselves. And if the filling between the posts, cross members and braces is made of aerated concrete, then the house turns out to be relatively light in weight and does not require a powerful foundation of blocks.
If you wish, you can build such a house with aerated concrete core with your own hands. You just need to stock up on materials, tools and carefully study the project and technology.
Internal walls and partitions in a frame house can be made of aerated concrete - a lightweight, durable and warm material.
The lower crown of the bath: rules and nuances of installation and replacement
When building wooden houses from logs or beams, the weak point is traditionally the lower crown. This is especially true for baths and saunas due to high humidity.
As a result of improper installation or processing of this fragment of the structure, the lower rims of the bathhouse will soon need to be replaced, as they will rot.
The lower crown of a chopped bathhouse is most susceptible to rotting and deterioration, and therefore requires processing and proper installation.
Lower crown
Features of operation
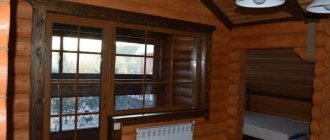
As can be seen in the photo, it is the lower or frame crown that is in contact with the structures of the plinth or foundation.
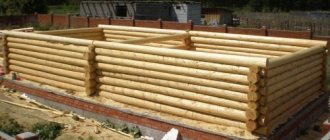
After the foundation is ready and completely settled and hardened, the first logs or beams of the future log house begin to be laid on it. It is this part of the building that takes on the maximum load from the gravity of the entire building, and also the lower frame is closer to the ground than others and is in contact with concrete or brick.
Rainwater, under the influence of the Earth's gravity, flows down and accumulates, again, in this area. In addition, there is capillary suction of moisture from concrete and brick, which are in direct contact with the wood of the casing.
No less dangerous is the moisture that is released by the bathhouse itself during its operation. There is space between the floor and the ground where this moisture can settle and accumulate. If there is no good ventilation of the underground space, then the problem of rotting of the lower ceiling, beams and floor boards, as well as lower logs is guaranteed.
As a rule, in Russia, pine is used for the construction of log houses and timber houses, which is quite affordable and of sufficient quality.
However, even pine is not able to withstand constant moisture, as it carries the following dangers to wood:
- Water dissolves most chemicals, changing the composition and structure of materials;
- Salts and other compounds dissolved in water can react with wood components, thereby causing chemical corrosion;
- Water is a necessary condition for the development of life, and this is its main danger: with water it brings fungal spores and insect larvae, as well as plant seeds. As a result, wood becomes the object of culinary interest for a number of organisms, such as fungi, bacteria, wood-boring insects, etc.;
- Under the influence of bacteria, a process such as rotting or decomposition of organic compounds occurs. Wood is a completely organic material, so bacteria can destroy it completely;
- Wood is a common nutrient substrate for a number of molds and other types of fungi. Over time, the mycelium completely permeates the structure of the wooden part, gradually digesting it from the inside with the help of special enzymes that it releases during digestion. As a result, the wood itself turns into useless dust.
Connecting beams to each other
So, let’s move on to the topic of how to correctly lay the first crown of timber on the foundation, and move on to a very important position - fastening the elements together. If this concerns the corners of the house, then four options are most often used:
- Half a tree. This is when half the thickness of each element is cut off to a certain length. Two adjacent beams are joined, forming a reliable connection that does not change the cross-section of the joint relative to the body of the material.
- Butt joint is the simplest option. But it is not recommended for use in residential buildings. Because it is the corner that often becomes the place where heat leaks from the house due to the formation of leaks at the joint. Therefore, the corners of buildings are well insulated, but often this does not save.
Root tenon - ideal joint Source remontik.org
- Root thorn , also known as a warm corner. An ideal option for corners both in terms of reliability and thermal insulation qualities. Structurally, it is a tongue-and-groove connection. That is, a groove is made in one element, a tenon is planed in another, which exactly fits the dimensions of the first. When joining, insulation is placed inside, providing high thermal insulation characteristics of the structure.
- Dovetail . The most difficult to manufacture, but the most durable option in terms of fastening. It also falls into the category of tongue-and-groove joints. Only the shape of the cut elements is not rectangular, but trapezoidal. It is this shape that ensures an increase in the contact area of the joint parts.
Replacing a damaged crown
If something irreparable does happen and the material deteriorates, it is better to know how to replace the lower rims of the bathhouse.
There are several ways to do this:
- They dismantle the walls, replace the crown with a new one, and lay the frame again. This is an excellent preventative measure for old buildings, since at the same time a number of other shortcomings can be eliminated. But the procedure is very labor-intensive and time-consuming;
- The upper rows of the plinth or foundation are dismantled, and the rotted material is replaced with a new timber, processed according to all the rules. The house is supported by a special structure or supports. The method is also difficult and tedious;
- They cut holes in the rotted row for inserting jacks, raise the bathhouse, replace the beams and put it in place. The most rational method, provided that the frame is of high quality, the corner joints are not damaged, and changes in geometry are not dangerous.
Advice! Before you replace damaged timber, remember about larch. This tree only becomes harder from moisture and is able to stand for centuries in salt water, like the supporting pillars of Venetian houses.
The frame is lifted with a jack and replaced.
Depending on the size of the bathhouse, lifting it may require from two to four jacks on each wall. In the top of the rotten rows, holes are made with a chainsaw about 30 cm in size and the width of the row in height. There are from 2 to 4 holes in each wall, according to the number of jacks.
Then a jack is inserted into the hole and gradually, in turn, each jack is raised a few millimeters. So they carefully lift one wall and install additional supports for safety. They can be made from logs or large timber.
Replacing the lower crown is a labor-intensive process
The old log is removed, the old roofing felt is removed, everything is thoroughly cleaned and treated with antiseptics, then a new lining of euroroofing felt is laid and a new timber is laid, pre-treated according to all the rules.
The bottom row of logs in a log house is a weak point due to objective reasons. That is why special attention should be paid to its installation in order to avoid time-consuming and expensive replacement and repairs. The video in this article illustrates everything that has been said well, so we recommend watching it.
A few words about designing the frame of a log house
In the article on the construction of wooden walls, the principle of installing the rim of a log frame has already been described. True, the information contained in it is more of a reference nature.
In the same article, the first crown will be designed for a specific layout, namely for a 5x6 meter bathhouse.
And the drawings themselves will be part of the Russian bathhouse project, which can be viewed here .
A description of the procedure for cutting and laying the crown itself will be given in the corresponding article after the entire bathhouse project has been developed. And at this stage of construction of the bathhouse, that is, its design, only the design of the first crown with drawings and required dimensions is given. This is enough to easily move on to the next part of the project - the construction of wooden walls .
Installation of basement drip sill
The gap formed at the place where the casing is laid on the waterproofing layer poses a serious danger to the entire structure; atmospheric moisture stagnates in this part. This drawback is eliminated by installing metal ebbs around the perimeter of the log house. On a strip of iron 20-25 mm wide, a bend is made at an angle of 120 degrees, the structure is fastened with self-tapping screws, and the area adjacent to the beam is treated with sealant. For the manufacture and installation of the drip sill, all the tools are available in the household.
The first crown of the log house - drawings and design features
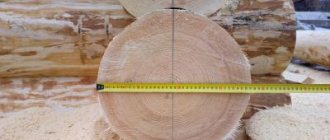
- Main material (pine):
- Log ø200 mm.
- Board 60×200 mm for monitor board.
- Beam 80×200 mm for lining under the top (transverse) log of the crown.
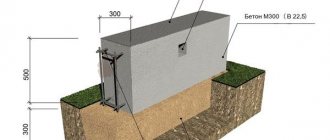
- On a foundation treated with bitumen mastic, roofing material is laid in two layers, on which a layer of bitumen mastic is also applied.
- Fire monitors and support beams are treated with a bitumen primer.
- Fire monitors and hewn logs along the axis E
should have a length of 6.4 m and 6.8 m respectively, which is longer than the standard length of the supplied log. Therefore, if it is not possible to obtain logs with an increased length, then they should be increased in length. To do this, you can use one of the methods
connections of wooden parts, for example, a tongue-and-groove connection, as shown in these drawings. - Along axis A,
the role of the connecting element is played by a vertical post, which also serves to design
the opening in the fence of the veranda of the bathhouse.
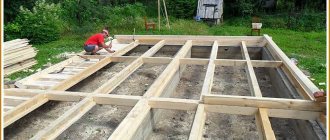
Work order
Regardless of whether you laid the board or not, before laying the mortgages, their lower part must be cut off. This is necessary in order to ensure their stability on the foundation. They do this with a chainsaw, cutting off the top of the log. The edge size should be at least 12-15cm. The horizontal positioning is checked by a level.
Next, the transverse (small) logs of the first crown are found and placed in their places, while aligning the marks made on them with the markings applied to the embedded logs. This is done in order to avoid distortion of the log house. If they are missing or you need to make sure that the correct shape of the cell is maintained, an additional diagonal is set.
A gap is formed between the transverse logs and the foundation, slightly smaller than the diameter of the log. It needs to be sealed, of course. This is a very interesting point; if you do the work incorrectly, you can later become the owner of a cold bath.
There are two ways to solve the problem:
1) A subcut is a piece of log equal in length to the resulting gap. They are prepared in advance from the same forest that was cut down. By removing the required layer of wood from the bottom and top sides, the log is adjusted to the desired size.
Having tried it on and made sure that it fits freely, but with minimal gaps, in its place, we put it in place.
Having removed the small logs, we carefully caulk the places where the undercuts adjoin the mortgages. Then we lay a layer of moss or other inter-crown insulation on top. After which we put the transverse logs in place.
In some cases, the roll-offs are installed after the frame has been completely assembled. This, of course, is also possible, but it will not be possible to insulate this place well, and as a result, air leaks may occur later.
2) Recently, the practice of filling the resulting space with cement mortar has become increasingly common. This is done after the construction of the walls is completed.
The process is carried out as follows: in these places, formwork is built on the outer and inner sides of the foundation, reaching a height up to the middle of the lower log. Then the first crown is wrapped in roofing felt and filled with mortar.
Which of the considered options to prefer is up to you to choose. Both have their pros and cons, but choosing one over the other will likely depend on which is easier to accomplish.
Replacing the lower crowns of a log house: technology and important nuances.
The lower crown is the most vulnerable place of the log house. Unlike other structural elements of a wooden house/bath, it is most susceptible to the harmful effects of moisture. But the worst thing is that, easily rotting, it immediately begins to spread rot to the upper logs, which invariably leads to the destruction of the entire structure. To prevent such a development of the situation, it is necessary to immediately, at the first signs of rotting, replace the lower crown either partially or completely. Partial replacement of the lower crowns. If you immediately respond to the situation, you can save yourself from unnecessary financial and labor costs and replace only some damaged parts of the lower crown. Replacement technology. The essence of this procedure is to remove the rotten area and install in its place a “patch” made of wood, brick or other materials. The outer skin is separated from the area affected by rot; Determine the boundaries of rotten wood, marking them with a chisel or knife; To prevent damage to the entire structure, when removing rotten wood, screeds are installed at a distance of 40 cm from the intended boundaries. Screeds are bars 2-3 crowns high and 40 cm thick. A total of 4 bars are used, attaching them to the sides of the rotten area on both sides of the wall. You need to use ties if a large section of the crown is removed, but if a small area is damaged, you don’t need to use ties; The damaged part of the log is removed with an electric or chainsaw. To do this, you first need to make a through cut on both sides. The sawed area must be removed; In the resulting space you need to place an insert. To ensure that it is firmly fixed, notches are made along the edges of the resulting opening (width 20 cm); The lower part of the second crown is cleaned and leveled with a chisel until it is flat. In order to protect the wood from insects, moisture, mold, rot and fire, treat the side walls of the resulting opening and the lower part of the second crown with an antiseptic; The foundation is covered with roofing felt in 2-3 layers or glass roofing felt in 1 layer. An insert is made. A piece of exactly the same diameter as the damaged logs is cut out of the log. The length of the insert should be 1-2 cm less than the size of the opening. It is treated with an antiseptic - vk.com/wall-72891995_1080, and then installed in the opening. If you have problems with this, you can use a sledgehammer. To make the insert, you can use bricks instead of wooden blocks. To do this, in the opening formed after cutting out the rotten part, bricks are laid on concrete mortar. Thus, brickwork will replace the entire lower crown; The gaps between the insert and the frame are covered with fibrous materials such as tow and jute. Replacement of the entire lower crown can be carried out according to the above scheme. This will require a lot of time and effort, since you will need to gradually cut off all the damaged areas, replacing them with new ones. But there is also a big advantage - you will no longer need to lift the frame with jacks. It will be much stronger if the new lower crown is made not from pieces, but from whole logs. To do this, you need to move the entire structure of the log house, lifting it with the help of jacks. Replacement technology. 1. Preparatory stage: To prevent windows and doors from cracking, they are removed while raising the frame; The log house must remain empty, and therefore all heavy objects must be removed from the bathhouse; The floor joists embedded in the lower crown need to be disassembled. The logs laid above the lower crown are not disassembled; To avoid damage to the ceilings and roofing by the heavy chimney pipe, it must be separated; The undamaged crowns of the log house must be fixed. This is done like this: on the inner and outer sides of each wall, at a distance of 0.5 meters from the corners of the log house, boards or bars (4 cm thick) are nailed vertically. Their lower edges should end exactly in the same place as the logs of the crown that cannot be replaced (second from the bottom), and the upper edges should be attached to the logs of the topmost crown. To fix undamaged areas, 16 boards are used, which must be secured at the bottom and top with through dowels. This is done so that when the log house is raised on jacks, its walls do not move.
Once all of the above work is completed, you can begin the procedure for repairing the lower crown of the log house. 2. Basic work The process of replacing the lower crown of a log house depends on the type of foundation. Strip foundation. A log frame consists of a top and bottom log that are joined and tied at a corner. It is very important to accurately determine which logs in the rotten crown are the top ones, since it is under them that the jacks will be installed; In the crown of the log house being replaced, at a distance of 0.7-1 m from the corner of the house, an opening 0.4 m wide is knocked out in the foundation. A part is cut out of the log of the lower crown, located opposite the resulting opening, so that the total height of the niche allows placing a jack there. According to this scheme, exactly the same niches are made on two opposite walls. The distance from the corners should be the same; Now you need to install jacks (2-4 pieces). A very important point is the choice of jacks. To do this, you need to select a mechanism with a load capacity of at least 10 tons. Depending on the size of the house, the lifting capacity of the jack can reach 25 tons. An error at this stage can lead to distortions and broken logs. The number of jacks depends on how the frame will be lifted: all at once or each wall separately. But if you raise the walls one by one, this can lead to distortions, so the best option would be to raise the entire frame together. To do this, you need to install 2 jacks under opposite walls so that they rest against the upper logs of the crown bandaging; Using jacks, raise the frame by 7-10 cm and remove the lower logs of the dressing; Reliable temporary supports, such as bricks, concrete blocks, logs, boards, bars, are placed under the lower logs of the second crown. The main thing is that they can withstand the weight of the entire log house; The jacks, along with the upper logs of the crown being repaired, are lowered, and instead of them, new ones are immediately installed and pressed with jacks. All supports installed under the lower logs of the second crown are taken away. The upper logs of the dressing are placed on the lower ones, and the lower logs are laid on the foundation. The jack is lowered very slowly and synchronously; At the last stage, caulking is carried out - the cracks formed when connecting new logs with the second crown of the log house are sealed. To do this, fibrous materials (tow, moss and jute) are used, which are hammered into the resulting seams. Columnar foundation. Replacing the crowns of a log house on this type of foundation is quite simple. It is necessary to install 4 jacks between the foundation columns, which are connected to the upper logs of the lower crown trim. Place 2 of them on each wall. It is necessary to install these jacks on a very solid base, such as a board made of boards measuring 50x50 cm. The head of the jack rod should rest against the log only through a metal plate; The jacks are raised synchronously. Further actions are exactly the same as when replacing the lower crown of a strip foundation frame. The difference between replacing rotten crowns of a log house with a strip and column foundation is only in the process of installing jacks. The first option is more labor-intensive, since the foundation must be partially destroyed. There is no need to do this for a columnar foundation, since there is a lot of space in its structure for installing jacks. How to protect the lower crowns from rotting? The process of replacing damaged logs can take forever, repeating itself every 2-3 years. The reason for this lies in improperly carried out waterproofing. Protective measures: The lower crowns of the log house must be made from tree species that are difficult to rot - oak or larch. It is not necessary to take whole logs; larch boards that need to be placed under the lower crown are quite suitable for these purposes. Thus, a protective layer is formed between the foundation and the crown, which is not affected by fungi; To protect logs from rotting, they need to be fired and/or covered with fire-bioprotection. It is also possible to carry out “machine processing”, but in this case a pungent odor will be felt for a long period; The base of the house also needs to be covered with a water repellent; Between the crown and the foundation, waterproofing must be used to waterproof the joint; The lower crowns must be protected from external moisture with canopies made of galvanized strips.
Work order
In some cases, in order to protect the first row of wood from the cold concrete of the foundation, you can lay beds (backing slats). Whether to do this or not is a controversial issue and each builder decides it individually. But if it is decided to lay it, then both the logs and the logs must be carefully treated with an antiseptic and protected from moisture penetration.
The next stage is laying the embedded (longitudinal) logs of the first row. To ensure stability, the lower part is cut off. Next, the transverse logs are installed, the markings of which must exactly match the marks on the longitudinal ones. Only if these requirements are met will the log house be smooth. During the installation of the first row, the dimensions of the building perimeter and the correctness of the diagonals are checked.
The next task that definitely needs to be solved is to seal the gap between the foundation and the first row. Craftsmen often use for this purpose small trunks of trees of the same species that were used for the first crown. They are adjusted to the dimensions of the gap and sealed with insulation specially designed for this purpose. Sizing is done by cutting off excess wood from the top and bottom of the log.
We recommend watching a video on how to process log corner notches.
The procedure is very important, since it determines whether the house will be warm and dry or not. Therefore, if during the process of sealing cracks there is no access to all the necessary places, then the transverse logs are dismantled. Eliminate all cracks and gaps between the logs in the longitudinal direction, then return the cross members to their places. In some cases, ordinary cement mortar or polyurethane foam is also used to seal cracks instead of tow or moss.
The lower crown of the bath
The lower crown of the bathhouse is most susceptible to moisture. Therefore, it often rots very quickly. The entire frame is still in excellent condition, but it has to be replaced. What to do?
First, let's determine why the lower crown of the bathhouse rots very quickly. The causes of rotting must be determined in order to take a number of protective measures even when assembling a new log house.
The healthy condition of the lower crown is influenced by the following constructive measures when building a wooden house or bathhouse, which must be done without errors:
- a waterproofing layer of roofing felt on the surface of the concrete foundation in front of the brickwork of the base. This layer of waterproofing prevents moisture from rising from below and absorbing it into the brick material. Wet brick is not the best basis for the lower log of a log house.
- the second waterproofing layer of roofing felt is placed on the upper level of the brickwork of the base. It is the roofing felt that comes into contact with the wood of the lower crown of the log house. This contact must be made correctly.
- vents in a brick base or concrete foundation in order to provide natural ventilation in the underground.
- to prevent rainwater from getting in and stagnating on the roofing felt (see point 2), it is necessary to make a protective flashing. Its design can be different depending on the chosen material. You can simply cover the joint with a flashing board around the perimeter of the log house. You can make a drain from galvanized steel or buy it ready-made and install it so that it covers the joint and, at the same time, protects the basement part of the bathhouse from rain due to a slight offset from the outer edge of the brickwork. You can make a screed with a slope from cement-sand mortar along the upper edge of the base and stick soft tiles along it.
- Treat the lower rims with protective compounds in several layers
The absence of any of the above measures leads to rapid rotting of the casing.
The best way to avoid replacing the lower crowns is to make them from larch. Larch has the ability to harden (turn to stone) even more in the presence of moisture. It is not susceptible to fungi.
If it is not possible to get larch logs and in your region only pine is used for log houses, then you can compromise and find at least a larch board. By placing it under the lower crown, you can solve the problem of replacing the lower crowns in the same way if there were a pair of lower logs made of larch. The option is quite generous in monetary terms.
If you can’t get larch boards, then oak grows everywhere. Oak boards are a good alternative to deciduous boards. In addition, it is easier to replace the board than the lower crown.
Regarding the second point of protective measures: since the waterproofing from the roofing felt layer has a horizontal surface on which the lower log is laid, it is natural that water can stand here in puddles. Therefore, it is necessary to ensure that the surface of the roofing material is not horizontal, but has a slight slope to the outer sides to allow water to flow to the ground.
It's very easy to do:
- cut narrow strips of roofing felt approximately 5 cm wide
- put them 3-4 pieces together
- lay these roofing felt strips in the middle of the width of the plinth (or foundation)
- on top of them, place a layer of roofing felt slightly wider than the width of the plinth. (Usually a meter-wide roll of roofing felt is cut in half, resulting in a width of 500 mm, which is quite enough for waterproofing along the plinth (or foundation).
These additional soft “pads” will give you the following benefits:
- a soft “lining” will close the gaps that have formed between the log and the surface of the plinth due to unevenness of the lower surface of the log itself. In a normal situation, they are either left uncovered and the floor is raised above this joint so that it ends up underground. Or they are plugged with tow, but always from the outside; the joint is sealed with some kind of elastic sealant to prevent the tow from getting wet. This option is not entirely reliable. Better tightness is achieved through a soft “gasket”
- since in the middle it will be higher due to 5 layers of roofing material (4 narrow strips and 1 layer of a wide main strip), then the surface of the waterproofing layer will have a slope for water to drain from its surface.
Even with this design of roofing felt waterproofing, it is necessary to cover the lower crown and the upper part of the base with a galvanized or painted steel drain to prevent any moisture from getting under the lower log (see paragraph 4 of protective measures).
How to treat the lower rims of a bathhouse
In order to recommend how to treat the lower crowns of the bathhouse, let’s clarify their location.
If the lower crown is located under the floor, then you can use waste oil from the engine. Since it is very smelly, it cannot be used in used premises, only underground. But there are doubts about “working off”, since there is evidence that it does not saturate the wood enough to withstand the high humidity in the underground of a steam room and washing bath.
Therefore, the second impregnation option is much more reliable:
- apply fire-bioprotective drug Senezh in 2-3 layers
- on top of Senezh 2-3 layers of hot natural drying oil
Replacement of the lower crowns of the bath
If things have reached such a state that it is urgently necessary to replace the lower rims of the bathhouse, then you will have to work hard:
- prepare the logs, fit them to each other. Or assemble the log house if 2-3 crowns will be replaced along the entire perimeter
- dismantle the sauna stove pipe
Nests are cut out in rotten logs for jacks
cut nests (holes) for jacks in those logs that will be replaced
- place four (or more, depending on the size of the log house) jacks in these sockets
- raise the frame using jacks
- place logs next to the jacks and lower the frame onto them, thereby removing the jacks
- Now you can remove the rotten logs completely
- if necessary, build support pillars from bricks
- you need to bring the new crown on one side, where there are no stops and which seems to hang in the air
- well, continue in the same spirit...
In each case, the entire process of replacing the lower crowns of the bathhouse will be individual. controversial argumentative essay topics